background image

61

62

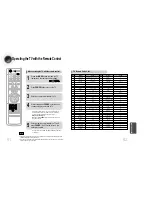
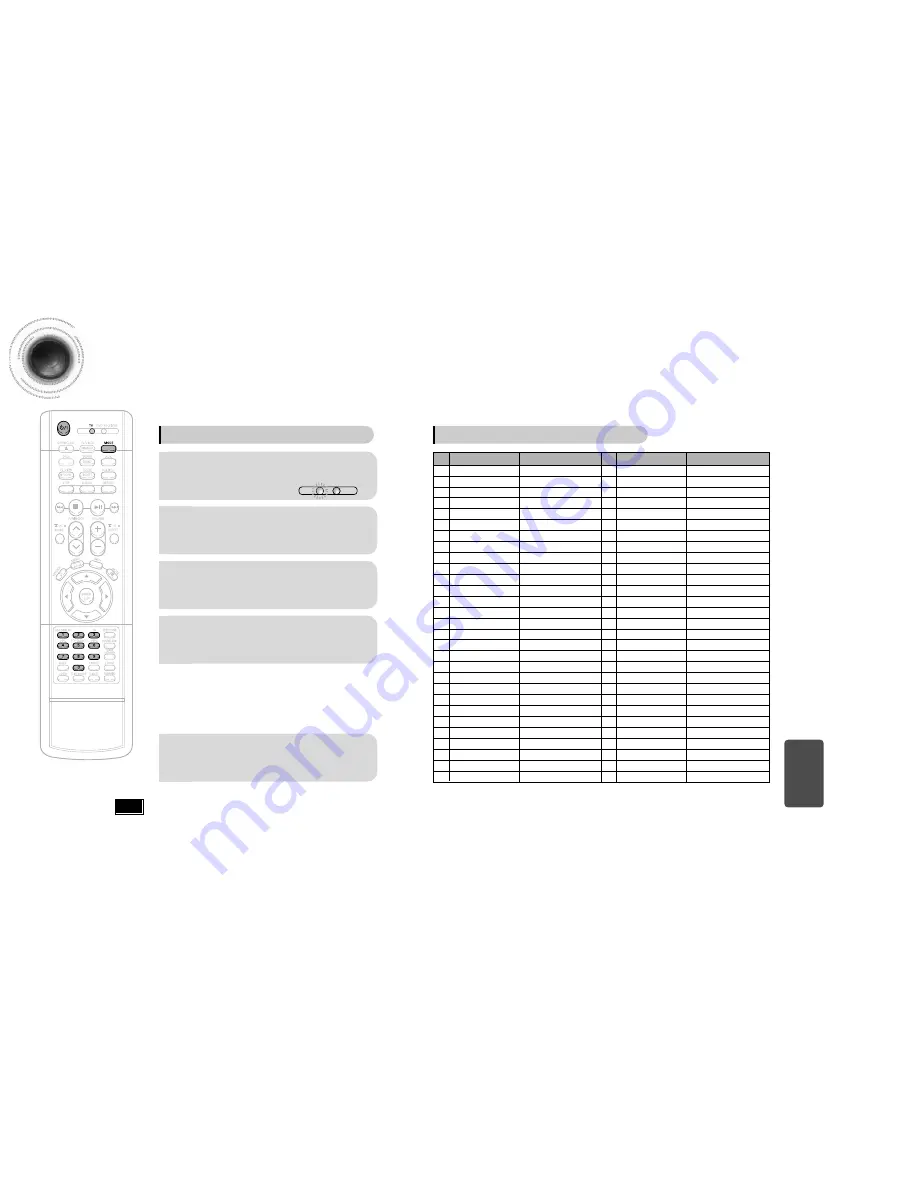
Operating the TV with the Remote Control

The remote control may not work on some brands of TVs. Also some operations may not be
possible depending on your brand of TV.

If you do not set the remote control with the code for your brand of TV, the remote control will
work on a Samsung TV by default.

When operating the TV with the remote control

1

Press the MODE button to make the TV
indicator on the remote control to flash.

2

Press POWER button to turn on the TV.

3

Point the remote control toward the TV.

4

While holding down POWER, enter the code
corresponding to your brand of TV.

If the code matches the TV's code, the TV will be turned off.

If there is more than one code listed for your TV in the table, 
enter one at a time to determine which code works.

Example: For a Samsung TV
While holding down POWER, use the number buttons to enter 00,
01, 02, 03, 04, and 05.

You can use the TV POWER, VOLUME, CHANNEL, and Numeric
buttons (0~9).

5

Point the remote control toward the TV and
press POWER. If the TV turns off or on, the
setting is complete.

TV

DVD RECEIVER

Note

MISCELLANEOUS

1

2

3

4

5

6

7

8

9

10

11

12

13

14

15

16

17

18

19

20

21

22

23

24

25

26

27

28

29

SAMSUNG

ANAM

DAEWOO

LG

HITACHI

JVC

SHARP

SONY

TOSHIBA

SANYO

MITSUBISHI

MATSUSHITA

TELEFUNKEN

RCA

PANASONIC

SABA

PHILIPS

GRUNDIG

ZENITH

MIVAL

NOBLEX

EMERSON

MAGNAVOX

LOEWE

THOMSON

NORDMENDE

LOEWE OPTA

BLAUPUNKT

SIEMENS

TV Brand Code List

No.

Brand

Code

00(Initial Value), 01, 02, 03, 04, 05, 73

06~11, 59

12~18, 20, 21

05, 20, 21, 22, 53

23, 40, 41, 49

24, 55

27, 33, 34, 35, 54

27, 36

27, 37, 42, 43, 44, 46

27, 30, 31, 32

05, 27, 28

09, 26

41, 49, 51, 57

29, 61

07, 09, 26, 48, 49, 50

40, 41, 47, 48, 49

05, 45, 47, 64, 65, 66, 67, 68, 69

39, 42, 46, 70, 71, 72

38

52

56

19

25

05, 60

40, 41, 49, 62, 63

40, 41, 49

36, 47, 05

39

39

30

31

32

33

34

35

36

37

38

39

40

41

42

43

44

45

46

47

48

49

50

51

52

53

54

55

56

57

BRANDT

FERGUSON

PIONEER

TELEAVA

FINLUX

FISHER

AKAI

YOKO

PHONOLA

RADIOLA

SCHNEIDER

NEWSAN

CONTINENTAL EDISON

SALORA

SELECO

NOKIA

REX

MIVAR

IMPERIAL

CGE

BANG & OLUFSEN

BRIONVEGA

FORMENTI

METZ

WEGA

RADIOMARELLI

SINGER

SINUDYNE

No.

Brand

Code

41

41

41, 48, 74

41

05, 42, 47

31

31

05

05, 45, 47

05, 45

05

58

49

48

48

48

48

46

46

46

47

47

47

47

47

47

47

47

Содержание HT-DM150

Страница 1: ...II RETU RN MENU INFO MU TE MODE ENTER SOUNDEDIT TESTTONE RDSDISPLAY PTY PTY PTYSEARCH TA SLEEP LOGO DIGEST SLIDEMODE CANCEL ZOOM REMAIN TUNER MEMORY PL II EFFECT VOLUME DSP EQ REPEAT BAND MO ST TV VI...

Страница 2: ...operating and maintenance instructions accompanying the unit WARNING To reduce the risk of fire or electric shock do not expose this appliance to rain or moisture CAUTION TO PREVENT ELECTRIC SHOCK MAT...

Страница 3: ...avorite image during JPEG DVD or VCD playback and set it as your background PREPARATION Contents PREPARATION Safety Warnings 1 Precautions 2 Features 3 Notes on Discs 5 Description 7 CONNECTIONS Conne...

Страница 4: ...recorded on a single CD a maximum of 500 tracks can be played If more than 300 folders are recorded on a single CD a maximum of 300 folders can be played What is MP3 MP3 is short for MPEG 1 Audio Laye...

Страница 5: ...to connect external equipment capable of digital output External Audio Component Input Connector Standby indicator Volume control Play Pause button Stop button Power button Headphone Jack Disc Tray Fu...

Страница 6: ...ose batteries to heat or flame Caution PREPARATION Description TV DVD RECEIVER OPEN CLOSE DVD TUNER AUX EZ VIEW NTSC PAL SLOW SUBTITLE STEP TUNING CH PL II R E T U R N MENU INFO M U T E MODE ENTER SOU...

Страница 7: ...tly in front of the center speakers Center Speaker It is best to install it at the same height as the front speakers You can also install it directly over or under the TV Position of the DVD Player Pl...

Страница 8: ...art Best Quality If you television is equipped with an SCART input connect an Scart Jack not supplied from the AV OUT jack on the back panel of the system to the SCART IN jack on your television SCART...

Страница 9: ...cting an External Analog Component Audio Cable If the external analog component has only one Audio Out connect either left or right 15 CONNECTIONS Press AUX on the remote control to select DIGITAL IN...

Страница 10: ...sult Cooling Fan 18 Connecting the Antennas 17 Connect the FM antenna supplied to the FM 75 COAXIAL terminal as a temporary measure Slowly move the antenna wire around until you find a location where...

Страница 11: ...ER Press the POWER button to turn on the TV 5 6 Press the MODE button so that the DVD RECEIVER indicator on the remote control flashes Press DVD button to select DVD CD mode 19 CONNECTIONS Before Usin...

Страница 12: ...t of the disc the initial screen may appear different Depending on the recording mode some MP3 CDs cannot be played Table of contents of a MP3 CD varies depending on the MP3 track format recorded on t...

Страница 13: ...MP3 CD sound is heard only at 2x speed and not at 4x 8x and 32x speeds No sound is heard during slow playback and step motion playback The picture moves forward one frame each time the button is press...

Страница 14: ...layback mode changes as follows DVD VCD CD MP3 JPEG Repeat playback operation is not possible with version 2 0 VCD discs if PBC is turned on To use Repeat Playback on a VCD with PBC you should set the...

Страница 15: ...ttom of the TV screen can be removed by pressing the EZ VIEW button This function will not work if the DVD is recorded with multi camera angle format Black bars may not disappear because some DVD disc...

Страница 16: ...025 040 1 17 30 1 1 5 Press Cursor buttons to move to time display Moving to a Specific Time Press the numeric buttons You can press on the remote control to move directly to the desired title chapter...

Страница 17: ...ed with a digital camera or camcorder or JPEG files on a PC can be stored on a CD and then played back with this DVD player Slide Mode JPEG 31 Place the JPEG disc on the disc tray Each time the button...

Страница 18: ...ween PBC ON and OFF When you select the disc menu that is not supported by the disc the This menu is not supported message appears on the screen 1Press MENU button Press Cursor buttons to move to DISC...

Страница 19: ...tup and then press ENTER button 4 Once the setup is complete if the language was set to English OSD will be displayed in English 3 Selecting the Subtitle Language recorded on the disc Selecting the Di...

Страница 20: ...to fit your TV or monitor For a standard TV select either 4 3LB or 4 3PS option according to personal preference Select 16 9 if you have a wide screen TV Select this to view a 16 9 picture in the ful...

Страница 21: ...Cursor button to move to Setup and then press ENTER button 4 The password is set to 7890 by default Once the setup is complete you will be taken to the previous screen If you have selected Level 6 yo...

Страница 22: ...The setting is complete 3 5 Press RETURN button to return to the previous level Press MENU button to exit the setup screen 41 42 Press Cursor button to move to PASSWORD and then press ENTER button Pre...

Страница 23: ...Cursor button to move to LOGO and then press ENTER button Press MENU button to exit the setup screen Press OPEN CLOSE button to open and then close the disc tray Press Cursor button to move to USER an...

Страница 24: ...d STEREO the speaker mode may vary Press RETURN button to return to the previous level Press MENU button to exit the setup screen 45 46 Note SETUP SMALL Select this when using the speakers NONE Select...

Страница 25: ...and each speaker is the same Since the sounds arrive at the listening position at different times depending on the placement of speakers you can adjust this difference by adding a delay effect to the...

Страница 26: ...6dB Method 1 Whenadjustingtheaudioqualityusingthesetupscreen Method 2 When manually adjusting with the SOUND EDIT button 2 1 Adjusting Front Speaker Balance Adjusting Rear Speaker Balance Press SOUND...

Страница 27: ...on DSP Digital Signal Processor DSP modes have been designed to simulate different acoustic environments EQ You can select from ROCK POP or CLASSIC depending on the genre of music DSP appears on the d...

Страница 28: ...6 3 4 PANORAMA This mode extends the front stereo image to include the surround speakers for an exciting wraparound effect with side wall imaging CENTER WIDTH Sound is output to the center speaker onl...

Страница 29: ...Mono Stereo This applies only when listening to an FM station To tune in to a preset station press on the remote control to select a channel Refer to Step 2 on page 55 to automatically or manually tun...

Страница 30: ...rs The display window cannot show accented letters A for instance may stans for accented A s like and 57 58 To search for a program using the PTY codes Before you start remember The PTY Search is only...

Страница 31: ...on You can set the time that the DVD player will shut itself off Adjusting Display Brightness You can adjust the brightness of the display on the main unit so it won t interfere with your movie viewin...

Страница 32: ...and press POWER If the TV turns off or on the setting is complete TV DVDRECEIVER Note MISCELLANEOUS 1 2 3 4 5 6 7 8 9 10 11 12 13 14 15 16 17 18 19 20 21 22 23 24 25 26 27 28 29 SAMSUNG ANAM DAEWOO LG...

Страница 33: ...c Dolby Digital 5 1 CH Surround Sound is produced only if the disc is recorded with 5 1 channel sound Is the audio language correctly set to DOLBY DIGITAL 5 1 CH in the information display Dolby Digit...

Страница 34: ...discs or discs that are scratched Caution Condensation may form if warm air comes into contact with cold parts inside the player When condensation forms inside the player the player may not operate c...

Страница 35: ...and sound whose quality is roughly comparable to that of video tape This player also supports video CDs with playback control version 2 0 You can enjoy 5 1 or 6 channels of high fidelity digital soun...

Отзывы: