background image

14

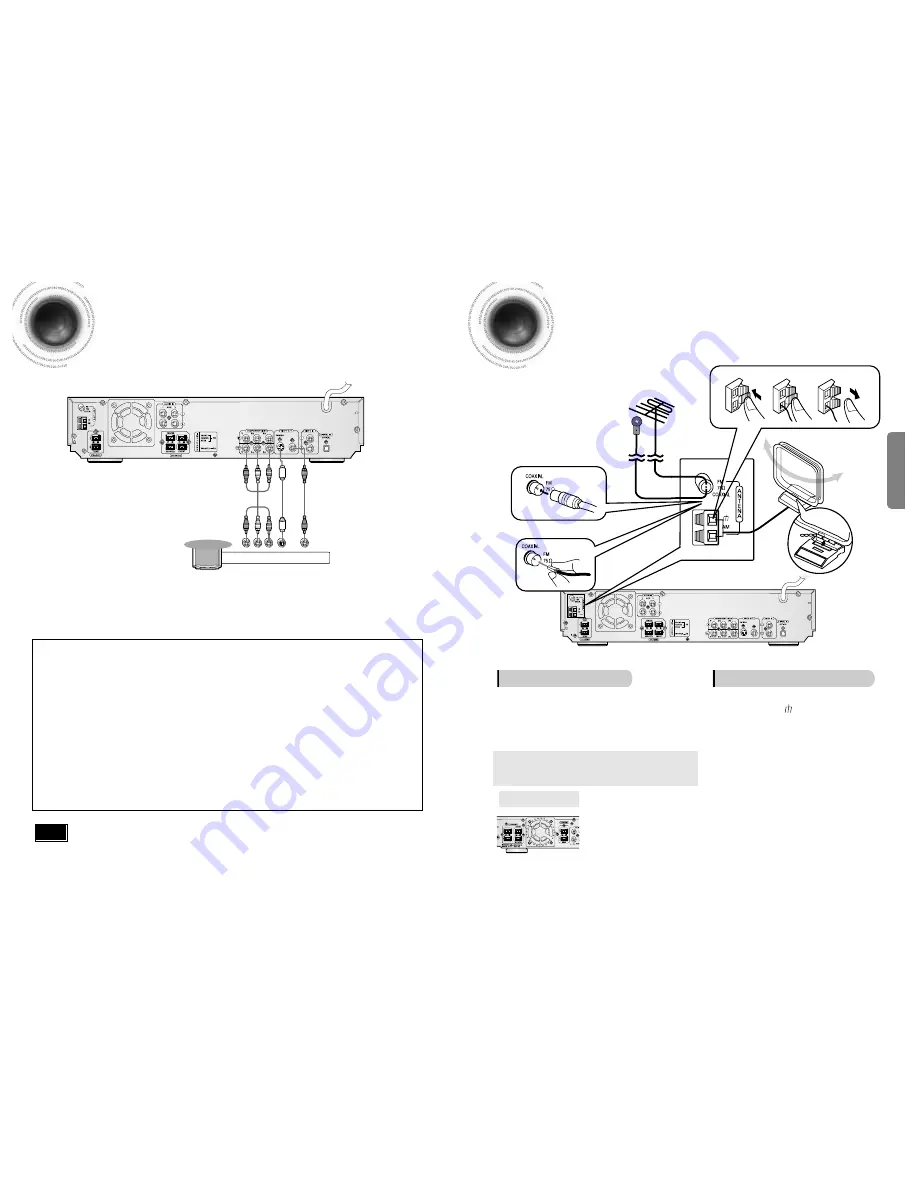
Connecting the Video to TV

13

Composite Video (Good Quality)

Connect the supplied video cable from the VIDEO OUT jack on the back panel of the
system to the VIDEO IN jack on your television.

S-Video (Better Quality)

If you television is equipped with an S-Video input, connect an S-Video cable (not supplied)
from the S-VIDEO OUT jack on the back panel of the system to the S-VIDEO IN jack on
your television.

Component Video (Best Quality)

If your television is equipped with Component Video inputs, connect a component video
cable (not supplied) from the Pr, Pb and Y jacks on the back panel of the system to the
corresponding jacks on your television.

When the Progressive scan mode is selected, the VIDEO and S-VIDEO outputs do not feed
any signals. See page 16 to select Progressive Scan.

*  

Depending on your TV, Component Video input connectors may be marked as DVD Video input connectors.

Note

CONNECTIONS

Composite

Video

Component

Video

S-Video

TV

The cooling fan dissipates the heat generated inside the unit so that the unit can be operated
normally. The cooling fan is activated automatically to supply cool air to the unit.

Please observe the following cautions for your safety.

Make sure the unit is well-ventilated. If the unit has poor ventilation, the temperature inside the unit could rise
and may damage it.

Do not obstruct the cooling fan or ventilation holes. (If the cooling fan or ventilation holes are covered with a
newspaper or cloth, heat may build up inside the unit and fire may result.)

Cooling Fan

Connecting the FM and AM

(MW

Antennas

FM antenna connection

AM

(MW)

antenna connection

1. Connect the FM antenna supplied to the FM 75

COAXIAL terminal as a temporary measure.

2. Slowly move the antenna wire around until you

find a location where reception is good, then
fasten it to a wall or other rigid surface.

• If reception is poor, connect an outdoor antenna. 

Before attaching a 75

coaxial cable (with a standard

type connector), disconnect the supplied FM antenna.

1. Connect the AM loop antenna supplied

to the AM and       terminals.

2. If reception is poor, connect an outdoor

single vinyl-covered wire to the AM
terminal. (Keep the AM loop antenna
connected).

1

2

3

If FM reception is poor, 
connect an outdoor FM

antenna  (not supplied).

FM Antenna (supplied)

AM Loop Antenna 
(supplied)

If AM reception is poor, connect an
outdoor AM antenna(not supplied).

Snap the tabs on the loop into the
slots of the base to assemble the
AM loop antenna.

Содержание HT-DB8020

Страница 1: ...C SKIP ASC TUNING CH PL II RETU RN MENU INFO MU TE MODE ENTER SOUNDEDIT TESTTONE SLEEP LOGO REPEAT CANCEL ZOOM P SCAN REMAIN TUNER MEMORY PL II EFFECT VOLUME LSM V H P MOVIE MUSIC SUPER5 1 BAND MO ST TV VIDEO MODE DIMMER V I D E O COMPACT DIGITAL AUDIO COMPACT DIGITAL VIDEO Instruction Manual AH68 01328T ...

Страница 2: ...on 3 4inches Make sure the ventilation slots are not covered Do not stack anything on top of the player Do not place the player on amplifiers or other equipment which may become hot Before moving the player ensure the disc tray is empty This player is designed for continuous use Switching off the DVD player to the stand by mode does not disconnect the electrical supply In order to disconnect the p...

Страница 3: ...layback AM FM Tuner The HT DB8020 combines the convenience of multi disc playback capability including DVD VCD CD MP3 CD CD R CD RW and DVD RW with a sophisticated AM FM tuner all in a single player Super Digital Sound Master Equipped with a new digital audio technology auto sound calibration magic sound field and magic headphone developed in cooperation with DiMagic Co Ltd in Japan you can enjoy ...

Страница 4: ... recorded on a single CD a maximum of 300 folders can be played What is MP3 MP3 is short for MPEG 1 Audio Layer 3 and MPEG is an acronym for Moving Pictures Experts Group MP3 is a file format with compression ratio of 1 12 128 Kbps That is you can use MP3 format to record about 12 times the usual amount of data on a regular CD DVD Digital Versatile Disc offers fantastic audio and video thanks to D...

Страница 5: ...utton RADIO FREQUENCY indicator System Status Display SPEAKER indicator DTS Disc indicator LINEAR PCM indicator PBC indicator PREPARATION Audio Cable Video Cable Remote Control Auto Sound Calibration Microphone User s Manual AM Antenna Accessories Live Surround Mode button Rear Panel AM Antenna Connector FM Antenna Connector External Video Component Input Connectors External Audio Component Input ...

Страница 6: ... batteries to heat or flame 9 Description Caution PREPARATION TV DVD RECEIVER OPEN CLOSE DVD TUNER AUX EZ VIEW NTSC PAL SLOW DISC SKIP ASC TUNING CH PL II R E T U R N MENU INFO M U T E MODE ENTER SOUNDEDIT TESTTONE SLEEP LOGO REPEAT CANCEL ZOOM REMAIN TUNER MEMORY PL II EFFECT VOLUME LSM V H P MOVIE MUSIC SUPER5 1 BAND MO ST TV VIDEO MODE DIMMER PL II MODE button TUNING CH button MENU button DVD P...

Страница 7: ...ritical Place it anywhere you like Usually it is placed by a corner near the front speakers Front Speakers Place these speakers in front of your listening position facing inwards about 45 toward you Place the speakers so that their tweeters will be at the same height as your ear Align the front face of the front speakers with the front face of the center speaker or place them slightly in front of ...

Страница 8: ... the unit Please observe the following cautions for your safety Make sure the unit is well ventilated If the unit has poor ventilation the temperature inside the unit could rise and may damage it Do not obstruct the cooling fan or ventilation holes If the cooling fan or ventilation holes are covered with a newspaper or cloth heat may build up inside the unit and fire may result Cooling Fan Connect...

Страница 9: ...r and TV Connecting an External Analog Component Video Cable Audio Cable If the external analog component has only one Audio Out connect either left or right Note The AC Cord must be plugged into an appropriate socket Before plugging your system into an AC outlet you must check the voltage Check the position of the voltage selector on the rear of the system OPTIONAL 1 Plug the AC Cord on the rear ...

Страница 10: ...ess the POWER button to turn on the TV 5 6 Press the MODE button so that the DVD RECEIVER indicator on the remote control flashes Press DVD button to select DVD CD mode Before Using Your DVD Player Your DVD player is capable of playing DVD VCD CD MP3 and JPEG discs Depending on the disc you are using these instructions may vary slightly Read the instructions carefully before using 17 By default th...

Страница 11: ...ou Back for good Love of my life More than words I need you My love Uptown girl DVDRECEIVER SMARTNAVI If pressed once PRESS PLAY is displayed and the stop position will be stored in memory If PLAY PAUSE button or ENTER button is pressed playback resumes from the stop position This function works only with DVDs If pressed twice STOP is displayed and if PLAY PAUSE button is pressed playback starts f...

Страница 12: ...he disc currently being played What is a Track File A section of video or a music file recorded on a VCD CD or MP3 CD Screen Display DVD display VCD display CD display MP3 CD display TITLE display CHAPTER display TRACK FILE display ELAPSED TIME display REPEAT PLAYBACK display AUDIO LANGUAGE display SUBTITLE display STEREO L R display DOLBYDIGITALdisplay ANGLE display Depending on the disc the disc...

Страница 13: ...APTER 002 040 TITLE 01 05 CHAPTER 004 040 Fast Slow Playback Fast Playback DVD VCD CD MP3 Press and hold Each time the button is held down during playback the playback speed changes as follows Press SLOW button Each time the button is pressed during playback the playback speed changes as follows Slow Playback DVD VCD 23 Reverse slow playback does not work with VCDs Note Note OPERATION Something li...

Страница 14: ... mode changes as follows DVD VCD CD MP3 JPEG Repeat playback operation is not possible with version 2 0 VCD discs if PBC is turned on To use Repeat Playback on a VCD with PBC you should set the PBC to OFF in the disc menu See page 33 CHAPTER Repeatedly plays the selected chapter TITLE Repeatedly plays the selected title RANDOM Plays tracks in random order A track that has already been played may b...

Страница 15: ...m of the TV screen can be removed by pressing the EZ VIEW button This function will not work if the DVD is recorded with multi camera angle format Black bars may not disappear because some DVD discs have a built in horizontal to vertical ratio 27 Angle Function This function allows you to view the same scene in different angles DVD 2 Press Cursor button to move to ANGLE display 1Press INFO button ...

Страница 16: ... Chapter display Moving to a Chapter 01 05 025 040 1 17 30 1 1 5 Press Cursor buttons to move to time display Moving to a Specific Time Press the numeric buttons You can press on the remote control to move directly to the desired title chapter or track Depending on the disc you may not be able to move to the selected title or time 29 Selecting Audio Subtitle Language Depending on the number of lan...

Страница 17: ...tween PBC ON and OFF When you select the disc menu that is not supported by the disc the This menu is not supported message appears on the screen 1Press MENU button Press Cursor buttons to move to DISC MENU and then press ENTER button 4 Press ENTER button 3 Press Cursor buttons to select the desired item PBC Playback Control Function When playing a VCD version 2 0 you can select and view various s...

Страница 18: ...to move to Setup and then press ENTER button 4 Once the setup is complete if the language was set to English OSD will be displayed in English 3 Selecting the Subtitle Language recorded on the disc Selecting the Disc Menu Language recorded on the disc Press ENTER button 5 Press Cursor button to select the desired item and then press ENTER button Press Cursor button to select the desired language an...

Страница 19: ...our TV or monitor For a standard TV select either 4 3LB or 4 3PS option according to personal preference Select 16 9 if you have a widescreen TV Select this to view a 16 9 picture in the full screen mode on your widescreen TV You can enjoy the widescreen aspect Select this to play a 16 9 picture in the letter box mode on a conventional TV Black bars will appear at the top and bottom of the screen ...

Страница 20: ...ss Cursor button to move to Setup and then press ENTER button 4 The password is set to 7890 by default Once the setup is complete you will be taken to the previous screen If you have selected Level 6 you cannot view DVDs with Level 7 or higher The higher the level the closer the content is to violent or adult material 3 5 Press Cursor button to move to PARENTAL and then press ENTER button Press Cu...

Страница 21: ...ord The setting is complete 3 5 Press RETURN button to return to the previous level Press MENU button to exit the setup screen 39 40 Press Cursor button to move to PASSWORD and then press ENTER button Press ENTER button Enter the password and then press ENTER button Setting the Password You can set the password for the Parental rating level setting ...

Страница 22: ...ess Cursor button to move to LOGO and then press ENTER button Press MENU button to exit the setup screen Press OPEN CLOSE button to open and then close the disc tray Press Cursor button to move to USER and then press ENTER button DVD VCD JPEG To Change the Wallpaper 1 During playback press PLAY PAUSE button when you see an image you like Press LOGO button LOGO COPYING will be displayed on the TV s...

Страница 23: ...on PRO LOGIC and STEREO the speaker mode may vary Press RETURN button to return to the previous level Press MENU button to exit the setup screen 43 44 Note SMALL Select this when using the speakers NONE Select this when no speakers are installed 2 1Press MENU button Press Cursor button to move to Audio and then press ENTER button 3 Press Cursor button to move to TEST TONE and then press ENTER butt...

Страница 24: ...een you and each speaker is the same Since the sounds arrive at the listening position at different times depending on the placement of speakers you can adjust this difference by adding a delay effect to the sound of the Center and Surround Speakers Df The distance from FRONT SPEAKER Dc The distance from CENTER SPEAKER Ds The distance from SURROUND SPEAKER Ideal CENTER SPEAKER placement It is desi...

Страница 25: ...closer to 6dB Method 1 Whenadjustingtheaudioqualityusingthesetupscreen Method 2 When manually adjusting with the SOUND EDIT button 2 1 Adjusting Front Speaker Balance Adjusting Rear Speaker Balance Press SOUND EDIT button and then press Cursor 3 Adjusting Center Speaker Level 4 5 Adjusting Rear Speaker Level Adjusting Subwoofer Speaker Level Press RETURN button to return to the previous level Pres...

Страница 26: ...hen press ENTER button The longer the Cursor button is held down the greater the effect and the longer Cursor button is held down the smaller the effect Once the setup is complete you will be taken to the previous screen 3 4 Press Cursor button to move to DRC and then press ENTER button Press Cursor to adjust the DRC Press RETURN button to return to the previous level Press MENU button to exit the...

Страница 27: ...ield is optimized automatically The auto sound calibration setup takes about 2 minutes to complete 3 Adjust the volume control on the main unit as follows If the distance between the listener and the speaker is over 5 m Set the main unit s volume to over 25 If the distance between the listener and the speaker is 3 to 5 m Set the main unit s volume to 25 If the distance between the listener and the...

Страница 28: ...RS TITLE PBC CHAP PRGM RT TA TUNED kHz MHz ST DSP CMX LINEAR PCM MPEG 2 AAC MPEG L C R SW LS RS TITLE PBC CHAP PRGM RT TA TUNED kHz MHz ST RDS DSP If you select Music Sound Field when listening to a 2 channel sound source it will be reproduced in 5 1 channel surround sound so that you can enjoy dynamic sound with a sense of presence LiveSurroundModeFunction Each time the button is pressed the sele...

Страница 29: ...ront left and right speakers produce phantom sound DIMENSION Incrementally adjusts the sound field DSP from the front or rear When playing a DVD disc encoded with two or more channels multi channel mode will be selected automatically and Dolby Pro Logic II button does not work You can select either 0 or 1 Press PL II MODE button to select MUSIC mode Press PL II EFFECT button and then press Cursor ...

Страница 30: ...station To tune in to a preset station press on the remote control to select a channel Refer to Step 2 on page 59 to automatically or manually tune in to a station 2 1 Each time the button is pressed the band switches between FM AM TITLE CHAP PRGM RDS RT ST TUNED kHz MHz TITLE CHAP PRGM RDS RT ST TUNED kHz MHz TITLE CHAP PRGM RDS RT ST TUNED kHz MHz PRGM flashes in the display 3 Example Presetting...

Страница 31: ...ges as follows 10 20 30 60 90 120 150 OFF TITLE CHAP PRGM RDS RT ST TUNED kHz MHz Press SLEEP button Sleep Timer Function You can set the time that the DVD player will shut itself off Adjusting Display Brightness You can adjust the brightness of the display on the main unit so it won t interfere with your movie viewing To cancel the sleep timer press SLEEP button until OFF appears on the display P...

Страница 32: ...he TV and press POWER If the TV turns off or on the setting is complete TV DVDRECEIVER Note 1 2 3 4 5 6 7 8 9 10 11 12 13 14 15 16 17 18 19 20 21 22 23 24 25 26 27 28 29 SAMSUNG ANAM DAEWOO LG HITACHI JVC SHARP SONY TOSHIBA SANYO MITSUBISHI MATSUSHITA TELEFUNKEN RCA PANASONIC SABA PHILIPS GRUNDIG ZENITH MIVAL NOBLEX EMERSON MAGNAVOX LOEWE THOMSON NORDMENDE LOEWE OPTA BLAUPUNKT SIEMENS TV Brand Cod...

Страница 33: ...e disc Dolby Digital 5 1 CH Surround Sound is produced only if the disc is recorded with 5 1 channel sound Is the audio language correctly set to DOLBY DIGITAL 5 1 CH in the information display Dolby Digital 5 1 CH Surround Sound is not produced Symptom Check Remedy Is the TV power on Are the video cables connected properly Make sure that the disc is not a PAL disc Is the disc dirty or damaged A p...

Страница 34: ...ours with the power on Note Power Consumption Weight Dimensions W x H x D Operating Temperature Range Operating Humidity Range Usable Sensitivity Usable Sensitivity S N Ratio Distortion Usable Sensitivity S N Ratio Distortion Component Video Composite Video Component Video S VIDEO Front speaker output Center speaker output Rear speaker output Subwoofer speaker output Frequency range S N Ratio Chan...

Страница 35: ...ayer cannot play the disc Translated appearing at the bottom of the screen A DVD disc can contain up to 32 subtitle languages These numbers are recorded on DVD discs When a disc contains two or more movies these movies are numbered as Title 1 Title 2 etc These numbers are assigned to the tracks which are recorded on video and audio CDs They enable specific tracks to be located quickly Contains rec...

Отзывы: