background image

24

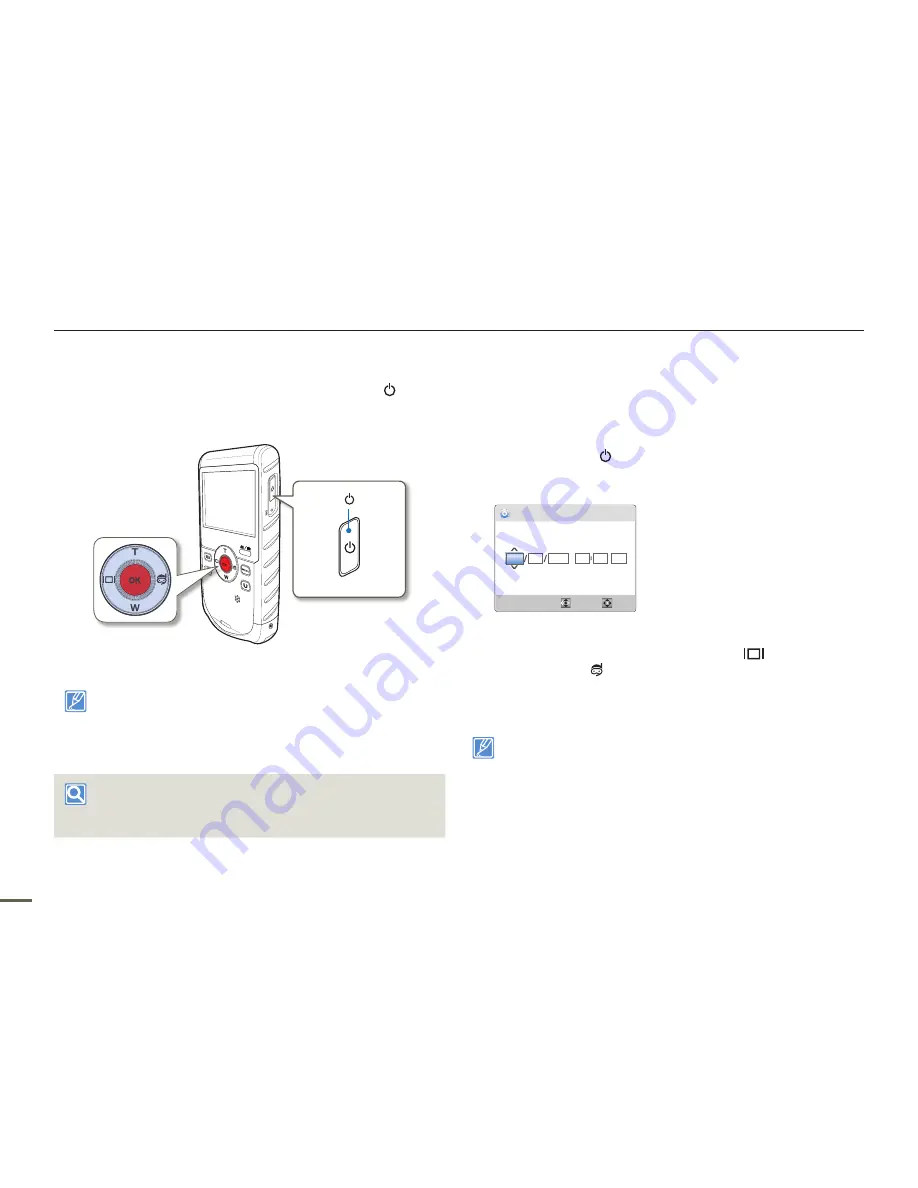
TURNING YOUR PRODUCT ON/OFF

You can turn the power on or off by pressing the 

Power

 (   )  button.

Power (   )  button

The product operates the self-diagnosis function when powered 
on. 

¬

pages 73~75

Press the 

Reset

 button with any sharp object if the product does 

not turn on. 

¬

page 81

When using this product for the first time

When you use your product for the first time or after you reset it, the 
date/time set screen appears at start-up. Set the date and time.

SETTING THE DATE/TIME FOR THE FIRST 
TIME

Set the date and time of your local area when you turn on the 
product for the first time.

Press the 

Power

 (   ) button to turn on the product.

When you turn on your product for the first time, the Date/
Time Set screen appears.

Date/Time Set

Move

OK

Month

Day

Year

Hr

Min

01

JAN

00

00

2011

AM

Set each date or time value by pressing the 

T

/

W

 buttons.

To move left or right, press the 

Display

 ( 

 )  or 

Underwater

 (   )  button. 

After setting AM/PM, press the 

OK (REC)

 button.

The product exits the date/time screen.

The year can be set up to 2037.
Set “

Date/Time Display

” to On. 

¬

page 59

User settings may be reset to the default if the internal battery has 
been discharged completely. After using the product, recharge it 
before storing.
If the internal battery has been discharged completely, the Date/Time 
setting resets to “

JAN/01/2011 12:00AM

”.


Basic operation of the product

Содержание HMX-W190RN

Страница 1: ...user manual HMX W190RN HMX W200RN HMX W200TN www samsung com register For video recording use a memory card that supports faster write speeds Recommended Memory Card 4MB s Class 4 or above ...

Страница 2: ...over underwater Do not use the product in hot water such as a hot spring Do not expose the product to strong vibration shock or pressure Do not jump or dive into water holding the product Do not use the product in strong water flows such as in rapids or under waterfalls The strong water pressure may impair the water proof performance or cause a malfunction Do not place the product near sand Sand c...

Страница 3: ...aded area This product is designed to drain well The water drains through the small holes around the buttons on the product Do not use a device such as a hair dryer to dry the product The water proof performance may deteriorate or the appearance of the product can be transformed Do not open the memory card HDMI jack cover and the USB plug cover until the product has dried out Do not open or close ...

Страница 4: ... 4 Follow all instructions 5 Clean only with dry cloth 6 Do not block any ventilation openings Use in accordance with the manufacturer s instructions 7 Do not place near any heat sources such as radiators heat registers stoves or other apparatus including amplifiers that produce heat 8 Do not defeat the safety purpose of the polarized or grounding type plug A polarized plug has two blades with one...

Страница 5: ...This PRODUCT may be equipped with either a polarized 2 wire AC line plug a plug having one blade wider than the other or a 3 wire grounding type plug a plug having a third grounding pin If you are unable to insert the plug fully into the outlet try reversing the plug If the plug still fails to fit contact your electrician to replace your outlet Do not defeat the safety purpose of the polarized plu...

Страница 6: ...alified service personnel 25 DAMAGE REQUIRING SERVICE Unplug this PRODUCT from the wall outlet and refer servicing to qualified service personnel under the following conditions a When the power supply cord or plug is damaged b If any liquid has been spilled onto or objects have fallen into the PRODUCT c If the PRODUCT has been exposed to rain or water d If the PRODUCT does not operate normally by ...

Страница 7: ...mmunications However there is no guarantee that interference will not occur in a particular installation If this equipment does cause harmful interference to radio or television reception which can be determined by turning the equipment off and on the user is encouraged to try to correct the interference by one or more of the following measures Reorient or relocate the receiving antenna Increase t...

Страница 8: ...uct and keep it handy for future reference Should your product fail to operate correctly refer to Troubleshooting pages 73 81 This User Manual covers the HMX W190RN HMX W200RN and HMX W200TN models Illustrations of model HMX W200RN are used in this user manual The displays in this user manual may not be exactly the same as those you see on the LCD screen The design and specifications of the produc...

Страница 9: ...y recommend that you obtain permission beforehand For Open Source license information refer to the Opensource W200 pdf in the provided CD ROM Notes regarding trademarks All the trade names and registered trademarks mentioned in this manual or other documentation provided with your Samsung product are trademarks or registered trademarks of their respective holders Furthermore and are not mentioned ...

Страница 10: ...water metal or inflammable material to enter the product Doing so may pose a fire hazard No oil Oil entering the product can cause electric shock or cause the product to malfunction Do not aim the product directly into the sun Doing so could cause eye injuries and may cause internal parts of the product to malfunction Do not dispose of the product in a fire Fire can cause the battery to explode Ne...

Страница 11: ...ervice center There is risk of fire or personal injury Don t disassemble or attempt to repair the USB plug or the product There is a risk of fire or electric shock Do not place heavy objects on the USB plug Heavy objects can cause the plug to break or disconnect from the product Do not open and close memory card cover or USB plug cover near or in the water Do not open or close the cover with wet h...

Страница 12: ...nction or injury Do not leave the product in a closed vehicle for a long time where the temperature is very high High temperatures can cause the product to malfunction and the battery to explode or burst into flame Do not expose the product to soot or steam Thick soot or steam could damage the product case or cause the product to malfunction Do not use the product near dense exhaust generated by g...

Страница 13: ...tort the video or audio you are recording Use Samsung approved accessories only Using products from other manufacturers may cause overheating fire explosion electric shock or personal injuries caused by abnormal operation Place the product on a stable surface that is well ventilated Store important data separate from the product Samsung is not responsible for data loss Manufacturers of unauthorize...

Страница 14: ...AY UNDERWATER OK REC BUTTON 25 SWITCHING THE INFORMATION DISPLAY MODE 27 USING THE STRAP 27 SELECTING THE OSD LANGUAGE 28 Getting ready to start recording 29 INSERTING EJECTING A MEMORY CARD NOT SUPPLIED 29 SELECTING A SUITABLE MEMORY CARD NOT SUPPLIED 30 RECORDABLE TIME AND CAPACITY 32 Basic recording 33 RECORDING VIDEOS 33 CAPTURING PHOTOS DURING VIDEO RECORDING 35 RECORDING PHOTOS 36 RECORDING ...

Страница 15: ...ness 59 Auto LCD Off 60 Beep Sound 60 Shutter Sound 61 Auto Power Off 61 PC Software 62 Format 62 Default Set 63 Language 63 Connecting to a TV 64 CONNECTING TO A HIGH DEFINITION TV WITH HDMI 64 VIEWING ON A TV SCREEN 64 Using with a Windows computer 65 WHAT YOU CAN DO WITH A WINDOWS COMPUTER 65 USING THE Intelli studio PROGRAM 66 USING AS A REMOVABLE STORAGE DEVICE 71 Troubleshooting 73 WARNING I...

Страница 16: ...ds with this product 2 Charge the battery fully page 21 The battery is fully charged when the CHG charging indicator light turns green The product comes with the battery installed No additional battery is required Charge the product s internal battery via the USB connection STEP 2 Record with your product Built in USB plug LCD screen Power button Playback button OK REC button T W button Delete but...

Страница 17: ...he Mode button to set the video recording mode 3 Press the OK REC button To stop recording press the OK REC button again 0 00 00 579Min Pause Capture Recording photos You can take photos and store them in the storage media Set the desired resolution before recording 1 Press the Power button 2 Press the Mode button to set the photo recording mode 3 Frame the subject in the LCD screen and half press...

Страница 18: ... Save recorded videos or photos Using the Intelli studio program built into your product you can import videos photos into your computer and edit or share the videos photos with your friends and family For details see pages 65 70 Importing videos photos from the product to your PC and viewing them on your PC screen 1 Start the Intelli studio program by connecting the built in USB plug of the produ...

Страница 19: ...your contents with the world by uploading videos and photos directly to a web site with a single click Click Share J Upload on the browser page 69 STEP 5 Delete videos or photos If the product s storage media is full you can not record new videos or photos Save videos and photos to your computer and then delete the videos or photos you ve saved to your computer from the product s storage media The...

Страница 20: ...D46 00408A Quick start guide AD68 06510A The exact appearance of each item may vary by model The contents may vary depending on the sales region You can purchase parts and accessories from your local Samsung dealer SAMSUNG is not responsible for reduced battery life time or malfunctions caused by any unauthorized use of accessories A memory card is not included See page 30 for memory cards compati...

Страница 21: ...8 10 11 12 13 6 5 4 3 2 14 9 1 LCD screen 2 T W button 3 OK REC button 4 Display button 5 Playback button 6 Delete button 7 Power button 8 CHG Charging indicator 9 Underwater button 10 Mode button 11 MENU button 12 Share Pause button 13 Internal speaker 14 Strap hook ...

Страница 22: ... Built in USB plug 5 Water proof seal Built in USB plug 6 Built in USB plug 7 Built in USB open lever 8 Tripod receptacle 9 Memory card slot 10 HDMI jack 11 Reset button 12 Water proof seal Memory card HDMI jack 13 Open Close lever Memory card HDMI jack 14 Cover Memory card HDMI jack Be careful not to cover the internal microphone and lens during recording ...

Страница 23: ...me The settings of functions marked with are not retained when the product is turned off The on screen indicators are based on a micro SDHC memory card with a 32GB capacity The screen above is an example and may differ from the actual display For warning indicators and messages see pages 73 75 The illustrated items above and their positions may be changed without notice to improve performance IDEN...

Страница 24: ...z Operating status focusing photo capturing Storage media memory card Battery information remaining charge level Right of the LCD screen Indicator Meaning Digital Zoom bar Bottom of the LCD screen Indicator Meaning Photo Resolution Smart Filter Back Light Face Detection Anti Shake DIS JAN 01 2011 12 00AM Date Time The settings of functions marked with are not retained when the product is turned of...

Страница 25: ...ution X W W X X Operating status playback pause search slow motion playback 0 00 00 0 00 55 Time code elapsed time recorded time Battery information remaining battery level Erase protection Share mark 100 0001 File name file number Center of the LCD screen Indicator Meaning Previous skip Rewind Forward skip Fast Forward Volume up down Playback Pause X Reverse forward slow motion playback Bottom of...

Страница 26: ...Indicator Meaning Photo playback mode Photo Resolution Slide show 1 10 Current photo Number of total recorded photos Battery information remaining battery level Erase protection 100 0001 File name file number Center of the LCD screen Indicator Meaning Previous Next photo Playback zoom Bottom of the LCD screen Indicator Meaning Multi View Button guide JAN 01 2011 12 00AM Recorded date time The on s...

Страница 27: ...pleted detach the USB plug from the PC and then push in the built in USB plug 5 Slide and close the Open Close lever in the direction of the arrow to close the built in USB plug cover as show in the figure Do not force the built in USB plug Depending on your computer environment you can attach an external USB cable not supplied to the product s USB plug and your computer s USB port to charge the p...

Страница 28: ... The battery level display shows the amount of power remaining in the battery Battery level indicator State Message Fully charged 25 50 used 50 75 used 75 95 used 95 98 used Exhausted flickers The product will be forced to turn off after 3 minutes Charge the battery as soon as possible After 3 seconds the product turns off Low Battery The figures above are based on a fully charged battery at a nor...

Страница 29: ...aster than this reference if you use the recording start stop zoom and playback functions About the battery Battery properties A lithium ion battery is small sized and has a high capacity Low ambient temperature below 10ºC 50ºF may shorten its usage time and affect its function Be careful not to completely discharge the battery When fully discharged a battery damages its internal cells The battery...

Страница 30: ...e first time 1 Press the Power button to turn on the product When you turn on your product for the first time the Date Time Set screen appears Date Time Set Move OK Month Day Year Hr Min 01 JAN 00 00 2011 AM 2 Set each date or time value by pressing the T W buttons To move left or right press the Display or Underwater button 3 After setting AM PM press the OK REC button The product exits the date ...

Страница 31: ...k mode Mode Mode indicator Functions Video recording mode To record videos Photo recording mode To record photos Playback mode To play back videos or photos USING THE T W DISPLAY UNDERWATER OK REC BUTTON The functions of the T W Display Underwater OK REC buttons vary according to the operation mode you are using The following tables list the buttons and the functions they perform in each mode Menu...

Страница 32: ...page 33 Photo capturing page 36 Playback mode Button Video playback mode Single view Photo playback mode Single view T lncreases the volume page 41 W Decreases the volume page 41 Search playback RPS Reverse Playback Search rate x2Jx4Jx8Jx16 page 41 Previous skip playback page 41 Reverse slow motion playback page 41 Previous image page 43 Search playback FPS Forward Playback Search rate x2Jx4Jx8Jx1...

Страница 33: ...ay button in the standby mode The full and minimum display modes alternate Minimum display mode STBY Full display mode STBY 579Min Warning indicators and messages may appear depending on the recording conditions pages 73 75 USING THE STRAP Attach the strap and place your hand through the loop to prevent the product from being dropped ...

Страница 34: ...e Time Set Settings 3 Press the T W button to select Language and then press the OK REC button Exit Menu Format Default Set Language Settings English ǎᨕ Français Deutsch 4 Press the T W button to select the desired OSD language and then press the OK REC button 5 To exit press the MENU button The product displays the menus and messages in the language you selected Supported languages English ǎᨕ Fra...

Страница 35: ...ct a memory card 1 Turn off the product Then slide the Open Close lever in the direction of the arrow and open the memory card cover as shown in the figure above 2 Gently push the memory card to eject it 3 To close and lock the memory card cover close the cover and then slide the Open Close lever in the direction of the arrow as show in the figure To avoid the data loss turn off the product by pre...

Страница 36: ...eleting recording and playback may cause data loss If you modify the name of a file or folder stored in the memory card with your PC your product may not recognize the modified file The micro memory card does not support any data recovery mode Therefore care should be taken in case the memory card is damaged while recording We recommend that you power off the product before inserting or removing t...

Страница 37: ...ct forcibly stores the video on the low speed memory card and displays a warning Low speed card Please record at a lower resolution If you are unavoidably using a low speed memory card the resolution of the recording may be lower than the set value page 47 The higher the resolution and quality the more memory the product uses Using the memory card adaptor This product uses micro SD micro SDHC memo...

Страница 38: ...048x1536 1 000 1 950 3 930 7 900 9 999 9 999 1920x1080 1 340 2 630 5 270 9 999 9 999 9 999 640x480 3 700 7 240 9 999 9 999 9 999 9 999 Unit Approximate number of images 1GB ⴊ 1 000 000 000 bytes Actual formatted capacity may be less as the internal firmware uses a portion of the memory Actual recording times may differ depending on the recording conditions and the subject The higher the resolution...

Страница 39: ...ording indicator appears and recording starts 0 00 00 Pause Capture 579Min 3 To stop recording press the OK REC button again Record Pause The product allows you to pause temporarily while recording a video With this function you can record separate scenes as a single video Press the Share button to pause while recording Press it again to resume 0 00 00 Pause Capture 579Min 0 01 35 Resume Stop 579M...

Страница 40: ...ake sure that the microphone is not blocked Before recording an important video test the recording function to see if there any problems with the audio or video recording For various functions available during recording see pages 47 51 You can adjust the brightness of the LCD screen in the menu options Adjusting the LCD screen does not affect the image being recorded page 59 When you record indoor...

Страница 41: ...apture 579Min 2 While recording the video frame the scene you want to photograph and then press the Playback button This product records the photo image without a shutter sound You can capture up to 5 photos during video recording Video keeps recording even while you take photos Pause Capture 579Min 3 To stop recording press the OK REC button again Photos are captured in the video recording resolu...

Страница 42: ...d is heard and the photo is recorded Do not turn off the product or remove the memory card while it is accessing the storage media Doing so may damage the storage media or the data in the storage media The recordable number of photos varies depending on the recording conditions and the photo resolution page 32 Audio is not recorded when you take photos For the on screen display information see pag...

Страница 43: ...c settings When you set the Smart Filter function the product records in the basic settings The product may not select the correct scene depending on shooting conditions such as product shake lighting and distance to the subject The product may not detect the portrait mode depending on the orientation or the brightness of faces When you set the Face Detection to On the Portrait mode can be activat...

Страница 44: ... angle The subject appears smaller and further away The smallest zoom ratio is the subject s original size in the zoom out W Wide angle T Telephoto Note that the image quality decreases when you use the digital zoom The image quality may deteriorate depending on how much you zoom in on the subject Frequent use of the zoom function consumes more power The minimum focal length between the product an...

Страница 45: ...mbnail display options based on the standby mode you used the last time You display video or photo thumbnails using the Play Mode menu page 52 Video playback mode Photo playback mode MENU button J Play Mode J Video or Photo 0 00 55 Play Mode Menu 1 10 Play Mode Menu 1 10 Photo recording mode Video recording mode STBY 579Min 9999 You can switch the playback mode to the video or photo recording mode...

Страница 46: ...e product plays back the video you selected and the on screen indicators appear briefly They reappear when you press the OK REC button Multi View 0 00 00 0 00 55 100 0001 Capture 3 To return to thumbnail index view while playing back use the Share button Do not power off or eject the memory card during video playback Doing so may damage the recorded data It may take some time to start playback dep...

Страница 47: ...dly skips files in the forward direction During playback press the Display button to locate the start point of the current file Pressing the Display button repeatedly skips files in the reverse direction Press the Display button within 3 seconds of the start point of the current file to skip back to the previous file Slow motion playback 1 During pause press the Display Underwater button to make t...

Страница 48: ... T W Display Underwater button to select the video you want and then press the OK REC button The selected video is played back Multi View 0 00 00 0 00 55 100 0001 Capture 3 Aim the product at the scene you want to capture and then press the Playback button The captured photo is recorded in JPEG format 4 To return to thumbnail index view while playing back use the Share button Photos are captured i...

Страница 49: ...reen indicators appear briefly They reappear when you press the OK REC button To view the previous next file press the Display Underwater button Multi View 1 10 100 0001 3 To return to the thumbnail index view use the Share button Do not power off the product or eject the memory card during photo playback Doing so may damage the recorded data Loading time may vary depending on the size and quality...

Страница 50: ...00 0001 2 Adjust the magnification with the OK REC button The screen is framed and the image is magnified starting from the center of the image You can zoom in from x1 3 to x2 0 Exit 1 10 100 0001 x1 5 3 Press the T W Display Underwater button to view the area you want on the magnified photo 4 To cancel use the Share button Photos recorded on other devices or those edited on a PC can not be magnif...

Страница 51: ...function is used here as an example Exit Menu 1080 30p 720 30p Video Resolution 3 Press the T W button to select the desired option and then press the OK REC button Exit Menu 1080 30p 720 30p Video Resolution 4 To exit the menu press the MENU button When you are using certain menu items some other menu items can not be used at the same time or may be grayed out For more information see Troubleshoo...

Страница 52: ...Playback menu items Available X Not Available Operation mode Items Video Photo Default value Page Thumbnail view Single view Thumbnail view Single view Play Mode X X Video 52 Delete 53 Protect 54 Share Mark X X 55 Slide Show X X 56 File Info 56 Settings 57 63 Menu options and default values may be changed without prior notice MENU ITEMS The items available in each menu vary depending on the operat...

Страница 53: ...esolution there is less space to record videos in the memory The recording times depend on the resolution of a video to be recorded page 32 Photo Resolution You can select the resolution of the photo to be recorded Press the Mode button to set the photo recording mode page 25 1 Press the MENU button J Display Underwater button J Photo Resolution 2 Select the desired submenu item with the T W butto...

Страница 54: ...oduct displays a normal natural image during recording or playback Vignetting Apply the retro looking colors high contrast and strong vignette effect of lomo cameras Fish eye Distort close objects to imitate the visual effect of a fish eye lens Retro R R Apply a sepia tone effect Classic CL CL Apply a black and white effect Negative N N Apply a negative film effect Smart Filter Examples Normal Neg...

Страница 55: ...REC button Exit Menu Off On Back Light 3 Press the MENU button to exit the menu Submenu items Off Disables the function On Backlight compensation brightens the subject Cases Where You Would Typically Use the Back Light Function The subject is in front of a window The person you want to record is wearing white or shiny clothes and is placed against a bright background The person s face is too dark ...

Страница 56: ...ay Underwater button J Face Detection 2 Select the desired submenu item with the T W button J OK REC button Exit Menu Off On Face Detection 3 Press the MENU button to exit the menu Submenu items Off Disables the function On Detects faces automatically and sets the optimal recording values Example of the Face detection mode When you set the Face detection mode to On the face detection frame appears...

Страница 57: ...ems Off Disables the function On The Anti Shake DIS function is enabled to compensate for shaking Use the Anti Shake function in the following cases When recording while walking or in a moving car When recording with the zoom function When recording subjects of a small size Gross product shake may not be entirely corrected even if Anti Shake DIS is On Firmly hold the product with both hands When t...

Страница 58: ...e MENU button J Play Mode 0 00 55 Play Mode Menu 1 10 2 Select the desired submenu item with the T W button J OK REC button Exit Menu Video Photo Play Mode Submenu items Video Your product displays videos in the thumbnail index view Photo Your product displays photos in the thumbnail index view 0 00 55 Play Mode Menu 1 10 Video Photo Play Mode Menu 1 10 These playback mode settings are available i...

Страница 59: ...ll Files the product deletes all the files in storage media except for those that are protected If you selected Select Files the product deletes the files you selected Submenu items Select Files Deletes selected videos or photos All Files Deletes all videos or photos Deleting files by using the Delete button Select the file to be deleted and then press the Delete button Deleted images can not be r...

Страница 60: ...esponds to that option Go to Step 4 3 Press the T W Display Underwater buttons and then the OK REC button to select each file you want to protect A indicator appears on the files you selected After you have selected all the files you want to protect press the MENU button Protect Protect Menu Cancel 1 10 4 Select Yes with the Display Underwater OK REC button If you selected All On the indicator app...

Страница 61: ...you have selected all the files you want to share mark press the MENU button Share Mark Mark Menu Cancel 1 10 4 Select Yes with the Display Underwater OK REC button If you selected All On the indicator appears on all files If you selected All Off the indicator disappears from all share marked files If you selected Select Files the indicator appears on the files you selected for share mark Submenu ...

Страница 62: ...ress the T W OK REC or MENU button File Info You can see the image information for all images Insert a memory card page 29 Press the Playback button to set playback mode page 39 Set Play Mode to Video or Photo page 52 1 Press the MENU button J Display Underwater button J File Info J OK REC button File Info Exit Menu OK 100VIDEO Date JAN 01 2011 Duration 0 00 55 Size 123 MB Resolution HD 720 30p HD...

Страница 63: ... media used memory space and available memory space Insert a memory card page 29 1 Press the MENU button J Display Underwater button J Settings 2 Press the T W button J Storage Info J OK REC button Used memory space memory space available for use and the available recordable time appears Note that the storage info values depend on the currently selected video resolution Exit Menu Storage Info Used...

Страница 64: ...et Resets the file number to 0001 when you format the memory card delete all files or insert a new memory card When you set File No to Series each file is assigned a different number to avoid duplicating file names This is convenient when you want to manage your files on a PC Date Time Set Set the current date and time so the product can record them correctly 1 Press the MENU button J Display Unde...

Страница 65: ... option you selected Submenu items Off Current date time information is not displayed Date Displays the current date Time Displays the current time Date Time Displays the current date and time The date time will read JAN 01 2011 12 00AM in the following case When the internal battery is depleted LCD Brightness You can adjust the brightness of the LCD screen to compensate for ambient lighting condi...

Страница 66: ...s enabled and the LCD screen dims you can press any button on the product to return the LCD screen s brightness to normal Auto LCD Off is disabled in the following case If you have connected the built in USB plug of the product to a PC Beep Sound You can set the beep sound on or off If you hear a beep sound when operating the menu settings the setting is turned on 1 Press the MENU button J Display...

Страница 67: ... Min This setting turns off the product if there is no operation for five minutes 1 Press the MENU button J Display Underwater button J Settings 2 Press the T W button J Auto Power Off J OK REC button 3 Select the desired submenu item with the T W button J OK REC button Exit Menu Shutter Sound Auto Power Off PC Software Settings Off 5 Min 4 Press the MENU button to exit the menu Submenu items Off ...

Страница 68: ...want to correct problems with the storage media Insert a memory card page 29 1 Press the MENU button J Display Underwater button J Settings 2 Press the T W button J Format J OK REC button Exit Menu Format Default Set Language Settings 3 Select Yes with the Display Underwater button J OK REC button Do not remove the storage media or perform any other operation such as turning off the power during f...

Страница 69: ...er button J OK REC button Select No to cancel the Default Set All setting values are initialized to the factory default After resetting the product reset the Date Time Set page 24 Do not turn off the power while initializing the settings The Default Set function does not affect the files recorded on the storage media Language You can select a language in which to display the menu and messages page...

Страница 70: ... LCD screen of the product turns off and the images recorded by the product appear in thumbnail view on the TV For videos and photos playback see pages 40 43 VIEWING ON A TV SCREEN Image appearance depends on the TV screen aspect ratio Recording ratio Appearance on Wide Screen 16 9 TV Appearance on 4 3 TV Images recorded in a 16 9 ratio Images recorded in a 4 3 ratio When you connect the product t...

Страница 71: ...Core 2 2 GHz or higher is recommended Notebook Intel Core2 Duo 2 2GHz or AMD Athlon X2 Dual Core 2 6GHz or higher is recommended RAM 1GB or higher is recommended Video Card NVIDIA GeForce 8500 or higher ATI Radeon HD 2600 series or higher Display 1024 x 768 16 bit color or higher 1280 x 1024 32 bit color recommended USB USB 2 0 Direct X DirectX 9 0c or higher Recommended Memory Card 4MB s Class 4 ...

Страница 72: ... 1 Click the Safely Remove Hardware icon on the taskbar 2 Select USB Mass Storage Device and then click Stop 3 If the Stop a Hardware device window appears click OK 4 Disconnect the product s built in USB plug from the PC Make sure you insert the USB plug into the USB port with the plug facing in the correct direction When the built in USB plug is connected turning the product on or off may cause ...

Страница 73: ...nnected device Browse folders stored on your computer Move to the previous or next folder Print files view files on a map store files in Contents Manager or register faces If you install Intelli studio on your PC the program will launch more quickly To install the program select Tool Install Intelli studio on PC on the Intelli studio screen If you install the full version of Intelli studio softwar...

Страница 74: ...he video or photo you want double click to play back Playback starts and the controls appear Intelli studio supports the following file formats Video formats MP4 Video H 264 Audio AAC WMV WMV 7 8 9 Photo formats JPG GIF BMP PNG TIFF Step 4 Editing videos or photos You can edit the videos or photos in various ways with various functions Change Size Fine Tuning Image Effect Insert Frame etc Before e...

Страница 75: ...can choose YouTube twitter Flickr Facebook Picasa Email or another web site you want to use for your on line photo or video management 4 Click Upload to start uploading A pop up window appears to open the web browser of the selected site or a pop up window appears asking for your ID and password 5 Enter your ID and the password to access Access to the web site contents can be limited depending on ...

Страница 76: ...ouTube If you want to upload directly without showing a pop up sharing window check Intelli studio does not pop a list of share marked files from the connected device You can use the Share button only while Intelli studio is running As part of the uploading process the videos you marked are converted into a format playable by YouTube before actually uploading Time spent uploading may vary dependin...

Страница 77: ... file types are stored in different folders Photos Videos Setting folder System folder 5 Select the desired folder or files to copy then drag and drop them into the destination folder The folder or files are copied from the storage media to the PC If the Removable Disk window does not appear confirm the connection page 66 or perform steps 1 to 3 again If the removable disk does not appear automati...

Страница 78: ...lowing order 100VIDEO 101VIDEO etc The maximum number of folders is 999 The product can create a maximum of 9 999 files in a storage media Photo file 2 As with video files the file number used in the file name automatically increases when you create a new photo file Photos have a SAM_ JPG name format The folder names are given in the following order 100PHOTO 101PHOTO etc File format Video files Vi...

Страница 79: ...to a PC using the built in USB plug Storage media Message Icon Meaning Action Insert Card There is no memory card inserted in the memory card slot Insert a memory card Card Full There is not enough space to record on the memory card Delete unnecessary files from the memory card Back up files to a PC or another storage media and then delete unneeded files Replace the memory card with another card t...

Страница 80: ...ecord at this resolution Record video at a lower resolution Replace memory card with a faster card Recording Message Icon Meaning Action Write Error A problem has occurred while the product was writing data to storage media Turn the product s power off and on for data recovery If a file is not recovered use the product to format the storage media after backing up important files to a PC or another...

Страница 81: ...atting File number is full Cannot take a photo The folder and file number have reached their maximum number and you can not record Set File No to Reset and format the storage media Remember to back up important files before formatting Playback Message Icon Meaning Action Read Error A problem has occurred while the product was reading data from the storage media Use the product to format the storag...

Страница 82: ...on Press the Reset button page 16 The battery discharges quickly The temperature is too low The battery is not fully charged Charge the battery again The battery has reached the end of its lifespan and can not be recharged Contact your local Samsung dealer Display Symptom Explanation Solution The TV screen or LCD display has distorted images or has stripes at the top bottom or on the left right Th...

Страница 83: ...up important files on your PC and format the storage media or delete unnecessary files If you make recordings or delete files frequently the performance of the storage media deteriorates If this occurs format the storage media again If you use a memory card with a low write speed the product automatically stops recording videos and displays a message on the LCD screen When recording a subject illu...

Страница 84: ...This occurs when recording images under a fluorescent lamp sodium lamp or mercury lamp This is not a malfunction Storage Media Symptom Explanation Solution Memory card functions do not operate Insert a memory card into your product properly page 29 If you use a memory card formatted on a computer format it again directly on your product page 62 Image can not be deleted You can not delete a protect...

Страница 85: ...on your product Check memory card compatibility page 30 The skip or search function does not work properly If the temperature inside the product is too high it can not function properly Turn the product off wait for a few minutes and turn it on again Playback on other devices TV Symptom Explanation Solution You can not view the image on or hear the sound from the connected device Make sure that th...

Страница 86: ... studio is not Mac OS compliant Set PC Software to On in the Settings menu The Intelli studio program may not run automatically If this occurs access My Computer or Windows Explorer open the drive that corresponds to your product find Intelli studio and then run IStudio exe Your computer is not playing back videos images or sound located on your product properly Video playback or sound may stop te...

Страница 87: ...om Explanation Solution The date and time are incorrect Has the product been left unused for a long period of time The internal battery may be discharged page 23 The product does not turn off or the buttons do not operate normally Press the Reset button to reset the product The product turns off The Reset function does not affect the recorded images and user settings Reset button Menu items that c...

Страница 88: ...ently with a soft cloth If necessary wipe gently with lens paper or tissue Mold may form if the lens is not cleaned regularly If the lens looks dim turn off the product and leave it off for about 1 hour LCD screen To prolong its service life do not rub the LCD screen with a coarse cloth Be aware of the following LCD screen phenomena They are not malfunctions When you use the product the surface ar...

Страница 89: ...roduct only after dew condensation has completely disappeared USING YOUR PRODUCT ABROAD Each country or region has its own electric and video color systems Before using your product abroad check the following items On TV color systems Your product is an NTSC based product If you want to view your recordings on a TV or copy them to an external device it must be an NTSC based TV or external device a...

Страница 90: ...nes the brightness of a lens Smaller number lenses generally have brighter images The f number is directly proportional to the focal length and inversely proportional to the lens diameter Ú F No focal length diameter of lens aperture MPEG 4 AVC H 264 MPEG 4 AVC H 264 defines the latest video coding format standardized by the ISO IEC and the ITU T in 2003 Compared with the conventional MPEG 2 forma...

Страница 91: ...neral Dust proof Water proof specification Max 3 m underwater IEC IP58 Power source 3 7V Using Lithium Ion battery Power source type Lithium Ion battery Power consumption Recording 2 1 W LCD on Operating temperature 32 F 104 F 0 C 40 C Operating humidity Below 60 Storage temperature 4 F 140 F 20 C 60 C Storage media Memory card micro SD micro SDHC Not supplied External dimensions WxHxD Approx 2 4 ...

Страница 92: ... be presented to the authorized service center EXCLUSIONS WHAT IS NOT COVERED This warranty does not cover damage due to accident fire flood and or other acts of God misuse incorrect line voltage improper installation improper or unauthorized repairs commercial use or damage that occurs in shipping Exterior and interior finish lamps and glass are not covered under this warranty Customer adjustment...

Страница 93: ...the 6 hazardous materials Cadmium Cd Lead Pb Mercury Hg Hexavalent Chromium Cr 6 Poly Brominated Biphenyls PBBs Poly Brominated Diphenyl Ethers PBDEs in our products QUESTIONS OR COMMENTS COUNTRY CALL OR VISIT US ONLINE AT WRITE IN THE US 1 800 SAMSUNG 726 7864 www samsung com Samsung Electronics America Inc 85 Challenger Road Ridgefield Park NJ 07660 2112 ...

Отзывы: