Samsung HLM507W - HLM - 507W Скачать руководство пользователя страница 16

Selecting Your Favorite Channels

You can store up to ten of your favorite channels for each available input source (such as TV and
CATV). Then, when you press the Fav.CH button on the remote control, the TV displays only the
favorite channels you previously stored, allowing you to quickly and easily find frequently
watched channels. 

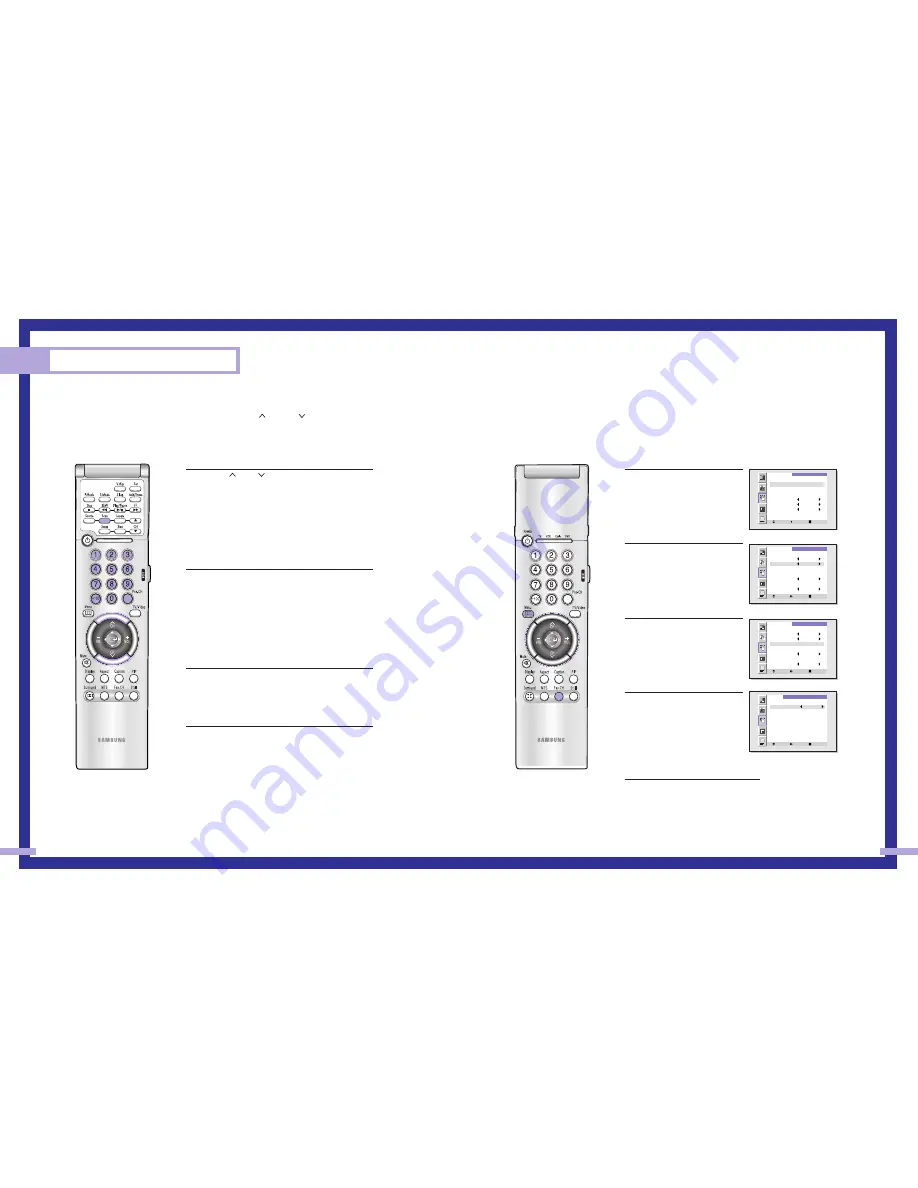
To Store Your Favorite Channels:

1

Press the Menu button. Move

the joystick down to select 

SETUP, then press the joystick 
to enter.

2

Press the joystick to enter.

The channel setup menu will 

appear.  Move the joystick 
down to select Air or CATV, 
then move the joystick to 
the right to display the type of
cable system or Air.

3

Move the joystick down to

select “Favorite Channel”,
then press the joystick to
enter.

4

Move the joystick to the left

or right to select channel.
Note: Only memorized chan-
nels can be set as Favorite
channels.

To View Your Favorite Channels:

Press the Fav.CH button repeatedly to
jump from one favorite channel 
to another.
The favorite channels are selected in
ascending sequence.

31

Changing Channels

You can change channels on your TV by using the CH

and CH

buttons, or by direct selec-

tion using the number buttons. You can use the number buttons to tune to any channel (even one
that has been erased or has not been memorized). 

Using the Channel Buttons

Press the CH

or CH

buttons to change channels.

The TV changes each channel in order, up or down,
depending on which button you press. You will see all
the channels that the TV has memorized. (The TV must
have memorized at least three channels.) You will not
see channels that were not memorized or have been
erased.

Using the Number Buttons

To change to single-digit channels (0–9) faster, press
“0” before the single digit. 

Example: For channel 4, press “0,” then “4.” 

To select a channel over 100, press the +100 button
first.  

Example: For channel 122, press “+100,” then “2,” then “2.” 

Using the Previous Channel

Press the Pre-ch button on the remote control.  The TV
changes to the last channel you were watching.

Scanning channels

You can automatically scan all of the channels in memo-
ry at the touch of just one button.  Press the Scan button
on the remote control.  The TV will change the channels
automatically, one by one.  To stop channel scan, 
press the Scan button again. 
Note: When the ANT B mode is selected, the chan-nels
scan function doesn’t work.

Operation

30

SETUP

Move      Enter        Menu

Channel Setup
Closed Caption
Time
Language

  English

Melody

     Off

Blue Screen

     Off

V-chip

SETUP

Move      Select       Menu

Antenna

       A

Air or CATV

     AIR

Favorite Channel 
Auto Channel Memory
Fine Tune

       0

Add/Erase
Labeling

    - - - -

SETUP

Move      Select       Menu

Antenna

       A

Air or CATV

    AIR

Favorite Channel 
Auto Channel Memory
Fine Tune

       0

Add/Erase
Labeling

    - - - -

FAVORITE CHANNEL

Move      Select       Menu

    Source                AIR

 111  

 - - -  


112


 - - -  

 - - -  

 - - -  

 - - -  

 - - -  

 - - -  

 - - -  

Содержание HLM507W - HLM - 507W

Страница 1: ...ica Inc Samsung Electronics America inc 105 Challenger Road Ridgefield Park N J 07660 Service Division TEL 1 800 SAMSUNG 1 800 726 7864 www samsungsupport com BP68 00000A ENG DLPTV I N S T R U C T I O N M A N U A L HLM507W DLPTV ...

Страница 2: ...lectriques introduire la lame le plus large de la fiche dans la borne correspondante de la prise et pousser jusqu au fond Note to CATV system installer This reminder is provided to call CATV system installer s attention to Article 820 40 of the National Electrical Code Section 54 of Canadian Electrical Code Part I that provides guidelines for proper grounding and in particular specifies that the c...

Страница 3: ...evision tech nology We designed it with easy to use on screen menus and closed captioning capabilities making it one of the best products in its class We are proud to offer you a product that will provide convenient dependable service and enjoyment for years to come Important Safety Information Always be careful when using your TV To reduce the risk of fire electrical shock and other injuries keep...

Страница 4: ...Your New Wide TV SAMSUNG ...

Страница 5: ...ure possible A built in multi channel sound decoder for stereo and bilingual listening Built in dual channel speakers A special sleep timer Picture in Picture capability that lets you watch two channels at once Headphone jack for private listening Widescreen TV with adjustable image size Checking Parts Once you have unpacked your TV check to make sure that you have all the parts shown here If any ...

Страница 6: ... Pb Pr L R L R DTV1 S VIDEO 2 V L R MONITOR OUT VIDEO 2 VIDEO 1 DTV2 PC AUDIO DVI PC RS 232C Œ ANTENNA terminals Two independent cables or antennas can be connected to these termi nals Use ANT A and ANT B terminals to receive a signal from VHF UHF antennas or your cable system Use the ANT A OUT termi nal to send the signal being received by the ANT A terminal out to another component such as a Cab...

Страница 7: ...e or DVD 11 Pre ch Tunes to the previous channel 12 TV Video Press to display all of the available video sources i e TV VCR DVD DTV PC 13 Joystick Use to highlight on screen menu items and change menu values 14 Caption Controls the caption decoder 15 PIP Activates picture in picture 16 Still Press to stop the action during a particular scene Press again to resume normal video 17 Fav CH Favorite Ch...

Страница 8: ...Connections SAMSUNG ...

Страница 9: ...ds If your antenna looks like this it is an antenna with 75 ohm round leads 1 Plug the antenna lead into the ANT A terminal on the back panel of the TV ANT A ANT A OUT ANT B S VIDEO 1 S VIDEO 2 V L R ANT A ANT A OUT ANT B S VIDEO 1 S VIDEO 2 V L R M Separate VHF and UHF Antennas If you have two separate antennas for your TV one VHF and one UHF you must combine the two antenna signals before connec...

Страница 10: ...eatures that you can not program using the remote control such as programming your favorite channels and blocking channels Connecting a Cable Converter Box and a VCR This connection allows you to watch and record basic and premium cable channels as well as watch videotapes You should keep your TV selected to ANT A so that you can use the TV s fea tures When viewing premium channels or recording wi...

Страница 11: ...se your camcorder to view tapes without using a VCR 1 Locate the A V output jacks on the camcorder They are usually found on the side or back of the camcorder 2 Connect an audio cable between the AUDIO OUT PUT jack on the camcorder and the AUDIO terminals on the side of the TV If your camcorder is stereo you must connect two sepa rate cables The audio cables are usual ly included with the cam cord...

Страница 12: ...DIO OUT jacks on the Set Top Box 2 Connect video cables between the DVI OUT jack on the Set Top Box and the DVI IN jack on the TV NOTES The DTV Set Top Box connection is not supported in PC mode When switching into DTV or PC mode Monitor Out remains in the previous mode RF Video DVD But in DVD mode only black signal is output Audio is output in the last selected mode 23 Connections 22 DTV Set Top ...

Страница 13: ...Operation SAMSUNG ...

Страница 14: ...e listening to Selecting the Menu Language Choose a language for the on screen menus English Spanish or French 1 Press the Menu button Move the joystick down to select SETUP then press the joystick to enter 2 Move the joystick down to select Language 3 Move the joystick right or left to select the language Press the Menu button on the remote control to exit the menu Selecting the Antenna Input You...

Страница 15: ...utton at any time to interrupt the memorization process If the TV set stops operation when Auto Channel Memory runs it is recommended to re run the program Note When the ANT B mode is selected the auto programming runs on the main screen Adding and Erasing Channels 1 Use the number buttons to select the channel you want to add or erase 2 To add a channel select it and press the Add Erase button on...

Страница 16: ... memorized Using the Channel Buttons Press the CH or CH buttons to change channels The TV changes each channel in order up or down depending on which button you press You will see all the channels that the TV has memorized The TV must have memorized at least three channels You will not see channels that were not memorized or have been erased Using the Number Buttons To change to single digit chann...

Страница 17: ...joystick up or down to select a letter a number or a blank Pressing the CH button results in this sequence A B Z blank 0 1 9 5 Move the joystick to the right to switch to the next field which will be selected Select a second letter or digit using joystick up or down as above Repeat the process to select the last two digits Press the Menu button to exit Operation 32 11 SETUP Move Enter Menu Channel...

Страница 18: ...e Video menu will return You can continue to make adjustments or press the Menu button to exit Using Automatic Standard Picture Settings 1 Press the P Mode button on the remote control to change the picture settings 2 Press P Mode repeatedly to select the Standard Dynamic Movie or Custom picture setting Guide to Automatic Picture Settings Choose Standard to set the TV to operate at top performance...

Страница 19: ...just the settings yourself 37 Sound Control You can control and customize the sound levels and settings of the TV with the remote control Using the on screen menus you can change the TV s bass treble and balance settings Adjusting the Volume Press VOL to raise the volume or VOL to lower the volume Using the Mute Button Press the Mute button on the remote control to silence the volume The word Mute...

Страница 20: ...ime then press the joystick to enter 3 Move the joystick right to select the hour Move the joy stick up or down to select the correct hour 4 Move the joystick right to select the minute Move the joystick up or down to select the correct minute Move the joystick to the right to select AM then move the joystick up or down to select am or pm 5 Press Menu to exit the menus Operation 38 SETUP Move Ente...

Отзывы: