background image

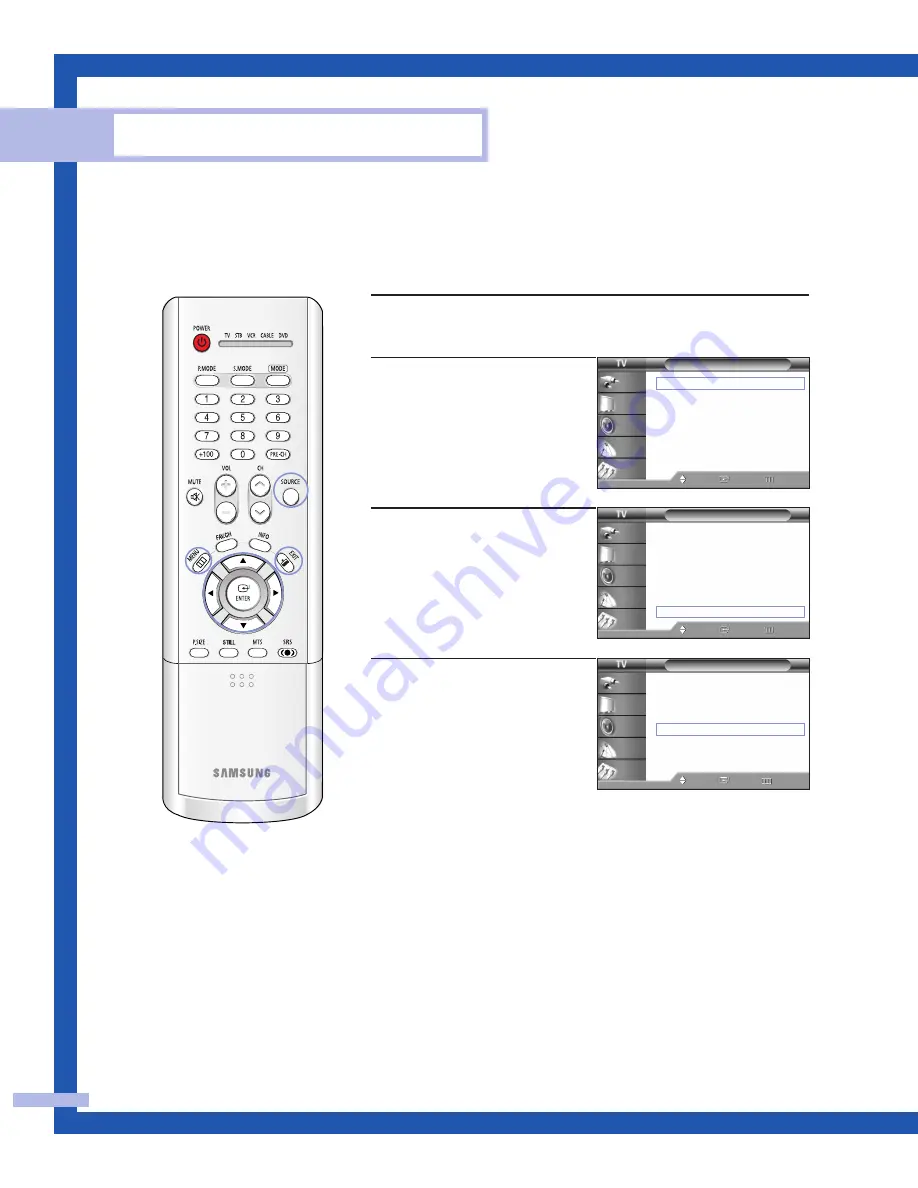
Initializing the Picture Settings

You can replace all picture settings with the factory default values.

English - 90

PC Display

1

Press the SOURCE button to select “PC”.

2

Press the MENU button.
Press the 

or 

button to

select “Setup”, then press the
ENTER button.

3

Press the 

or 

button to

select “PC”, then press the
ENTER button.

4

Press the 

or 

button to

select “Recall”, then press
the ENTER button.
The picture settings are
replaced with the factory
default values.

Press the EXIT button to exit.

Setup

Language

: English

Time

V-Chip

Caption

Blue Screen

: Off

Melody

: On

Color Weakness

PC

Move

Enter

Return

Input

Picture

Sound

Channel

Setup

Setup

Language

: English

Time

V-Chip

Caption

Blue Screen

: Off

Melody

: On

Color Weakness

PC

Move

Enter

Return

Input

Picture

Sound

Channel

Setup

PC

Coarse

Fine

Position

Auto Adjustment
Recall

Move

Enter

Return

Input

Picture

Sound

Channel

Setup

Содержание HL-P5063W

Страница 1: ...HL P4663W HL P5063W HL P5663W HL P6163W DLPTV This device is a Class B digital apparatus I N S T R U C T I O N M A N U A L ...

Страница 2: ...VD Player 21 Connecting to Y PB PR 21 Connecting to Audio and Video Jacks 21 Connecting a DTV Set Top Box 22 Connecting to Y PB PR 22 Connecting to DVI Digital Visual Interface 22 Connecting to R G B 23 Connecting to HDMI High Definition Multimedia Interface 23 Operation 26 Turning the TV On and Off 26 Viewing the Menus and On Screen Displays 26 Selecting the Menu Language 27 Selecting the Antenna...

Страница 3: ...Source 63 Setting the SRS TSXT 64 Choosing a Multi Channel Sound MTS track 65 Auto Volume 66 Enjoying the Sound of External Speakers 67 Using the V Chip 68 Viewing Closed Caption Information 78 Setting the Blue Screen Mode 80 Setting The On Off Melody 81 Using the Color Weakness Enhancement Feature 82 PC Display 84 Using Your TV as a Computer PC Display 84 How to Connect Your PC to the TV 84 Setti...

Страница 4: ...SAMSUNG ...

Страница 5: ...Your New Wide TV ...

Страница 6: ... the same code number and type 2 The lamp type is indicated on the right side of the TV It is also indicated on the lamp case 3 After checking the code number for the lamp give the code number to the store where you purchased the TV or to a Samsung Service center Caution 1 Replace with the correct code numbered lamp to avoid damage to the TV 2 Turn the power off and wait for 30 minutes before repl...

Страница 7: ...ecure the screw The TV will not turn on if the lamp cover is not correctly closed as this will activate the protective circuit 1 Unplug TV then use a screwdriver to remove the screw 2 Remove the Lamp cover 3 Remove the screws securing the Lamp by using a screwdriver 4 Separate the Lamp from the engine by holding the handle and pulling it out 5 To reinstall the Lamp follow these steps in reverse or...

Страница 8: ...nate reception problems Fine tuning control for the sharpest picture possible A built in multi channel sound decoder for stereo and bilingual listening Built in dual channel speakers A special sleep timer Picture in Picture capability that lets you watch two channels at once Widescreen TV with adjustable image size Life like clear images provided by DNle technology My Color Control Mode for corres...

Страница 9: ... volume and to select items when using the on screen menu Press to change channels and move between items on the on screen menu Press to activate or change a particular item Side Panel Jacks Use the right side panel jacks to connect a component that is used only occasionally a camcorder or video game for example Connect the video signal from a camcorder or video game Connect the audio signal from ...

Страница 10: ...ure will automatically appear in about 15 seconds Auto Timer ON OFF has been set and the set will automatically be turned on in about 25 seconds A cooling fan inside the set is not operating normally Lamp cover on rear of the set is not properly shut Check if the ventilation hole on the rear of the set is blocked because if the inner temperature is too high the power will shut off Lamp may be defe...

Страница 11: ...S VHS VCR or DVD player ˇ VIDEO AUDIO INPUT jacks VCR1 VCR2 Connect video audio signals from external sources such as a VCR or DVD players VIDEO AUDIO OUTPUT jacks Sends a video signal from the TV to an external source such as a VCR Note It is available only in RF Video and S Video modes ˆ Component1 2 jacks Y PB PR L R Use these jacks to connect the component video audio signals from a DVD player...

Страница 12: ... PC 14 CH CH Press to change channels 15 INFO Press to display information on the TV screen 16 EXIT Press to exit the menu 17 œ ENTER Press to select highlight up down left or right While using the on screen menus press the ENTER to activate or change a particular item 18 MTS Multichannel Television Stereo Press to choose Stereo Mono or SAP Secondary Audio Program 19 SRS Activates TruSurround 20 A...

Страница 13: ...oth batteries and do not mix old and new batteries in the remote control If you won t be using the remote control for a long time remove the batteries and store them in a cool dry place 1 Slide the back cover all the way out to open the battery compartment of the remote control 2 Install two AAA size batteries Make sure to match the and ends of the batteries with the diagram inside the compartment...

Страница 14: ...SAMSUNG ...

Страница 15: ...Connections ...

Страница 16: ...s it has 300 ohm flat twin leads 1 Place the wires from the twin leads under the screws on the 300 75 ohm adaptor not supplied Use a screwdriver to tighten the screws 2 Plug the adapter into the ANT 1 IN terminal on the rear panel Antennas with 75 ohm Round Leads If your antenna looks like this it is an antenna with 75 ohm round leads 1 Plug the antenna lead into the ANT 1 IN terminal on the rear ...

Страница 17: ...F and one UHF you must combine the two antenna signals before connecting the antennas to the TV This procedure requires an optional combiner adaptor available at most electronics shops 1 Connect both antenna leads to the combiner 2 Plug the combiner into the ANT 1 IN terminal on the rear panel ...

Страница 18: ...ble Box If you want to connect cable and you do not need to use a cable box 1 Plug the incoming cable into the ANT 1 IN terminal on the rear panel Cable with a Cable Box that Descrambles All Channels 1 Find the cable that is connected to the ANTENNA OUT terminal on your cable box This terminal might be labeled ANT OUT VHF OUT or simply OUT 2 Connect the other end of this cable to the ANT 1 IN term...

Страница 19: ...well as watch videotapes You should keep your TV selected to ANT 1 IN so that you can use the TV s features When viewing premium channels or recording with the VCR select ANT 2 IN whichever channel is vacant in your area then use the converter box to change channels Caution If you want to record one channel while watching another channel a splitter not included must be added between the cable and ...

Страница 20: ...O IN jacks on the TV and the AUDIO OUT jacks on the camcorder If you have mono camcorder connect L mono to camcorder audio out using only one audio cable 3 Connect a video cable between the VIDEO IN or S VIDEO IN jack on the TV and the VIDEO OUT jack on the camcorder The audio video cables shown here are usually included with a Camcorder If not check your local electronics store If your camcorder ...

Страница 21: ...or 2 VIDEO Y PB PR IN jacks on the TV and VIDEO Y PB PR or Y CB CR OUT jacks on the DVD player Note For an explanation of Component video see your DVD player s owner s manual Connecting to audio and video jacks 1 Connect a set of audio cables between the AUDIO IN 1 or 2 jacks on the TV and the AUDIO OUT jacks on the DVD player 2 Connect a video cable between the VIDEO IN 1 or 2 jack on the TV and ...

Страница 22: ...CR OUT jacks on the Set Top Box Note For an explanation of Component video see your Set Top Box owner s manual Connecting to DVI Digital Visual Interface 1 Connect a set of audio cables between the DVI AUDIO L R IN jacks on the TV and the AUDIO OUT jacks on the Set Top Box 2 Connect a video cable between the DVI IN jack on the TV and the DVI OUT jack on the Set Top Box Connections English 22 TV Re...

Страница 23: ...necting to HDMI High Definition Multimedia Interface 1 Connect a HDMI cable between the HDMI IN jack on the TV and the HDMI OUT jack on the Set Top Box NOTE Please check if the power of HDMI source is on in case that you fail to select HDMI from the Source List even after you connected the cable of HDMI source DTV Set Top Box DVD etc to TV TV Rear Panel DTV Set Top Box Incoming Cable or Antenna TV...

Страница 24: ...SAMSUNG ...

Страница 25: ...Operation ...

Страница 26: ...te control You can also use the POWER button on the front panel Viewing the Menus and On Screen Displays The on screen menu system allows you to control the settings of your TV Access the on screen menu system by pressing the MENU button on the remote control Once the on screen menu appears use the œ ENTER on your remote control to select menu items and make adjustments You can also view the on sc...

Страница 27: ... On Color Weakness PC Move Enter Return Input Picture Sound Channel Setup English Español Français Selecting the Antenna Input You can connect to two different signal sources by choosing the antenna input 1 or 2 1 Press the MENU button Press the or button to select Channel then press the ENTER button 2 Press the ENTER button to select Antenna Press the or button to select Ant 1 or Ant 2 then press...

Страница 28: ...button to select the type of cable system STD HRC or IRC Press the EXIT button to exit NOTES STD HRC and IRC identify various types of cable TV systems Contact your local cable company to identify the type of cable system that exists in your particular area At this point the signal source has been selected Proceed to Storing Channels in Memory Subscription cable services require service specific r...

Страница 29: ...ss the or button to select Channel then press the ENTER button 2 Press the or button to select Add Delete then press the ENTER button Repeatedly pressing the ENTER button will alternate between add channel and delete channel Press the CH or CH button or number buttons to switch to the appropriate channel then repeat above Press the EXIT button to exit Alternate method Simply press the ADD DEL butt...

Страница 30: ...three channels You will not see channels that were either erased or not memorized Using the Number Buttons Press the number buttons to go directly to a channel When you use the number buttons you can directly select channels that were either erased or not memorized For example to select channel 27 press the 2 then 7 The TV will change channels when you press the second number To change to single d...

Страница 31: ...nels then press the ENTER button Press the or button to select a channel then press the ENTER button Press the ENTER button again to deselect the selected channel Press the EXIT button to exit To View Your Favorite Channels Press the FAV CH button repeatedly to jump from one favorite channel to another NOTE Only memorized channels can be set as Favorite channels Channel Antenna Ant 1 Air CATV Air ...

Страница 32: ...e ENTER button The TV scans all of the channels memorized Press the EXIT button to exit NOTE When the ANT 2 IN mode is selected the channel scan function works on the main picture only Air 3 Air 4 Return Scan Channel Antenna Ant 1 Air CATV Air Auto Program Add Delete Favorite Channels Name Fine Tune More Move Enter Return Input Picture Sound Channel Setup Channel More LNA On Scan Move Enter Return...

Страница 33: ...nk Results in this sequence A Z blank 0 9 4 Press the button to switch to the next field which will be selected Select a second letter or digit pressing or button as above Repeat the process to select the last two digits When you have finished press the ENTER button To erase the assigned new name select Clear by pressing the œ button then press the ENTER button Press the EXIT button to exit Name M...

Страница 34: ...actory Defaults You can return to the factory default picture settings 4 Press the MENU button to display the Mode menu Press the or button to select Reset then press the ENTER button The previously adjusted picture settings will be reset to the factory defaults Contrast 90 Picture Mode Standard Color Tone Warm1 Size Wide Digital NR Off DNIe On My Color Control Film Mode Off PIP Move Enter Return ...

Страница 35: ... the EXIT button to exit Alternate method Press the P MODE button on the remote control repeatedly to select one of the standard picture settings Choose Dynamic for viewing the TV during the day or when there is a bright light in the room Choose Standard for the standard factory settings Choose Cinema when viewing a movie English 35 Standard Picture Mode Standard Color Tone Warm1 Size Wide Digital...

Страница 36: ...ither the VOL or VOL button Customizing the Sound The sound settings can be adjusted to suit your personal preference Alternatively you can use one of the automatic settings See next page 1 Press the MENU button Press the or button to select Sound then press the ENTER button 2 Press the or button to select Equalizer then press the ENTER button Continued Mute Sound Mode Standard Equalizer SRS TSXT ...

Страница 37: ...then press the ENTER button Press the EXIT button to exit Alternate method Press the S MODE button on the remote control repeatedly to select one of the standard sound settings Choose Standard for the standard factory settings Choose Music when watching music videos or concerts Choose Movie when watching movies Choose Speech when watching a show that is mostly dialogue i e news Choose Custom to re...

Страница 38: ...ime will appear every time you press the INFO button Setup Language English Time V Chip Caption Blue Screen Off Melody On Color Weakness PC Move Enter Return Input Picture Sound Channel Setup Time Clock Set am Sleep Timer Off On Timer Off Off Timer Off Move Enter Return Input Picture Sound Channel Setup Clock Set Move Adjust Return Input Picture Sound Channel Setup Hour Min am pm 12 00 am Absent P...

Страница 39: ...tton to select Off Timer then press the ENTER button 5 Press the or button to adjust Hour then press the button to move to the next step Set other items using the same method as above Press the EXIT button to exit English 39 Setup Language English Time V Chip Caption Blue Screen Off Melody On Color Weakness PC Move Enter Return Input Picture Sound Channel Setup Time Clock Set 10 30 am Sleep Timer ...

Страница 40: ...ternate method Press the SLEEP button on the remote control repeatedly until the appropriate time interval appears any of the preset values from 30 Min to 180 Min NOTE If no signal is received for 15 minutes the TV will be automatically turned off Setup Language English Time V Chip Caption Blue Screen Off Melody On Color Weakness PC Move Enter Return Input Picture Sound Channel Setup Time Clock Se...

Страница 41: ...ress the ENTER button Press the EXIT button to exit Alternate method Press the SOURCE button on the remote control repeatedly to select an external signal source NOTE When you connect equipment to the TV you can choose between the following sets of jacks AV1 AV2 S Video1 S Video2 Component1 Component2 PC DVI or HDMI on the TV s rear panel and AV3 or S Video3 on the TV s side panel Input Source Lis...

Страница 42: ...select a signal source then press the ENTER button Press the or button to select an external device then press the ENTER button Press the EXIT button to exit Input Source List TV Edit Name Move Enter Return Input Picture Sound Channel Setup Input Source List TV Edit Name Move Enter Return Input Picture Sound Channel Setup Edit Name AV1 AV2 AV3 S Video1 S Video2 S Video3 Component1 More Move Enter ...

Страница 43: ...ode the main and sub pictures are stilled at the same time Remote Control VCR DVD Buttons Slide the cover of the remote control up to access buttons that can control the tape functions of a connected VCR or DVD including Rewind Stop Play Pause and Fast Forward Slide the cover of your remote control unit for access to the tape function controls Press the appropriate buttons to control your VCR or D...

Страница 44: ...SAMSUNG ...

Страница 45: ...Special Features ...

Страница 46: ...the VCR Cable box or DVD player code listed on next page for your brand of VCR Cable box or DVD player Make sure you enter 3 digits of the code even if the first digit is a 0 If more than one code listed try the first one 5 Press the POWER button Your VCR Cable box or DVD player should turn on If your VCR Cable box or DVD player turns on your remote control is now set correctly If your VCR Cable b...

Страница 47: ...English 47 Remote Control Codes VCR Codes DVD Codes Cable Box Codes ...

Страница 48: ... store the fine tuning setting in the TV s memory press the ENTER button The symbol is displayed To reset the fine tuning to 0 select Reset by pressing the or button then press the ENTER button Press the EXIT button to exit Channel Antenna Ant 1 Air CATV Air Auto Program Add Delete Favorite Channels Name Fine Tune More Move Enter Return Input Picture Sound Channel Setup Channel Antenna Ant 1 Air C...

Страница 49: ...tton 2 Press the or button to select LNA then press the ENTER button 3 Press the or button to select On or Off then press the ENTER button Press the EXIT button to exit NOTE This function works in ANT 1 IN mode only not available in ANT 2 IN mode Channel More LNA Off Scan Move Enter Return Input Picture Sound Channel Setup Off On Channel Antenna Ant 1 Air CATV Air Auto Program Add Delete Favorite ...

Страница 50: ...t available in the Cinema picture mode Picture Mode Standard Color Tone Warm1 Size Wide Digital NR Off DNIe On My Color Control Film Mode Off PIP Move Enter Return Input Picture Sound Channel Setup Cool2 Cool1 Normal Warm1 Warm2 Picture Mode Standard Color Tone Warm1 Size Wide Digital NR Off DNIe On My Color Control Film Mode Off PIP Move Enter Return Input Picture Sound Channel Setup Picture Mode...

Страница 51: ...the picture on screen using the scroll function Press the or button to scroll the picture Zoom2 Magnifies the size of the picture more than Zoom1 You can also move the picture on screen using the scroll function Press the or button to scroll the picture 4 3 Sets the picture to 4 3 normal mode This is a standard TV screen size NOTES You can select only Wide 4 3 screen size in the Component 480p 720...

Страница 52: ...on 3 Press the or button to select Off or On then press the ENTER button Press the EXIT button to exit Picture Mode Standard Color Tone Warm1 Size Wide Digital NR Off DNIe On My Color Control Film Mode Off PIP Move Enter Return Input Picture Sound Channel Setup Picture Mode Standard Color Tone Warm1 Size Wide Digital NR Off DNIe On My Color Control Film Mode Off PIP Move Enter Return Input Picture...

Страница 53: ...e method Press the DNIe button on the remote control repeatedly to select one of the settings On Switches on the DNIe mode Off Switches off the DNIe mode Demo The screen before applying DNIe appears on the right and the screen after applying DNIe appears on the left Picture Mode Standard Color Tone Warm1 Size Wide Digital NR Off DNIe On My Color Control Film Mode Off PIP Move Enter Return Input Pi...

Страница 54: ... the ENTER button to accept the selected mode Press the EXIT button to exit Blue Emphasizing Clear Blues Feel the clear sun shine on the blue Mediterranean sea Green Emphasizing Mild Greens Feel the translucent romantic turquoise sea Pink Emphasizing Warm Skin Colors Standard Standard Picture Picture Mode Standard Color Tone Warm1 Size Wide Digital NR Off DNIe On My Color Control Film Mode Off PIP...

Страница 55: ...You can return to the factory default settings for My Color Control colors 4 Press the MENU button to display the Detail Control menu Press the or button to select Reset then press the ENTER button The previously adjusted My Color Control Colors will be reset to the factory defaults Picture Mode Standard Color Tone Warm1 Size Wide Digital NR Off DNIe On My Color Control Film Mode Off PIP Move Ente...

Страница 56: ...ss the ENTER button Press the EXIT button to exit NOTE Film mode is supported in 480i only Picture Mode Standard Color Tone Warm1 Size Wide Digital NR Off DNIe On My Color Control Film Mode Off PIP Move Enter Return Input Picture Sound Channel Setup Picture Mode Standard Color Tone Warm1 Size Wide Digital NR Off DNIe On My Color Control Film Mode Off PIP Move Enter Return Input Picture Sound Chann...

Страница 57: ...ton to exit Alternate method Press the PIP button on the remote control repeatedly to activate or deactivate the PIP Picture Mode Standard Color Tone Warm1 Size Wide Digital NR Off DNIe On My Color Control Film Mode Off PIP Move Enter Return Input Picture Sound Channel Setup Picture Mode Standard Color Tone Warm1 Size Wide Digital NR Off DNIe On My Color Control Film Mode Off PIP Move Enter Return...

Страница 58: ...XIT button to exit Picture Mode Standard Color Tone Warm1 Size Wide Digital NR Off DNIe On My Color Control Film Mode Off PIP Move Enter Return Input Picture Sound Channel Setup NOTES The sub picture doesn t support ANT 2 IN Component1 Component2 PC DVI and HDMI For more information about external signals see Viewing an External Signal Source See page 41 If you select TV the sub picture is the sam...

Страница 59: ...EXIT button to exit Picture Mode Standard Color Tone Warm1 Size Wide Digital NR Off DNIe On My Color Control Film Mode Off PIP Move Enter Return Input Picture Sound Channel Setup NOTE The swapping doesn t support ANT 2 IN Component1 Component2 PC DVI and HDMI PIP PIP On Source TV Swap Size Position Channel Air 11 Select Sound Main Move Enter Return Input Picture Sound Channel Setup Picture Mode St...

Страница 60: ...he EXIT button to exit Alternate method Press the SIZE button on the remote control repeatedly to select one of the settings Picture Mode Standard Color Tone Warm1 Size Wide Digital NR Off DNIe On My Color Control Film Mode Off PIP Move Enter Return Input Picture Sound Channel Setup PIP PIP On Source TV Swap Size Position Channel Air 11 Select Sound Main Move Enter Return Input Picture Sound Chann...

Страница 61: ...ion you want then press the ENTER button Press the EXIT button to exit Picture Mode Standard Color Tone Warm1 Size Wide Digital NR Off DNIe On My Color Control Film Mode Off PIP Move Enter Return Input Picture Sound Channel Setup PIP PIP On Source TV Swap Size Position Channel Air 11 Select Sound Main Move Enter Return Input Picture Sound Channel Setup Picture Mode Standard Color Tone Warm1 Size W...

Страница 62: ...tton to exit Alternate method Press the CH or CH button on the remote control to change channels of sub picture during PIP on Picture Mode Standard Color Tone Warm1 Size Wide Digital NR Off DNIe On My Color Control Film Mode Off PIP Move Enter Return Input Picture Sound Channel Setup PIP PIP On Source TV Swap Size Position Channel Air 11 Select Sound Main Move Enter Return Input Picture Sound Chan...

Страница 63: ...ress the ENTER button Main is for the main TV picture audio and Sub is for the sub picture PIP audio Press the EXIT button to exit Picture Mode Standard Color Tone Warm1 Size Wide Digital NR Off DNIe On My Color Control Film Mode Off PIP Move Enter Return Input Picture Sound Channel Setup PIP PIP On Source TV Swap Size Position Channel Air 11 Select Sound Main Move Enter Return Input Picture Sound...

Страница 64: ...t SRS TSXT then press the ENTER button 3 Press the or button to select Off 3D Mono or Stereo then press the ENTER button Press the EXIT button to exit Alternate method Press the SRS button on the remote control repeatedly to select one of the settings Sound Mode Standard Equalizer SRS TSXT Off MTS Stereo Auto Volume Off Internal Mute Off Move Enter Return Input Picture Sound Channel Setup Off 3D M...

Страница 65: ...ton on the remote control repeatedly to select one of the settings Choose Mono for channels that are broadcasting in mono or if you are having difficulty receiving a stereo signal Choose Stereo for channels that are broadcasting in stereo Choose SAP to listen to the Separate Audio Program which is usually a foreign language translation Sound Mode Standard Equalizer SRS TSXT Off MTS Stereo Auto Vol...

Страница 66: ...nd then press the ENTER button 2 Press the or button to select Auto Volume then press the ENTER button 3 Press the or button to select Off or On then press the ENTER button Press the EXIT button to exit Sound Mode Standard Equalizer SRS TSXT Off MTS Stereo Auto Volume Off Internal Mute Off Move Enter Return Input Picture Sound Channel Setup Off On Sound Mode Standard Equalizer SRS TSXT Off MTS Ste...

Страница 67: ...ernal Mute then press the ENTER button 3 Press the or button to select Off or On then press the ENTER button Press the EXIT button to exit Sound Mode Standard Equalizer SRS TSXT Off MTS Stereo Auto Volume Off Internal Mute Off Move Enter Return Input Picture Sound Channel Setup Off On Sound Mode Standard Equalizer SRS TSXT Off MTS Stereo Auto Volume Off Internal Mute Off Move Enter Return Input Pi...

Страница 68: ...ress the ENTER button 4 Press the number buttons to enter your new 4 digit pin number Re enter your new pin number to confirm Press the EXIT button to exit NOTE If you forget the pin number press the remote control buttons in the following sequence which resets the pin to 0 0 0 0 POWER Off MUTE 8 2 4 POWER On Setup Language English Time V Chip Caption Blue Screen Off Melody On Color Weakness PC Mo...

Страница 69: ...ress the or button to select On then press the ENTER button Press the EXIT button to exit Setup Language English Time V Chip Caption Blue Screen Off Melody On Color Weakness PC Move Enter Return Input Picture Sound Channel Setup V Chip 0 9 Enter PIN Return Input Picture Sound Channel Setup Enter PIN V Chip V Chip Lock Off TV Parental Guidelines MPAA Rating Canadian English Canadian French Change P...

Страница 70: ...umber for a new TV set is 0000 The V Chip menu is displayed 3 Press the or button to select TV Parental Guidelines then press the ENTER button Setup Language English Time V Chip Caption Blue Screen Off Melody On Color Weakness PC Move Enter Return Input Picture Sound Channel Setup V Chip 0 9 Enter PIN Return Input Picture Sound Channel Setup Enter PIN V Chip V Chip Lock On TV Parental Guidelines M...

Страница 71: ...d over TV MA Mature Audience Press the EXIT button to exit NOTES These categories consist of two separate groups TV Y and TV Y7 young children through age 7 and TV G through TV MA everybody else The restrictions for these two groups work independently If a household includes very young children as well as young adults the TV parental guidelines must be set up separately for each age group See page...

Страница 72: ...ss the or button to select MPAA Rating then press the ENTER button 4 You can independently lock the movie ratings The locked movie ratings are indicated by the symbol Press the ENTER buttons to activate the appropriate restrictions for movie rating system Press the EXIT button Setup Language English Time V Chip Caption Blue Screen Off Melody On Color Weakness PC Move Enter Return Input Picture Sou...

Страница 73: ...audience including children from ages two six TV FCC Content Category V Violence S Sexual content L Offensive language D Dialog sexual innuendo FV Fantasy or cartoon violence MPAA Rating System Movies G General audience No restriction PG Children under 13 should be accompanied by an adult PG 13 Parental guidance suggested Children under 13 should be accompanied by an adult R Restricted Viewers sho...

Страница 74: ...t pin number for a new TV set is 0000 The V Chip menu is displayed 3 Press the or button to select Canadian English then press the ENTER button Setup Language English Time V Chip Caption Blue Screen Off Melody On Color Weakness PC Move Enter Return Input Picture Sound Channel Setup V Chip 0 9 Enter PIN Return Input Picture Sound Channel Setup Enter PIN V Chip V Chip Lock On TV Parental Guidelines ...

Страница 75: ...xempt programming includes news sports documentaries and other information programming talk shows music videos and variety programming C Programming intended for children under age 8 C8 Programming generally considered acceptable for children 8 years and over to watch on their own G General programming suitable for all audiences PG Parental Guidance 14 Programming contains themes or content which ...

Страница 76: ... is displayed 3 Press the or button to select Canadian French then press the ENTER button Setup Language English Time V Chip Caption Blue Screen Off Melody On Color Weakness PC Move Enter Return Input Picture Sound Channel Setup V Chip 0 9 Enter PIN Return Input Picture Sound Channel Setup Enter PIN V Chip V Chip Lock On TV Parental Guidelines MPAA Rating Canadian English Canadian French Change PI...

Страница 77: ... Sound Channel Setup E G 8 ans 13 ans 16 ans 18 ans E Exempt programming includes news sports documentaries and other information programming talk shows music videos and variety programming G General 8 ans 8 General Not recommended for young children 13 ans Programming may not be suitable for children under the age of 13 16 ans Programming is not suitable for children under the age of 16 18 ans Pr...

Страница 78: ...Press the ENTER button to select Caption Press the or button to select On then press the ENTER button 3 Press the or button to select Mode then press the ENTER button Press the or button to select Caption or Text then press the ENTER button In Caption mode caption appears at the bottom of the screen and they usually cover only a small portion of the picture In Text mode information unrelated to th...

Страница 79: ...ield 1 For example Channel 1 may have subtitles in English while Channel 2 has subtitles in Spanish Caption Caption On Mode Caption Channel 1 Field 1 Move Enter Return Input Picture Sound Channel Setup 2 1 Caption Caption On Mode Caption Channel 1 Field 1 Move Enter Return Input Picture Sound Channel Setup Caption Caption On Mode Caption Channel 1 Field 1 Move Enter Return Input Picture Sound Chan...

Страница 80: ...tton to select Blue Screen then press the ENTER button 3 Press the or button to select On or Off then press the ENTER button Press the EXIT button to exit Setup Language English Time V Chip Caption Blue Screen Off Melody On Color Weakness PC Move Enter Return Input Picture Sound Channel Setup Setup Language English Time V Chip Caption Blue Screen Off Melody On Color Weakness PC Move Enter Return I...

Страница 81: ... On then press the ENTER button Press the EXIT button to exit the menu Setup Language English Time V Chip Caption Blue Screen Off Melody On Color Weakness PC Move Enter Return Input Picture Sound Channel Setup Off On Setup Language English Time V Chip Caption Blue Screen Off Melody On Color Weakness PC Move Enter Return Input Picture Sound Channel Setup Setup Language English Time V Chip Caption B...

Страница 82: ...n to select a color to be adjusted then press the ENTER button Press the œ or button to adjust the value of a color selected Press the EXIT button to exit Setup Language English Time V Chip Caption Blue Screen Off Melody On Color Weakness PC Move Enter Return Input Picture Sound Channel Setup Setup Language English Time V Chip Caption Blue Screen Off Melody On Color Weakness PC Move Enter Return I...

Страница 83: ...PC Display ...

Страница 84: ...w to Connect Your PC to the TV This figure shows the Standard Connector jack panel The actual configuration on your TV may be different depending on the model NOTE The SERVICE jack is for repairs and software upgrades 15Pin D Sub Cable TV Rear Panel PC Audio Cable ...

Страница 85: ...e Windows start menu While Settings is highlighted move the cursor so that control panel is highlighted Navigate to the Settings tab on the display dialog box The two key variables that apply to the TV PC interface are resolution and colors The correct settings for these two variables are Screen area sometimes called resolution 1024 x 768 pixels Colors 24 bit color might also be expressed as 16 mi...

Страница 86: ...r information about connecting your PC to a TV display monitor Same modes as PC are supported for the signal input to the DVI jack Only a separate sync signal is supported Resolution 640 x 350 720 x 400 640 x 480 800 x 600 832 x 624 1024 x 768 1920 x 1080i 1280 x 720p 720 x 483p Horizontal Frequency KHz 31 47 31 47 37 93 31 47 35 00 37 86 37 50 43 27 35 16 37 88 48 08 46 87 53 67 49 73 48 36 56 40...

Страница 87: ...o select PC then press the ENTER button 4 Press the or button to select Coarse or Fine then press the ENTER button 5 Pressing the œ or button to remove the picture noise Press the EXIT button to exit NOTE This feature may change the width of the image If necessary adjust the position to center Setup Language English Time V Chip Caption Blue Screen Off Melody On Color Weakness PC Move Enter Return ...

Страница 88: ...the position of picture by pressing the œ button Press the EXIT button to exit NOTE If a PC signal is input to DVI or HDMI you can t adjust the quality and position of picture PC Coarse Fine Position Auto Adjustment Recall Move Enter Return Input Picture Sound Channel Setup Setup Language English Time V Chip Caption Blue Screen Off Melody On Color Weakness PC Move Enter Return Input Picture Sound ...

Страница 89: ... to select Auto Adjustment then press the ENTER button The picture quality and position are automatically adjusted and the picture returns to original view about a few seconds later Press the EXIT button to exit Auto in Progress Please Wait PC Coarse Fine Position Auto Adjustment Recall Move Enter Return Input Picture Sound Channel Setup Setup Language English Time V Chip Caption Blue Screen Off M...

Страница 90: ... or button to select Recall then press the ENTER button The picture settings are replaced with the factory default values Press the EXIT button to exit Setup Language English Time V Chip Caption Blue Screen Off Melody On Color Weakness PC Move Enter Return Input Picture Sound Channel Setup Setup Language English Time V Chip Caption Blue Screen Off Melody On Color Weakness PC Move Enter Return Inpu...

Страница 91: ...V screen regardless of the aspect ratio of the input source The picture position and size adjustment are available by pressing the œ button Expand Scales the picture to the aspect ratio of the input source 4 3 Displays the picture as it is without changing the aspect ratio of input source NOTES The Wide PC and Expand modes are recommended for the PC mode In VGA 640x480 and SVGA 800x600 modes the W...

Страница 92: ...SAMSUNG ...

Страница 93: ...Appendix ...

Страница 94: ...dcasted in color Adjust the picture settings Adjust the antenna Check all wire connections If you are using a VCR check the tracking Unplug the TV for 30 seconds then try operating it again Press the MODE button to put your remote control into TV mode Make sure the remote has batteries Make sure the wall outlet is working Make sure the remote has batteries The display panel used for the DLP TV is ...

Страница 95: ...ight cause a problem because dirt or some other contaminant may become attached to the inside of the TV set Temperature If your TV is suddenly moved from a cold to a warm place unplug the power cord and allow at least two hours for moisture that may have formed inside the unit to dry completely Using Your TV in Another Country If you plan to take your TV with you to a foreign country please be awa...

Страница 96: ...ctronics America Service Division 400 Valley Road Suite 201 Mount Arlington NJ 07856 www samsungusa com Samsung Electronics Canada Inc Samsung Customer Care 7037 Financial Drive Mississauga Ontario L5N 6R3 www samsung ca BP68 00283B 01 DLPTV ...

Отзывы: