background image

Supported Resolutions for UHD Input Signals


Resolution: 3840 x 2160p, 4096 x 2160p

If Input Signal Plus is set to Off

Frame rate (fps)

Colour Depth / 

Chroma Sampling

RGB 4:4:4

YCbCr 4:4:4

YCbCr 4:2:2

YCbCr 4:2:0

50 / 60

8 bit

-

-

-

O

If Input Signal Plus is set to On

Frame rate (fps)

Colour Depth / 

Chroma Sampling

RGB 4:4:4

YCbCr 4:4:4

YCbCr 4:2:2

YCbCr 4:2:0

50 / 60

8 bit

O

O

O

O

10 bit

-

-

O

O

12 bit

-

-

O

O

Supported Resolutions for Connecting a Computer

When you use your TV as a computer monitor, you can also select one of the standard resolutions listed in the 
Resolution column. The TV will automatically adjust to the resolution you choose.

Mode

Resolution

Display 

format

Horizontal 

frequency (KHz)

Vertical frequency 

(Hz)

Clock frequency 

(MHz)

Polarity (horizontal 

/ vertical)

IBM

720 x 400

70

 Hz

31.469

70.087

28.322

-/+

MAC

640 x 480

67

 Hz

35.000

66.667

30.240

-/-

832 x 624

75

 Hz

49.726

74.551

57.284

-/-

1152 x 870

75

 Hz

68.681

75.062

100.000

-/-

VESA DMT

640 x 480

60

 Hz

31.469

59.940

25.175

- / -

640 x 480

72

 Hz

37.861

72.809

31.500

- / -

640 x 480

75

 Hz

37.500

75.000

31.500

- / -

800 x 600

60

 Hz

37.879

60.317

40.000

+ / +

800 x 600

72

 Hz

48.077

72.188

50.000

+ / +

800 x 600

75

 Hz

46.875

75.000

49.500

+ / +

1024 x 768

60

 Hz

48.363

60.004

65.000

- / -

1024 x 768

70

 Hz

56.476

70.069

75.000

- / -

1024 x 768

75

 Hz

60.023

75.029

78.750

+ / +

1152 x 864

75

 Hz

67.500

75.000

108.000

+ / +

1280 x 720

60

 Hz

45.000

60.000

74.250

+ / +

1280 x 800

60

 Hz

49.702

59.810

83.500

- / +

1280 x 1024

60

 Hz

63.981

60.020

108.000

+ / +

1280 x 1024

75

 Hz

79.976

75.025

135.000

+ / +

1440 x 900

60

 Hz

55.935

59.887

106.500

- / +

1600 x 900

60

 Hz

60.000

60.000

108.000

+ / +

1680 x 1050

60

 Hz

65.290

59.954

146.250

- / +

1920 x 1080

60

 Hz

67.500

60.000

148.500

+ / +

English - 49

Содержание HG55RU750EB

Страница 1: ...msung product To receive more complete service please registeryour product at www samsung com Model Serial No INSTALLGUIDE Questo manuale d istruzione è fornito da trovaprezzi it Scopri tutte le offerte per Samsung HG55RU750EB o cerca il tuo prodotto tra le migliori offerte di Televisori ...

Страница 2: ...SBB orSTB identifies the TV the TVgives full control to the SBB orSTB Standalone mode In this mode the TVworks alonewithout an external SBB orthe STB The TVhas a Admin menu that letsyou easilyset itsvarious hospitalityfunctions Please see page 31 The menu also letsyou activate orde activate some TVand hospitalityfunctions soyou can createyouroptimal hospitalityconfiguration Still imagewarning Avoi...

Страница 3: ...rheating these slots and openings must neverbe blocked orcovered Do not place this apparatus in a confined space such as a bookcase orbuilt in cabinet unless proper ventilation is provided Do not place this apparatus nearorovera radiatororheat register orwhere it is exposed to direct sunlight Do not placevessels vases etc containingwateron this apparatus as this can result in a fire orelectric sho...

Страница 4: ...to installyourTVin a location with heavydust high orlowtemperatures high humidity chemical substances orwhere itwill operate 24 hours a daysuch as in an airport a train station etc Failure to do so maylead to serious damage toyourTV Use onlya properlygrounded plug andwall outlet An improperground maycause electric shock orequipment damage Class l Equipment only To turn off this apparatus completel...

Страница 5: ...properventilation foryourTV 14 02 The Remote Control About the Buttons on the Remote Control 15 Installing batteries into the remote control Batterysize AAA 16 03 Controlling external deviceswith a remote control Usingthe Universal Remote Downloading the Universal Remote icon 19 04 Initial Setup Using the TVController 22 05 The Connection Panel 06 Connections Connecting toyourInternet network 25 C...

Страница 6: ...ned in theAdmin menu 38 SettingAuto Initialize 40 Updating the TV s Software 43 09 Editing Channels Using Channel Editor 44 10 Specifications and OtherInformation Specifications 47 Environmental Considerations 48 Decreasing powerconsumption 48 Supported Resolutions forUHD Input Signals 49 Supported Resolutions forConnecting a Computer 49 Supported Resolutions forVideo Signals 51 Dimensions 52 Lice...

Страница 7: ...ssories hidden behind orin the packing materialswhen opening the box An administration fee maybe charged in the following situations a An engineeris called out atyourrequest but it is found that the product has no defect i e where the user manual has not been read b You bring the unit to a repaircentre but it is found that the product has no defect i e where the usermanual has not been read Youwil...

Страница 8: ...e purchase contract This product and its electronic accessories should not be mixedwith othercommercialwastes fordisposal Correct disposal ofthe batteries inthis product Applicable in countrieswith separate collection systems This marking on battery manual orpackaging indicates that the batteries in this product should not be disposed ofwith otherhouseholdwaste at the end of theirworking life Wher...

Страница 9: ...mponents and parts x 4 M4 x L14 Stand Screws 1 L R Place a soft cloth overthe table to protect the TV and then place the TVso that its screen faces down toward the table surface Insert the Stands into the slot on the bottom of the TV Slide and assemble it to the end line in the direction of arrow English 9 ...

Страница 10: ...2 x 2 M4 x L14 x 2 M4 x L14 3 43 50 75 NOTE Make sure to distinguish between the front and back of each componentwhen assembling them Make sure that at least two persons lift and move the TV English 10 ...

Страница 11: ...depending on the model Thewall mount kit sold separately allowsyou to mount the TVon awall Fordetailed information on installing thewall mount see the instructions providedwith thewall mount Contact a technician forassistancewhen installing thewall mount bracket Samsung Electronics is not responsible forany damage to the product orinjurytoyourself orothers ifyou select to install the TVonyourown E...

Страница 12: ...ke sure the screws are firmlyfixed to thewall We stronglyrecommendyou drive the screws into a stud 2 Insert the screws into thewall brackets and firmlyfasten the screws to the topVESAscrewholes on the back of the TV 3 Connect the brackets on the TVand the brackets on thewallwith a strong string orcable and then tie the string or cable tighrlyto the brackets Verifyall connections are properlysecure...

Страница 13: ...ications Screws that are too long maycause damage to the inside of the TVset Forwall mounts that do not complywith theVESAstandard screwspecifications the length of the screws may differdepending on thewall mount specifications Do not fasten the screws too firmly This maydamage the product orcause the product to fall leading to personal injury Samsung is not liable forthese kinds of accidents Sams...

Страница 14: ...fire ora problemwith the product caused byan increase in its internal temperature Whenyou installyourTVwith a stand orawall mount we stronglyrecommendyou use parts provided bySamsung Electronics only Using parts provided byanothermanufacturermaycause difficultieswith the product orresult in injurycaused bythe product falling Installationwith a stand Installationwith awall mount 10 cm 10 cm 10 cm 1...

Страница 15: ...s on the TVscreen Use these buttonswith specific features Use these buttons according to the directions on the TVscreen Displays the Guide screen Displays information on the TV screen Moves the cursor selects the on screen menu items and changes the values seen on the TV s menu P Power Turns the TVon and off Adjusts thevolume Alternatelyselects Teletext mode Full TTX Double TTX Mix Live TV Returns...

Страница 16: ...g the remote control nearspecial fluorescent lights orneon signs Alkaline batteries are recommended forlongerbatterylife 1 Gentlypull on the batterycover s notch and then remove the covercompletelyonce it comes loose 2 Insert 2AAAalkaline batteries making sure to align the positive and negative polarities correctly 3 Place the batterycoveron the remote control and insert the coverinto the remote c...

Страница 17: ...n menu and then select Universal Remote Setting The Universal Remote Setup screen appears Admin menu Universal Remote Universal Remote Setting Select Device Type Set up a cable or satellite box to control it with your remote Home Theater OTT Box Game C Blue ray Disc Pla Cable Satellite Box 2 If the TVis connected to a set top box select Cable Satellite Box Select Your TV Service Provider Select yo...

Страница 18: ...w to search foryour device Search model number Manufacturer Unkown SMT C7140 SMT C7140 6 Followthe instructions on the screen to search forthe model numberof the set top box connected to the TV When the model numberis found repeat step 5 forthe operation test Setup Complete Now you can control your connected devices with your Samsung remote Done New Setup 7 Whenyou have completed all the settings ...

Страница 19: ...135 x135 2MB Sources stb_source_icon jpg stb_app_icon jpg Source TV Remote Access Hotel Hotel The image onyourTVmaydifferfrom the image above depending on the model and geographical area 2 Go to the Admin menu and then select Universal Remote Icon DL Admin menu Universal Remote Universal Remote Icon DL The Universal Remote Icon DL is onlyavailable afteryou have completelyset up the Universal Remot...

Страница 20: ...ryMenu End Initial Setup and go to Admin menu directly 3 Selectingyourlanguage You can change the menu language 4 Set a room number Change the TVname to reflect a room number 5 Selectingthe broadcasting signal You can selecting the connected aerial thatyouwant to use to get channels 6 Connectingtothe Internet Connect to an availablewired orwireless network Ifyou connect a LAN cable the TVautomatic...

Страница 21: ...cast channels and these channels transmit date and time information set Set Current Time to Auto The TVwill set the date and time automatically If the TVis not tuned to digital broadcast channels set Set Current Time to Manual and then set the date and time on the TVmanually Selectyourtime zone Set DST Daylight Saving Time to No Yes to applyto the TV 11 TVsetup summary Displays the information set...

Страница 22: ...Formore information about its usage referto the figure below The screen maydim if the protective film on the SAMSUNG logo orthe bottom of the TVis not detached Please remove the protective film Control menu Poweroff Volume Up Channel Up Volume Down Channel Down Source TVController button Remote control sensor Press Move Press Hold Select The TVController button is located on the bottom of the TV E...

Страница 23: ...nnection port to the cable Wheneveryou connect an external device toyourTV make sure that poweron the TVand the device is turned off DIGITALAUDIO OUT OPTICAL Connects to a DigitalAudio component USB 5V0 5A USB HDD 5V1A Connectorforsoftware upgrades and Media Play etc Service connection English 23 ...

Страница 24: ...t ports onAV Composite devices Connect componentvideo cables not supplied to the component ports PR PB Y onyourTVand the other ends to corresponding componentvideo out ports on a DVD player Match the colours on the ports and cables Ifyouwant to connect both a set top box and a DVD player you should connect the set top box to the DVD and connect the DVD to the component ports PR PB Y onyourTV The P...

Страница 25: ... 11n Otherwise whenyou playvideo overa network connection thevideo maynot playsmoothly Some of the IEEE 802 11 communication protocols maynot be supported depending on the model or geographical area To use awireless network the TVmust be connected to awireless access point ormodem If thewireless access point supports DHCP the TVcan use a DHCPorstatic IPaddress to connect to thewireless network Sel...

Страница 26: ...gs YourSmart TVcannot connect to uncertifiedwireless access point Establishing awired Internet connection There are three mainways to connect the TVtoyournetwork using cable depending onyournetwork setup Theyare illustrated below The Modem Port on theWall Modem Cable Not Supplied LAN Cable Not Supplied TVRearPanel External Modem ADSL VDSL Cable TV TVRearPanel The Modem Port on theWall Modem Cable ...

Страница 27: ...ferdepending on the SBB orSTB type IR signals sent bythe remote control to the TVorSBB STB must meet the following specification to use IR pass through function IR signal recieverspecification Band pass filtercentre frequency 37 9 CarrierFrequency Duty50 Minimum Burst Length tburst 12 pulses 316 us Minimum Gap Time Between the burst tburst gap 16 pulses 422 us Minimum Gap Time between the data com...

Страница 28: ...orto buythe data cable not included in the TV 1 6 1 2 3 4 5 Confirm the code on the Code Label TVside STB SBB side Cable code Pin assign SIVendor BN39 02462A Colour BLACK TV SIDE 1 NC 2 RX 3 TX 4 IR 5 GND STB SBB SIDE P1 P2 3 1 5 2 6 3 1 4 2 5 1 IR 2 GND 3 NC 4 NC 5 RX 6 TX RED GREEN WHITE BLACK YELLOW SAMSUNG and others RX and TX notation is based on TV Operation Specification of Data Cable RJ12 ...

Страница 29: ...ctingthe CI orCI Card via COMMON INTERFACE slotwiththe CI CARDAdapter Attachingthe CI CARDAdaptervia COMMON INTERFACE slot To attach the CI CARDAdapterto the TV followthese steps Insert the CI CARDAdapterinto the two holes on the back of TV Please locate the two holes at the back of the TVnext to the COMMON INTERFACE slot Connect the CI CARDAdapterto the COMMON INTERFACE slot on the back of TV Con...

Страница 30: ...please contactyour service provider When the configuration of channel information has finished the message Updating Completed is displayed indicating the channel list is updated You must obtain a CI orCI CARD from a local cable service provider When removing the CI orCI CARD carefullypull it outwithyourhands since dropping the CI orCI CARD may cause damage to it Insert the CI orCI CARD in the dire...

Страница 31: ...s When the screen is displaying one menu item you can press the up ordown directional button to displaythe next orprevious menu item Press the RETURN button to exit the current menu item and go to a highermenu level To exit a Admin menu turn off the TV and then turn it on again Anychangesyou made are saved except changes to SI System Integration vendor Forchanges to SIvendor you must turn the TVof...

Страница 32: ...n it displays the channel itwas displayingwhen itwas turned off PowerOn Channel Num When the TVis turned on it switches automaticallyto this channel PowerOn Channel Type Select the type of the channelwill be displayedwhen the TVis turned on ATV analogue aerial band DTV digital aerial band CATV analogue cable band CDTV digital cable band SDTV digital satellite band IPTV IPchannel IPTV is set when d...

Страница 33: ...el numberupdate Channel Rescan Message When there is a mismatch between the data in the channel map and the transmitted data the TVautotunes the channels to restore the data parameters in the channel map ON When Channel Rescan Message is set to on the OSD showing that the channels are being rescannedwill be displayed to the guest OFF When Channel Rescan Message is set to off if the rescan message ...

Страница 34: ...ing function OFF Turns off the energysaving function Cloning Clone TVto USB Clone the current TVoptions to a USB device Clone USBto TV Clone the saved TVoptions on a USB device to the TV SettingAuto Initialize Ifyou set SettingAuto Initialize to On and the TV s poweris turned off and on TV menu items are restored again to theirvalues cloned initially Smart Service Network Setup Run the Network men...

Страница 35: ...access If this function is set to Disable access to USB media is blocked Clone USBto TV and TVResetwill be disabled in the Admin menu HDMI Enable ordisable HDMI access If this function is set to Disable Anynet HDMI source HDMI type external channelswill not be accessible to the user TTX Security If this option is set to Disable the TTX featurewill notworkwhen the TTX MIX button is pressed on the r...

Страница 36: ...roff the HMS Mode When set to ON the TVcan operatewith the LYNKHMS serverthrough the IPnetwork ServerURLSetting You can enterthe LYNKHMS server s address Example http 192 168 1 2 8080 GatewayRole When there is one TVperroom set to Master When there are more than one TVs perroom set the main TVto Master and the others to Slave Virtual Standby Virtual StandbyMode When theAC powercord is plugged in a...

Страница 37: ...asting and so on and the Admin menu Cloning USBto TV Copies menu settings and channel data in a USB deviceto a TV To clone data to the TVusing the Admin menu followthese steps 1 Turn the TVoff 2 Insert the USB device into the USB port on the rearof the TV 3 Turn the TVon 4 Go to the Admin menu 5 Press the up ordown directional button to select Clone USBto TV and press the Select button on the remo...

Страница 38: ...olume Num 0 100 Yes MinVolume 0 100 Yes MaxVolume 0 100 Yes PowerOn Source TV HDMI1 HDMI2 HDMI3 Last Saved Yes PowerOn Option PowerOn Standby Last Option Yes Channel Channel Setup Yes Channel Editor Yes Mixed Channel Map ON OFF Yes Dynamic SI ON OFF Yes Channel Rescan Message ON OFF Yes Pan Euro MHEG ON OFF Yes MyChannel ON OFF Yes SubtitleAuto On ON OFF Yes TTXWidescreen Mode ON OFF Yes Menu OSD ...

Страница 39: ...ing Yes Password Reset No SecurityMode ON OFF Yes USB Enable Disable Yes HDMI Enable Disable Yes TTX Security Enable Disable Yes DRM DRM Mode OFF LYNKDRM Yes System Self Diagnosis forHTV STB SIVendorSetting Si Name Success Failure No Self Diagnosis forTV No System Manger No OTN Update ON OFF Yes SWUpdate No About This TV No StandbyLED ON OFF Yes TVReset No LYNKCloud Enrollment No Enrollment Status...

Страница 40: ...s to the cloned standardvalues when the TVis turned off and then turned on again Note that SettingAuto Initializeworks on cloned guest side menu values only Then unplug the TV wait forthe powerindicatorto go off and then plug the TVin again Settingswhich have not been cloned are ignored The table belowlists the settings that are restored to theirclonedvalueswhenyou set the SettingAuto Initialize f...

Страница 41: ... ColourSpace Settings ColourSpace Colour Red Green Blue Sound Sound Output Sound Mode Expert Settings Balance Equaliser Digital OutputAudio Format Digital OutputAudio Delay AutoVolume Sound Feedback Broadcasting Expert Settings Teletext Language Settings Teletext Language PrimaryTeletext Language SecondaryTeletext Language Audio Options PrimaryAudio Language SecondaryAudio Language English 41 ...

Страница 42: ...ernal Device Manager Anynet HDMI CEC Game Mode Input Signal Plus HDMI Black Level Input Device Manager Keyboard Settings Keyboard Language Keyboard type Eco Solution EnergySaving Mode Motion Lighting Auto PowerOff Accessibility High Contrast Greyscale ColourInversion Enlarge English 42 ...

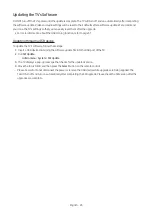
Страница 43: ...7 Updatingthrough a USB device To update the TV s software followthese steps 1 Insert a USB device containing the software update file into the USB port of the TV 2 Run SWUpdate Admin menu System SWUpdate 3 The TVdisplays a pop up message that checks forthe updatedversion 4 Move the focus to OK and then press the Select button on the remote control Please be careful to not disconnect the powerorre...

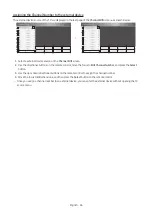
Страница 44: ...ose channels Channel Editor also letsyouviewinformation about each channel easily withoutyourhaving to displayeach channel directly General StepsforUsingthe Channel Editorin Standalone Mode The image onyourTVmaydifferfrom the image above depending on the model and geographical area 1 Run Channel Setup Channel Channel Setup in the Admin menu 2 EnterChannel Editor Channel Channel Editor in the Admin...

Страница 45: ...he channel number the channel information is updated automatically Renamethe Channel Change the name of a channelyou select To change the name of a channel followthese steps 1 Select a channel on the Channel Edit screen 2 Use the directional buttons on the remote control move the focus to Rename channel and then press the Select button 3 Use the on screen keyboard that appears to enterthe newname ...

Страница 46: ...se the directional buttons on the remote control move the focus to Edit Channel Number and press the Select button 3 Use the up ordown directional buttons on the remote control to assign the channel number 4 Move the focus to OKwhen done and then press the Select button on the remote control Onceyou assign a channel numberto an external device you can enterthe external devicewithout opening the TV...

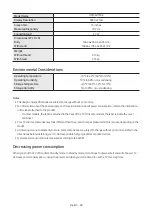
Страница 47: ...10 3 mm 1124 8 x 650 2 x 59 1 mm 1124 8 x 728 8 x 261 3 mm Weight Without Stand With Stand 9 6 kg 9 8 kg 13 6 kg 13 9 kg Model Name HG55RU750E HG65RU750E DisplayResolution 3840 x 2160 3840 x 2160 Screen Size Measured Diagonally 55 inches 138 cm 65 inches 163 cm Sound Output 20W 20W Dimensions Wx H x D Body With stand 1238 6 x 714 2 x 58 7 mm 1238 6 x 792 8 x 261 3 mm 1457 5 x 837 3 x 59 1 mm 1457 ...

Страница 48: ...owerconsumption referto the information on the label attached to the product On most models the label is attached to the back of the TV On some models the label is inside the cover terminal YourTVand its accessories maylook different than the product images presented in this manual depending on the model All drawings are not necessarilyto scale Some dimensions are subject to changewithout priornot...

Страница 49: ...MHz Polarity horizontal vertical IBM 720 x 400 70 Hz 31 469 70 087 28 322 MAC 640 x 480 67 Hz 35 000 66 667 30 240 832 x 624 75 Hz 49 726 74 551 57 284 1152 x 870 75 Hz 68 681 75 062 100 000 VESADMT 640 x 480 60 Hz 31 469 59 940 25 175 640 x 480 72 Hz 37 861 72 809 31 500 640 x 480 75 Hz 37 500 75 000 31 500 800 x 600 60 Hz 37 879 60 317 40 000 800 x 600 72 Hz 48 077 72 188 50 000 800 x 600 75 Hz ...

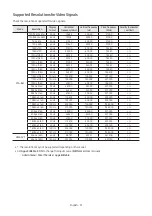
Страница 50: ...35 000 60 000 594 000 3840 x 2160 100 Hz 225 000 100 000 1188 000 3840 x 2160 120 Hz 270 000 120 000 1188 000 4096 x 2160 100 Hz 225 000 100 000 1188 000 4096 x 2160 120 Hz 270 000 120 000 1188 000 The resolution maynot be supported depending on the model The interlaced mode is not supported The set might operate abnormallyifyou select a non standardvideo format Separate and Composite modes are su...

Страница 51: ...920 x1080 120 Hz 135 000 120 003 297 000 1920 x1080 60 Hz 67 500 60 000 148 500 3840 x 2160 24 Hz 54 000 24 000 297 000 3840 x 2160 25 Hz 56 250 25 000 297 000 3840 x 2160 30 Hz 67 500 30 000 297 000 3840 x 2160 50 Hz 112 500 50 000 594 000 3840 x 2160 60 Hz 135 000 60 000 594 000 3840 x 2160 100 Hz 225 000 100 000 1188 000 3840 x 2160 120 Hz 270 000 120 000 1188 000 4096 x 2160 24 Hz 54 000 24 00...

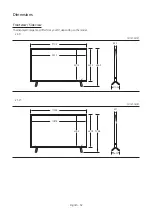
Страница 52: ...nsions Frontview Sideview The displayed image maydifferfromyourTV depending on the model 43 Unit mm 943 2 970 2 58 2 210 3 531 4 563 2 636 3 50 Unit mm 1097 8 1124 8 59 1 261 3 618 4 650 2 728 8 English 52 ...

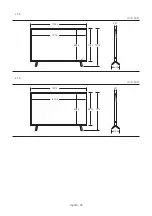
Страница 53: ... 55 Unit mm 1211 6 1238 6 58 7 261 3 682 4 714 2 792 8 65 Unit mm 1430 5 1457 5 59 1 312 8 805 5 837 3 917 3 English 53 ...

Страница 54: ... 75 Unit mm 1652 2 1684 6 60 1 356 1 930 3 966 4 1056 5 English 54 ...

Страница 55: ...rview Detailed dimensions can be checked at Displaysolutions samsung com Base Stand detail The displayed image maydifferfromyourTV depending on the model 43 Unit mm 34 3 168 1 210 3 50 55 Unit mm 42 8 197 9 261 3 English 55 ...

Страница 56: ... 65 Unit mm 47 2 199 2 312 8 75 Unit mm 53 8 214 5 356 1 English 56 ...

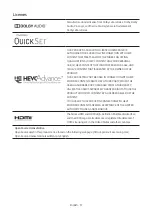
Страница 57: ...DED CONTENTCREATED BYATHIRD PARTY WHICH THE USER HAS ORDERED OR PURCHASED FROMATHIRD PARTY UNLESS THE USER IS SEPARATELY GRANTED RIGHTS TO USE THE PRODUCTWITH SUCH CONTENTBYALICENSED SELLER OF THE CONTENT YOUR USE OF THIS PRODUCTIN CONNECTIONWITH HEVC ENCODED CONTENTIS DEEMEDACCEPTANCE OF THE LIMITED AUTHORITY TO USEAS NOTEDABOVE The terms HDMI and HDMI High Definition Multimedia Interface and the...

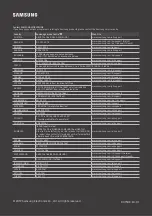
Страница 58: ...G 800 7267864 www samsung com it support LUXEMBURG 261 03 710 www samsung com be_fr support MONTENEGRO 020 405 888 www samsung com support SLOVENIA 080 697 267 brezplačna številka www samsung com si support NETHERLANDS 088 90 90 100 www samsung com nl support NORWAY 21629099 www samsung com no support POLAND 801 172 678 lub 48 22 607 93 33 opłata według taryfy operatora www samsung com pl support ...

Отзывы: