background image

English - 9

03 Initial Setup

When you turn on your TV for the first time, it immediately starts the 
Initial Setup. Follow the instructions displayed on the screen and 
configure the TV's basic settings to suit your viewing environment.
If you already completed the Initial Setup, run the Initial Setup again 
using the following menu.


Hotel Option

 menu > 

System

 > 

TV Reset

If you select 

TV Reset

, the TV resets all values to their factory defaults. 

When the TV turns off, press the 

Power

 button on the remote control 

to turn on the TV. The TV starts the Initial Setup.

1

Select the region settings


Before select region, refer to the country list information on 
the right.


If you select the incorrect region, execute 

TV Reset

 again after 

the Initial Setup is completed.


If the region is changed, the TV automatically turns off and on.

2

Selecting your TV installation type


TV Basic Setup

: Select to proceed to the next step to set the 

basic options for using your TV.


Cloning Mode

: Copy the system settings from the USB or server 

to the TV.


Factory Menu

: End Initial Setup and go to 

Hotel Option

 menu 

directly.


Follow the instructions on the screen to configure the settings for 
your own viewing environment.

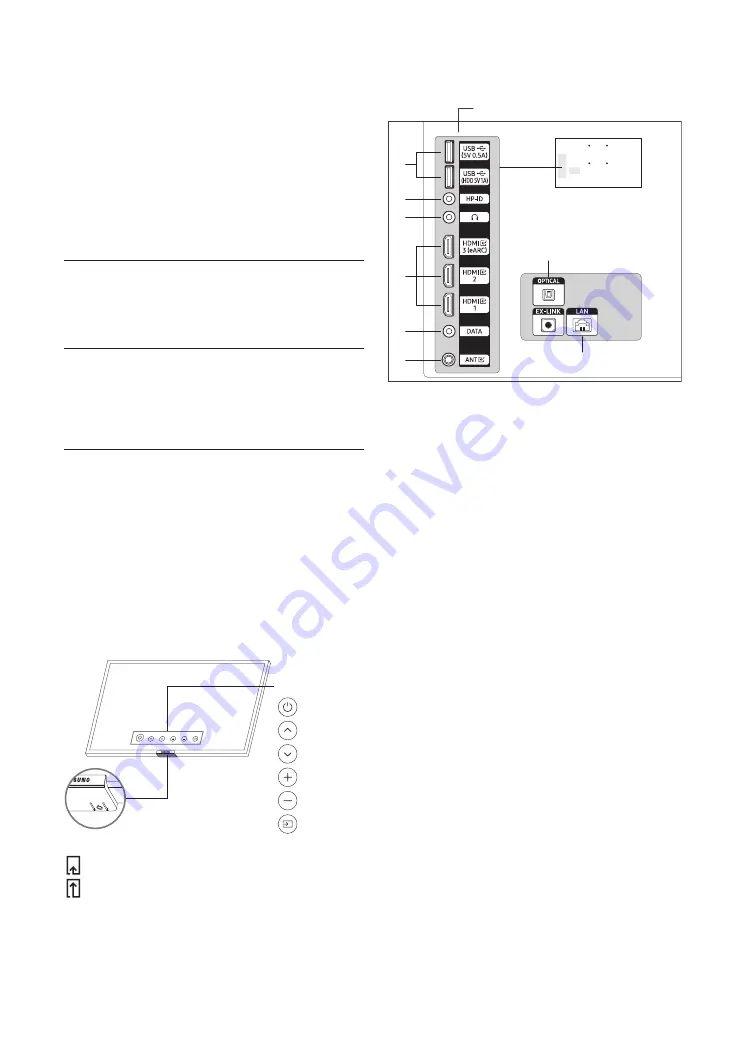
Using the TV Controller

You can turn on the TV with the 

TV Controller

 button at the bottom 

of the TV, and then use the 

Control menu

. The 

Control menu

 appears 

when the 

TV Controller

 button is pressed while the TV is On. For more 

information about its usage, refer to the figure below.


The screen may dim if the protective film on the SAMSUNG 
logo or the bottom of the TV is not removed. Please remove the 
protective film.

Control menu

:Power On/Off

:Channel Up

:Channel Down

:Volume Up

:Volume Down

:Source

TV Controller

 button / 

Remote control sensor

Short Press: Move

Long Press & Hold: Select

The 

TV Controller

 button is located on the bottom of the TV.

04 The Connection Panel


BACK OF TELEVISION

*  

EX-LINK

: Dedicated to service technicians.


When connecting an external device, match the color of the 
connection port to the cable.


Whenever you connect an external device to your TV, make sure 
that power on the TV and the device is turned off.

① 

USB (5V 0.5A), USB (HDD 5V 1A)


– Connector for software upgrades and Media Play, etc.


– Service connection.

② 

HP-ID

Connect the cable to HP-ID and Headphone Jack simultaneously 
and connect it to separated Headphone Box. See page 12. When 
connecting Headphone to Headphone Box, it works same as 
Headphone function.

③ 

HEADPHONE JACK

Headphones may be connected to the headphone jack on your TV. 
While the headphones are connected, the sound from the built-in 
speakers is disabled.

④ 

HDMI IN 1, 2, 3 (eARC )

Connects to the HDMI jack of a device with an HDMI output.


– No separate sound connection is needed for an HDMI to HDMI 

connection. HDMI connections carry both audio and video.


– It is recommended that the external device of the HDMI 

1.3 or 1.4 version will be used with this TV. If you meet the 

compatible problem like no sound or the abnormal screen 
or etc with the device of the HDMI 1.2 version, contact to the 
Samsung customer care center.

Содержание HG43CU700 Series

Страница 1: ...ank you for purchasing this Samsung product To receive more complete service please registeryour product at www samsung com Model Serial No HG43CU700 HG50CU700 HG55CU700 HG65CU700 HG75CU700 INSTALLGUI...

Страница 2: ...to reduce image retention and screen burn in Warning Important Safety Instructions Please read the SafetyInstructions before usingyourTV Referto the table belowforan explanation of symbolswhich maybe...

Страница 3: ...ded and unused forlong periods of time unplug it from thewall outlet and disconnect the antenna orcable system This will prevent damage to the set due to lightning and powerline surges Before plugging...

Страница 4: ...Headphone Box 12 06 Settingthe Hotel Option menu Hotel Option menu items 13 USB Cloning 17 Settings Cloned in the Hotel Option Menu 18 SettingAuto Initialize 19 Updating the TV s Software 22 07 Editin...

Страница 5: ...rmaycause difficultieswith the product orresult in injurycaused bythe product falling Securingthe TVtotheWall Caution Pulling pushing orclimbing on the TVmay cause the TVto fall In particular ensureyo...

Страница 6: ...separately TV Wall mount bracket C The Product shape maydifferdepending on the model Thewall mount kit sold separately allowsyou to mount the TVon awall Fordetailed information on installing thewall...

Страница 7: ...mponents When installing the stand use the provided components and parts Stand PowerCord 1 R 2 3 43 75 50 65 4 NOTE Make sure to distinguish between the front and back of each componentwhen assembling...

Страница 8: ...Screen Volume Move the button up ordown to adjust the volume To mute the sound press the button When pressed for2 seconds ormore the AccessibilityShortcuts appears Channel Move the button up ordown to...

Страница 9: ...mation about its usage referto the figure below The screen maydim if the protective film on the SAMSUNG logo orthe bottom of the TVis not removed Please remove the protective film Control menu PowerOn...

Страница 10: ...using awireless access point or modem Wireless IPaccess point or modemwith a DHCPServer LAN Cable Not Supplied The LAN Port on theWall This TVsupports the IEEE 802 11 a b g n ac communication protoco...

Страница 11: ...1 IR 2 GND 3 TX 4 NC 5 RX 6 CLK RED GREEN WHITE BLACK YELLOW STB SBB SIDE MTI RX and TX notation is based on TV Operation Specification of Data Cable RJ12 RS232 Network SecurityProtocols The TVonlysup...

Страница 12: ...menu appears followthese general directions to navigate and changevalues Use the directional buttons on the remote control to move from menu item to menu item Press the Select button on the remote co...

Страница 13: ...nput source to be displayedwhen the TVis turned on Hotel Option menu Item Description PowerOn Option Determines the TV s statewhen powerreturns aftera powerfailure orafteryou have unplugged the TVand...

Страница 14: ...n Lock Turning the TVControllerbutton operations on oroff Unlock Unlocks TVControllerbutton Lock Locks TVControllerbutton OnlyPower Locks TVControllerbutton except the poweroff function Clock Local Ti...

Страница 15: ...HDMI Enable ordisable HDMI access If this function is set to Disable Anynet HDMI source HDMI type external channelswill not be accessible to the user Hotel Option menu Item Description Smart Service...

Страница 16: ...FF Turns off DRM support LYNKDRM Select to turn on LYNKCAS support only Pro idiom Selectwhen there are any Pro Idiom channels LYNKDRM PI Selectwhen there are LYNK DRM and Pro Idiom channels at the sam...

Страница 17: ...menu settings and channel data in a USB deviceto a TV Shortcut Turn the TVoff insert the USB device turn the TVon and then press the Select button on the remote control for5 seconds To clone data to t...

Страница 18: ...tton Lock Unlock Lock OnlyPower Yes Clock Local Time Standalone Mode Manual Time Channel Interactive Mode Manual Auto Time Channel Yes Time Channel Type DTV CDTV Yes Time Channel Num Yes Menu Item Sub...

Страница 19: ...have not been cloned are ignored The table belowlists the settings that are restored to theircloned valueswhenyou set the SettingAuto Initialize function to on The menu items maynot be supported depen...

Страница 20: ...adcasting Auto Program Antenna Audio Options Preferred Language Multi Track Sound Menu Item Expert Settings White Balance 2 Point R Gain G Gain B Gain R Offset G Offset B Offset Reset 20 Point Setting...

Страница 21: ...torun LastApp Autorun MultiViewMirroring Support Software Update Update now Device Care Remote Management About This TV Menu Item General Privacy Accessibility Voice Guide Settings Voice Guide Volume...

Страница 22: ...rade Please check the SWversion afterthe upgrades are complete 07 Editing Channels Using Channel Editor O O Hotel Option menu Channel Channel Editor Using Channel Editoryou can edit the channels store...

Страница 23: ...el Edit screen 2 Use the directional buttons on the remote control move the focus to Edit Channel Number and press the Select button 3 Use the up ordown directional buttons on the remote control to ch...

Страница 24: ...bs 30 8 kg Environmental Considerations Operating Temperature Storage Temperature Operating Humidity Storage Humidity 50 F to104 F 10 C to 40 C 4 F to113 F 20 C to 45 C 10 to 80 non condensing 5 to 95...

Страница 25: ...5 000 1024 x 768 75 Hz 60 023 75 029 78 750 1152 x 864 75 Hz 67 500 75 000 108 000 1280 x 720 60 Hz 45 000 60 000 74 250 1280 x 800 60 Hz 49 702 59 810 83 500 1280 x1024 60 Hz 63 981 60 020 108 000 12...

Страница 26: ...100 000 297 000 1920 x1080 120 Hz 135 000 120 003 297 000 1920 x1080 60 Hz 67 500 60 000 148 500 3840 x 2160 24 Hz 54 000 24 000 297 000 3840 x 2160 25 Hz 56 250 25 000 297 000 3840 x 2160 30 Hz 67 5...

Страница 27: ...imple message certain functions such as the font size and colorselection maynot be available There is a limit to the numberof bookmarks and the size of the log file that can be saved The numberofwindo...

Страница 28: ...HIS PRODUCTMAY NOTBE USED IN CONNECTIONWITH HEVC ENCODED CONTENTCREATED BYATHIRD PARTY WHICH THE USER HAS ORDERED OR PURCHASED FROMATHIRD PARTY UNLESS THE USER IS SEPARATELY GRANTED RIGHTS TO USE THE...

Страница 29: ...lection and duration of television formats used for viewing Uneven LED aging as a result of format selection and use as well as burned in images are not covered byyourSamsung limited warranty SAMSUNG...

Страница 30: ...ents relating to Samsung products please contact the Samsung service center Samsung Hospitality Hotline 1 866 sam4biz US 1 800 749 0205 CANADA 800 1488 747 MEXICO Website https www samsung com us busi...

Отзывы: