

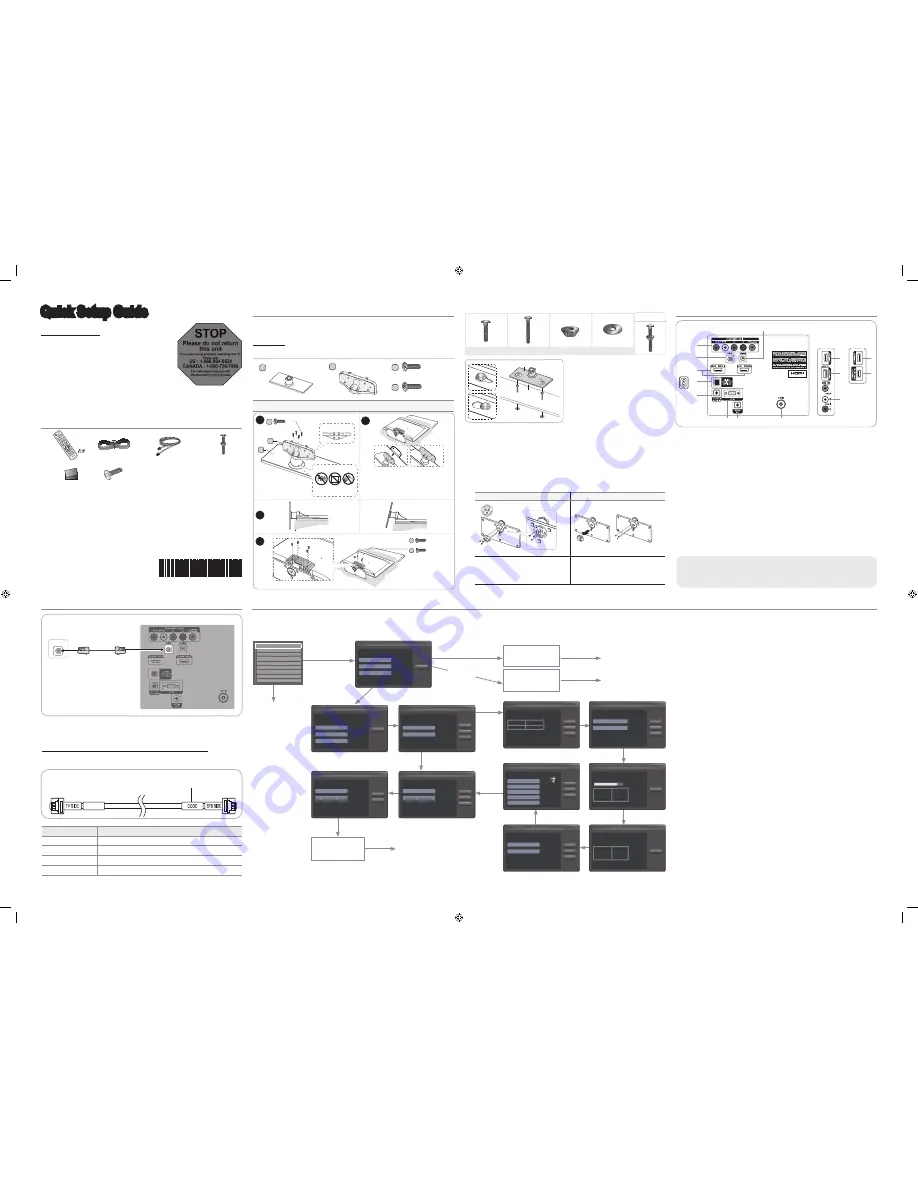
Installing the LED TV Stand
♦
HG26NA470 / HG26NA477 / HG32NA470 / HG32NA477 / HG32NA478 / HG40NA570 /
HG40NA577 / HG40NA578 / HG46NA570 / HG46NA577 / HG46NA578
Components
When installing the stand, use the provided components and parts.
A
1 EA
B
1 EA
D
x4 (M4 X L12, SECURITY)
C
x8 (M4 X L12)
y
Stand
(depending on the model)
y
Guide Stand
y
Screws
To register this product please visit
www.samsung.com/register.
Quick Setup Guide
STOP
Please do not return
this unit
If you are having problems operating this TV,
Please call;
US : 1-866-894-0524
CANADA : 1-800-726-7864
For web support please visit
http://www.samsung.com/us/business
BN68-04292A
BN68-04292A-00
Viewing the Connection Panel
➣
The product color and shape may vary depending on the model.
1
COMPONENT IN / AV IN1 (46” Model: COMPONENT IN / AV IN)
2
DATA
3
HDMI IN 1 (DVI), 2, 3 / PC/DVI AUDIO IN
4
DIGITAL AUDIO OUT (OPTICAL)
5
PC / DVI AUDIO IN
6
PC IN
7
AUDIO OUT
8
ANT IN
9
EX-LINK
0
USB / CLONING
!
VIDEO / R-AUDIO-L
Connecting the TV with an SBB or STB
1.
Connect the [DATA] jack of the TV to the [ETH MODEM] jack of the STB (SBB) with
the Data cable.
➣
Use data communication.
List of Vendors and Compatible Data Cables Supplied with the TV
♦
Refer to the code label on the data cables.
Vendor
Cable code
OCC
BN39-00865B
NXTV
BN39-01011B
nStreams
BN39-01110A
MTI
BN39-01011C
[TV Rear Panel]
Confirm the code on the
Code Label
Note the
labeled end.
Note the
labeled end.
1
B
A
C
(M4 X L12)
x4
Top View
DO NOT USE
CHEMICALS
DO NOT USE
GREASE
DO NOT USE
OIL
ATTENTION
Rear
Front
✎
Place a soft cloth over the table to
protect the TV, and then place the TV
on the cloth screen side down.
✎
Insert the Stand Guide into the slot on
the bottom of the TV.
2
(Incorrect assembly)
(Correct assembly)
Side View
33
D
(M4 X L12, SECURITY)
x4
C
(M4 X L12)
x4
4
♦
Hotel Mount Kit
♦
Assembling the swivel
The 32” and larger LED TVs have swivel stands. You can set these stands so
that the TVs swivel 20 degrees left and right, 60 degrees left and right, or 90
degrees left and right. The 26” LED TVs do not have swivel stands.
60"
90"
Leaving the BRACKET HOLDER SWIVEL
unchanged lets the TV swivel 20° left and right.
Rotating the BRACKET HOLDER SWIVEL 180°,
and then assembling the stand as shown above
lets the TV swivel 60° left and right.
Removing the BRACKET HOLDER SWIVEL and
assembling the stand as shown above without the
BRACKET HOLDER SWIVEL lets the TV swivel
90° left and right.
Top
Bottom
Affixing the stand to a flat surface
such as a dresser top, desk top, or
entertainment center.
✎
Make sure to distinguish between the front and back of Stand and
Stand Guide when assembling them.
✎
Make sure that at least two people lift and move the LED TV.
✎
Lay the product down, with the screen facing down, and then fasten the screws.
2
3
1
4
5
7
8
6
9
3
0
!
3
0
[TV Rear Panel]
Power
Input
[46” Model]
ETH MODEM
Data Cable
Hotel Plug & Play
Hotel Plug & Play function automatically performs the Hotel mode selection, Country Setup, Clock Setup, and Picture mode Setup runs once,
when power is first turned ON. Setup also runs automatically after you have executed a Service Reset.
♦
UI Scenario
♦
Hotel Plug & Play OSD
-
Initial Highlight: Interactive
-
If you select the Standalone Only button, the Standalone hotel mode is set by default
and the “Standalone mode is set” OSD appears for 3 seconds.
-
TV enters into RF mode automatically after displaying “Standalone mode is set” OSD for
3 seconds.
-
If you select the Interactive mode, the Interactive Setup Menu is displayed. Press the
power off key to exit from the Interactive menu.
-
If you select the Standalone Plug & Play mode, the “Select Menu Language” OSD
appears.
♦
Select Menu Language OSD
-
If you select Standalone from the “Select Hotel TV Mode” OSD, the “Select Menu
Language” OSD appears.
-
Initial Highlight : English
-
Display time: OSD timeout and operation are the same as Samsung’s consumer TV
models.
-
If you press the Enter key, the “Select Country” OSD appears.
♦
Clock Mode OSD
-
Initial Highlight: Auto.
-
Display time: 30 seconds.
-
The Clock Set item OSD appears if you select Manual.
-
If you press the Enter key after setting the clock, or while in Auto clock set, the Picture
Mode OSD appears.
♦
Set daylight saving time OSD
-
Initial Highlight: Off
-
If you press the Enter key, the Select the DST area OSD appears.
♦
Picture Mode OSD
-
Initial Highlight: Dynamic.
-
The TV displays the Picture Mode OSD where you can choose the Dynamic or a
Standard Picture mode.
-
After you select the picture mode, the TV displays the Standalone Setup Menu OSD.
Press power off to exit.
♦
Auto Search Mode OSD
-
If you select the Skip option, the TV displays the Clock Mode OSD.
-
If you press the Enter key, the TV auto searches for channels.
-
The OSD Display time, which starts at the time that Auto Store is completed goes to the
time Auto Sort starts, is 30 seconds.
When in the Hotel mode (Interactive or Standalone), the Channel menu items in
the Menu OSD, except for Channel List, are deactivated. If you need to change the
channel line up, use the Channel Setup item in the Hotel option menu.
Hotel Plug & Play is not supported in B-LAN models (HG478/578).
Notice
If you select the
Factory Reset, the
TV resets all values
to their factory
defaults and then
displays the Hotel
Plug & Play menu.
Go to the first Hotel
Plug & Play screen
above right labeled
Setup>Plug & Play.
Standalone Hotel
Option Menu
If you select Standalone
Plug & Play
Press Power
OFF to exit.
E
E
E
E
E
E
E
E
Easy Set up
Setup > Plug & Play
• Interactive
• Standalone Plug & Play
• Standalone Only
Next
Select the language you want to use
Setup > Menu Language
Next
Select English
as the language
• English
• Español
• Français
Fastory Reset
Type
32P6AF0D
Local Set
US
Basic Model
HA477
SVC Model
477
Tuner
SI_ATC2
Light Effect
OFF
Ch Table
NONE
Front Color
NONE
Let's find and store channels on
your TV. How do you receive
programming?
Setup > Auto Program (1/5)
Next
Skip
Previous
Select antenna
cable means all
the channels
available
through your
RF cable (air)
will be stored.
(Auto Program
necessary)
• I use an antenna cable..
• I use a set-top box.
Setup > Auto Program (2/5)
Next
Skip
Previous
Set the search options for auto tuning.
Air
c
Cable
Set the parameters for cable auto
program.
Select the digital
cable system
Setup > Auto Program (3/5)
Next
Skip
Previous
• Digital Cable System
STD
• Analog Cable System
STD
Auto Program is finding channels
for you ...
Cable 64
Setup > Auto Program (4/5)
Stop
DTV Air
Air
DTV Cable
Cable
0
0
0
0
Auto Program is complete
110 channels are memorized.
Setup > Auto Program (5/5)
OK
DTV Air
Air
DTV Cable
Cable
40
30
20
10
Set the Clock Mode.
Setup > Clock (1/3)
Next
Skip
Previous
Set the
current time
automatically
using the time
from the digital
broadcast.
• Auto
• Manual
What time zone are you in?
Setup > Clock (2/3)
Next
Skip
Previous
Select Eastern if
you are located in
that region.
• Newfoundland
• Atlantic
• Eastern
• Central
• Mountain
Add Daylight Savings Time?
Setup > Clock (3/3)
Next
Skip
Previous
Switch are DST
function off.
• Off
• On
Select Picture Mode.
Setup > Picture Mode
Next
Previous
• Off
• On
If you select
"I use an
antenna
cable..."
If you select "I use a
set-top box."
Standalone mode is set.
TV will enter the RF
mode.
After 3
seconds
Interactive
Hospital Option Menu
Press Power OFF
to exit.
If you select
Interactive
If you select
Standalone Only
Long Bolt (2EA)
Short Bolt (2EA)
Nut (2EA)
Washer (2EA)
Bolt + Nut
List of Parts
1
Remote Control (AA59-00628A) &
Batteries (AAA x 2)
2
Power Cord
3
Data Cable
(BN39-00865B, BN39-01011C : except
478/578 model)
4
Hotel Mount Kit
5
• Owner’s Instructions
• Safety Guide
6
Security Screw x 4
Bit tool (sold separately)
1
5
6
2
3
4
[HG470570-QSG]BN68-04292A-ENG.indd 1
2012-04-17 �� 8:34:20