background image

ENG-21

Connections

C

O N N E C T I O N S

Note

- Please turn the volume down when you turn on the Amplifier. 

Sudden loud sound may cause damage to the speakers and your ears.

- Please set the audio in the menu screen according to the Amplifier. (See pages 60 to 61)

- The position of terminals may vary depending on the Amplifier. 

Please refer to the user's manual of the Amplifier.

- Please remove the dust cover before using the optical cable (not included) and put the cover on the cable

again when it's not used.

- DVD-AUDIO only plays back two channel audio through the Digital Audio out. 

Multi-channel DVD-Audio discs are output through the Analog outputs.

- SACD plays back only through the Analog outputs. (See pages 60 to 61)

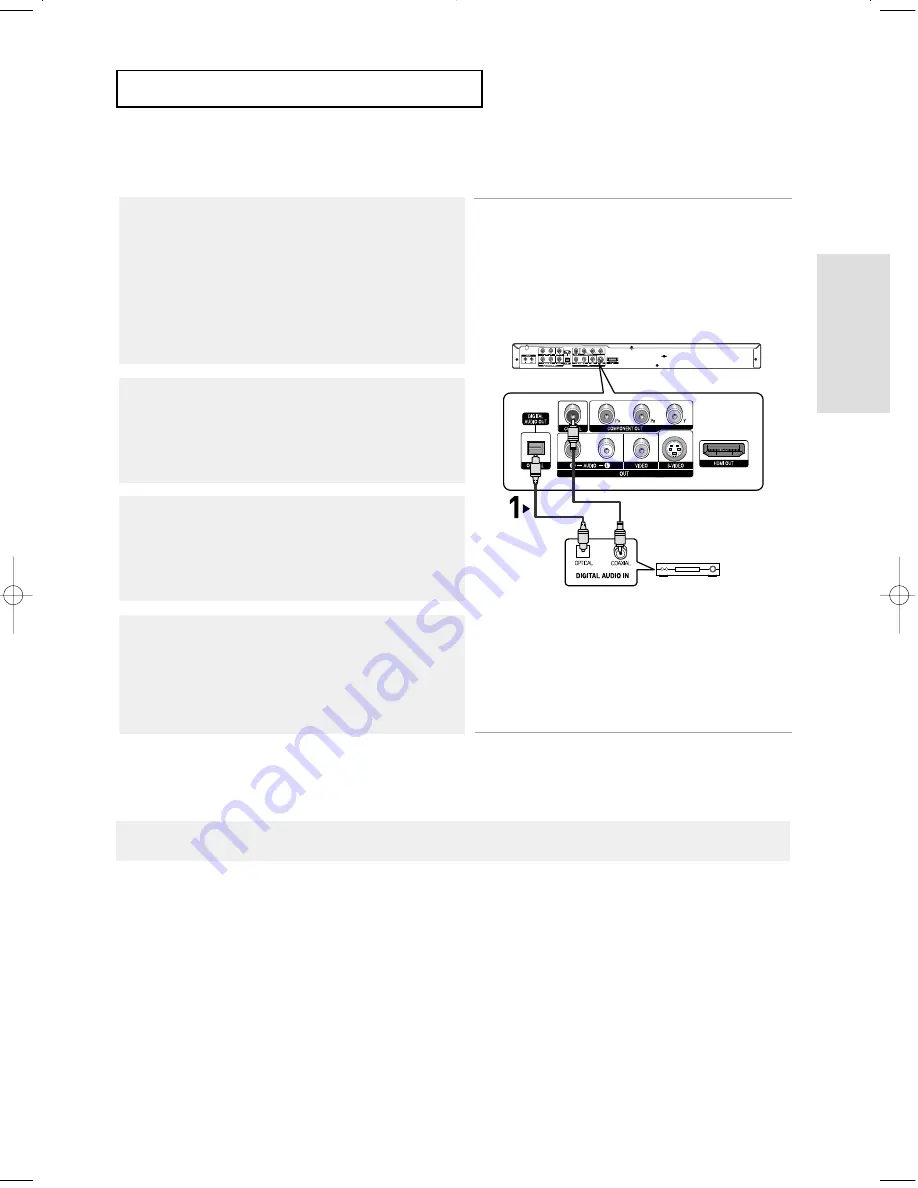
Connection to an Audio System (Dolby digital or DTS Amplifier)

1

If using an optical cable (not included), connect the DIGITAL
AUDIO OUT (OPTICAL) 
terminal on the rear of the DVD player
to the DIGITAL AUDIO IN (OPTICAL) terminal of the Amplifier.
If using a coaxial cable (not included), connect the DIGITAL
AUDIO OUT (COAXIAL) 
terminal on the rear of the DVD player
to the DIGITAL AUDIO IN (COAXIAL) terminal of the Amplifier.

2

Using the video signal cable(s), connect the VIDEO, S-VIDEO,
COMPONENT or HDMI OUT terminals on the rear of the DVD
player to the VIDEO, S-VIDEOCOMPONENTHDMI or DVI IN
terminals of your TV as described on pages 13 to 17.

3

Turn on the DVD player, TV, and Amplifier.

4

Press the input select button of the Amplifier to select external
input 
in order to hear sound from the DVD player.
Refer to your Amplifier's user manual to set the Amplifier's
audio input.

Optical Cable 
(not included)

Coaxial Cable 
(not included)

or

Dolby digital or

DTS amp

00627B-HD950-XAA-1  5/6/05  3:21 PM  Page 21

Содержание HD950

Страница 1: ...DVD Player DVD HD950 ...

Страница 2: ... the provided plug does not fit into your outlet consult an electrician for replacement of the obsolete outlet 10 Protect the power cord from being walked on or pinched particularly at plugs convenience receptacles and the point where they exit from the apparatus 11 Only use attachments accessories specified by the manufacturer 12 Use only with cart stand tripod bracket or table specified by the m...
Страница 3: ...t electromagnetic interference with electric appliances such as radios and televisions use shielded cables and connectors for connections FCC NOTE for U S A This equipment has been tested and found to comply with the limits for a Class B digital device pursuant to Part 15 of the FCC rules These limits are designed to provide reasonable protection against harmful interference in a residential insta...

Страница 4: ...duct unit to encode and or decode audio files conforming to the ISO IEC 11172 3 or ISO IEC 13818 3 No rights are granted under this license for product features or functions that do not conform to the ISO IEC 11172 3 or ISO IEC 13818 3 Handling Cautions Before connecting other components to this player be sure to turn them all off Do not move the player while a disc is being played or the disc may...

Страница 5: ...sn t operate properly Check the polarity of the batteries Dry Cell Check if the batteries are drained Check if remote control sensor is blocked by obstacles Check if there is any fluorescent lighting nearby Before you start Accessories Remote Control AK59 00025G Batteries for Remote Control AAA Size AC43 12002H User s Manual AK68 00627B Video Audio Cable AC39 42001R HDMI Cable MF39 00299A HDMI DVI...

Страница 6: ...g the Aspect Ratio EZ View 33 Selecting the Audio Language 35 Selecting the Subtitle Language 36 Changing the Camera Angle 37 Using the Instant Replay Skip Function 37 Using the Bookmark Function 38 Using the Zoom Function 40 DVD AUDIO Playback 41 Super Audio CD Playback 44 Clips Menu for MP3 WMA JPEG 47 Folder Selection 47 MP3 WMA Playback 48 Picture CD Playback 50 Picture CD Playback for HD JPEG...

Страница 7: ...ghest possible audio fidelity capable on DVD HDMI High Definition Multimedia Interface HDMI reduces picture noise by allowing a pure digital video audio signal path from the player to your TV Note Discs which cannot be played with this player DVD ROM DVD RAM CD ROM CDV CDI CVD CDGs play audio only not graphics Ability to play back may depend on recording conditions DVD R R CD RW DVD RW RW V mode T...

Страница 8: ...cause damage to the DVD player 5 31 2 Single sided 240 min Double sided 480 min Single sided 80 min Double sided 160 min Audio Video DVD contains excellent sound and video due to Dolby Digital and MPEG 2 system Various screen and audio functions can be easily selected through the on screen menu Disc Types Logos Recording Types Disc Size Max Playing Time Characteristics DVD VIDEO 5 31 2 74 min 20 m...

Страница 9: ...e disc here 3 OPEN CLOSE Press to open and close the disc tray 4 DISPLAY Operation indicators are displayed here 5 EZ VIEW The aspect ratio of a picture can easily be adjusted to your TV s screen size 16 9 or 4 3 6 STOP Stops disc play 7 REMOTE CONTROL RECEIVER 8 SKIP SEARCH Use to forward skip a scene or music 9 SKIP SEARCH Use to reverse skip a scene or music 10 PLAY PAUSE Begin or pause disc pl...

Страница 10: ...mber 10 DVD Audio Index number 11 Disc type indicators SVCD Super VCD VCD CD 12 MPEG Audio output 13 CVD Chinese VCD Disc indicator 14 MP3 Audio output 15 Linear PCM audio output 16 Lights when the device connected to the HDMI Jack is a DVI device 17 Lights when the device connected to the HDMI Jack is a HDMI device 18 Displays various messages concerning operations such as PLAY STOP LOAD no DISC ...

Страница 11: ...n HDMI compatible TV HDMI will be output automatically a maximum of 10 seconds later If you want to use a Video S Video or Component Output unplug HDMI cable 8 COMPONENT VIDEO OUT JACKS Use these jacks if you have a TV with Component Video in jacks These jacks provide PR PB and Y video If HDMI COMPONENT P SCAN Video Output is selected in Setup Menu progressive scan mode will work If COMPONENT I SC...

Страница 12: ...r status displays from the screen 20 INSTANT SKIP Button This function skips playback ahead 10 seconds 21 INSTANT REPLAY Button This function is used to replay the previous 10 seconds of a movie from the current position 22 CH Buttons Channel selection 23 OPEN CLOSE Button To open and close the disc tray 24 HDMI SEL Button HDMI or DVI Output resolution setup 25 PLAY PAUSE Button Begin Pause disc p...

Страница 13: ...e input selector on your TV remote control until the Video signal from the DVD player appears on the TV screen Note Noise may be generated if the audio cable is placed too close to the power cable If you want to connect to an Amplifier please refer to the Amplifier connection page See pages 20 to 22 The number and position of terminals may vary depending on your TV set Please refer to the user s m...

Страница 14: ...fer to the user s manual of your TV 1 Using an S Video cable not included connect the S VIDEO OUT terminal on the rear of the DVD player to the S VIDEO IN terminal of your TV 2 Using the audio cables connect the AUDIO red and white OUT terminals on the rear of the DVD player to the AUDIO red and white IN terminals of your TV Turn on the DVD player and TV 3 Press the input selector on your TV remot...

Страница 15: ...depending on the manufacturer The number and location of the terminals may vary depending on the TV set Please refer to the user s manual of your TV 1 Using component video cables not included connect the COMPONENT VIDEO OUT terminals on the rear of the DVD player to the COMPONENT IN terminals of your TV 2 Using the audio cables connect the AUDIO red and white OUT terminals on the rear of the DVD ...

Страница 16: ... follow the TV User s Manual regarding Progressive Scan settings in the TV s menu system Depending on your TV the connection method may differ from the illustration above 2 Using the audio cables connect the AUDIO red and white OUT terminals on the rear of the DVD player to the AUDIO red and white IN terminals of your TV Turn on the DVD player and TV 3 Press the input selector on your TV remote co...

Страница 17: ...f the DVD player to the HDMI IN terminal of your TV 2 Press the input selector on your TV remote control until the HDMI signal from the DVD player appears on your TV screen HDMI VIDEO Specifications When you press the HDMI SEL button 480p 720p 768p and 1080i are selected in order The first press of the HDMI SEL button brings up the current resolution The second press allows you to change the HDMI ...

Страница 18: ...amsung use HDMI Analog TVs require an analog video audio signal However when playing a DVD the data transmitted to a TV is digital Therefore either a digital to analog converter in the DVD player or an analog to digital converter in the TV is required During this conversion the picture quality is degraded due to noise and signal loss HDMI technology is superior because it requires no D A conversio...

Страница 19: ...nction works only with Samsung Anynet supported models Using Anynet you can easily control this DVD Player with your Samsung TV For detailed operation steps and connections refer to the Samsung TV Anynet user s manual Please note that you need to set the Anynet on your Samsung TV to use the Anynet function Note Anynet operation is only available with Samsung TV sets that support Anynet If Componen...

Страница 20: ...t the AUDIO red and white OUT terminals on the rear of the DVD player to the AUDIO red and white IN terminals of the Amplifier 2 Using the video signal cable s connect the VIDEO S VIDEO COMPONENT or HDMI OUT terminals on the rear of the DVD player to the VIDEO S VIDEO COMPONENT HDMI or DVI IN terminal of your TV as described on pages 13 to 17 3 Turn on the DVD player TV and Amplifier 4 Press the i...

Страница 21: ... System Dolby digital or DTS Amplifier 1 If using an optical cable not included connect the DIGITAL AUDIO OUT OPTICAL terminal on the rear of the DVD player to the DIGITAL AUDIO IN OPTICAL terminal of the Amplifier If using a coaxial cable not included connect the DIGITAL AUDIO OUT COAXIAL terminal on the rear of the DVD player to the DIGITAL AUDIO IN COAXIAL terminal of the Amplifier 2 Using the ...

Страница 22: ...connect the 5 1CH ANALOG AUDIO OUT terminals on the rear of the DVD player to the 5 1CH ANALOG AUDIO IN terminals of the 5 1CH Analog Amplifier 2 Using the video signal cable s connect the VIDEO S VIDEO COMPONENT or HDMI OUT terminals on the rear of the DVD player to the VIDEO S VIDEO COMPONENT HDMI or DVI IN terminals of your TV as described on pages 13 to 17 3 Turn on the DVD player TV and Ampli...

Страница 23: ...e you select a menu language you can change it by pressing the button on the front panel of the unit for more than 5 seconds with no disc in the unit Then the SELECT MENU LANGUAGE window appears again where you can reset your preferred language Playback 1 Press the OPEN CLOSE button The STANDBY indicator light turns off and the tray opens 2 Place a disc gently into the tray with the disc s label f...

Страница 24: ...y in the forward direction 5 Removing Disc Press the OPEN CLOSE button 8 Slow Motion Play Except CD Press the SEARCH button to choose the play speed between 1 8 1 4 and 1 2 of normal during PAUSE or STEP mode Note This icon indicates the function is not available in the current mode 4 Stopping Play Press the STOP button during play Note If the player is left in the stop mode for more than one minu...

Страница 25: ...ring during search mode Except CD DVD VCD CD SACD DVD AUDIO 2X 4X 64X 128X 4X 8X 2X 4X 8X Skipping Tracks When playing a DVD if you press the SKIP button it moves to the next chapter If you press the SKIP button it moves to the beginning of the chapter One more press makes it move to the beginning of the previous chapter When playing a VCD 2 0 in Menu Off mode or a VCD 1 1 or a CD if you press the...

Страница 26: ...on on the remote control You can also select Info in the function menu by pressing the MENU button 2 Press the buttons to select the desired item DVD VCD CD When VCD2 0 is in Menu Off mode only this function works Select Menu Off by pressing the DISC MENU buton 01 02 0 00 13 ENG 5 1CH Off 01 0 00 43 01 0 00 48 ...

Страница 27: ...rting time as a reference The time search function does not operate on some discs Refers to the film s soundtrack language In the example the soundtrack is played in English 5 1CH A DVD disc can have up to eight different soundtracks Refers to the subtitle languages available in the disc You will be able to choose the subtitle languages or if you prefer turn them off from the screen A DVD disc can...

Страница 28: ...Disc Menu using the DISC MENU button on the remote control In VCD 2 0 the DISC MENU button is used to select Menu On or Menu Off mode Using the Title Menu DVD 1 During the playback of a DVD disc press the MENU button on the remote control 2 Press the buttons to select Title Menu then press the or ENTER button Note Depending on the disc the Title Menu may not be avaliable Title Menu will only be di...

Страница 29: ...es 30 to 31 EZ View See pages 33 to 34 Front Display Lights when the front display is selected ON You can also directly select these functions except Front Display using their respective buttons on the remote control Note For VCD2 0 this function is available in Menu Off mode only Select Menu Off by pressing the DISC MENU button 3 Press the buttons to select one of the six functions Then press the...

Страница 30: ...ion 1 Press the REPEAT A B button at the point where you want repeat play to start A B is automatically highlighted 2 Press the REPEAT A B button again at the point where you want repeat play to stop B To return to normal play press the CLEAR button Note A B REPEAT does not allow you to set point B until at least 5 seconds of playback time has elapsed after point A has been set 3 To return to norm...

Страница 31: ...he DISC MENU buton To set A B REPEAT set A first then set B after the following slow play time has elapsed 1 8x wait 40 seconds then press B 1 4x wait 20 seconds then press B 1 2x wait 10 seconds then press B Using the A B Repeat function 1 During slow playback press the REPEAT A B button at the point where you want repeat play to start A B is automatically highlighted 2 Press the REPEAT A B butto...

Страница 32: ...o the program Press the ENTER button The selection numbers appear in the Program Order box To return to the previous menu screen press the RETURN button To cancel the selected program order press the CLEAR button This unit can support a maximum of 20 programmed tracks Note Depending on a disc the Program and Random Play functions may not be avaliable While in playback mode press the CLEAR button o...

Страница 33: ...e picture will look vertically stretched Depending on a type of disc the black bars may not disappear completely ZOOM FIT The top bottom left and right of the screen are cut off and the central portion of the screen is enlarged For 4 3 aspect ratio discs Normal Wide Displays the content of the DVD title in 16 9 aspect ratio The picture will look horizontally stretched SCREEN FIT The top and bottom...

Страница 34: ...ll screen appears The picture will look vertically stretched ZOOM FIT The top bottom left and right of the screen are cut off and the central portion of the screen is enlarged For 4 3 aspect ratio discs Normal Screen Displays the content of the DVD title in 4 3 aspect ratio SCREEN FIT The top and bottom portions of the screen are cut off and the full screen appears The picture will look vertically...

Страница 35: ...o languages are represented by abbreviations 2 To remove the AUDIO icon press the CLEAR or RETURN button ENG DOLBYDIGITAL 5 1CH AUDIO DVD When playing a VCD or CD you can select among Stereo Right or Left AUDIO VCD CD Note This function depends on audio languages that are encoded on the disc and may not be available A DVD disc can contain up to 8 audio languages To have the same audio language com...

Страница 36: ...are represented by abbreviations 2 To remove the SUBTITLE icon press the CLEAR or RETURN button Note Depending on DVDs you can change desired subtitle in the Disc Menu Press the DISC MENU button This function depends on what subtitles are encoded on the disc and may not be avaliable on all DVDs A DVD disc can contain up to 32 subtitle languages To have the same subtitle language come up whenever y...

Страница 37: ... To remove the ANGLE icon press the CLEAR or RETURN button Note If the disc has only one angle this feature won t work Currently very few discs have this feature 4 6 ANGLE Using the Instant Replay Skip Function Using the Instant Replay function DVD If you miss a scene you can see it again using this function Press the INSTANT REPLAY button The current scene moves backward about 10 seconds and play...

Страница 38: ...the buttons to select Bookmark then press the or ENTER button 2 When you reach the scene you want to mark Press the button to move to the next Bookmark and press the ENTER button Up to three scenes may be marked at a time Note When VCD2 0 is in Menu Off mode only this function works Select Menu Off by pressing the DISC MENU buton Depending on a disc the Bookmark function may not work Press the but...

Страница 39: ...ote control 3 Press the PLAY PAUSE button to skip to the marked scene 2 Press the œ buttons to select a marked scene Clearing a Bookmark 1 During play press the BOOKMARK button on the remote control 3 Press the CLEAR button to delete a bookmark number 2 Press the œ buttons to select the bookmark number you want to delete ...

Страница 40: ... Press the or œ buttons to select the part of the screen you want to zoom in on Press the ENTER button During DVD play press ENTER to zoom in 2X 4X 2X Normal in order During VCD play press ENTER to zoom in 2X Normal in order Press the buttons to select Function then press the or ENTER button Note For VCD2 0 this function works in Menu Off mode only Select Menu Off by pressing the DISC MENU button ...

Страница 41: ...FO button on the remote control You can select Info in the function menu by pressing the MENU button 4 Press the œ buttons to make the desired setup and then press the ENTER button You may use the number buttons of the remote control to directly access a Group Track Page or to start the playback from the desired time Some DVD AUDIO discs don t down mix audio These discs always output 5 1ch analog ...

Страница 42: ...you can see this icon In this case you cannot use PAGE PRE NEXT buttons Allows playback of music from a desired time by using the number buttons Slide V zone Page Index Function 1 Use PAGE PRE NEXT buttons to Skip the Page when there is more than one in a group Some DVD AUDIO discs include a slide show In the slide show mode this function can not be used PAGE is still images You can see the still ...

Страница 43: ...eats the title that is playing Group repeats the group that is playing DVD AUDIO Off 01 01 AUDIO Format Display 1 During DVD AUDIO playback press the AUDIO button to see AUDIO Format information LPCM Linear Pulse Code Modulation Not compressed Audio data format PPCM Packet Pulse Code Modulation Lossless compressed Audio data format Note Some DVD AUDIO discs don t allow audio down mixing DVD AUDIO ...

Страница 44: ... music title If you want to use the Repeat Function press the REPEAT button to change the mode such as Off Track Disc Off Normal Playback Track Repeats the current music title Disc Repeats the music titles in the Super Audio CD Off If you want to see information about the Disc title and Artist press the INFO button If you want to convert to regular CD mode press the SACD CD button During play or s...

Страница 45: ...s off 2 During play press the INFO button on the remote control You can select Info in the function menu by pressing the MENU button 4 Press the œ buttons to make the desired setup and then press the ENTER button You may use the number buttons of the remote control to directly access a track and to start the playback from the desired time 3 Press the buttons to select the desired item SACD SACD 01...

Страница 46: ...hannel and 2 channel audio format 2CH L R MULTI F L F R R L R R C T S W CD To access the desired Track when there is more than one in the disc CD Allows playback from a desired time You must enter the starting time as a reference CD Layer Play Function 1 During Super Audio CD playback press the SACD CD button to playback the CD layer of a dual layer Super Audio CD disc Refer to the page 25 for set...

Страница 47: ...T button Off Normal Playback Track Repeats the current track Folder Repeats the current folder Random Files in the disc will be played in random order MP3 file icon WMA file icon JPEG file icon Folder icon Current Folder icon To select the Parent Folder Press the RETURN button to go to the parent folder or press the buttons to select and press ENTER to go to the parent folder To select the Peer Fo...

Страница 48: ...ton to change the playback mode There are four modes Off Track Folder and Random Off Normal Playback Track Repeats the current song file Folder Repeats the song files which have the same extension in the current folder Random Song files which have the same extension will be played in random order To resume normal play press the CLEAR button 0 0 0 0 2 3 B e c a u s e Yo u B e c a u s e Yo u C a c t...

Страница 49: ...uality Conversely files with decompression rates below 128 Kbps will not be played properly Use a decompression transfer rate of at least 64Kbps when recording WMA files Sound quality with WMA files basically depends on the rate of compression you choose Getting CD audio sound requires an analog digital sampling rate of 64Kbps and up to 192Kbps Conversely files with decompression rates below 64Kbp...

Страница 50: ...re rotates 90 degrees clockwise Zoom Press the or œ buttons to select the part of the screen you want to zoom in on Press the ENTER button Each time the ENTER button is pressed the picture is enlarged up to 4X 2X 4X 2X Normal Slide Show The unit enters slide show mode Before beginning the Slide Show the picture interval must be set Press the œ buttons to select a desired icon then press the ENTER ...

Страница 51: ...file size the amount of time between each picture may be different from the set interval time Album Screen Zoom and Info functions are not available when displaying images in HD JPEG mode OSD On Screen Display messages are not displayed when displaying images in HD JPEG mode The image may be displayed at a smaller size depending on the picture size when displaying images in HD JPEG mode Note Only ...

Страница 52: ...disc the disc can be played only up to the blank segment A maximum of 3000 images can be stored on a single CD Kodak Picture CDs are recommended When playing a Kodak Picture CD only the JPEG files in the pictures folder can be played Kodak Picture CD The JPEG files in the pictures folder can be played automatically Konica Picture CD If you want to see the Picture select the JPEG files in the clips...

Страница 53: ...vent children from viewing unsuitable movies such as those with violence adult subject matter etc ˆ EZ Setup Using the EZ Setup you can setup PLAYER MENU LANGUAGE TV Aspect and PCM Down Sampling in a single menu to suit your preference 1 With the unit in Stop mode press the MENU button on the remote control Press the buttons to select Setup then press the or ENTER button 2 Press the buttons to acc...

Страница 54: ... Yes then press the ENTER button 5 Press the buttons to select the desired player menu language then press the ENTER button EZ SETUP Setup Language Setup Audio Setup Display Setup Parental Setup EZ Setup Setup EZ Setup start Yes No Current Settings Player Menu Language English TV Aspect Wide PCM Down Sampling On EZ SETUP Player Menu Language English Français Deutsch Español Italiano Nederlands 6 P...

Страница 55: ...inished setting the speaker press the œ buttons to select END then press the ENTER button You can also use the RETURN button to exit 8 1 If an AV Receiver is not connected to the TV press the buttons to select Not connected then press the ENTER button Press the ENTER to finish EZ SETUP PCM Down Sampling Off On EZ SETUP EZ SETUP AV Receiver Connected Connected Not Connected EZ SETUP L SL R SR C LFE...

Страница 56: ...the or ENTER button 4 Press the buttons to select Player Menu then press the or ENTER button 5 Press the buttons to select the desired language then press the or ENTER button The language is selected and the screen returns to Language Setup menu To exit the setup menu press the MENU button Player Menu English Disc Menu English Audio English Subtitle Automatic LANGUAGE SETUP Player Menu English Fra...

Страница 57: ...e is selected The language is selected and the screen returns to Language Setup menu To exit the setup menu press the MENU button 1 With the unit in Stop mode press the MENU button 2 Press the buttons to select Setup then press the or ENTER button 3 Press the buttons to select Language Setup then press the or ENTER button Player Menu English Disc Menu English Audio English Subtitle Automatic LANGU...

Страница 58: ...anguage is selected The language is selected and the screen returns to Language Setup menu To exit the setup menu press the MENU button 1 With the unit in Stop mode press the MENU button 2 Press the buttons to select Setup then press the or ENTER button 3 Press the buttons to select Language Setup then press the or ENTER button Player Menu English Disc Menu English Audio English Subtitle Automatic...

Страница 59: ...case the disc will use its original language setting The language is selected and the screen returns to setup menu To exit the setup menu press the MENU button 1 With the unit in Stop mode press the MENU button 2 Press the buttons to select Setup then press the or ENTER button 3 Press the buttons to select Language Setup then press the or ENTER button Player Menu English Disc Menu English Audio En...

Страница 60: ...ns to select the desired item then press the or ENTER button 1 With the unit in Stop mode press the MENU button 2 Press the buttons to select Setup then press the or ENTER button To exit the setup menu press the MENU button Setup Language Setup Audio Setup Display Setup Parental Setup EZ Setup Setup Language Setup Audio Setup Display Setup Parental Setup EZ Setup Dolby DTS Digital Out PCM Dynamic ...

Страница 61: ...t Digital Audio to PCM If your TV is not compatible with LPCM sampling rates over 48kHz you should set PCM Down sampling to On SACD audio is only available through the analog outputs It is not possible to output SACD audio via the HDMI output or Digital Audio Output Œ Dolby DTS Digital Out PCM Converts to PCM 2CH audio Bitstream Outputs Dolby Digital or DTS Bitstream via digital output Select Bits...

Страница 62: ... Setup then press the or ENTER button To exit the setup menu press the MENU button Setup Language Setup Audio Setup Display Setup Parental Setup EZ Setup Setup Language Setup Audio Setup Display Setup Parental Setup EZ Setup AUDIO SETUP 5 Press the œ buttons to select the desired item then press the ENTER button to set the size L SL R SR C LFE SPEAKER SETUP Small Small User Test Small Small Small ...

Страница 63: ...ˇ Surround SL SR None If you do not connect a center speaker select this Large Rear Side Outputs the bass frequencies of the rear speaker Small Rear Side When the sound distorts or the surround sound effects are difficult to hear select either of these according to the rear speaker s position This activates the Dolby Digital bass redirection circuitry and outputs the bass frequencies of the rear s...

Страница 64: ...then press the or ENTER button 1 With the unit in Stop mode press the MENU button 2 Press the buttons to select Setup then press the or ENTER button To exit the setup menu press the MENU button TV Aspect Wide Still Mode Auto Screen Messages On Video Output COMPOSIT S VID HDMI 480p Picture Quality DISPLAY SETUP Setup Language Setup Audio Setup Display Setup Parental Setup EZ Setup Setup Language Se...

Страница 65: ...eature when the screen shakes in the Auto mode Frame Select this feature when you want to see small letters more clearly in the Auto mode ˇ Screen Messages Use to turn on screen messages On or Off Video Output Select Video Output COMPOSITE S VIDEO Select when you want to use Video and S Video Out COMPONENT I SCAN Select when you want to use Video and Component 525i Interlace Out HDMI COMPONENT P S...

Страница 66: ...igh Definition image source Available when resolution is 720p 768p 1080i in HDMI enabled SD Standard Definition image source DVI Output You can use this function to set HDMI to DVI output format When HDMI to DVI cable is plugged in TV you can select either Mode A or Mode B to set up the DVI output This function corrects a TV screen when it is not centered to secure a normal view If HDMI to DVI Out...

Страница 67: ...Yes if you want to use a password The Enter Password screen appears 5 Enter your password The Re enter Password screen appears to confirm the password Enter your password again The player is locked 1 With the unit in Stop mode press the MENU button 2 Press the buttons to select Setup then press the or ENTER button Use Password No PARENTAL SETUP CREATE PASSWORD Enter Password CREATE PASSWORD Re ent...

Страница 68: ... Press the buttons to select the Rating Level you want then press the or ENTER button e g Setting up in Level 6 1 With the unit in Stop mode press the MENU button 2 Press the buttons to select Setup then press the or ENTER button Use Password Yes Rating Level 8 Change Password PARENTAL SETUP RATING LEVEL PASSWORD CHECK Enter Password Level 8 Adult Level 7 Level 6 Level 5 Level 4 Level 3 Level 2 Le...

Страница 69: ...in 1 With the unit in Stop mode press the MENU button 2 Press the buttons to select Setup then press the or ENTER button CHANGE PASSWORD Enter New Password CHANGE PASSWORD Re enter Password Use Password Yes Rating Level 8 Change Password PARENTAL SETUP Note If you have forgotten your password see Forgot Password in the Troubleshooting Guide To exit the setup menu press the MENU button Setup Langua...

Страница 70: ...1 BRAND CODE ANAM 10 11 12 13 14 15 16 17 18 AIWA 82 BANG OLUFSEN 57 BLAUPUNKT 71 BRANDT 73 BRIONVEGA 57 CGE 52 CONTINENTALEDISON 75 DAEWOO 19 20 23 24 25 26 27 28 29 30 31 32 33 34 EMERSON 64 FERGUSON 73 FINLUX 06 49 57 FORMENTI 57 FUJITSU 84 GRADIENTE 70 GRUNDIG 49 52 71 HITACHI 60 72 73 75 IMPERIAL 52 JVC 61 79 LG 06 19 20 21 22 78 LOEWE 06 69 LOEWE OPTA 06 57 MAGNAVOX 40 METZ 57 MITSUBISHI 06 ...

Страница 71: ...SETUP Menu is the Audio Output set to Bitstream The features or action cannot be completed at this time because 1 The DVD s software restricts it 2 The DVD s software doesn t support the feature e g angles 3 The feature is not available at the moment 4 You ve requested a title or chapter number or search time that is out of range Check if the disc has a Menu Some of the functions selected in the S...

Страница 72: ...720p 768p 1080i DVD player If snow noise appears on the screen it means that TV does not support HDCP High bandwidth Digital Content Protection Check your TV system setup correctly The screen Jitter phenomenon may occur when frame rate is converted from 50Hz to 60Hz for 720P 1080i HDMI High Definition Multimedia Interface Output Please refer to the user s manual of your TV Action Problem Page P17 ...

Страница 73: ...Sided Single Layer Disc 135 min Reading Speed 4 8 5 6 m sec Maximum Play Time 74 min Reading Speed 4 8 5 6 m sec Maximum Play Time 20 min Reading Speed 4 8 5 6 m sec Maximum Play Time 74 min Video Audio 1 channel 1 0 Vp p 75 Ω load Y 1 0 Vp p 75 Ω load Pr 0 70 Vp p 75 Ω load Pb 0 70 Vp p 75 Ω load Luminance Signal 1 0 Vp p 75 Ω load Chrominance Signal 0 3 Vp p 75 Ω load 480p 720p 768p 1080i L 1 L ...

Страница 74: ...ice the purchaser must contact SAMSUNG for problem determination and service procedures SAMSUNG DOES NOT WARRANT UNINTERRUPTED OR ERROR FREE OPERATION OF THE PRODUCT All replaced parts and products become the property of SAMSUNG and must be returned to SAMSUNG Replacement parts and products assume the remaining original warranty or ninety 90 days whichever is longer This limited warranty covers ma...

Страница 75: ... 00 ELECTRONICS HEADQUARTERS 105 Challenger Road Ridgefield Park NJ 07660 0511 TEL 1 800 SAMSUNG SERVICE DIVISION 400 Valley Road Suite 201 Mount Arlington NJ 07856 1 800 SAMSUNG 1 800 726 7864 www samsung com US ...

Отзывы: