background image

FRA - 13

05  CONNEXION À UN APPAREIL EXTERNE

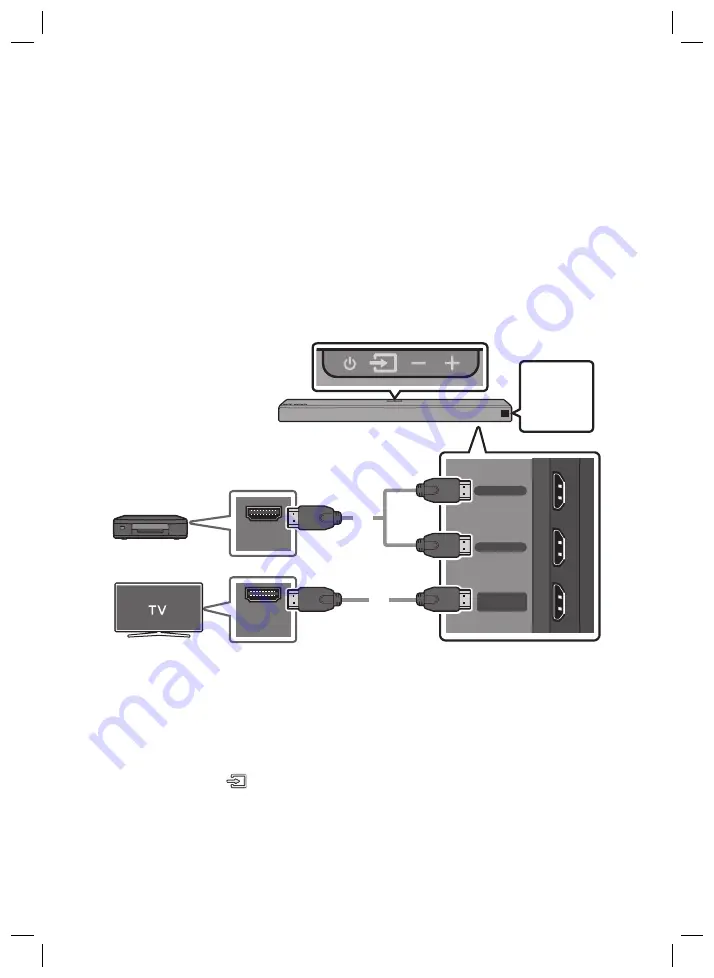
Raccordez un appareil externe via un réseau câblé ou sans fil pour écouter le son de l’appareil externe 

via la Soundbar.

Connexion à l’aide d’un câble HDMI (compatible Dolby Atmos®) 


Qu’est-ce que Dolby Atmos® ?

 La technologie Atmos améliore les systèmes audio surround 

7.1 existant en ajoutant une enceinte au plafond. L’auditeur est ainsi entouré de son sur 360 degrés, 
ce qui lui offre une expérience immersive, haute définition, riche, complète et plus profonde.


Important

 : Ce produit prend en charge Dolby Atmos® uniquement en mode HDMI.

DIGITAL AUDIO IN

(OPTICAL)

HDMI IN 1

HDMI IN 2

HDMI OUT

(TV-ARC)

HDMI OUT

HDMI IN

(ARC)

Haut de la Soundbar

OU

Câble HDMI 

Câble HDMI 

Appareil externe

HDMI 1 

OU

HDMI 2

Partie inférieure de la Soundbar

1. 

Branchez un câble HDMI de la prise jack 

HDMI IN 1

 ou 

HDMI IN 2

 située au bas de la Soundbar à la 

prise jack HDMI OUT de votre appareil numérique.

2. 

Raccordez un câble HDMI de la prise 

HDMI OUT (TV-ARC)

 au bas de la Soundbar à la prise HDMI IN 

de votre téléviseur.

3. 

Appuyez sur la touche 


(Source)

 sur le panneau supérieur ou sur la télécommande, puis 

sélectionnez «

HDMI 1

» ou «

HDMI 2

».

4. 

Le mode «

HDMI 1

» ou «

HDMI 2

» s’affiche sur le panneau d’affichage de la Soundbar et vous pouvez 

entendre le son.

Содержание Harman/Kardon HW-N850

Страница 1: ...HW N850 USER MANUAL...

Страница 2: ...tes that the rated voltage marked with the symbol is DC voltage Caution Consult instructions for use This symbol instructs the user to consult the user manual for further safety related information WA...

Страница 3: ...unit malfunctions Your product is not intended for industrial use It is for personal use only Condensation may occur if your product has been stored in cold temperatures If transporting the unit durin...

Страница 4: ...Automatic connection between the Subwoofer and the Soundbar 5 Manually connecting the Subwoofer if automatic connection fails 6 04 ConnectingtoaTV 7 Method 1 Connecting with a Cable 7 Connecting a TV...

Страница 5: ...to Use the Remote Control 18 Adjusting the Soundbar volume with a TV remote control 21 08 InstallingtheWallMount 22 Installation Precautions 22 Wallmount Components 22 09 SoftwareUpdate 24 10 Trouble...

Страница 6: ...Label Bottom of the Soundbar Main Unit The power components are labelled 1 2 For more information about power connections see page 4 For Soundbar wall mounting components see page 22 To purchase addi...

Страница 7: ...R REAR POWER SERVICE NETWORK ID SET WOOFER REAR DIGITAL AUDIO IN OPTICAL HDMI IN 1 HDMI IN 2 HDMI OUT TV ARC POWER DIGITAL AUDIO IN OPTICAL HDMI IN 1 HDMI IN 2 HDMI OUT TV ARC SERVICE NETWORK ID SET W...

Страница 8: ...formation about the required electrical power and power consumption refer to the label attached to the product Label Bottom of the Soundbar Main Unit POWER RearofSubwoofer 1 PowerCord Connecting Elect...

Страница 9: ...rLightsontheRearofSubwoofer LED Status Description Resolution Blue On Successfully connected normal operation Blinking Standby with the Soundbar main unit turned off Check the power supply to the Soun...

Страница 10: ...d the blue indicator blinks RearofSubwoofer 5 Sec BlueLEDBlinkingFast 2 Press and hold the Upbutton on the remote control for at least 5 seconds The IDSET message appears on the display of the Soundba...

Страница 11: ...V is set to PCM we recommend that you change the setting to Dolby Digital When the setting on the TV is changed you will experience better sound quality The TV menu may use different words for Dolby D...

Страница 12: ...L OUT jack of the TV with a digital optical cable not supplied 2 Press the Source button on the top panel or on the remote control and then select the D IN mode AutoPowerLink Auto Power Link automatic...

Страница 13: ...EADY appears press and hold the Source button on the top panel of the Soundbar for more than 5 seconds to display BTPAIRING 2 Select Bluetooth mode on the TV For more information see the TV s manual 3...

Страница 14: ...utton on the remote control or press and hold the Source button on the top of the Soundbar for more than 5 seconds while the Soundbar is in BT mode NOTES If asked for a PIN code when connecting a Blue...

Страница 15: ...When using selected Samsung TVs 2016 2018 Samsung Smart TVs that support Bluetooth If you select WIFI mode when the TV is turned on the TV screen displays a pop up window providing instructions on ho...

Страница 16: ...tings Sound Select Speaker AV Samsung Soundbar Nxxx Wi Fi ForTVsreleasedin2015 Menu Sound Speaker List ForTVsreleasedin2014 Menu Sound Speaker Settings Multiroom Link Settings NOTES The TV and Soundba...

Страница 17: ...rtant This product supports Dolby Atmos only in HDMI mode BottomoftheSoundbar DIGITAL AUDIO IN OPTICAL HDMI IN 1 HDMI IN 2 HDMI OUT TV ARC HDMI OUT HDMI IN ARC TopoftheSoundbar OR HDMICable HDMICable...

Страница 18: ...onlyon 7 1 2 channels Make sure that the content supports DolbyAtmos ConnectingusinganHDMICable BottomoftheSoundbar DIGITAL AUDIO IN OPTICAL HDMI IN 1 HDMI IN 2 HDMI OUT TV ARC HDMI OUT HDMI IN ARC T...

Страница 19: ...ble notsupplied TopoftheSoundbar BD DVDplayer Set topbox Gameconsole D IN 1 Connect DIGITALAUDIOIN OPTICAL on the main unit to the OPTICAL OUT jack of the Source Device using a digital optical cable n...

Страница 20: ...appears press and hold the Source button on the top panel of the Soundbar for more than 5 seconds to display BTPAIRING 2 On your device select AV SamsungSoundbarNxxx from the list that appears When t...

Страница 21: ...r Theinitialconnection 1 Press the Source button on the top of the Soundbar or on the remote control to select WIFI mode TopoftheSoundbar WIFI 2 Install and launch the SmartThings app on your mobile d...

Страница 22: ...VOL WOOFER SOUND MODE PAIR Press the Mute button to mute the sound Press it again to unmute the sound SOUNDMODE VOL WOOFER SOUND MODE PAIR Press to select the desired sound effect STANDARD SURROUND or...

Страница 23: ...is connected to your TV through a digital optical cable the Soundbar can automatically turn on when you turn on your TV Press and hold the Left button for 5 seconds to toggle Auto Power Link ON and O...

Страница 24: ...t the volume of the subwoofer to 12 or between 6 to 6 To set the subwoofer volume level to 0 press the button VOL WOOFER SOUND MODE PAIR VOL S O U N D M O D E V O L W O O F E R S O U N D B A R S O U N...

Страница 25: ...ur TV s remote push up and hold the WOOFER button for 5seconds repeatedly until ALL TVREMOTE appears in the display Then use your TV s menu to select external speakers S O U N D M O D E V O L W O O F...

Страница 26: ...to wall studs Purchase wall mounting screws according to the type and thickness of the wall you want to mount the Soundbar on Diameter M5 Length 35 mm or longer recommended Connect cables from the uni...

Страница 27: ...d drill bit drill a hole in the wall at each marking If the markings do not correspond to the positions of studs make sure you insert appropriate anchors or mollies into the holes before you insert th...

Страница 28: ...down so that Bracket Wall Mounts rest securely on the Holder Screws 09 SOFTWARE UPDATE When the Soundbar is connected to the Internet software updates automatically occur even when the Soundbar is tu...

Страница 29: ...undbar main unit TheredLEDonthesubwooferblinksand thesubwooferisnotproducingsound Thisissuecanoccurifthesubwooferisnot connectedtotheSoundbarmainunit Try to connect your subwoofer again See page 5 The...

Страница 30: ...etails 11 LICENCE Manufactured under license from Dolby Laboratories Dolby Dolby Atmos Dolby Audio Dolby Digital Plus Pro Logic and the double D symbol are trademarks of Dolby Laboratories For DTS pat...

Страница 31: ...r reference only and may differ from actual product appearance An administration fee may be charged if either a an engineer is called out at your request and there is no defect with the product i e wh...

Страница 32: ...ELESS DEVICE OUTPUT POWER Wi Fi max transmitter power 100mW at 2 4GHz 2 4835GHz 5 15GHz 5 35GHz 5 47GHz 5 725GHz WIRELESS DEVICE OUTPUT POWER BT max transmitter power 100mW at 2 4GHz 2 4835GHz WIRELES...

Страница 33: ...button on the bottom panel of the Soundbar for 30 seconds to turn Bluetooth On Off Hereby Samsung Electronics declares that this equipment is in compliance with Directive 2014 53 EU The full text of...

Страница 34: ...ries or literature indicates that the product and its electronic accessories e g charger headset USB cable should not be disposed of with other household waste at the end of their working life To prev...

Страница 35: ...dass es sich bei der mit diesem Symbol gekennzeichneten Nennspannung um eine Gleichspannung handelt Achtung Gebrauchsanweisung beachten Dieses Symbol weist den Benutzer an weitere sicherheitsrelevante...

Страница 36: ...nsatz vorgesehen Verwenden Sie dieses Produkt nur f r den privaten Bereich Wenn Ihr Produkt oder die CD bei kalten Temperaturen aufbewahrt wurden kann Kondensation auftreten Wenn Sie das Ger t bei kal...

Страница 37: ...Soundbar 5 Manuelles Verbinden des Subwoofers bei Fehlschlagen der automatischen Verbindung 6 04 AnschlussanihrFernsehger t 7 Methode 1 Verbindung mit einem Kabel 7 Einen Fernseher ber ein HDMI Kabel...

Страница 38: ...Anpassen der Soundbar Lautst rke mit einer TV Fernbedienung 21 08 InstallierenderWandhalterung 22 Vorsichtsma nahmen f r die Installation 22 Komponenten f r die Anbringung an der Wand 22 09 Software...

Страница 39: ...Soundbar Hauptger ts Die Stromanschlusskomponenten sind gekennzeichnet 1 2 Weitere Informationen zu den Stromanschl ssen finden Sie auf Seite 4 Siehe Seite 22 zu den Wandhalterungskomponenten Wenden S...

Страница 40: ...MI OUT TV ARC POWER DIGITAL AUDIO IN OPTICAL HDMI IN 1 HDMI IN 2 HDMI OUT TV ARC SERVICE NETWORK ID SET WOOFER REAR Quelle W hlt den Quelleneingangsmodus aus D IN HDMI1 HDMI2 WIFI BT Zum Einschalten d...

Страница 41: ...den Abbildungen Weitere Informationen zur ben tigten Stromversorgung und zum Stromverbrauch finden Sie auf dem Etikett am Ger t Etikett Unterseite des Soundbar Hauptger ts POWER R ckseitedes Subwoofer...

Страница 42: ...eigelichteraufderR ckseitedesSubwoofers LED Status Beschreibung Abhilfe Blau Ein Erfolgreich verbunden normaler Betrieb Blinkend Standby bei ausgeschaltetem Soundbar Hauptger t berpr fen Sie die Strom...

Страница 43: ...die blaue Anzeigeleuchte blinkt R ckseitedesSubwoofers 5 Sec BlaueLEDblinktschnell 2 Halten Sie die Taste Oben auf der Fernbedienung l nger als 5 Sekunden gedr ckt F r kurze Zeit erscheint nun die Mel...

Страница 44: ...t wird empfohlen die Einstellung auf Dolby Digital zu ndern Nach dem ndern der Einstellung k nnen Sie eine bessere Soundqualit t genie en Das Men des Fernsehers kann je nach dem Hersteller des Fernseh...

Страница 45: ...OUT des Fernsehers 2 Dr cken Sie die Taste Quelle auf der Oberseite oder auf der Fernbedienung und w hlen Sie dann den Modus D IN AutoPowerLink Auto Power Link wird automatisch eingeschaltet wenn der...

Страница 46: ...e auf der Oberseite der Soundbar f r mehr als 5 Sekunden gedr ckt um BTPAIRING anzuzeigen 2 W hlen Sie den Bluetooth Modus an dem Fernseher aus Weitere Informationen finden Sie im Handbuch des Fernseh...

Страница 47: ...der Fernbedienung oder dr cken und halten Sie die Taste Quelle auf der Oberseite der Soundbar f r l nger als 5 Sekunden gedr ckt w hrend sich die Soundbar im Modus BT befindet HINWEISE Falls sie beim...

Страница 48: ...Verwenden von ausgew hlten Samsung Fernsehern Samsung Smart Fernsehermodelle von 2016 2018 die Bluetooth unterst tzen Falls Sie den WIFI Modus ausw hlen w hrend der Fernseher eingeschaltet ist zeigt...

Страница 49: ...n AV Samsung Soundbar Nxxx Wi Fi F r2015erschieneneFernseher Men Ton Lautsprecherliste F r2014erschieneneFernseher Men Ton Lautsprechereinstellungen Multiroom Link Einstell HINWEISE Der Fernseher und...

Страница 50: ...Produkt unterst tzt Dolby Atmos nur im HDMI Modus DIGITAL AUDIO IN OPTICAL HDMI IN 1 HDMI IN 2 HDMI OUT TV ARC HDMI OUT HDMI IN ARC OberseitederSoundbar ODER HDMI Kabel HDMI Kabel ExternesGer t HDMI1...

Страница 51: ...bei 7 1 2 Kan len Stellen Sie sicher dass die Inhalte Dolby Atmos unterst tzen VerbindungmiteinemHDMI Kabel DIGITAL AUDIO IN OPTICAL HDMI IN 1 HDMI IN 2 HDMI OUT TV ARC HDMI OUT HDMI IN ARC Oberseited...

Страница 52: ...berseitederSoundbar BD DVD Player Set Top Box Spielkonsole D IN 1 Verbinden Sie den Anschluss DIGITALAUDIOIN OPTICAL am Hauptger t ber ein optisches Digitalkabel nicht mitgeliefert mit dem Anschluss O...

Страница 53: ...le auf der Oberseite der Soundbar f r mehr als 5 Sekunden gedr ckt um BTPAIRING anzuzeigen 2 W hlen Sie AV SamsungSoundbarNxxx aus der Liste aus Wenn eine Soundbar mit dem Bluetooth Ger t verbunden is...

Страница 54: ...dbar DieersteVerbindung 1 Dr cken Sie die Taste Quelle auf der Oberseite der Soundbar oder auf der Fernbedienung um den Modus WIFI auszuw hlen OberseitederSoundbar WIFI 2 Installieren und starten Sie...

Страница 55: ...PAIR Dr cken Sie die Taste Stummschaltung um den Ton stumm zu schalten Dr cken Sie sie erneut um den Ton wieder einzuschalten SOUNDMODE VOL BASS SOUND MODE PAIR Dr cken Sie hier um den gew nschten Ton...

Страница 56: ...bel an Ihren Fernseher angeschlossen ist kann die Soundbar automatisch eingeschaltet werden wenn Sie Ihren Fernseher einschalten Halten Sie die Taste Links 5 Sekunden lang gedr ckt um Auto Power Link...

Страница 57: ...chen 6 bis 6 einzustellen Um die Lautst rke des Subwoofers auf 0 zu stellen dr cken Sie die Taste VOL BASS SOUND MODE PAIR VOL S O U N D M O D E V O L W O O F E R S O U N D B A R S O U N D M O D E V O...

Страница 58: ...bar mit der Fernbedienung Ihres Fernsehers steuern wollen dr cken Sie wiederholt die Taste WOOFER nach oben und halten Sie sie f r 5 Sekunden gedr ckt bis ALL TVREMOTE in der Anzeige erscheint Verwend...

Страница 59: ...ndmontage entsprechend der Art und der Dicke der Wand an der Sie die Soundbar montieren wollen Durchmesser M5 L nge 35 mm oder l nger empfohlen Schlie en Sie die Kabel vom Ger t an externe Ger te an b...

Страница 60: ...ie mit einem geeigneten Bohrer an jeder Markierung ein Loch in die Wand Wenn die Markierungen nicht den Positionen der Halterungsbolzen entsprechen achten Sie darauf geeignete D bel oder Molly D bel i...

Страница 61: ...sicher auf den Aufh ngungsschraube ruhen 09 SOFTWARE AKTUALISIERUNG Wenn die Soundbar mit dem Internet verbunden ist werden Softwareaktualisierungen automatisch ausgef hrt auch wenn die Soundbar ausg...

Страница 62: ...Soundbar Hauptger t heran DieroteLEDamSubwooferblinktundder SubwoofergibtkeinenTonaus DiesesProblemkannauftreten wennder SubwoofernichtandasSoundbar Hauptger t angeschlossenist Versuchen Sie den Subwo...

Страница 63: ...rnseher und der Soundbar herstellen Kontaktieren Sie Ihren Internetdienstleister f r Details 11 LIZENZ Manufactured under license from Dolby Laboratories Dolby Dolby Atmos Dolby Audio Dolby Digital Pl...

Страница 64: ...m aktuellen Produkt unterscheiden Es kann eine Geb hr erhoben werden wenn a Ein Techniker auf Ihre Anfrage bestellt wird und am Ger t kein Defekt vorliegt z B weil Sie diese Bedienungsanleitung nicht...

Страница 65: ...DRAHTLOSGER TS Wi Fi max Transmitterleistung 100mW bei 2 4GHz 2 4835GHz 5 15GHz 5 35GHz 5 47GHz 5 725GHz AUSGANGSLEISTUNG DES DRAHTLOSGER TS BT max Transmitterleistung 100mW bei 2 4GHz 2 4835GHz AUSG...

Страница 66: ...Sie die Taste NETWORK auf der Unterseite der Soundbar 30 Sekunden lang gedr ckt um das Bluetooth ein auszuschalten Samsung Electronics erkl rt hiermit dass dieses Ger t der Richtlinie 2014 53 EU ents...

Страница 67: ...dazugeh rigen Dokumentation gibt an dass das Produkt und Zubeh rteile z B Ladeger t Kopfh rer USB Kabel nach ihrer Lebensdauer nicht zusammen mit dem normalen Haushaltsm ll entsorgt werden d rfen Ents...

Страница 68: ...e spanning gelijkspanning is Voorzichtig raadpleeg de instructies voor gebruik Dit symbool geeft aan dat de gebruiker de handleiding moet raadplegen voor meer informatie over de veiligheid WAARSCHUWIN...

Страница 69: ...et bedoeld voor industrieel gebruik Dit product is uitsluitend bestemd voor particulier gebruik Wanneer het product of een schijf bij een lage temperatuur wordt bewaard kan condensatie optreden Als u...

Страница 70: ...e verbinding tussen de subwoofer en de Soundbar 5 De subwoofer handmatig verbinden als de automatische verbinding mislukt 6 04 VerbindenmetuwTV 7 Methode 1 Verbinden met een kabel 7 Een tv verbinden m...

Страница 71: ...en 18 Het volume van de Soundbar aanpassen met de afstandsbediening van de tv 21 08 DeWandmontageInstalleren 22 Voorzorgsmaatregelen bij de installatie 22 Componenten voor muurmontage 22 09 Software U...

Страница 72: ...id van de Soundbar De stroomverbindingstappen zijn gelabeld 1 2 Meer informatie over stroomverbindingen vindt u op pagina 4 De wandbevestigingsonderdelen van de Soundbar vindt u op pagina 22 Om extra...

Страница 73: ...ICAL HDMI IN 1 HDMI IN 2 HDMI OUT TV ARC POWER DIGITAL AUDIO IN OPTICAL HDMI IN 1 HDMI IN 2 HDMI OUT TV ARC SERVICE NETWORK ID SET WOOFER REAR Bron Selecteert de invoermodus van de bron D IN HDMI1 HDM...

Страница 74: ...over de vereiste elektriciteit en het stroomverbruik vindt u op het etiket op het product Etiket onderkant van de hoofdeenheid van de Soundbar POWER Achterkantvan Subwoofer 1 Netsnoer Deelektriciteit...

Страница 75: ...tus Beschrijving Oplossing Blauw Aan Met succes aangesloten normale werking Knipperend Stand by met de hoofdeenheid van de Soundbar uitgeschakeld Controleer de stroomtoevoer naar de hoofdeenheid van d...

Страница 76: ...indicatorlampje knippert AchterkantvanSubwoofer 5 Sec Snelknipperende blauweled 2 Houd de knop Omhoog op de afstandsbediening ten minste 5 seconden ingedrukt Het bericht IDSET verschijnt even op het...

Страница 77: ...t aangeraden om de instelling in Dolby Digital te wijzigen Wanneer de instelling is gewijzigd kunt u genieten van een betere geluidskwaliteit Het tv menu kan andere woorden gebruiken voor Dolby Digita...

Страница 78: ...erbinden met de OPTICAL OUT jack van de tv 2 Druk op de knop Bron op het bovenpaneel of op de afstandsbediening en selecteer vervolgens de D IN modus AutoPowerLink De Auto Power Link schakelt de Sound...

Страница 79: ...et bovenpaneel van de Soundbar gedurende meer dan 5 seconden ingedrukt zodat BTPAIRING wordt weergegeven 2 Selecteer Bluetooth modus op de tv Meer informatie vindt u in de handleiding van de tv 3 Sele...

Страница 80: ...ing of houd de knop Bron aan de bovenkant van de Soundbar gedurende meer dan 5 seconden ingedrukt wanneer in BT modus OPMERKINGEN Als u bij het verbinden met een Bluetooth apparaat een pincode wordt g...

Страница 81: ...geselecteerde tv van Samsung gebruikt Smart tv s van Samsung uit 2016 2018 die Bluetooth ondersteunen Als u WIFI modus selecteert wanneer de TV is ingeschakeld verschijnt er op het TV scherm een pop...

Страница 82: ...Luidspreker selecteren AV Samsung Soundbar Nxxx Wi Fi Voortv sdiezijnuitgebrachtin2015 Menu Geluid Luidsprekerlijst Voortv sdiezijnuitgebrachtin2014 Menu Geluid Luidsprekerinstellingen Multiroom Link...

Страница 83: ...Belangrijk Dit product ondersteunt Dolby Atmos uitsluitend in HDMI modus DIGITAL AUDIO IN OPTICAL HDMI IN 1 HDMI IN 2 HDMI OUT TV ARC HDMI OUT HDMI IN ARC BovenkantvandeSoundbar OF HDMI kabel HDMI kab...

Страница 84: ...mos werkt alleen op 7 1 2 kanalen Zorg ervoordat de inhoud DolbyAtmos ondersteunt VerbindenmeteenHDMI kabel DIGITAL AUDIO IN OPTICAL HDMI IN 1 HDMI IN 2 HDMI OUT TV ARC HDMI OUT HDMI IN ARC Bovenkantv...

Страница 85: ...nkantvandeSoundbar BD DVD speler Settopbox Gameconsole D IN 1 Verbind DIGITALAUDIOIN OPTICAL op de hoofdeenheid met de OPTICAL OUT aansluiting van het bronapparaat met behulp van een digitale optische...

Страница 86: ...npaneel van de Soundbar gedurende meer dan 5 seconden ingedrukt zodat BTPAIRING wordt weergegeven 2 Selecteer AV SamsungSoundbarNxxx in de lijst Wanneer een Soundbar is verbonden met het Bluetooth app...

Страница 87: ...steverbinding 1 Druk op de knop Bron op de bovenkant van de Soundbar of op de afstandsbediening om WIFI modus te selecteren BovenkantvandeSoundbar WIFI 2 Installeer en start de SmartThings app op uw m...

Страница 88: ...UND MODE PAIR Druk op de Geluiddempen knop om het geluid te dempen Druk opnieuw op de knop om het geluid niet meer te dempen SOUNDMODE VOL BASS SOUND MODE PAIR Druk om het gewenste geluidseffect te se...

Страница 89: ...r met uw tv is verbonden via een digitale optische kabel kan de Soundbar automatisch worden ingeschakeld wanneer u uw tv inschakelt Houd de knop Links gedurende 5 seconden ingedrukt om Auto Power Link...

Страница 90: ...egelen op 12 of tussen 6 en 6 Druk op de knop om het volume van de subwoofer op 0 in te stellen VOL BASS SOUND MODE PAIR VOL S O U N D M O D E V O L W O O F E R S O U N D B A R S O U N D M O D E V O L...

Страница 91: ...met de afstandsbediening van de tv duw de knop WOOFER gedurende 5seconden herhaaldelijk omhoog tot ALL TVREMOTE op het scherm verschijnt Gebruik vervolgens het menu van de tv om externe luidsprekers t...

Страница 92: ...dersteuningsschroeven in muurtapeinden Koop wandmontageschroeven volgens het type en de dikte van de wand waarop u de Soundbar wilt monteren Diameter M5 Lengte 35 mm of langer aanbevolen Sluit kabels...

Страница 93: ...jzer een gat in de muur bij elke markering Als de markeringen niet overeenkomen met de posities van de tapeinden zorg er dan voor dat u de geschikte verankeringen of pluggen in de gaten plaatst voorda...

Страница 94: ...unmuurmontage stevig op de Schroefhouder rusten 09 SOFTWARE UPDATE Wanneer de Soundbar is verbonden met het internet worden software updates automatisch uitgevoerd zelfs wanneer de Soundbar is uitgesc...

Страница 95: ...Soundbar Derodeledopdesubwooferknippertende subwooferproduceertgeengeluid Ditprobleemkanoptredenalsdesubwoofer nietisaangeslotenopdehoofdeenheidvande Soundbar Sluit uw subwoofer opnieuw aan Zie pagina...

Страница 96: ...de Soundbar Neem contact op met uw internetprovider voor meer informatie 11 LICENTIE Manufactured under license from Dolby Laboratories Dolby Dolby Atmos Dolby Audio Dolby Digital Plus Pro Logic and t...

Страница 97: ...afwijken van hoe het apparaat er in werkelijkheid uitziet In de volgende gevallen kunnen administratiekosten in rekening worden gebracht a een technicus komt bij u langs maar de speler vertoont geen...

Страница 98: ...LOOS APPARAAT Wi Fi max zendvermogen 100 mW op 2 4 GHz 2 4835 GHz 5 15 GHz 5 35 GHz 5 47 GHz 5 725 GHz UITGANGSVERMOGEN DRAADLOOS APPARAAT BT max zendvermogen 100 mW op 2 4 GHz 2 4835 GHz UITGANGSVERM...

Страница 99: ...deactiveren Druk gedurende 30 seconden op de knop NETWORK op het onderpaneel van de Soundbar om Bluetooth in uit te schakelen Samsung Electronics verklaart hierbij dat deze apparatuur voldoet aan Ric...

Страница 100: ...t merkteken op het product de accessoires of het informatiemateriaal duidt erop dat het product en zijn elektronische accessoires bv lader headset USB kabel niet met ander huishoudelijk afval verwijde...

Страница 101: ...indiqu e par le symbole est une tension CC Mise en garde Consulter le mode d emploi ce symbole avertit l utilisateur qu il doit consulter le manuel d utilisation pour en savoir plus sur les informatio...

Страница 102: ...ement Votre produit n est pas pr vu pour un usage industriel Ce produit ne peut tre utilis qu des fins personnelles Une condensation peut se former si le produit ou un disque a t stock basse temp ratu...

Страница 103: ...n automatique entre le Caisson de basse et la Soundbar 5 Connexion manuelle du Caisson de basse si la connexion automatique choue 6 04 Connexion votreT l viseur 7 M thode 1 Connexion avec un c ble 7 C...

Страница 104: ...la t l commande 18 R glage du volume de la Soundbar avec une t l commande de t l viseur 21 08 InstallationduSupportMural 22 Pr cautions d installation 22 Composants de fixation au mur 22 09 Mise jour...

Страница 105: ...Les tapes de connexion de l alimentation sont tiquet es 1 2 Pour plus d informations sur les connexions de l alimentation consultez la page 4 Pour les composants de fixation murale de la Soundbar con...

Страница 106: ...HDMI IN 2 HDMI OUT TV ARC POWER DIGITAL AUDIO IN OPTICAL HDMI IN 1 HDMI IN 2 HDMI OUT TV ARC SERVICE NETWORK ID SET WOOFER REAR Source S lectionne le mode d entr e de la source D IN HDMI1 HDMI2 WIFI B...

Страница 107: ...sur l alimentation et la consommation lectriques requises reportez vous l tiquette coll e sur le produit tiquette Partie inf rieure de l unit principale Soundbar POWER Arri redu Caissondebasse 1 Cord...

Страница 108: ...uCaissondebasse DEL tat Description R solution Bleu Activ Connexion r ussie fonctionnement normal Clignotement Veille lorsque l unit principale de la Soundbar est teinte V rifiez l alimentation de l u...

Страница 109: ...ateur bleu clignote Arri reduCaissondebasse 5 Sec DELbleueclignotant rapidement 2 Appuyez sur la touche Haut de la t l commande et maintenez la enfonc e pendant au moins 5secondes Le message IDSET s a...

Страница 110: ...rique est PCM sur votre t l viseur il est recommand de modifier le r glage sur Dolby Digital Une fois le r glage modifi vous pouvez profiter d une meilleure qualit sonore Il se peut que le menu du t l...

Страница 111: ...e optique non fourni num rique 2 Appuyez sur la touche Source sur le panneau sup rieur ou sur la t l commande puis s lectionnez le mode D IN AutoPowerLink Le Auto Power Link active la Soundbar lorsque...

Страница 112: ...e la Soundbar et maintenez la enfonc e pendant plus de 5 secondes pour afficher BTPAIRING 2 S lectionnez le mode Bluetooth sur le t l viseur Pour plus d informations reportez vous au manuel du t l vis...

Страница 113: ...dbar Appuyez sur le touche PAIR de la t l commande ou maintenez la touche Source situ e en haut de la Soundbar enfonc e pendant plus de 5 secondes alors que la Soundbar est en mode BT REMARQUES Si un...

Страница 114: ...lectionn s T l viseurs Samsung Smart sortis de 2016 2018 qui prennent en charge le Bluetooth Si vous s lectionnez le mode WIFI lorsque le t l viseur est allum l cran du t l viseur affiche une fen tre...

Страница 115: ...lect hautparleur AV Samsung Soundbar Nxxx Wi Fi Pourlest l viseurssortisen2015 Menu Son Liste des haut parleurs Pourlest l viseurssortisen2014 Menu Son Param tres haut parleur Multiroom Link Param tr...

Страница 116: ...prend en charge Dolby Atmos uniquement en mode HDMI DIGITAL AUDIO IN OPTICAL HDMI IN 1 HDMI IN 2 HDMI OUT TV ARC HDMI OUT HDMI IN ARC HautdelaSoundbar OU C bleHDMI C bleHDMI Appareilexterne HDMI1 OU H...

Страница 117: ...ctionne qu avec les canaux 7 1 2 Assurez vous que le contenu prend en charge DolbyAtmos Connexion l aided unc bleHDMI DIGITAL AUDIO IN OPTICAL HDMI IN 1 HDMI IN 2 HDMI OUT TV ARC HDMI OUT HDMI IN ARC...

Страница 118: ...urni HautdelaSoundbar LecteurBD DVD Bo tierd codeur Consoledejeu D IN 1 Raccordez DIGITALAUDIOIN OPTICAL de l unit principale la prise OPTICAL OUT de l appareil source l aide d un c ble optique non fo...

Страница 119: ...e sur le panneau sup rieur de la Soundbar et maintenez la enfonc e pendant plus de 5 secondes pour afficher BTPAIRING 2 S lectionnez AV SamsungSoundbarNxxx dans la liste Lorsqu une Soundbar est connec...

Страница 120: ...Appuyez sur la touche Source en haut de la Soundbar ou s lectionnez le mode WIFI sur la t l commande HautdelaSoundbar WIFI 2 Installez et lancez l application SmartThings sur votre appareil mobile pa...

Страница 121: ...DE PAIR Appuyez sur la touche Coupuredeson pour couper le son Appuyez de nouveau sur cette touche pour activer le son SOUNDMODE VOL WOOFER SOUND MODE PAIR Appuyez pour s lectionner l effet sonore d si...

Страница 122: ...Anynet Auto Power Link Si la Soundbar est connect e au t l viseur par un c ble optique num rique la Soundbar peut s allumer automatiquement lors de la mise sous tension de votre t l viseur Appuyez et...

Страница 123: ...e sur 12 ou entre 6 et 6 Pour r gler le niveau de volume du caisson de basse sur 0 appuyez sur la touche VOL WOOFER SOUND MODE PAIR VOL S O U N D M O D E V O L W O O F E R S O U N D B A R S O U N D M...

Страница 124: ...e votre t l viseur poussez la touche WOOFER vers le haut et maintenez la enfonc e pendant 5secondes jusqu ce que ALL TVREMOTE apparaisse l cran Utilisez ensuite le menu de votre t l viseur pour s lect...

Страница 125: ...ns les poteaux Achetez les vis de support mural selon le type et l paisseur du mur sur lequel vous souhaitez monter la Soundbar Diam tre M5 Longueur 35 mm ou plus recommand s Connectez les c bles depu...

Страница 126: ...trou dans le mur au niveau de chaque marque Si les marques ne correspondent pas aux positions des poteaux muraux veillez ins rer les ancrages ou les chevilles Molly appropri es dans les trous avant d...

Страница 127: ...xationmurale vers le bas afin que les Supportdefixationmurale reposent de mani re s re sur les Visdefixation 09 MISE JOURDU LOGICIEL Lorsque la Soundbar est connect e Internet les mises jour de logici...

Страница 128: ...ELrougesurlecaissondebasseclignote etlecaissondebasseneproduitaucunson Ceprobl mepeutseproduiresilecaissonde bassen estpasconnect l unit principale Soundbar Essayez de reconnectervotre caisson de bass...

Страница 129: ...viseur et la Soundbar Contactez votre fournisseur de service Internet pour plus de d tails 11 LICENCE Manufactured under license from Dolby Laboratories Dolby Dolby Atmos Dolby Audio Dolby Digital Plu...

Страница 130: ...e l apparence du produit r el Des frais suppl mentaires pourront vous tre factur s dans les cas suivants a Vous demandez l intervention d un ing nieur mais il s av re que l appareil ne pr sente aucune...

Страница 131: ...REIL SANS FIL Puissance de transmission Wi Fi max 100 mW 2 4 GHz 2 4835 GHz 5 15 GHz 5 35 GHz 5 47 GHz 5 725 GHz PUISSANCE DE SORTIE DE L APPAREIL SANS FIL Puissance de transmission BT max 100 mW 2 4...

Страница 132: ...WORK sur le panneau inf rieur de la Soundbar et maintenez la enfonc e pendant 30 secondes pour activer d sactiver le Bluetooth Samsung Electronics d clare par la pr sente que cet quipement est conform...

Страница 133: ...uit ses accessoires ou sa documentation indique que ni le produit ni ses accessoires lectroniques usag s chargeur casque audio c ble USB etc ne peuvent tre jet s avec les autres d chets m nagers La mi...

Страница 134: ...niawed ugtaryfy operatora http www samsung com pl support HUNGARY 0680SAMSUNG 0680 726 7864 www samsung com hu support AUSTRIA 0800 SAMSUNG 0800 7267864 OnlyforDealers 0810 112233 www samsung com at s...

Отзывы: