background image

25

Getting started

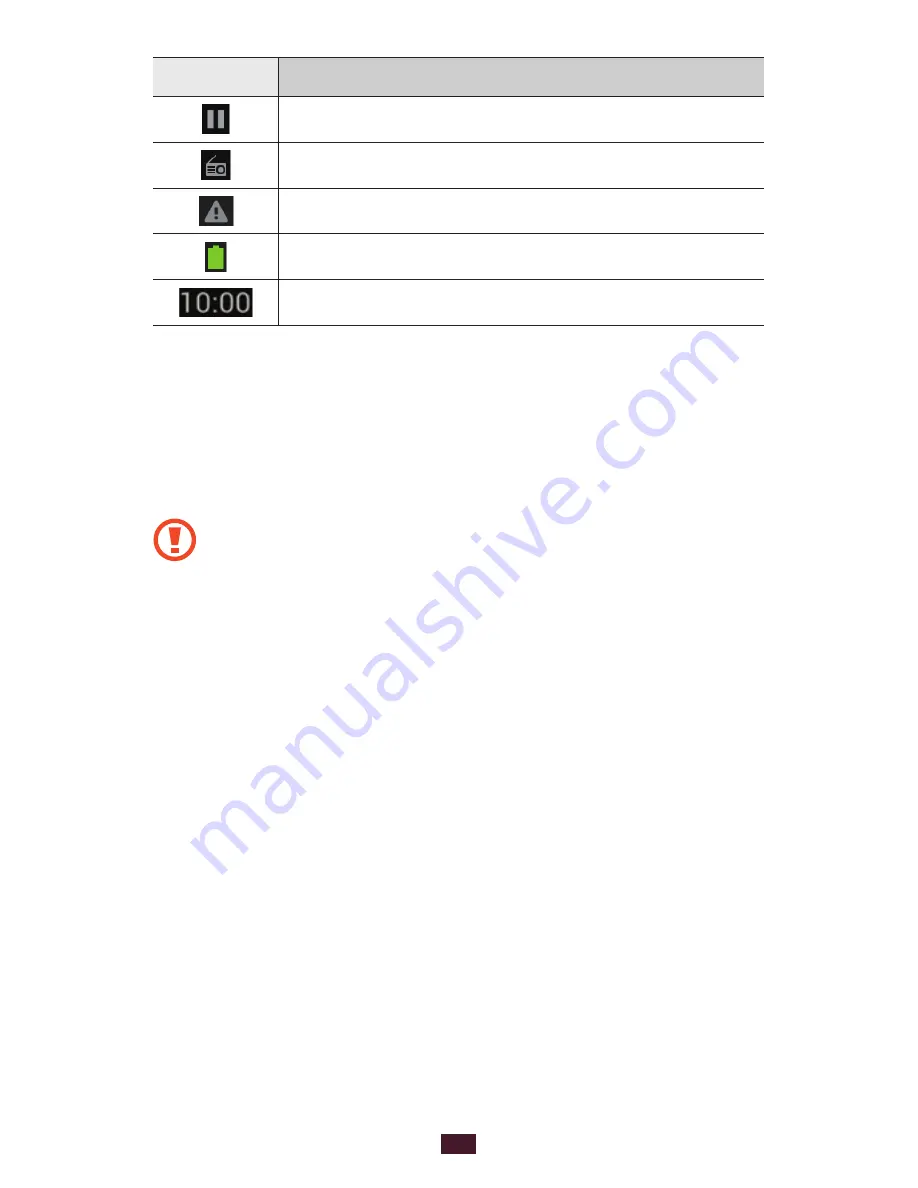
Icon

Definition
Music playback paused
FM radio playing in the background
Error occurred or caution required
Battery power level
Current time

Use the S Pen and the touch screen

Your device’s touch screen lets you easily select items or 

perform functions. Learn basic actions for using the touch 

screen.

Do not press the touch screen with your fingertips, 


or use sharp tools on the touch screen. Doing so may 

damage the touch screen or cause it to malfunction.
Do not allow the touch screen to come into contact 


with other electrical devices. Electrostatic discharges 

can cause the touch screen to malfunction.
Do not allow the touch screen to come into contact 


with liquids. The touch screen may malfunction in 

humid conditions or when exposed to liquids.
Leaving the touch screen idle for extended periods 


may result in afterimages (screen burn-in) or ghosting. 

Turn off the touch screen when you do not use the 

device.
Do not bend the S Pen.


The tip of the S Pen is not replaceable.


Do not use the S Pen nearby a source of magnetic 


interference. It may cause the S Pen to malfunction or 

freeze.

Содержание GT-N7000

Страница 1: ...GT N7000 usermanual ...

Страница 2: ...of your device Images and screenshots used in this user manual may differ in appearance from the actual product Content in this user manual may differ from the product or from software provided by service providers or carriers and is subject to change without prior notice Refer to www samsung com hk for the latest version of the user manual Available features and additional services may vary by de...

Страница 3: ...imited use between Samsung and their respective owners Extracting and using these materials for commercial or other purposes is an infringement of copyright laws Samsung is not liable for such copyright infringement by the user Please keep this manual for future reference Instructional icons Before you start familiarise yourself with the icons you will see in this manual Warning situations that co...

Страница 4: ...uted translated or transmitted in any form or by any means electronic or mechanical including photocopying recording or storing in any information storage and retrieval system without the prior written permission of Samsung Electronics Trademarks SAMSUNG and the SAMSUNG logo are registered trademarks of Samsung Electronics The Android logo Google Google Maps Google Mail YouTube Google Play Store a...

Страница 5: ...is is an official DivX Certified device that plays DivX video Visit www divx com for more information and software tools to convert your files into DivX videos ABOUT DIVXVIDEO ON DEMAND This DivX Certified device must be registered in order to play purchased DivXVideo on Demand VOD movies To obtain your registration code locate the DivXVOD section in your device setup menu Go to vod divx com for m...

Страница 6: ...o know your device 21 Use the S Pen and the touch screen 25 Lock or unlock the touch screen and keys 27 Get to know the Home screen 27 Access applications 32 Customise your device 34 Enter text 40 Using special features 47 Learn basic S Pen actions 47 Learn advanced S Pen actions 48 Learn motions 49 Use Handwriting mode 54 Use S Note 58 Use the quick note pad 64 Use S Planner 65 Contents ...

Страница 7: ...lling 69 Messaging 79 Google Mail 81 Email 83 Talk 86 ChatON 87 Messenger 88 Google 88 Entertainment 89 Camera 89 Video Player 101 Gallery 104 Paper Artist 107 Music Player 108 FM Radio 111 Personal information 115 Contacts 115 S Planner 118 S Note 120 Voice Recorder 124 ...

Страница 8: ... 134 S Choice 134 Voice Search 135 Play Store 135 Readers Hub 136 Connectivity 137 USB connections 137 Wi Fi 140 Wi Fi Direct 142 AllShare Play 143 Group Cast 145 Mobile network sharing 146 Bluetooth 148 GPS 150 VPN connections 151 Tools 154 Clock 154 Calculator 156 Downloads 157 Dropbox 157 ...

Страница 9: ...enu 163 Wi Fi 163 Bluetooth 163 Data usage 163 More settings 164 Home screen mode 166 Blocking mode 166 Sound 166 Display 167 Storage 168 Power saving mode 168 Battery 169 Application manager 169 Location services 169 Lock screen 169 Security 170 One handed operation 172 Language and input 172 Cloud 178 Backup and reset 178 ...

Страница 10: ...Contents 10 Add account 179 Motion 179 S Pen 180 Accessory 180 Date and time 181 Accessibility 181 Developer options 183 About device 184 Troubleshooting 185 ...

Страница 11: ...gion or service provider You can purchase additional accessories from your local Samsung retailer The supplied accessories perform best for your device Accessories other than the ones supplied may not be compatible with your device Install the SIM or USIM card and battery When you subscribe to a cellular service you will receive a Subscriber Identity Module SIM card with subscription details such ...

Страница 12: ...er key and select 1 Power off OK to turn it off Remove the back cover 2 Be careful not to damage your fingernails when you remove the back cover Do not bend or twist the back cover excessively Doing so may damage the cover Insert the SIM or USIM card with the gold coloured 3 contacts facing downwards ...

Страница 13: ...he SIM card slot If the memory card becomes lodged in the SIM card slot you must take your device to a Samsung Service Centre to have the memory card removed The SIM card slot of your device is only suited for standard SIM cards Inserting a micro SIM card or a micro SIM card with an unauthorised holder may cause damage to the SIM card slot of your device Insert the battery 4 Replace the back cover...

Страница 14: ...y icon will also be empty If the battery level becomes too low the device will automatically power off Recharge your battery to continue using your device If the battery is completely discharged you cannot turn on the device even with the travel adapter connected Allow a depleted battery to charge for a few minutes before you try to turn on the device If you use multiple applications at once netwo...

Страница 15: ...trical 2 socket You can use the device while it is charging but it may take longer to fully charge the battery If the device receives an unstable power supply while charging the touch screen may not function If this happens unplug the travel adapter from the device The device may heat up while charging This is normal and should not affect your device s lifespan or performance If your device is not...

Страница 16: ...ave energy unplug the travel adapter when not in use The travel adapter does not have a power switch so you must unplug the travel adapter from the electrical socket when not in use to avoid wasting power The device should remain close to the electrical socket while charging About the battery charging icons When you charge the battery while the device is off the following icons will show the curre...

Страница 17: ...te the Bluetooth feature Deactivate theWi Fi feature Deactivate auto syncing of applications Decrease the backlight time Decrease the brightness of the display Insert a memory card optional Your device accepts memory cards with maximum capacities of 32 GB Depending on the memory card manufacturer and type some memory cards may not be compatible with your device Samsung uses approved industry stand...

Страница 18: ...ry card into your device the memory card s file directory will appear in the extSdCard folder Remove the back cover and battery 1 Insert a memory card with the gold coloured contacts 2 facing downwards Push the memory card into the memory card slot until it 3 locks in place Replace the battery and back cover 4 Remove the memory card Before removing a memory card first unmount it for safe removal I...

Страница 19: ...age to the memory card or device Format the memory card Formatting your memory card on a computer may cause incompatibilities with your device Format the memory card only on the device In the application list select Settings Storage Format SD card Format SD card Erase everything Before formatting the memory card remember to make backup copies of all important data stored on your device The manufac...

Страница 20: ...uctions to set up your device To turn off your device press and hold the Power key and then select Power off OK Follow all posted warnings and directions from authorised personnel in areas where the use of wireless devices is restricted such as aeroplanes and hospitals To use only your device s non network services switch to Flight mode Press and hold the Power key and select Flight mode p 164 ...

Страница 21: ... Device layout Light sensor Microphone1 1 Active only when you use the speakerphone feature or record videos Proximity sensor Earpiece Front camera lens Home key Power Reset Lock key Menu key Touch screen Multifunction jack Back key Microphone ...

Страница 22: ...e screen launch the Google search application press and hold Open the search input window while using some applications press and hold 3 If your device experiences fatal errors hanging or freezing you may need to reset the device to regain functionality Flash Headset jack Volume key GPS antenna2 2 Do not touch the antenna area or cover this area with your hands or other objects while using wireles...

Страница 23: ...tiWindow panel press and hold Volume Adjust the device s volume Indicator icons Icons shown on the display may vary depending on your region or service provider Icon Definition No signal Signal strength GPRS network connected EDGE network connected UMTS network connected HSDPA network connected OpenWi Fi APs available Wi Fi AP connected Wi Fi Direct connected Bluetooth feature activated Bluetooth ...

Страница 24: ...iverting activated Connected to computer USB tethering activated Wi Fi hotspot activated No SIM or USIM card New text or multimedia message New email message New voice mail message Alarm activated Event notification Roaming outside of service area Silent mode activated mute Silent mode activated vibrate Flight mode activated Music playback in progress ...

Страница 25: ... cause it to malfunction Do not allow the touch screen to come into contact with other electrical devices Electrostatic discharges can cause the touch screen to malfunction Do not allow the touch screen to come into contact with liquids The touch screen may malfunction in humid conditions or when exposed to liquids Leaving the touch screen idle for extended periods may result in afterimages screen...

Страница 26: ...em and hold it for more than 2 seconds to open a list of options Drag Tap and drag your finger up down left or right to move to items on lists Drag and drop Tap and hold your finger on an item and then drag your finger to move the item Double tap Tap twice quickly with your finger to zoom in or out while viewing photos or webpages Pinch Place two fingers far apart and then pinch them together You ...

Страница 27: ...device is in Idle mode you will see the Home screen From the Home screen you can view indicator icons widgets shortcuts to applications and other items The Home screen has multiple panels Scroll left or right to the panels on the Home screen You can also select a dot at the bottom of the screen to move directly to the corresponding panel Use the notifications panel To open the notifications panel ...

Страница 28: ...ate the MultiWindow feature The options available may vary depending on your region or service provider Change the Home screen mode The Home screen has basic and easy modes In easy mode you can easily access your favourite contacts applications and settings by adding shortcuts to the Home screen To change the Home screen mode in the application list select Settings Home screen mode a mode Move ite...

Страница 29: ...ove a panel from the Home screen You can add or remove Home screen panels to organise widgets On the Home screen press 1 Edit page You can also place two fingers on the screen and pinch them together to switch to Edit mode Add remove or reorganise panels 2 To remove a panel tap and hold the thumbnail image of the panel and then drag it to the rubbish bin at the bottom of the screen To add a new pa...

Страница 30: ...get to add it to the Home screen 3 Add a Settings shortcut to the Home screen You can create shortcuts to frequently used setting options on the Home screen In the application list select 1 Widgets to open the widget panel Tap and hold 2 Settings Shortcut and release it on the Home screen Select a setting option such as Bluetooth orWi Fi 3 Launch MultiWindow applications You can run two applicatio...

Страница 31: ...l When the panel is hidden tap and hold the handle and drag it up or down or left or right to move the handle Select an application to launch 3 Tap and hold another application to launch and drag it to 4 a new location Drag the bar between the application panels up or down 5 to adjust the size of the panels To switch the location of the panels select To maximise the window to fit the screen select...

Страница 32: ... location on the Home screen Press 4 to return to the previous screen or press the Home key to return to the Home screen If you rotate the device while using some features the interface will automatically rotate as well To prevent the interface from rotating open the notifications panel and select Screen rotation While using the device you can capture a screenshot by pressing and holding the Home ...

Страница 33: ...ave Download an application In the application list select 1 Play Store or Samsung Apps Search for an application and download it to the device 2 To install applications that you downloaded from other sources you must select Settings Security Unknown sources Uninstall an application In the application list press 1 Uninstall Select 2 on an application icon and then select OK You can uninstall only ...

Страница 34: ...tions The task manager launches and shows active applications Control active applications 2 To switch applications select one from the list To close an application select End To close all active applications select End all Customise your device Get more from your device by customising it to match your preferences Set the current time and date In the application list select 1 Settings Date and time...

Страница 35: ...ct Phone Keypad and then tap and hold Press and hold the Power key and select Mute or Vibrate Open the notifications panel at the top of the screen and select Sound Change your ringtone In the application list select 1 Settings Sound Device ringtone Select a ringtone from the list and then select 2 OK Select a wallpaper for the Home screen In the application list select 1 Settings Display Wallpape...

Страница 36: ... list select 1 Settings Display Brightness Select the tick box next to 2 Automatic brightness Select 3 OK The device will increase the brightness in bright surroundings and decrease the brightness in dim surroundings automatically Adjust the brightness manually In the application list select 1 Settings Display Brightness Clear the tick box next to 2 Automatic brightness Drag the slider to the left...

Страница 37: ...screen and then tilt the device forwards Set a face detection unlock In the application list select 1 Settings Lock screen Screen lock Face unlock Select 2 Next Set it up Continue Adjust the device to fit your face inside the figure 3 When your face is captured correctly select 4 Continue Complete the setup of the backup PIN or pattern 5 Set an unlock signature In the application list select 1 Set...

Страница 38: ...ck PIN In the application list select 1 Settings Lock screen Screen lock PIN Enter a new PIN numeric and select 2 Continue Enter the PIN again and select 3 OK Set an unlock password In the application list select 1 Settings Lock screen Screen lock Password Enter a new password alphanumeric and select 2 Continue Enter the password again and select 3 OK Lock your SIM or USIM card You can lock your d...

Страница 39: ... help you locate and recover your device To use this feature you need a Samsung account to control the device remotely via the web In the application list select 1 Settings Security SIM Change Alert Select 2 Sign in To create a Samsung account select Create new account Enter the email address and password for your Samsung 3 account and then select Sign in Drag the 4 SIM Change Alert switch to the ...

Страница 40: ...icons area and drag it 1 downwards to open the notifications panel Select 2 Choose input method a text input method Enter text with the Google voice input feature Speak your text into the microphone 1 When you are finished select 2 To add input languages for voice recognition select the language Add more languages Enter text with the Samsung Chinese IME keypad Select 1 Choose input method Set up i...

Страница 41: ...Handwriting mode Tap and hold to enter text by voice access the clipboard or access the keypad settings 4 Insert a space 5 Clear your input 6 Start a new line 7 Change the input language 8 Insert a full stop Open the symbol panel tap and hold On the handwriting panel you can use the following gestures Function Gesture Space Enter Backspace ...

Страница 42: ...il the appropriate character appears XT9 Predictive text 1 In ABC mode select The dot next to XT9 turns green 2 Select corresponding virtual keys to enter a word 3 When the word appears correctly select to insert a space If the correct word does not appear select and an alternative word from the list that appears Number 1 Select to switch to Number mode 2 Select a number You can enter numbers by t...

Страница 43: ...ring text rotate the device to view the QWERTY keypad in widescreen Select the virtual keys as necessary to enter your text You can set the keyboard to appear on either side of the screen for convenience when entering text with one hand To use this feature tap One handed operation You can also use the following keys 4 5 6 7 1 2 3 Number Function 1 Change case 2 Switch text input modes 3 Switch to ...

Страница 44: ...e keypad p 174 Enter text with the Swype keypad Tap the first character of a word and then drag your finger 1 to the second character without releasing your finger from the screen Continue until you have finished spelling the word 2 Lift your finger 3 When the device recognises the correct word tap 4 the space bar to insert a space If the device does not recognise the word select an alternative wo...

Страница 45: ...r list appears you can enter special characters and symbols You can also use the following keys 4 5 7 1 2 3 6 Number Function 1 Change case 2 Enter the recommended word or add a new word to the dictionary Access the keypad settings tap and hold 3 Switch text input modes 4 Clear your input 5 Start a new line 6 Enter text by voice This feature may be unavailable depending on the selected input langu...

Страница 46: ... another application Tap and hold a passage of text 1 Drag 2 or to select the text to be copied Select 3 or to add the text to the clipboard In another application place the cursor where you want to 4 paste the text Select 5 Paste to insert the text from the clipboard into the text field ...

Страница 47: ...the S Pen from the slot at the bottom of your device You cannot press the touch keys with the S Pen Tap Tap an item or area on the screen to select an item open a menu or launch an application Tap and hold Tap and hold the S Pen on an item for more than two seconds Double tap Quickly tap an item or area on the screen twice Flick Tap an area on the screen and then slowly drag the S Pen up down left...

Страница 48: ...previous screen Menu Draw to open a list of options available on the current screen Screen capture Tap and hold the screen to capture a screenshot After capturing a screenshot you can draw on it write on it or crop it The edited image will be saved in My Files All files sdcard0 Pictures Screenshots IMG_edited You cannot capture a screenshot while using some features ...

Страница 49: ...ols You can perform actions by moving your device or performing gestures with your hands To use some of these functions you must first activate the motion recognition feature In the application list select Settings Motion and then drag the Motion switch to the right Excessive shaking or impact to the device may result in unintended inputs To learn how to control motions properly open the applicati...

Страница 50: ... features 50 Hold to ear While viewing call message or contact details pick up and hold the device to your ear to make a voice call Shake Shake your device to search for Bluetooth enabled devices or Kies air devices ...

Страница 51: ... on the screen and then tilt the device back and forth to zoom in or out Hand swipe Swipe your hand across the screen to capture a screenshot The image will be saved to the clipboard and in My Files All files sdcard0 Pictures Screenshots You cannot capture a screenshot while using some features ...

Страница 52: ...lm touch Touch the screen with your palm to pause media playback or mute the radio Pan to move While holding an item slide the device to the left or right to move the item to another page on the Home screen or the application list ...

Страница 53: ... image is zoomed in tap and hold a point on the screen and then slide the device in any direction to scroll through the image Turn over Place the device face down to mute ringtones pause media playback or turn off the FM radio when using the speaker ...

Страница 54: ...e screen and then rotate the device to the landscape view to launch the camera when the camera shortcut is activated p 170 Use Handwriting mode From the Samsung Chinese IME keypad you can switch to Handwriting mode to enter text more easily To switch to Handwriting mode select ...

Страница 55: ... from the alternative word list To switch to the Samsung Chinese IME keypad select HandwritingTutorial When you have written one character write the next one Write each letter to the right of the previous character If you draw a stroke on top of a previous character it may be recognised as a new character E g Not recognised Write characters upright do not slant E g Recognised ...

Страница 56: ...uages that do and do not support words and phrase should be listed in this guide All languages which support Handwriting SIP should support words and phrases Languages that support words and phrases English UK English US Čeština Български Dansk Deutsch Ελληνικά Español Eesti Suomi Français Hrvatski Magyar íslenska Italiano Қазақ 한국어 Lietuvių Latviešu Norsk Nederlands Polski Português Română Русски...

Страница 57: ...parately Languages that do and do not support cursive writing should be listed in this guide Languages that support cursive writing English UK English US Deutsch Español Français Italiano Nederlands Português Languages that do not support cursive writing Čeština Български Ελληνικά Eesti Hrvatski Magyar íslenska Қазақ 한국어 Lietuvių Latviešu Polski Română Русский Slovenčina Slovenščina Srpski Türkçe ...

Страница 58: ...e sure you leave enough space E g Recognised E g Not recognised Use S Note With S Note you can create notes by inserting various multimedia contents into notes and add a note shortcut to the Home screen In the application list select 1 S Note Select 2 a template ...

Страница 59: ...t action Undo your last action Erase your text or sketch Change the eraser thickness or clear your input double tap Enter text with the keyboard Change the text settings double tap Use productivity tools Draw a sketch Change the pen settings double tap Switch toView mode ...

Страница 60: ...while drawing a note select To add a page select To draw only with the S Pen select To zoom in place two fingers on the screen and spread them apart To zoom out move your fingers closer together When zoomed in drag with two fingers to scroll through the screen When you are finished select 5 Save For more information about viewing or editing notes or using other note features see page 120 ...

Страница 61: ...hickness or pen colour double tap 1 2 3 4 5 6 Number Function 1 Change the pen type 2 Change the line thickness 3 Change the pen colour 4 Open to view more colour or change the shade of colour Changing the colour shade is available when you select the highlighter 5 Save the current setting as a pen profile 6 Add a new colour with the Color Picker ...

Страница 62: ... option 2 View or change the current attributes 3 Change the text colour 4 Add a new colour with the Color Picker Tutorial for handwritten formulas and figures Write a formula on a single line If you write a long formula or a formula on more than one line the device will convert the formula incorrectly ...

Страница 63: ...figure in the square root will temporarily result in incorrect formula conversion The formula will be complete when you finish writing the formula When you draw an arrow draw the body of the arrow first When you draw the head of an arrow draw it in one stroke ...

Страница 64: ...n the quick note pad Enter text or draw a sketch 2 Undo your last action Erase your text or sketch Change the eraser thickness or clear your input double tap Enter text with the keyboard Draw a sketch Change the pen settings such as the pen type line thickness or pen colour double tap Redo your last action View the quick note pad in widescreen When you are finished select 3 ...

Страница 65: ...chedules and tasks more conveniently and effectively You can create and view events add items and change view modes To launch S Planner in the application list select S Planner Switch to Handwriting mode Select today s date Set which calendars to display Add a calendar event or task Hide or display the view mode tabs ...

Страница 66: ...e application list select 1 S Planner Select 2 Add task and then enter details To add a note select Notes an option To add an image select Images an option When you are finished select 3 Save To create an event or task from a memo This feature is available only for English and Korean In the application list select 1 S Planner Select 2 Quick add and then enter details When you are finished select 3...

Страница 67: ... quickly press the Home key twice If you are launching the application for the first time you will see a tutorial and help information Afterwards you will see the mainVoice talk screen This feature may be unavailable in some languages This feature may be unavailable depending on your region or service provider Access help information Deactivate or activate the voice command feature Select a voice ...

Страница 68: ...into the microphone and then select 2 Done Say additional commands to respond to the voice guide 3 for the feature you selected Capture screen area With the S Pen button pressed select an area by drawing 1 Select an application from the list of applications that 2 appear on the bottom of screen to associate it with the selected area The selected area is saved in the Gallery Screenshots folder The ...

Страница 69: ...ns off and locks the touch screen to prevent accidental inputs when you hold the device near your face p 77 Static electricity discharged from your body or clothing may interfere with the proximity sensor during a call Make a call 1 In the application list select Phone Keypad and then enter an area code and a phone number Select 2 to make a voice call To make a video call select To end the call se...

Страница 70: ...ne of several preset messages or create your own messages p 76 Call an international number In the application list select 1 Phone Keypad and then tap and hold to insert the character Enter the complete number you want to dial country 2 code area code and phone number and then select to dial the number Use a headset By plugging a headset into the device you can answer and control calls convenientl...

Страница 71: ...re To open the keypad select Keypad To activate the speakerphone feature select Speaker In noisy environments you may have difficulty hearing some calls while using the speakerphone feature For better audio performance use the normal phone mode To turn off the microphone so that the other party cannot hear you select Mute To converse with the other party via a Bluetooth headset select Headset To o...

Страница 72: ...ooth headset press Switch to headset To activate the speakerphone feature press Speaker On Off To apply emotional icons to your image press Animated emotions To apply decorative icons to your image press Theme view To change the view mode to the cartoon view press Enable cartoon view To use the other party s image tap and hold it You can capture an image of the screen or record the video call It i...

Страница 73: ...rs on the auto reject list Select 5 Auto reject list Select 6 Create Enter a number and select 7 Save You can set the criteria for the number To add more numbers repeat steps 6 7 8 Use Fixed Dialling Number FDN mode In FDN mode your device will restrict outgoing calls except for the numbers stored in the FDN list To activate FDN mode In the application list select 1 Phone Press 2 Call settings Add...

Страница 74: ...one Press 2 Call Settings Call forwarding a call type Select a condition 3 Enter a number to which calls will be forwarded and select 4 Enable Your setting will be sent to the network Set call barring Call barring is a network feature to restrict certain types of calling or to prevent others from making calls with your device In the application list select 1 Phone Press 2 Call settings Additional ...

Страница 75: ...s You can view logs of your calls filtered by their types In the application list select 1 Phone Logs Press 2 View by an option to sort the call logs From the call logs you can make a call or send a message directly to a contact by quickly flicking the contact to the left or right Select a log to view its details 3 From the detail view you can dial the number send a message to the number or add th...

Страница 76: ...lls Ringtones and keypad tones Device vibration Add or select a vibration pattern Ringtones and keypad tones Vibrate when ringing Set the device to vibrate and ring to alert you to incoming calls Ringtones and keypad tones Keytones Set the device to sound when you enter numbers on the dialling screen Call alert Call vibrations Set the device to vibrate when the other party answers or ends a call C...

Страница 77: ...er a specified period available only when a headset is connected Call accessories Automatic answering timer Select the length of time that the device waits before answering calls Call accessories Outgoing call conditions Set to allow outgoing calls with a Bluetooth headset even when your device is locked Call accessories Outgoing call type Select the type of outgoing calls to make you use a Blueto...

Страница 78: ...ot connected or that was cut off Additional settings Noise reduction Set to remove background noise so that the other party can hear you more clearly Additional settings Fixed Dialling Numbers Activate FDN mode to prevent calls to phone numbers that are not in the FDN list on the SIM or USIM card Additional settings Auto area code Set to insert a prefix area or country code automatically before a ...

Страница 79: ...hether to use IP call services for all calls or only for IP calls Messaging Learn to create and send text SMS or multimedia MMS messages and view or manage messages that you have sent or received You may incur additional charges for sending or receiving messages while outside of your home service area For details contact your service provider Send a text message 1 In the application list select Me...

Страница 80: ...g When you enter an email address the device will convert the message to a multimedia message Press 3 Add subject and enter a subject for the message Select the text field and enter your message text 4 To insert emoticons press Insert smiley Select 5 and add an item You can select a file event location or contact from the file list or create a new photo video or sound Select 6 to send the message ...

Страница 81: ...ontact your service provider for the number Google Mail You can retrieve new email messages from the Google Mail webmail service to your Inbox When you access this application the Inbox screen appears The total number of unread messages appears in the title bar and unread messages appear in bold type This feature may be unavailable depending on your region or service provider This menu may be labe...

Страница 82: ...options available may vary depending on the account To move to the next or previous message scroll right or left To mark the message as important select To reply to the message select To reply to the message and include all recipients select Reply all To forward the message to other people select Forward To archive the message select To delete the message select To add a label to the message selec...

Страница 83: ...your messages You can sort messages with the label filter Add a label to a message From the Inbox screen select a message 1 Select 2 Select a label and then select 3 OK Filter messages From the Inbox screen select 1 Select the label for the messages you want to view 2 Email Learn to send or view email messages via your personal or company email account Set up an email account 1 In the application ...

Страница 84: ...cipients 2 Enter email addresses manually and separate them with a semicolon or a comma Select email addresses from the call message or contact lists by selecting Add more recipients by pressing Add Cc Bcc Select the subject field to enter a subject 3 Select the text input field to enter your email text 4 Select 5 and attach a file You can select a file event location or contact from the file list...

Страница 85: ...time and date set on the device The time and date may be incorrect if you move across time zones and the network does not update the information View an email message When you open an email account you can view previously retrieved emails offline or connect to the email server to view new messages After retrieving email messages you can view them offline In the application list select 1 Email an e...

Страница 86: ...i press Print Your device is compatible only with some Samsung printers To create a new message press Compose To change the font size press Font size To filter messages from the sender press Set as priority sender You can read messages from the sender in the specified inbox To change the email settings press Settings The options available may vary depending on the email account or device s orienta...

Страница 87: ...pts the invitation the friend is added to your friend list Start a chat In the application list select 1 Talk Select a friend from the friend list 2 The chat screen opens Enter and send your message 3 To end the chat press 4 End chat ChatON Learn to use ChatON to send and receive instant messages from any device via mobile network orWi Fi In the application list select 1 ChatON If you are launchin...

Страница 88: ...he on screen instructions to complete the account setup Enter and send your message 2 Google Learn to access the Google s social network service You can create groups to share interests and thoughts or send and receive instant messages and upload your photos This feature may be unavailable depending on your region or service provider In the application list select 1 Google If you are launching thi...

Страница 89: ...pecified period The memory capacity may differ depending on the shooting scene or shooting conditions Capture a photo 1 In the application list select Camera to turn on the camera Aim the lens at the subject and make any necessary 2 adjustments 1 4 5 6 2 3 Number Function 1 Change the camera settings 2 Open the image viewer to view photos you captured ...

Страница 90: ...so tap the screen with two fingers and spread them apart to zoom in move your fingers closer together to zoom out The zoom function may be unavailable when shooting in the highest resolution Tap where you want to focus on the preview screen 4 The focus frame moves to the place you tap and changes to green when the subject is in focus Select 5 to take a photo The photo is saved automatically After ...

Страница 91: ...e photo to edit the note To add the photo to the clipboard press Copy to clipboard To rotate the photo anti clockwise press Rotate left To rotate the photo clockwise press Rotate right To crop a section from the photo press Crop To edit the photo with the image editor press Edit To set the photo as your wallpaper or a contact image press Set as To send the photo to a person whose face is tagged in...

Страница 92: ...Scene mode a scene Make any necessary adjustments 3 Select 4 to take a photo Capture a photo in Self shot mode You can take photos of yourself conveniently with the front camera lens In the application list select 1 Camera to turn on the camera Select 2 Self portrait Make any necessary adjustments 3 Select 4 to take a photo Capture a photo in Face detection mode Your camera can recognise people s ...

Страница 93: ...adjustments 3 Select 4 to take the first photo Slowly move the device in any direction and align the 5 green frame with the viewfinder When you have aligned the blue frame and viewfinder the camera will automatically take the next photo Repeat step 5 to complete the panoramic photo 6 Capture a photo in Shareshot mode You can capture a photo and automatically send it to your friends simultaneously ...

Страница 94: ... Smile shot mode Your camera can recognise people s smiling faces and help you take photos of them In the application list select 1 Camera to turn on the camera Select 2 Shooting mode Smile shot Make any necessary adjustments 3 Aim the camera lens at your subject and select 4 Your device recognises people s faces on the screen and detects their smiles When the camera detects a smiling face the cam...

Страница 95: ... flash on or off or set the camera to automatically use the flash when needed Shooting mode Change the shooting mode Effects Apply a special effect such as sepia or black and white tones Scene mode Change the scene mode Exposure value Adjust the exposure value Focus mode Take close up photos or set the camera to focus on the subject or focus on human faces automatically Timer Select the length of ...

Страница 96: ...s vibration or movement GPS tag Set the camera to include location information for your photos To improve GPS signals avoid shooting in locations where the signal may be obstructed such as between buildings or in low lying areas or in poor weather conditions Your location may appear on your photos when you upload them to the web To avoid this deactivate the GPS tag setting Contextual filename Set ...

Страница 97: ... Record a video 1 In the application list select Camera to turn on the camera Drag the slider to the camcorder to switch to the 2 camcorder Aim the lens at the subject and make any necessary 3 adjustments 1 4 5 6 3 2 Number Function 1 Change the camcorder settings 2 Open the image viewer to view videos you recorded 3 Record a video ...

Страница 98: ...or out 4 You can also tap the screen with two fingers and spread them apart to zoom in move your fingers closer together to zoom out The zoom function may be unavailable when recording at the highest resolution Select 5 to start recording Select 6 to stop recording The video is saved automatically The camcorder may not be able to properly record videos on a memory card with a slow transfer speed A...

Страница 99: ...fore recording a video select to access the following options Option Function Edit shortcuts Edit shortcuts to frequently used options Self recording Switch to the front camera to record a video of yourself Flash Change the flash setting You can manually turn the flash on or off Recording mode Change the recording mode Effects Apply a special effect such as sepia or black and white tones Exposure ...

Страница 100: ...en buildings or in low lying areas or in poor weather conditions Your location may appear on your videos when you upload them to the web To avoid this deactivate the GPS tag setting Contextual filename Set the camcorder to display contextual tags Save as flipped Set the camcorder to flip the image automatically when you record a video with the front camera lens Video quality Set the quality level ...

Страница 101: ...d drag it to the option list Press 3 to return to the preview screen Video Player Learn to use the video player to play various kinds of videos Some file formats are not supported depending on the software of the device If a file size exceeds the memory available an error may occur when you attempt to play it Playback quality may vary by content type Some files may not play properly depending on h...

Страница 102: ...ng the bar 3 Change the ratio of the video screen 4 Restart playback Skip to the previous file tap within 3 seconds Scan backwards in the file tap and hold 5 Adjust the volume 6 Pause playback Select to resume playback 7 Reduce the size of the video screen To return to the original size double tap the video screen 8 Skip to the next file Scan forwards in the file tap and hold ...

Страница 103: ... this option if you connect a headset to your device s headset jack To set the video player to turn off automatically after a specific period of time select Video auto off To change the video player settings select Settings To view video details select Details Customise video player settings During playback press 1 Settings Change the following options 2 Option Function Auto play next Set the vide...

Страница 104: ...ect Gallery Select a folder 2 an image While viewing an image use the following options To view more images scroll left or right To zoom in place two fingers on the screen and spread them apart To zoom out move your fingers closer together You can also double tap the screen If you activate tilting motions you can zoom in or out by tapping and holding two points with your fingers and then tilting t...

Страница 105: ... To rotate the image anti clockwise press Rotate left To rotate the image clockwise press Rotate right To crop a section from the image press Crop To edit the image with the image editor press Edit To set the image as your wallpaper or a contact image press Set as To send the image to a person whose face is tagged in the image press Buddy photo share To print the image viaWi Fi press Print Your de...

Страница 106: ...tomatically tap and hold a face area to add a frame manually Select a recognised face 4 Add name Select the person s name from the contact list 5 The contact is linked to the face in the image When the face tag appears with a name select the face tag and use the available options Play a video 1 In the application list select Gallery Select a folder 2 a video indicated by the icon Control playback ...

Страница 107: ...o auto off To change the video player settings select Settings To view video details select Details Paper Artist Learn to make images look like illustrations with fun effects or frames Open the application list and select 1 Paper Artist Use artistic tools to edit an image 2 The edited image is saved in Gallery Paper Pictures 2 4 3 1 5 6 9 8 7 Number Function 1 Select an existing image 2 Take a pho...

Страница 108: ... of the device If a file size exceeds the memory available an error can occur when you try to play it Playback quality may vary by content type Some files may not play properly depending on how they are encoded Add music files to your device Start by transferring files to your device or memory card Download from the Internet p 126 Download from a computer with Samsung Kies p 137 Download from a co...

Страница 109: ...8 6 9 7 Number Function 1 Activate Shuffle mode 2 Scan forwards or backwards in the file by dragging or tapping the bar 3 Select a sound effect 4 Restart playback Skip to the previous file tap within 3 seconds Scan backwards in the file tap and hold 5 Adjust the volume 6 Change the repeat mode 7 Sort music files by mood or year 8 Pause playback Select to resume playback ...

Страница 110: ...elect Via Bluetooth You cannot use this option if you connect a headset to your device s headset jack To send the music file to others or share it select Share via To add the music file to a playlist select Add to playlist To set the music file as your ringtone select Set as To search for devices that have media sharing activated select Scan for nearby devices To change the music player settings s...

Страница 111: ...ngs Adjust the following settings to customise your music 3 player Option Function SoundAlive Select a sound effect Play speed Change the playback speed Music menu Select music categories to display on the music library screen Lyrics Set to display lyrics during playback Music auto off Set the music player to automatically turn off after a specified length of time FM Radio Learn to listen to music...

Страница 112: ...utomatically The first time you turn on the FM radio it will start automatic tuning Select a radio station 3 Control the FM radio with the following keys 4 4 3 5 6 3 1 2 7 Number Function 1 Record a song from the FM radio 2 Turn on or off the FM radio 3 Search for an available radio station 4 Add the current radio station to the favourites list 5 Adjust the volume ...

Страница 113: ...dset into the device 1 In the application list select 2 FM Radio Select 3 to turn on the FM radio Scroll to a radio station 4 Select 5 to start recording When you are finished select 6 The recorded file will be saved in My Files All files sdcard0 Sounds Save a radio station automatically Plug a headset into the device 1 In the application list select 2 FM Radio Press 3 Scan a scanning option The F...

Страница 114: ...t 1 FM Radio Press 2 Settings Adjust the following settings to customise your FM radio 3 Option Function Storage Select a memory location for saving FM radio clips Radio text Set to show the station ID on the FM radio screen Station IDs are available only from radio stations that provide this information Alternative frequency Set whether or not the FM radio attempts to retune a radio station when ...

Страница 115: ...dd the contact to memory You can create contacts from the dialling screen by selecting Add to contacts Find a contact 1 In the application list select Contacts Contacts Scroll up or down on the contact list 2 You can also drag your finger along the index on the right side to quickly scroll through the list Select a contact s name 3 Once you find a contact you can use the following options To call ...

Страница 116: ...ist select 1 Contacts Contacts Select your name at the top of the contact list 2 Select 3 Enter your own personal details 4 Select 5 Save You can send your namecard to others or share it by pressing Share namecard via Create a group of contacts By creating groups of contacts you can manage multiple contacts and send a message or email to an entire group Start by creating a group In the application...

Страница 117: ...ontacts Press 2 Import Export Export to SIM card Select contacts to copy and then select 3 Done OK Import or export contacts You can import or export files in vcf format to or from your device s USB storage or a memory card Import contact files In the application list select 1 Contacts Contacts Press 2 Import Export Import from SD card or Import from USB storage Select a memory location 3 Select a...

Страница 118: ...n list select 1 S Planner If alert messages about the calendar sync appear select 2 Done Select an option 3 Enter details and select 4 Save For more information about creating events or tasks see page 65 Change the view mode To switch the calendar s view mode select a view mode tab You can also tap the screen with two fingers and then pinch or spread them to change the view mode Year view Select o...

Страница 119: ...d date for the event or task is automatically adjusted List view You can view events and tasks scheduled from or until a specific date Select the tick box next to a task to mark the task as completed Task view Select the tick box next to a task to mark the task as completed View events or tasks In the application list select 1 S Planner Select a date on the calendar 2 To move to todays date select...

Страница 120: ...tions panel from the top of the screen 1 Select the event notification 2 Select an event to view more details 3 To snooze or dismiss the event alarm select Snooze or Dismiss S Note Learn to create and view notes with special effects You can insert various multimedia contents into a note and add a note shortcut to the Home screen S Note provides various templates to help you create notes easily Not...

Страница 121: ...information about creating a note see page 58 To add a page select 4 a page type When you are finished select 5 Save To create a note by importing a PDF or image file In the application list select 1 S Note Press 2 Import a file format a file If you selected an image file resize the image and then 3 select Done a template Select 4 or tap the screen to switch to Edit mode Create a note with the ico...

Страница 122: ...cessary Select a note 3 While viewing the note use the following options To zoom in place two fingers on the screen and spread them apart To zoom out move your fingers closer together To move to other pages of the note select the arrow at the bottom of the screen To switch to Edit mode select or tap the screen To create a note press Create note To send the note to others press Share via To export ...

Страница 123: ...ld a note and select Edit cover Select 3 or tap the screen to switch to Edit mode Edit the note with the icons on the screen 4 p 58 To change the background image of the note press Change background To delete the note press Delete To add a tag press Add tag Select 5 Save Synchronise notes You can synchronise your notes with the web server In the application list select 1 S Note Press 2 Sync an opt...

Страница 124: ...or move notes In the application list select 1 S Note Select a folder if necessary 2 Press 3 Copy or Move Select notes 4 Copy or Move Move to a new location 5 Select 6 Copy here or Move here Voice Recorder Learn to operate your device s voice recorder Record a voice memo In the application list select 1 Voice Recorder Select 2 to start recording To pause recording select Speak into the microphone ...

Страница 125: ...voice recorder settings In the application list select 1 Voice Recorder Press 2 Settings Change the following options 3 Option Function Storage Select a memory location for saving voice memos Recording quality Select a quality level for voice memos Limit for MMS Set to limit recordings to the maximum length that can be attached to a multimedia message Contextual filename Set the device to save fil...

Страница 126: ...rvice provider Available icons may vary depending on your region or service provider Browse webpages In the application list select 1 Internet To access a specific webpage select the URL field enter the web address and then select Go Navigate webpages with the following keys 2 1 2 5 4 3 Number Function 1 Move backwards or forwards to webpages in history 2 Enter a web address or a keyword 3 Reload ...

Страница 127: ... your fingers and then tilting the device back and forth To open a new window press New window To bookmark the current webpage press Bookmark this page To add a shortcut for the current webpage to the Home screen press Add shortcut To send a web address URL to others press Share page To search for text on the webpage press Find on page To switch to desktop view press Desktop view To save current w...

Страница 128: ...r information and webpages related with the keyword Select a search result 4 Bookmark your favourite webpages In the application list select 1 Internet Enter a web address or navigate to a webpage 2 Press 3 Bookmark this page Enter a name for the bookmark and select 4 Save To view your bookmarks select Bookmarks From the bookmark list tap and hold a bookmark and use the following options To open t...

Страница 129: ... the internal memory Files you download from the Internet can include viruses that will damage your device To reduce this risk only download files from sources you trust Some media files include Digital Rights Management to protect copyrights This protection may prevent you from downloading copying modifying or transferring some files In the application list select 1 Internet Search for a file or ...

Страница 130: ...er a keyword for the location and select 3 To search for a location by voice select Select the location you want to view details 4 To zoom in or out place two fingers on the screen and slowly spread them apart or pinch them together To view a list of all results for your search select RESULTS LIST To view your current location select To switch to a compass view of the map that changes orientation ...

Страница 131: ... trip and select 5 MAP VIEW to view the route on the map Select 6 or to view only a single part of the route When you are finished press 7 Clear Map Local Learn to search for a place around you This feature may be unavailable depending on your region or service provider In the application list select 1 Local If you want to search for businesses or attractions near a 2 specific location select your...

Страница 132: ...ile driving This feature may be unavailable depending on your region or service provider In the application list select 1 Navigation Enter your destination with the following methods 2 Enter your destination by voice Enter your destination with the virtual keypad Select your destination from contacts addresses Select your destination from your starred places Install the required software and then ...

Страница 133: ... with the following keys 4 1 2 3 4 5 6 7 Number Function 1 Pause or resume playback 2 Scan forwards or backwards in the file by dragging the bar 3 View the video quality This feature may not be available for some videos 4 Add the video to your playlist 5 Send the URL to others 6 Search for videos 7 Rotate the screen to the portrait view ...

Страница 134: ...ications Samsung Apps gives you instant access to a wide range of mobile experiences Your device gets smarter with fully optimised applications from Samsung Apps Explore amazing applications and make your mobile life even better The feature may be unavailable depending on your region or service provider For details please visit www samsungapps com In the application list select 1 Samsung Apps If y...

Страница 135: ...pplications Play Store provides a quick and easy way to shop for mobile applications This feature may be unavailable depending on your region or service provider Your device will save user files from downloaded applications to the internal memory Download an application In the application list select 1 Play Store Search for an application and download it to the device 2 When the download is comple...

Страница 136: ... your region or service provider In the application list select 1 Readers Hub If you are launching this application for the first time 2 select the tick box next to Do not show for 90 days and select Confirm Select a type of reading material 3 Search for and download reading material from the online 4 store ...

Страница 137: ...r Data transfers may fail when using a USB hub Connect with Samsung Kies Ensure that Samsung Kies is installed on your computer You can download the program from the Samsung website Samsung Kies will work on bothWindows and Macintosh computers Connect your device to a computer with a USB cable 1 Samsung Kies launches on the computer automatically If Samsung Kies does not launch double click the Sa...

Страница 138: ...ry The file directory of the memory card will appear as a removable disk separate from the internal memory Please download correspond USB drivers from Samsung website www samsung com hk and install it correctly in your computer before using your phone as a removable disc If you want to transfer files from or to a memory card 1 insert a memory card into the device In the application list select 2 S...

Страница 139: ... Tap the indicator icons area and drag it downwards to 2 open the notifications panel Select 3 Connected as a media device Media device MTP Transfer files between your device and the computer 4 Connect as a camera device You can connect your device to a computer as a camera and access files in your device Use this USB connection mode when your computer does not support the media transfer protocol ...

Страница 140: ...oors Activate theWi Fi feature In the application list select Settings and then drag the Wi Fi switch to the right TheWi Fi feature running in the background will consume battery power To preserve battery power activate the feature only when needed Find and connect to aWi Fi AP In the application list select 1 Settings Wi Fi Your device searches for availableWi Fi APs automatically Select an AP 2 ...

Страница 141: ...on Press theWPS button on the AP within 2 minutes 3 Connect with aWPS PIN In the application list select 1 Settings Wi Fi Press 2 WPS PIN entry On the AP enter the PIN of your device 3 Set the static IP settings In the application list select 1 Settings Wi Fi Select an AP 2 Show advanced options Select the 3 IP settings drop down menu Select 4 Static Change the IP settings 5 Select 6 Connect Custo...

Страница 142: ...two devices via aWi Fi without requiring an AP Connect your device to another device In the application list select 1 Settings Wi Fi Wi Fi Direct Select 2 Scan Select a device 3 When the owner of the other device accepts the connection the devices are connected You can connect your device to multiple devices and send data by selecting Multi connect Send data viaWi Fi Select a file or item from an ...

Страница 143: ...or more devices as file servers The registration methods may vary depending on the device type To get more details about using AllShare Play press FAQ This feature may be unavailable depending on your region or service provider Send a file In the application list select 1 AllShare Play Select a device or web storage that contains media files 2 Select a media category and select the tick box on a f...

Страница 144: ...e to use as a media player 5 Control playback with the keys on your device 6 Manage contents on a web storage server In the application list select 1 AllShare Play Select a web storage server 2 View and manage your files 3 Customise AllShare Play settings In the application list select 1 AllShare Play Press 2 Settings Change the following options 3 Option Function Registered storage View web stora...

Страница 145: ...y language About View AllShare Play information Group Cast You can share images documents and music with other devices that are connected to the sameWi Fi AP This feature may be unavailable depending on your region or service provider Share a file In the application list select 1 Group Cast Select a media type under 2 Start to share with other devices If your device has not connected to aWi Fi AP ...

Страница 146: ...ature may be unavailable depending on your region or service provider In the application list select 1 Settings More settings Tethering and portable hotspot Drag the 2 PortableWi Fi hotspot switch to the right to activate mobile network sharing viaWi Fi Select 3 OK to confirm Select 4 PortableWi Fi hotspot Configure to configure network settings to use your device as an AP Option Function Network ...

Страница 147: ...o specified devices Select Allowed devices create a device list and then select your device s name to change the sharing mode to Only allowed devices Share your device s mobile network via USB Learn to use your device as a wireless modem by making a USB connection with a computer Connect your device to a computer with a USB cable 1 In the application list select 2 Settings More settings Tethering ...

Страница 148: ...ung is not responsible for the loss interception or misuse of data sent or received via the Bluetooth wireless feature Always ensure that you share and receive data with devices that are trusted and properly secured If there are obstacles between the devices the operating distance may be reduced Some devices especially those that are not tested or approved by Bluetooth SIG may be incompatible with...

Страница 149: ... of the other device accepts the connection or enters the same PIN pairing is complete If the pairing is successful the device will search for available services automatically Some devices especially headsets or hands free car kits may have a fixed Bluetooth PIN such as 0000 If the other device has a PIN you must enter it Send data via Bluetooth Select a file or item from an appropriate applicatio...

Страница 150: ...er If you receive a contact it is saved to the phonebook automatically GPS Your device is equipped with a global positioning system GPS receiver Learn to activate location services and use additional GPS functions For better reception of GPS signals avoid using your device in the following conditions Between buildings in tunnels or underground passages or inside buildings In poor weather Around hi...

Страница 151: ...for using mobile networks Use GPS satellites Set to use GPS satellites to find your location Location and Google search Set the device to use your current location for Google search and other Google services VPN connections Learn to create virtual private networks VPNs and connect to them securely over the Internet Your device should already be configured with Internet access If you have trouble a...

Страница 152: ... name IPSec pre shared key Enter a pre shared key IPSec user certificate Select a user certificate that theVPN server uses to identify you You can import certificates from theVPN server or download from the web IPSec CA certificate Select a certificate authority CA certificate that theVPN server uses to identify you You can import certificates from theVPN server or download from the web IPSec serv...

Страница 153: ...d options Set to change the advanced network settings The options available may vary depending on theVPN type When you are finished select 3 Save Connect to a private network In the application list select 1 Settings More settings VPN Select a private network 2 Enter the user name and password and then select 3 Connect ...

Страница 154: ...and then drag the Smart alarm switch to the right to activate simulated nature sounds prior to the main alarm When you are finished select 4 Save To deactivate an alarm select the clock icon next to the alarm To delete an alarm press Delete Stop an alarm When the alarm sounds To stop the alarm select and then drag your finger outside of the large circle To repeat the alarm for the snooze period se...

Страница 155: ...h Select 2 Start to begin the stopwatch Select 3 Lap to record lap times When you are finished select 4 Stop Select 5 Reset to clear recorded times Use the countdown timer In the application list select 1 Clock Timer Set the length of time to count down 2 Select 3 Start to begin the countdown When the timer expires select 4 and then drag your finger outside of the large circle to stop the alarm Us...

Страница 156: ...to update weather information automatically Dock Change the settings for using a desktop dock with your device Calculator Learn to perform mathematical calculations directly on your device like a typical hand held or desktop calculator Perform the calculation In the application list select 1 Calculator Use the keys that correspond to the calculator display to 2 perform basic mathematical operation...

Страница 157: ...oads Select a download category 2 To open a downloaded file select the log 3 To delete a log select the tick box and then select Dropbox Learn to use the Dropbox cloud storage service to save and share your files with others When you save files to your Dropbox folder your device automatically synchronise with the web server and any other computers that have Dropbox installed Activate Dropbox In th...

Страница 158: ... here Photos or videos or Other files Select files 4 Select 5 Upload The files in the folder will be added to the web server and your computer at home View a file In the application list select 1 Dropbox Select a file 2 Help Access help information to learn how to use the device and applications or configure important settings In the application list select 1 Help Select an item to view tips 2 To ...

Страница 159: ...mkv Music mp3 3ga aac m4a wma ogg flac Sound wav mxmf xmf imy midi amr Others doc docx pdf ppt pptx txt xls xlsx htm html vbm vcf vcs vnt jad crt der Some file formats are not supported depending on the device s software If a file size exceeds the memory available an error may occur when you try to open the file View a file In the application list select 1 My Files Select a folder 2 To move up one...

Страница 160: ...a on the web Search for a keyword In the application list select 1 Google Enter a letter or a word of the data to search for 2 To search for data by voice select and say a keyword into your device s microphone Select the item s name you want to access 3 Use Google Now Launch Google search to view Google Now cards that show the information you need at the right time In the application list select 1...

Страница 161: ...le on the go This feature may be unavailable depending on your region or service provider If your pronunciation is unclear when speaking in noisy places or when speaking with offensive or slang words and in dialectal accents the device may not recognise your commands or may perform unwanted commands In the application list select 1 Voice talk If you are launching this application for the first tim...

Страница 162: ...diary saved select 3 to create a new entry Change the today s date and set the weather if 4 necessary Select 5 Tap to add photo and add an image or capture a photo Select 6 Tap to add text and enter text and select Done Select 7 Done View a Mini diary In the application list select 1 Mini diary Select a diary 2 Scroll left or right to view more diaries 3 To send a diary to others press Share via ...

Страница 163: ...settings WPS push button Connect to a securedWi Fi AP with a WPS button WPS PIN entry Connect to a securedWi Fi AP with aWPS PIN Bluetooth Activate the Bluetooth feature to exchange information over short distances Data usage Keep track of your data usage and customise settings for your data limit Mobile data Set to use data connections on any mobile network Set mobile data limit Set a limit for t...

Страница 164: ...cally ShowWi Fi usage Set to show your data usage viaWi Fi Mobile hotspots Search for and use another device s mobile network More settings Change the settings to control connections with other devices or networks Flight mode Disable all wireless functions on your device You can use only non network services USB utilities Connect your device to a computer as a mass storage p 138 Mobile networks Mo...

Страница 165: ... USB tethering Set to use your device as a wireless modem by making a USB connection with a computer Bluetooth tethering Activate the Bluetooth tethering feature to share your mobile network with computers via Bluetooth Help View information about using the tethering features VPN Set up and connect to virtual private networks VPNs Nearby devices File sharing Activate media sharing to allow other D...

Страница 166: ...ge the settings for various sounds on your device Volume Adjust the volume level for call ringtones music and videos system sounds and notifications Vibration intensity Adjust the vibration intensity Device ringtone Select a ringtone to alert you to incoming calls Device vibration Add or select a vibration pattern Default notifications Select a ringtone to alert you to events such as incoming mess...

Страница 167: ...e screen Lock screen Select a background image for the locked screen Home and lock screens Select a background image for the Home screen and the locked screen Multi window Set to activate the MultiWindow feature Screen mode Select a display mode Dynamic Use this mode to make the display tone more vivid Standard Use this mode for normal surroundings Natural Use this mode to make the display tone ap...

Страница 168: ...librate the accelerometer to adjust the horizontal axis of the device for better motion recognition Storage View memory information for your device and memory card You can also format the USB storage and the memory card Formatting a memory card will permanently delete all data from the memory card The actual available capacity of the internal memory is less than the specified capacity because the ...

Страница 169: ...e Application manager View and manage the applications on your device Location services Change the settings for location services Use wireless networks Set to useWi Fi and or mobile networks for finding your location Use GPS satellites Set to use GPS satellites for finding your location Location and Google search Set the device to use your current location for Google search and other Google servic...

Страница 170: ... locked screen Help text Set to show the help text on the locked screen Camera quick access Set the device to launch the camera by tapping and holding the screen and rotating the device while the screen is locked Popup Note on lock screen Set to launch S Note when you double tap the locked screen with the S Pen button pressed Owner information Enter your information that is shown on the locked scr...

Страница 171: ...which helps you locate your device when it is lost or stolen p 39 Find my mobile web page Jump to SamsungDive webpage SamsungDive let you track and remotely control your device when lost or stolen To use this feature you need a Samsung account Set up SIM card lock Lock SIM card Activate or deactivate the PIN lock feature to require the PIN before using the device Change SIM PIN Change the PIN used...

Страница 172: ...ore convenient one hand inputs Language and input Change the settings for text input Language Select a display language for all menus and applications Default Select a default keyboard type for text input Google voice typing Activate the Google voice input feature to enter text by voice To change the voice input settings select Choose input languages Select input languages for Google voice recogni...

Страница 173: ...ce bar Link to contacts Create a link to a contact in the input selection panel You can tap and hold the link to add the contact information Voice Input Activate the voice input feature to enter text by voice on the Samsung Chinese IME keypad One handed operation Set the keyboard to appear on either side of the screen for convenience when entering text with one hand Fuzzy Pinyin Input Select Fuzzy...

Страница 174: ...nput Set to enter text by sweeping on the keypad Keyboard swipe Set to switch text input modes by sweeping your finger left or right across the keypad Pen detection Set the device to open the handwriting panel when you tap the field with the S Pen One handed operation Set the keyboard to appear on either side of the screen for convenience when entering text with one hand Handwriting Activate Handw...

Страница 175: ...yboard Gestures Learn Swype gestures to quickly accomplish desired tasks using shortcuts on the keyboard Preferences Vibrate on keypress Set the device to vibrate when you touch a key Sound on keypress Set the device to emit a sound when you tap a key Show helpful tips Set the device to automatically display tips for your actions when available Auto spacing Set the device to automatically insert a...

Страница 176: ...oice recognition engine Voice search For the Google voice recognition use the following options Language Select a language for Google voice recognition Speech output Set the device to provide voice feedback to alert you to the current action Block offensive words Set to hide offensive words from voice search results Download offline speech recognition Download and install language data for offline...

Страница 177: ...nput Auto start speaker Set to turn on the speakerphone automatically when making a call with theVoice talk application Show body of message Set to view the text of a new message received while in Driving mode Wake up command Set to begin voice recognition when you say the wake up command while using theVoice talk application Only on while charging Set to activate theWake up command feature only w...

Страница 178: ...he mouse or trackpad connected to your device Cloud Change settings for syncing data or files with your Samsung account or Dropbox cloud storage Backup and reset Change the settings for managing your settings and data Back up my data Set to back up your settings and application data to the Google server Backup account Add and view your Google account to back up your data Automatic restore Set to r...

Страница 179: ...es Pan to move icon Set to move an item to another page when you tap and hold the item and then slide the device to the left or right Pan to browse images Set to scroll through an image by sliding the device in any direction when the image is zoomed in Shake to update Set to shake your device to search for Bluetooth devices or Kies air devices Turn over to mute pause Set to mute ringtones pause me...

Страница 180: ...sing the S Pen Accessory Change the accessory settings Dock sound Set the device to play a sound when your device is connected to or removed from a desktop dock Audio output mode Set to use the dock speaker when your device is connected to a desktop dock Desk home screen display Set the device to show the desk clock when your device is connected to a desktop dock Audio output Select a sound output...

Страница 181: ...displayed in 24 hour format Select date format Select a date format Accessibility Accessibility services are special features for those with certain physical disabilities Access and alter the following settings to improve the device accessibility Auto rotate screen Set whether or not to rotate the content automatically when the device is rotated Screen timeout Select the length of time that the de...

Страница 182: ...e To change the settings for speech synthesis engines select Speech rate Select a speed for the text to speech feature Listen to an example Listen to the spoken text for an example Driving mode Activate Driving mode to set the device to read contents aloud Enhance web accessibility Set applications to install web scripts to make their web content more accessible Sound balance Adjust the sound bala...

Страница 183: ...nt to a Location Manager service for testing Select debug app Select applications to debug and prevent errors when you pause debugging Wait for debugger Set to prevent the selected application from loading until the debugger is ready Show touches Set to show the pointer when you touch the screen Show pointer location Set to show the coordinates and traces of the pointer when you touch the screen S...

Страница 184: ...rendering Set to check the time of GPU rendering time Enable traces Set to capture traces of application and system performance Do not keep activities Set to end a running application when you launch a new application Limit background processes Set to limit the number of processes that can run in the background Show all ANRs Set the device to alert you to unresponsive applications that are running...

Страница 185: ...n disable this feature by using the Lock SIM card menu PUK Your SIM or USIM card is blocked usually as a result of entering your PIN incorrectly several times You must enter the PUK supplied by your service provider PIN2 When you access a menu requiring the PIN2 you must enter the PIN2 supplied with the SIM or USIM card For details contact your service provider Your device displays network or serv...

Страница 186: ...to the latest version If the touch screen is scratched or damaged take it to your local Samsung Service Centre Your device freezes or has fatal errors If your device freezes or hangs you may need to close programs or reset the device to regain functionality If your device is frozen and unresponsive press and hold the Power key for 6 8 seconds The device will reboot automatically If this does not s...

Страница 187: ...thers cannot hear you speaking on a call Ensure that you are not covering the built in microphone Ensure that the microphone is close to your mouth If using a headset ensure that it is properly connected Audio quality is poor Ensure that you are not blocking the device s internal antenna When you are in areas with weak signals or poor reception you may lose reception Move to another area and try a...

Страница 188: ...you use applications that require more power or use applications on your device for an extended period of time your device may feel hot to the touch This is normal and should not affect your device s lifespan or performance Error messages appear when launching the camera Your Samsung mobile device must have sufficient available memory and battery power to operate the camera application If you rece...

Страница 189: ... with another radio receiver If you can hear the station with another receiver your device may require service Contact a Samsung Service Centre Error messages appear when opening music files Some music files may not play on your Samsung mobile device for a variety of reasons If you receive error messages when opening music files on your device try the following Free some memory by transferring fil...

Страница 190: ...h range 10 m If the tips above do not solve the problem contact a Samsung Service Centre A connection is not established when you connect the device to a computer Ensure that the USB cable you are using is compatible with your device Ensure that you have the proper drivers installed and updated on your computer If you are aWindows XP user ensure that you have Windows XP Service Pack 3 or higher in...

Страница 191: ... your service provider www samsung com hk English HK 02 2013 Rev 1 0 To install Kies PC Sync Download the latest version of Kies from the 1 Samsung website www samsung com hk kies and install it on your computer Connect your device to a computer with a USB 2 cable Refer to the Kies help for more information ...

Отзывы: