background image

Getting started

19

Get to know your device

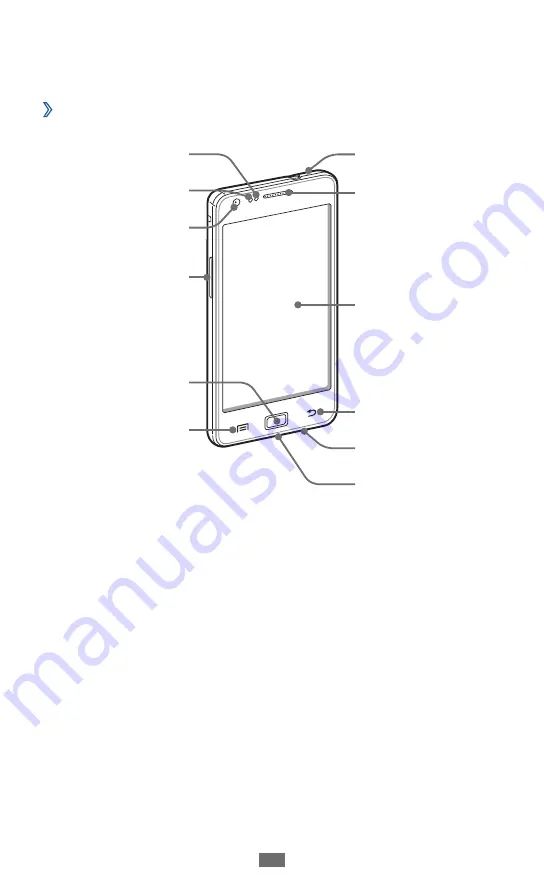
Device layout

 ›

1. Active only when you use the speakerphone feature or record 

videos.

Front camera lens

Proximity sensor

Home key

Volume key

Light sensor

Menu key

Multifunction jack

Earpiece

Touch screen

Back key

Mouthpiece

Mouthpiece

1

Содержание GT-I9100T

Страница 1: ... provider www samsung com English AUS 06 2011 Rev 1 0 To install Kies PC Sync Download the latest version of Kies from the 1 Samsung website www samsung com and install it on your PC Using a PC data cable connect your device to your 2 PC Samsung Kies will launch automatically Refer to the Kies help for more information ...

Страница 2: ...GT I9100T usermanual ...

Страница 3: ...r manual may differ in appearance from the actual product Content in this user manual may differ from the product or from software provided by service providers or carriers and is subject to change without prior notice Refer to www samsung com for the latest version of the user manual Available features and additional services may vary by device software or service provider Formatting and delivery...

Страница 4: ...ence Instructional icons Before you start familiarise yourself with the icons you will see in this manual Warning situations that could cause injury to yourself or others Caution situations that could cause damage to your device or other equipment Note notes usage tips or additional information Refer to pages with related information for example p 12 represents see page 12 Followed by the order of...

Страница 5: ...out the prior written permission of Samsung Electronics Trademarks SAMSUNG and the SAMSUNG logo are registered trademarks of Samsung Electronics The Android logo Google Search Google Maps Google Mail YouTube Android Market and Google Talk are trademarks of Google Inc Bluetooth is a registered trademark of the Bluetooth SIG Inc worldwide Oracle and Java are registered trademarks of Oracle and or it...

Страница 6: ...ays DivX video Visit www divx com for more information and software tools to convert your files into DivX video DivX Certified to play DivX video up to HD 720p including premium content May play DivX video up to HD 1080p ABOUT DIVXVIDEO ON DEMAND This DivX Certified device must be registered in order to play purchased DivXVideo on Demand VOD movies To obtain your registration code locate the DivXV...

Страница 7: ...e on and off 18 Get to know your device 19 Use the touch screen 23 Lock or unlock the touch screen and keys 24 Get to know the idle screen 24 Access applications 27 Customise your device 29 Enter text 34 Download applications from Android Market 39 Download files from the web 40 Synchronise data 40 Communication 42 Calling 42 Messaging 49 Google Mail 51 Email 53 Talk 56 Social Hub 57 IM 57 ...

Страница 8: ...aker 72 Music 74 Music Hub 76 FM radio 77 Game Hub 80 Personal information 81 Contacts 81 Calendar 85 Task 87 Memo 87 Voice recorder 88 Web 90 Internet 90 Maps 93 Latitude 95 Places 95 Navigation 96 Google Search 97 YouTube 97 Samsung Apps 98 Market 99 Readers Hub 99 News Weather 100 ...

Страница 9: ...ctions 111 VPN connections 113 Tools 115 Clock 115 Calculator 117 Downloads 118 Kies air 119 Mini diary 120 My files 121 Polaris Office 121 Task manager 122 Voice commands 123 Voice Search 123 Voice talk 124 Settings 125 Access the Settings menu 125 Wireless and network 125 Call 127 Sound 129 Display 130 Power saving mode 131 ...

Страница 10: ...cations 133 Accounts and sync 134 Motion 135 Privacy 135 Storage 136 Language and keyboard 136 Voice input and output 138 Accessibility 140 Dock settings 141 Date and time 141 About phone 141 Troubleshooting 142 Safety precautions 148 Index 159 ...

Страница 11: ...ble in your region or offered by your service provider You can obtain additional accessories from your local Samsung dealer The supplied accessories perform best for your device Accessories other than the supplied ones may not be compatible with your device Install the SIM or USIM card and battery When you subscribe to a cellular service you will receive a Subscriber Identity Module SIM card with ...

Страница 12: ...d hold the Power Lock key and 1 select Power off OK to turn it off Remove the back cover 2 Be careful not to damage your fingernails when you remove the back cover Insert the SIM or USIM card with the gold coloured 3 contacts facing down Do not insert a memory card into the SIM card slot ...

Страница 13: ...the device for the first time you must charge the battery You can charge the device with a travel adapter or by connecting the device to a PC with a PC data cable Use only Samsung approved chargers and cables Unauthorised chargers or cables can cause batteries to explode or damage your device ...

Страница 14: ... using your device If the battery is completely discharged you cannot turn on the device even with the travel adapter connected Allow a depleted battery to charge for a few minutes before you try to turn on the device Charge with a travel adapter Plug the small end of the travel adapter into the 1 multifunction jack Connecting the travel adapter improperly may cause serious damage to the device An...

Страница 15: ...and the charger to a Samsung Service Centre When the battery is fully charged the battery icon is no 3 longer moving unplug the travel adapter from the device and then from the power outlet Do not remove the battery before removing the travel adapter Doing this may cause damage to the device To save energy unplug the travel adapter when not in use The travel adapter does not have a power switch so...

Страница 16: ...g on memory card manufacturer and type Samsung uses approved industry standards for memory cards but some brands may not be fully compatible with your device Using an incompatible memory card may damage your device or the memory card and can corrupt data stored on the card Your device supports only the FAT file structure for memory cards If you insert a card formatted with a different file structu...

Страница 17: ...irst unmount it for safe removal In Idle mode select 1 Applications Settings Storage Unmount SD card OK Remove the back cover and battery 2 Push the memory card gently until it disengages from the 3 device Pull the memory card out of the memory card slot 4 Remove the memory card 5 Replace the battery and back cover 6 Do not remove a memory card while the device is transferring or accessing informa...

Страница 18: ...age Unmount SD card OK Format SD card Format SD card Erase everything Before formatting the memory card remember to make backup copies of all important data stored on your device The manufacturer s warranty does not cover loss of data resulting from user actions Attach a hand strap Remove the back cover 1 Slide a hand strap through the slot and hook it over the 2 small projection Replace the back ...

Страница 19: ...ions to set up your device To turn off your device press and hold the Power Lock key and then select Power off OK Follow all posted warnings and directions from official personnel when in areas where the use of wireless devices is restricted such as aeroplanes and hospitals To use your device s non network services only switch to Flight mode Press and hold the Power Lock key and select Flight mode...

Страница 20: ...evice Device layout 1 Active only when you use the speakerphone feature or record videos Front camera lens Proximity sensor Home key Volume key Light sensor Menu key Multifunction jack Earpiece Touch screen Back key Mouthpiece Mouthpiece1 ...

Страница 21: ...Menu Open a list of options available on the current screen Open the quick search bar press and hold Home Return to the idle screen Open the list of recent applications press and hold Back Return to the previous screen Volume Adjust the device s volume Headset jack Internal antenna Rear camera lens Power Lock key Speaker Back cover Flashbulb ...

Страница 22: ...o signal Signal strength GPRS network connected EDGE network connected UMTS network connected OpenWLANs available WLAN connected WLAN Direct connected Bluetooth activated Bluetooth headset connected GPS activated Call in progress Call on hold Speakerphone activated Missed call Synchronised with the web Uploading data Downloading data ...

Страница 23: ...timedia message New email message New voice mail message Alarm activated Event notification Roaming outside of normal service area Silent mode activated Vibration mode activated Flight mode activated Music playback in progress Music playback paused FM radio turned on in the background Error occurred or caution required Battery power level 10 00 Current time ...

Страница 24: ...tection film before using your device Your touch screen has a layer that detects small electrical charges emitted by the human body For best performance tap the touch screen with your fingertip The touch screen will not react to touches of sharp tools such as a stylus or pen Control your touch screen with the following actions Tap Touch once with your finger to select or launch a menu option or ap...

Страница 25: ...ock turn on the screen by pressing the Power Lock key or the Home key and then flick the window with your finger Get to know the idle screen When the device is in Idle mode you will see the idle screen From the idle screen you can view your device s status and access applications The idle screen has multiple panels Scroll left or right to a panel of the idle screen You can also select a dot at the...

Страница 26: ...e 1 Drag the item to the location you want 2 Remove items from the idle screen Tap and hold an item to remove 1 The trash bin appears at the bottom of the idle screen Drag the item to the trash bin 2 When the item turns red release the item 3 Use the shortcuts panel In Idle mode or while using an application tap the indicator icons area and drag your finger down to open the shortcuts panel You can...

Страница 27: ... region or service provider Add or remove panels to the idle screen You can add or remove panels of the idle screen to organise widgets according to your preferences and needs In Idle mode press 1 Edit You can also place your two fingers on the screen and pinch to switch to Edit mode Add or remove panels by using the following features 2 To remove a panel tap and hold the thumbnail of a panel and ...

Страница 28: ... a Google account You can add a shortcut to an application by tapping and holding the application icon from the application list You can move the icon to the location you want on the idle screen Press 4 to return to the previous screen Press the Home key to return to the idle screen If you rotate the device while using some features the interface will automatically rotate as well To prevent the in...

Страница 29: ...ess 4 Save To add a folder or panel to the menu screen In the application list press 1 Edit Tap and hold an application 2 Drag the application icon to 3 Add Folder or Add Page at the bottom of the screen Repeat steps 2 3 to add more applications 4 Drag 5 Add Folder or Add Page to the menu screen A new folder or panel containing the applications is added to the menu screen If you added a folder ent...

Страница 30: ...sumption To avoid these problems end unnecessary programs using the task manager In Idle mode open the application list and select 1 Task manager Active applications The list of all the applications currently running on your device appears To close an application select 2 Exit To close all active applications select Exit all Customise your device Get more from your device by customising it to matc...

Страница 31: ... Press and hold the Power Lock key and select Silent mode You can set the device to alert you to various events in Silent mode In Idle mode open the application list and select Settings Sound Vibration Always or Only in Silent mode When you switch to Silent mode will appear in place of Change your ringtone In Idle mode open the application list and select 1 Settings Sound Phone ringtone Select a r...

Страница 32: ... to 2 Automatic brightness Drag the slider 3 to adjust the level of brightness Select 4 OK The brightness level of the display will affect how quickly the device consumes battery power Set a screen lock You can lock the touch screen by activating the screen lock feature Your device will require the unlock code each time you turn on the device or unlock the touch screen If you forget your unlock co...

Страница 33: ...ontinue Draw a pattern again to confirm 5 Select 6 Confirm Set an unlock PIN code In Idle mode open the application list and select 1 Settings Location and security Set up screen lock PIN Enter a new PIN numeric and select 2 Continue Enter the PIN again and select 3 OK Set an unlock password In Idle mode open the application list and select 1 Settings Location and security Set up screen lock Passw...

Страница 34: ...lock the SIM or USIM card If you block your SIM or USIM card by entering an incorrect PUK bring the card to your service provider to unblock it Activate the mobile tracker When someone inserts a new SIM or USIM card in your device the mobile tracker feature will automatically send the contact number to specified recipients to help you locate and recover your device To use this feature you need a S...

Страница 35: ... be sent to the recipients 7 Select 8 Done Enter text You can enter text by selecting characters on the virtual keypad or by inputting handwriting on the screen You cannot enter text in some languages To enter text you should change the writing language to one of the supported languages p 136 Change the keyboard type You can change the keyboard type Tap and hold the text input field and select Inp...

Страница 36: ...inger on the last character 3 When the word displays correctly select 4 to insert a space If the correct word does not display select an alternative word from the list that appears Repeat steps 1 4 to complete your text 5 You can also tap the keys to enter text You can tap and hold a key to enter characters on the upper half of the key When you tap and hold a key until the character list appears y...

Страница 37: ...n Show the alternative word list for the selected characters Changed the text input method tap and hold 3 Switch between Symbol Number mode and ABC mode 4 Change the input language 5 Clear your input 6 Start a new line 7 Enter text by voice This feature may be unavailable depending on the selected input language 8 Insert a space ...

Страница 38: ...er text by selecting alphanumeric keys or writing on 2 the screen You can also use the following keys 1 2 3 5 4 6 7 Number Function 1 Change case 2 Switch between Symbol Number mode and ABC mode 3 Enter text by voice This icon is available only when you activate the voice input feature for the Samsung keypad This feature may be unavailable depending on the selected input language 4 Clear your inpu...

Страница 39: ...Copy and paste text While you are entering text you can use the copy and paste feature to use text in other applications Place the cursor on the text you want to copy 1 Select 2 Select 3 Select word or Select all to select the text you want Drag 4 or to select the text you want Select 5 Copy to copy or Cut to cut the text onto the clipboard In another application place the cursor where you want to...

Страница 40: ... provider Your device will save user files from downloaded applications to the internal moviNAND memory To save the files to the memory card connect your device to a PC and copy them from moviNAND to memory card Install an application In Idle mode open the application list and select 1 Market Select 2 Accept when the terms and conditions appear Search for a file or application and download it 3 Un...

Страница 41: ...oad files from the web In Idle mode open the application list and select 1 Internet Search for a file or application and download it 2 To install applications downloaded from websites other than Android Market you must select Settings Applications Unknown sources OK Synchronise data You can synchronise data with various web servers and back up or restore your data Once the synchronisation is compl...

Страница 42: ...t Log in Activate automatic sync In Idle mode open the application list and select 1 Settings Accounts and sync Select 2 Auto sync Select an account 3 Select the applications you want to synchronise 4 To exclude applications from automatic synchronisation clear the check boxes next to the applications you want Synchronise data manually In Idle mode open the application list and select 1 Settings A...

Страница 43: ...f and locks the touch screen to prevent accidental inputs when you hold the device near your face p 128 Static electricity discharged from your body or clothing may interfere with the proximity sensor during a call Make a call 1 In Idle mode open the application list and select Phone Keypad and enter an area code and a phone number Select 2 to make a voice call For a video call select To end the c...

Страница 44: ...ll Set reject messages Call an international number In Idle mode open the application list and select 1 Phone Keypad and tap and hold 0 to insert the character Enter the complete number you want to dial country 2 code area code and phone number and then select to dial the number Use a headset By plugging a headset into the device you can answer and control calls hands free To answer a call press t...

Страница 45: ... screen select Keypad To activate the speakerphone feature select Speaker In noisy environments you may have difficulty hearing some calls while using the speakerphone feature For better audio performance use the normal phone mode To turn off the microphone so that the other party cannot hear you select Mute To listen and talk to the other party via a Bluetooth headset select Headset To open the p...

Страница 46: ...ge to be shown to the other party press Outgoing image To open the dialling screen press Dialpad To listen and talk to the other party via a Bluetooth headset press Switch to headset To activate the speakerphone feature press Speaker On Off To use the other party s image tap and hold the other party s image You can capture an image of the screen or record the video call View and dial missed calls ...

Страница 47: ...tically To activate auto rejection and create auto reject lists In Idle mode open the application list and select 1 Settings Call Call rejection Select 2 Auto reject mode an option Option Function All numbers Reject all calls Only black list Reject calls from phone numbers on the black list Select 3 Black list Select 4 Add Select an option under 5 Match criteria if necessary Enter a phone number a...

Страница 48: ...to another number that you specify You can set this feature separately for several conditions when you are not able to answer calls such as when you are already on the phone or when you are outside of the service area In Idle mode open the application list and select 1 Settings Call Call forwarding a call type Select a condition 2 Enter a number to which calls will be forwarded and select 3 Enable...

Страница 49: ...ings Call Additional settings Call waiting Your setting will be sent to the network View call logs You can view logs of your calls filtered by their types In Idle mode open the application list and select 1 Phone Logs Press 2 View by an option to sort the call logs From the call logs you can make a call or send a message directly to a contact by quickly flicking the contact to the left or right Se...

Страница 50: ...rovider Send a text message 1 In Idle mode open the application list and select Messaging Select 2 Add recipients of your message 3 Enter phone numbers manually separating them with a semicolon or a comma Select phone numbers from the lists by selecting Select 4 Tap to enter message and enter your message text To insert emoticons press Insert smiley Select 5 Send to send the message Send a multime...

Страница 51: ... and add a subject for the message Select 5 Tap to enter message and enter your message text To insert emoticons press Insert smiley Select 6 and add an item You can select a file from the file list or create a new photo video or sound Select 7 Send to send the message View a text or multimedia message 1 In Idle mode open the application list and select Messaging Your messages are grouped into mes...

Страница 52: ...ice provider can give you the number Google Mail You can retrieve new email messages from Google Mail to your Inbox When you access this application the Inbox screen appears The total number of unread messages displays in the title bar and unread messages display in bold If you have labelled a message its label appears in a coloured rectangle on the message This feature may be unavailable dependin...

Страница 53: ...llowing options To reply to the message select To reply to the message including all recipients select Reply all To forward the message to other people select Forward To view an attachment select Preview To save it to your device select Download To archive the message select Archive To delete the message select Delete To move to the previous or next message select or Organise email by labels You c...

Страница 54: ...ivated Filter messages From the Inbox screen press 1 Go to labels Select the label of the messages you want to view 2 Email Learn to send or view email messages via your personal or company email account Set up an email account 1 In Idle mode open the application list and select Email Enter your email address and password 2 Select 3 Next for general email accounts such as Google Mail andYahoo or M...

Страница 55: ...lect 2 Add recipients of your message 3 Enter email addresses manually separating them with a semicolon or a comma Select email addresses from the lists by selecting To add more recipients press Add Cc Bcc Select the subject field to enter a subject 4 Select the text input field to enter your email text 5 Select 6 Attach and attach a file You cannot attach Digital Rights Management DRM protected f...

Страница 56: ...ication list and select 1 Email an email account Press 2 Refresh to update the message list Select an email message 3 From the message view use the following options To move to the previous or next message select or To move the message to another folder select To delete the message select To reply to the message select Reply To forward the message to other people select Forward To view an attachme...

Страница 57: ...k contacts at a glance Press 2 Add friend Enter an email address of the friend and select 3 Send invitation When your friend accepts the invitation the friend is added to your friend list Start a chat In Idle mode open the application list and select 1 Talk Select a friend from the friend list The chat screen opens 2 Enter your message and select 3 Send To insert emoticons press More Insert smiley...

Страница 58: ...n list and select 1 Social Hub Check and use contents delivered from Social Hub 2 IM Learn to chat with friends and family from any of the universal instant messengers In Idle mode open the application list and select 1 IM If you are launching this application for the first time 2 select the check box next to I accept all the terms above and select Agree Select 3 Add account a messenger Enter your...

Страница 59: ...esolutions up to 1920 x 1080 pixels The camera automatically turns off when you do not use it for a specified period The memory capacity may differ depending on the shooting scene or shooting conditions Capture a photo 1 In Idle mode open the application list and select Camera to turn on the camera Aim the lens at the subject and make any necessary 2 adjustments 1 2 4 6 5 3 ...

Страница 60: ...umber of photos you can take according to available memory Default storage location 5 Switch to the camcorder 6 Capture a photo Press theVolume key to zoom in or out 3 You can also tap the screen with two fingers and spread them apart move your fingers closer together to zoom out The zoom function may be unavailable when shooting in the highest resolution Tap where you want to focus on the preview...

Страница 61: ...ontact select Set as To delete a photo select Delete Capture a photo by using preset options for various scenes Your camera provides you with predefined settings for various scenes You can simply select the proper mode for your shooting conditions and subjects For example when you take photos at night select the night mode that uses an extended exposure In Idle mode open the application list and s...

Страница 62: ...list and select 1 Camera to turn on the camera Select 2 Shooting mode Smile shot Make any necessary adjustments 3 Select 4 Aim the camera lens at your subject 5 Your device recognises people in an image and detects their smiles When the subject smiles the device automatically takes a photo Capture a beauty photo You can hide facial imperfections using Beauty mode In Idle mode open the application ...

Страница 63: ...the green frame and viewfinder the camera will automatically take the next photo Repeat step 5 to complete the panoramic photo 6 Capture a photo of action You can capture shots of a moving subject and then combine them into a single photo that shows the action In Idle mode open the application list and select 1 Camera to turn on the camera Select 2 Shooting mode Action shot Make any necessary adju...

Страница 64: ...s the following options Option Function Self shot Switch between the front and rear camera lenses Flash Change the flash setting You can manually turn the flash on or off or set the camera to automatically use the flash when needed Shooting mode Change the shooting mode Scene mode Change the scene mode Exposure value Adjust the exposure value Focus mode Take close up photos or set the camera to fo...

Страница 65: ...ti Shake Reduce blur caused by the device s vibration or movement Auto contrast Automatically adjust contrast between your subject and background Blink detection Set the camera to alert you when people close their eyes Guidelines Display the guidelines on the preview screen Review Set the camera to display the taken image Image quality Set the quality level for your photos GPS tag Set the camera t...

Страница 66: ...der Aim the lens at the subject and make any necessary 3 adjustments 1 2 6 5 4 3 Number Function 1 Change the camcorder settings 2 Open the image viewer to view videos you recorded 3 Use camcorder shortcuts Change the flash setting Change the recording mode or switch between the front and rear camera lenses You can add or remove shortcuts to frequently used options p 68 ...

Страница 67: ...ers closer together to zoom out The zoom function may be unavailable when recording in the highest resolution Select 5 to start recording Select 6 to stop recording The video is saved automatically The camcorder may not be able to properly record videos to a memory card with a slow transfer speed After recording videos select the image viewer icon to view the recorded videos To view more videos sc...

Страница 68: ...ording a video Effects Apply a special effect such as sepia or black and white tones Resolution Change the resolution option White balance Adjust the colour balance according to lighting conditions Outdoor visibility Activate Outdoor visibility to select an appropriate lighting condition Video quality Set the quality level for your videos Guidelines Display the guidelines on the preview screen Rev...

Страница 69: ...list Press 3 to return to the preview screen Videos Learn to use the video player to play various kinds of videos The video player supports the following file formats 3gp mp4 avi wmv flv mkv Codec MPEG4 H 263 Sorenson H 263 H 264 VC 1 DivX XviD Some file formats are not supported depending on the software of the device If the file size exceeds the available memory an error can occur when you open ...

Страница 70: ...forward Scan forward in a file tap and hold Activate the 5 1 channel surround sound system when a headset is connected Adjust the volume Stop playback and return to the playlist Gallery Learn to view photos and play videos saved in your device s memory and memory card Supported file formats Type Format Image bmp gif jpg png Video 3gp mp4 avi wmv flv mkv Codec MPEG4 H 263 Sorenson H 263 H 264 VC 1 ...

Страница 71: ...elect 3 or at the top right of the screen Select a photo with no icon to view 4 While viewing a photo use the following options To view more photos scroll left or right To zoom in or out tap the screen with two fingers and spread them apart move your fingers closer together to zoom out If you activated tilting motions you can zoom in or out by tapping and holding two points with your fingers and t...

Страница 72: ... Select 3 New selection OK To add to or subtract from the selection border select Add to selection or Remove from selection To reverse the selection select Inverse selection To change the selection size select To rotate or flip the image select To crop the image select To undo or redo your last action select or Drag your finger over the area you want to select 4 Select 5 to apply a colour effect o...

Страница 73: ...lect 1 Video maker Rotate the device to landscape view 2 Select 3 New Select a frame theme and select 4 Apply Select an appropriate icon on the left pane of the screen 5 to add media files Tap and hold a file and then drag it to the bottom pane of 6 the screen and select Done To add more files repeat step 6 To select the duration that an image displays drag the image to the red line and select the...

Страница 74: ...4 file to begin Move the end bracket to the point where you want the file 5 to end Save the edited video 6 Split a video Launch the video editor and add media files 1 Select 2 Drag an image or video to the red line 3 Move to the point where you want to divide the file into 4 two clips and select Save the edited video 5 Apply an effect to a video Launch the video editor and add media files 1 Select...

Страница 75: ...iles to your device Start by transferring files to your device or memory card Download from the wireless web p 90 Download from a PC with Samsung Kies p 111 Receive via Bluetooth p 103 Copy to your memory card p 112 Play music After transferring music files to your device or memory card In Idle mode open the application list and select 1 Music Select a music category 2 Select a music file 3 Contro...

Страница 76: ...Scan forward in a file tap and hold 1 These icons are shown when you tap the player screen Create a playlist In Idle mode open the application list and select 1 Music Select 2 Playlists Press 3 Create Enter a title for your new playlist and select 4 Save Select 5 Add music Select the files you want to include and select 6 Add During playback you can add files to a playlist by pressing Add to playl...

Страница 77: ... player settings In Idle mode open the application list and select 1 Music Press 2 Settings Adjust the following settings to customise your music 3 player Option Function Equaliser Select a default equaliser type Sound effect Select a sound effect Music menu Select music categories to display on the music library screen Visualisation Display an animated visualisation during playback Music Hub You ...

Страница 78: ...to listen to music and news on the FM radio To listen to the FM radio you must connect a headset which serves as the radio antenna Listen to the FM radio Plug a headset into the device 1 In Idle mode open the application list and select 2 FM radio The FM radio scans and saves available stations automatically The first time you turn on the FM radio it will start automatic tuning Select the radio st...

Страница 79: ...to the favourites list 4 Adjust the volume 5 Fine tune the frequency Save a radio station automatically Plug a headset into the device 1 In Idle mode open the application list and select 2 FM radio Press 3 Scan a scanning option The FM radio scans and saves available stations automatically Select the radio station you want from the all station list 4 and press to return to the FM radio screen ...

Страница 80: ...omise your FM radio 3 Option Function Region Select your region Background playing Set whether or not to run the FM radio in the background while using other applications If this feature is on you can control the FM radio from the shortcuts panel Show Station ID Set whether or not to show the station ID on the FM radio screen Station IDs are available only from radio stations that provide this inf...

Страница 81: ... 1 Game Hub If you are launching this application for the first time 2 select the check box next to Do not show for 90 days and select Confirm Select and install a game 3 Follow the on screen instructions 4 Available games may vary depending on your region or service provider Controls and options of games may vary ...

Страница 82: ... location 3 If you have more than one account select an account to which you want to add the contact Enter contact information 4 Select 5 Save to add the contact to memory You can also create a contact from the dialling screen In Idle mode open the application list and select 1 Phone Keypad Enter a phone number 2 Select 3 Add to Contacts Create contact Select a memory location 4 If you have more t...

Страница 83: ...ng options To call the contact select or To send a message select To edit the contact information press Edit Set a speed dial number In Idle mode open the application list and select 1 Contacts Press 2 More Speed dial setting Select a location number 3 a contact Select a phone number if necessary 4 You can quickly dial this number by tapping and holding the location number from the dialling screen...

Страница 84: ...n Idle mode open the application list and select 1 Contacts Press 2 More View Friends Select an account 3 Select contacts and select 4 Add You can add comments to messages uploaded by your contacts and view their shared photos In Idle mode open the application list and select Contacts a contact Activities or Media Create a group of contacts By creating groups of contacts you can manage multiple co...

Страница 85: ...a memory location 3 If you have more than one account select an account to which you want to add the contact Select contacts to copy and select 4 Import To copy contacts from your device to the SIM or USIM card In Idle mode open the application list and select 1 Contacts Press 2 Import Export Export to SIM card Select contacts to copy and select 3 Export OK Import or export contacts To import cont...

Страница 86: ...select 5 OK To export contacts from your device to a memory card In Idle mode open the application list and select 1 Contacts Press 2 Import Export Export to SD card Select 3 OK to confirm Calendar Learn to create and manage daily weekly or monthly events and set alarms to remind yourself of important events Create an event In Idle mode open the application list and select 1 Calendar Select 2 Tap ...

Страница 87: ... a small square To move to a specific day by entering a date manually press Go to enter the date by selecting or and select Set To select today s date press Today Select an event to view its details 3 You can send the event to others by pressing Send via an option Stop an event alarm If you set an alarm for a calendar event the event alarm icon will appear at the specified time Open the shortcuts ...

Страница 88: ...In Idle mode open the application list and select 1 Task Press 2 List by an option to sort the tasks Select a task to view its details 3 For completed tasks with an expired deadline you can set their status to completed by selecting the check box Memo Learn to record important information to save and view at a later date Create a memo In Idle mode open the application list and select 1 Memo If the...

Страница 89: ...lect You can send the memo to others by tapping and holding the memo and selecting Send Voice recorder Learn to operate your device s voice recorder Record a voice memo In Idle mode open the application list and select 1 Voice recorder Select 2 Record to start recording Speak into the microphone 3 When you are finished select 4 Stop Your memo is saved automatically To record more voice memos selec...

Страница 90: ...sonal information 89 Play a voice memo In Idle mode open the application list and select 1 Voice recorder Select 2 List Select a voice memo to play 3 You can send the voice memo to others by pressing Share ...

Страница 91: ...etails contact your service provider Available icons may vary depending on your region or service provider Browse web pages In Idle mode open the application list and select 1 Internet to launch a specified homepage To access a specific web page select the URL input field enter the web address URL of the web page and select Navigate web pages with the following keys 2 2 1 The above screen may diff...

Страница 92: ...new window press New window To view the currently active windows press Windows You can open multiple pages and switch back and forth between them To adjust the brightness of the screen press Browser brightness This feature may be unavailable depending on your region To reload the current web page press Refresh To go to a next page in history press Forward To bookmark the current web page press Mor...

Страница 93: ... the application list and select 1 Internet Select the URL input field 2 Select 3 and say a keyword into your device s microphone The device searches for information and web pages related with the keyword Bookmark your favourite web pages If you know the web address of the web page you can manually add a bookmark To add a bookmark In Idle mode open the application list and select 1 Internet Select...

Страница 94: ... others select Share link To copy the web address URL of the web page select Copy link URL To delete the bookmark select Delete bookmark To use the web page as your homepage of the browser select Set as homepage Access the frequently visited pages or the recent history In Idle mode open the application list and select 1 Internet Select 2 Most visited or History Select a web page to access 3 You ca...

Страница 95: ...lect To zoom in or out select or To search for a place around you select To add layers to the map select To view your current location select Get directions to a specific destination In Idle mode open the application list and select 1 Maps Press 2 Directions Enter the addresses of the starting location and the 3 ending location To enter an address from your contact list or point the location on th...

Страница 96: ...device automatically joins Latitude Select 2 Select from Contacts or Add via email address Select a friend you want to add or enter an email address 3 and select Add friends Select 4 Yes When your friend accepts your invitation you can share locations Press 5 See map Your friends locations are marked with their photos on the map Places Learn to search for a place around you This feature may be una...

Страница 97: ... feature may be unavailable depending on your region or service provider In Idle mode open the application list and select 1 Navigation If you are launching this application for the first time 2 select Accept Enter your destination by using one of the following 3 methods Speak Destination Speak your destination such as Navigate to destination Type Destination Enter your destination with the virtua...

Страница 98: ...s name you want to access 3 YouTube Learn to view and share videos viaYouTube This feature may be unavailable depending on your region or service provider Watch videos In Idle mode open the application list and select 1 YouTube If you are launching this application for the first time 2 select Accept Select a video from the list 3 Rotate the device to landscape view 4 Control playback with the icon...

Страница 99: ...y adjustments 3 Select 4 to start recording Select 5 to stop recording Select 6 Save to upload the video that you have recorded Enter your user name and password and select 7 Sign in if necessary Enter details of the upload and select 8 Upload Samsung Apps Samsung Apps allows you to simply and easily download an abundance of applications directly to your device Featuring a wealth of games news ref...

Страница 100: ...g Apps Search for and download applications as desired 2 Market You can download games ringtones or other applications from the Android Market This feature may be unavailable depending on your region or service provider In Idle mode open the application list and select 1 Market Search for a file and download it to the device 2 p 39 Readers Hub Learn to use the integrated readers hub for accessing ...

Страница 101: ...cation list and select 1 News Weather Select 2 Weather at the top of the screen Your device searches for your current location and displays the weather information You can change the location to view the weather information in another region Press Settings Weather settings and clear the check box next to Use My Location Then select a location in Set location Read news articles In Idle mode open th...

Страница 102: ...amsung is not responsible for the loss interception or misuse of data sent or received via the Bluetooth wireless feature Always ensure that you share and receive data with devices that are trusted and properly secured If there are obstacles between the devices the operating distance may be reduced Some devices especially those that are not tested or approved by Bluetooth SIG may be incompatible w...

Страница 103: ...ce enters the same PIN or accepts the connection pairing is complete If the pairing is successful the device will automatically search for available services Some devices especially headsets or hands free car kits may have a fixed Bluetooth PIN such as 0000 If the other device has a PIN you must enter it Send data using the Bluetooth wireless feature Select a file or item such as a contact calenda...

Страница 104: ...evice Received data is saved to the bluetooth folder If you receive a contact it is automatically saved to the phonebook Wi Fi Learn to use your device s wireless networking capabilities to activate and connect to any wireless local area network WLAN compatible with the IEEE 802 11 b g n standards You can connect to the internet or other network devices anywhere an access point or wireless hotspot...

Страница 105: ...the application list and select 1 Settings Wireless and network Wi Fi settings The device will automatically search for availableWLANs Select a network under 2 Wi Fi networks Enter a password for the network if necessary 3 Select 4 Connect Add aWLAN manually In Idle mode open the application list and select 1 Settings Wireless and network Wi Fi settings AddWi Fi network Enter the SSID for the netw...

Страница 106: ...nnect to aWLAN with aWPS PIN In Idle mode open the application list and select 1 Settings Wireless and network Wi Fi settings Select a network indicated by theWPS icon and select 2 WPS PIN On the access point enter the PIN and press the start 3 button Wi Fi Direct Learn to use theWLAN Direct feature to connect two devices via aWLAN without requiring an access point Connect your device to anotherWL...

Страница 107: ...or My files Select an option for sending data via aWLAN 2 The method for selecting an option may vary by data type Search for and select aWLAN device 3 Receive data via aWLAN When prompted select OK to confirm that you are willing to receive data Received data is saved to the ShareViaWifi folder AllShare Learn to use the Digital Living Network Alliance DLNA service that enables you to share media ...

Страница 108: ...the following settings to customise the DLNA 3 feature Option Function Device name Enter a name for your device as a media server Share video Turn on video sharing with other DLNA enabled devices Share picture Turn on image sharing with other DLNA enabled devices Share audio Turn on music sharing with other DLNA enabled devices Upload from other devices Set whether or not to accept the upload from...

Страница 109: ...Playback may be buffered depending on the network connection and the connected server Play files of one device on the other device In Idle mode open the application list and select 1 AllShare Select 2 Remote device Your device automatically searches for DLNA enabled devices Select a device as the media server the one that 3 contains media files Select a media category and a file 4 Select a player ...

Страница 110: ...table hotspot Select 2 PortableWi Fi hotspot settings OK Select 3 PortableWi Fi hotspot to activate theWLAN hotspot Select 4 Configure portableWi Fi hotspot to customise theWLAN hotspot Option Function Network SSID View and edit the device name that will be shown to external devices Security Select the security type When you are finished select 5 Save From another device locate your device s name ...

Страница 111: ...to USB tethering The sharing method for the network connection may differ depending on the PC s operating system GPS Your device is equipped with a global positioning system GPS receiver Learn to activate location services To receive better GPS signals avoid using your device in the following conditions between buildings in tunnels or underground passages or inside buildings in poor weather around...

Страница 112: ...es Set to use the GPS satellite for finding your location Use sensor aiding Use sensors to enhance pedestrian positioning when the GPS signal is obstructed There may be variations between the sensor estimates and your actual location PC connections Learn to connect your device to a PC with a PC data cable in USB connection modes By connecting the device to a PC you can transfer data to and from yo...

Страница 113: ...ory of the memory card by using the device as a memory card reader The file directory of the memory card will appear as a removable disk separate from the internal memory If you want to transfer files from or to a memory card 1 insert a memory card into the device In Idle mode open the application list and select 2 Settings Wireless and network USB utilities Connect storage to PC Select 3 OK to co...

Страница 114: ...s the internet Your device should already be configured with internet access If you have trouble accessing the internet you need to edit connections If you are not sure about the connection information to enter ask your service provider Set upVPN connections In Idle mode open the application list and select 1 Settings Wireless and network VPN settings AddVPN Select aVPN type 2 Customise the connec...

Страница 115: ...er or download from the web Set CA certificate Select a certificate authority CA certificate that theVPN server uses to identify you You can import certificates from theVPN server or download from the web DNS search domains Enter the domain name server DNS address When you are finished press 4 Save Connect to a private network In Idle mode open the application list and select 1 Settings Wireless a...

Страница 116: ...et alarm details 3 Select the check box next to Smart alarm to activate simulated nature sounds with the alarm screen prior to the main alarm When you are finished select 4 Save Stop an alarm When the alarm sounds To stop the alarm drag right To repeat the alarm after a specified length of time drag left Delete an alarm In Idle mode open the application list and select 1 Clock Alarm Press 2 Delete...

Страница 117: ...time to the clocks tap and hold a clock and select DST settings Use the stopwatch In Idle mode open the application list and select 1 Clock Stopwatch Select 2 Start to begin the stopwatch Select 3 Lap to record lap times When you are finished select 4 Stop Select 5 Reset to clear recorded times Use the count down timer In Idle mode open the application list and select 1 Clock Timer Set the length ...

Страница 118: ...cuWeather Set to display the weather for your current location You can also set the desk clock to be automatically updated with latest information and select a temperature unit Reset to default Reset the desk clock settings to the factory default values Dock settings Set to use the connected dock s speaker when your device is connected to a car or desktop dock Calculator Learn to perform mathemati...

Страница 119: ...fic calculator View the calculation history In Idle mode open the application list and select 1 Calculator Perform the calculation 2 Select 3 to close the calculator keypad The calculation history appears To clear the history press 4 Clear history Downloads Learn to open and manage files you have downloaded from the web and email In Idle mode open the application list and select 1 Downloads Select...

Страница 120: ...options 3 Option Function Access request Set to receive authorisation requests from other devices while your device is connected to a PC Enable visibility Set the device to be visible to a PC Time out Select the length of time the device waits before ending the connection Lock contents Select the types of date that should not display on the PC browser Reset settings Reset your settings to the fact...

Страница 121: ...the application list and select 1 Mini diary If there is a diary saved select 2 Create diary to create a new entry Change the today s date and set the weather if 3 necessary Select 4 Tap to add photo and add an image or capture a photo Select 5 Tap to add text and enter text and select Done Select 6 Save View a Mini diary In Idle mode open the application list and select 1 Mini diary Select a diar...

Страница 122: ...o create a new folder select Create folder To delete files or folders select Delete To change the view mode select View by To sort files or folders select List by To use additional features using a file such as moving copying or renaming option select More Polaris Office Learn to create and view Polaris Office documents on your device and memory card Create a document In Idle mode open the applica...

Страница 123: ...ations and memory information In Idle mode open the application list and select 1 Task manager Use the following options 2 Active applications View the list of all the applications currently running on your device Downloaded View the total amount of memory used for applications installed on your device RAM Check and manage the RAM for your device Storage View the used and available memory on your ...

Страница 124: ...oice commands If you are launching this application for the first time read 2 the help information and select Next I Agree Finish Select 3 Tap Speak Say a command into the microphone 4 Voice Search Learn to use the voice command feature to dial a number send a message or search for locations and information by voice This feature may be unavailable depending on your region or service provider In Id...

Страница 125: ...send a message write a memo or complete other tasks simply by speaking to your device while on the go In Idle mode open the application list and select 1 Voice talk If you are launching this application for the first time 2 select Continue Get Started Select 3 Tap Speak Say a command into the microphone 4 ...

Страница 126: ... Fi Turn theWLAN feature on or off p 104 Network notification Set the device to notify you when an open network is available WPS button connection Connect to aWLAN using aWi Fi Protected Setup WPS button AddWi Fi network AddWLAN APs manually Wi Fi Direct settings Wi Fi Direct Activate theWLAN Direct feature to connect two devices via aWLAN without requiring an access point p 105 ConfigureWi Fi Dir...

Страница 127: ...d portable hotspot USB tethering Activate the USB tethering feature to share your device s mobile network connection with PCs via USB When connected to a PC your device is used as a wireless modem for a PC p 110 PortableWi Fi hotspot settings PortableWi Fi hotspot Activate the PortableWLAN hotspot feature to share your device s mobile network connection with PCs or other devices through theWLAN fe...

Страница 128: ...calls from specified phone numbers automatically You can add phone numbers to the reject list p 46 Set reject messages Add or edit the message that will be sent when you reject a call Call alert Outgoing call vibration Set the device to vibrate when the other party answers a call Call status tones Activate or deactivate call connection tone minute minder tone or call disconnect tone Alerts on call...

Страница 129: ...dialling a call that was not connected or cut off during a call Fixed Dialing Numbers Activate or deactivate FDN mode to restrict calls to numbers in the FDN list You must enter the PIN2 supplied with your SIM or USIM card and reboot the device Video call image Select an image to be shown to the other party Own video in received call Set whether to show your live image or preset image to the other...

Страница 130: ...ringtone to alert you to incoming calls Notification ringtone Select a ringtone to alert you to events such as incoming messages missed calls and alarms Audible touch tones Set the device to sound when you touch the keys on the dialling screen Audible selection Set the device to sound when you select an application or option on the touch screen Screen lock sounds Set the device to sound when you l...

Страница 131: ...s of the display Background effect Select a display mode Auto rotate screen Set whether or not to rotate the content automatically when the device is rotated Animation Set the device to display animation when you switch between windows Screen time out Set the length of time the device waits before turning off the display s backlight Touch key light duration Set the duration for the touch key backl...

Страница 132: ...when the battery is low Power saving mode on at Select a power level for Power saving mode Turn offWi Fi Deactivate theWLAN feature when the device is not connected with aWLAN AP Turn off Bluetooth Deactivate the Bluetooth feature when not in use Turn off GPS Deactivate the GPS feature when not in use Turn off Sync Turn off sync when the device is not synchronising with a web server Brightness Act...

Страница 133: ...nd your actual location Set up screen lock Set the unlock security code When you have set your security code this option changes to Change screen lock None Disable the screen lock Pattern Set an unlock pattern to unlock the screen PIN Set a PIN numeric to unlock the screen Password Set a password alphanumeric to unlock the screen Set up SIM card lock Lock SIM card Activate or deactivate the PIN lo...

Страница 134: ... ensure secure use of various applications Install from USB storage Install encrypted certificates that are stored in the USB storage Set password Create and confirm a password for accessing credentials Clear storage Erase the credential contents from the device and reset the password Applications Change the settings for managing installed applications Unknown sources Select to download applicatio...

Страница 135: ...sting This is for application development Samsung Apps Select a network connection Wi Fi or packet switched data network to get notifications for new applications from Samsung Apps This feature may be unavailable depending on your region or service provider Accounts and sync Change the settings for the auto sync feature or manage accounts for synchronisation Background data Select this setting to ...

Страница 136: ...nd forth Panning Set to move an item to another page when you tap and hold the item and then tilt the device to the left or right Double tap Set to activateVoice talk by double tapping the device Tutorial Learn how to control motions Privacy Change the settings for managing your settings and data Back up my data Set to back up your settings and application data to the Google server Automatic resto...

Страница 137: ...ons Select Input Method Select a default keyboard type for text input Swype Language Select languages for text input You cannot enter text in some languages To enter text you should change the writing language to one of the supported languages Word prediction Set the device to predict words according to your input and display word suggestions Audio feedback Set to alert you when there are no alter...

Страница 138: ...the word list will display Speed vs accuracy Set the balance for the speed and accuracy Swype help Access help information for using the Swype keyboard Tutorial Learn how to enter text faster with the Swype keyboard Version View version information Samsung keypad Portrait keypad types Select the default input method such as the QWERTY keyboard traditional keypad or handwriting screen Input languag...

Страница 139: ...od question mark or exclamation mark Handwriting settings Customise the recognition time in Handwriting mode Voice input Activate the voice input feature to enter text by voice on the Samsung keypad Auto full stop Set the device to insert a period when you double tap the space bar Tutorial Learn how to enter text with the Samsung keypad Voice input and output Change the settings for the voice reco...

Страница 140: ... begin voice recognition when you launch the voice command feature Voice command help Access help information for using the voice command feature Social settings Change the settings for accessing community websites Voice talk settings Change the settings for usingVoice talk Voice talk help Access help information for usingVoice talk For the Google voice recognition use the following options Langua...

Страница 141: ...lt settings Default engine Set the speech synthesis engine to be used for spoken text Install voice data Download and install voice data for the text to speech feature Speech rate Select a speed for the text to speech feature Language Select a language for the text to speech feature Engines View the text to speech engines downloaded from Android Market Accessibility Accessibility Activate an acces...

Страница 142: ...splayed on your device Automatic Automatically update the time when you move across time zones Set date Set the current date manually Select time zone Set your home time zone Set time Set the current time manually Use 24 hour format Set to the time to be displayed in 24 hour format Select date format Select a date format About phone Access information about your device check the device s status an...

Страница 143: ...n disable this feature by using the Lock SIM card menu PUK Your SIM or USIM card is blocked usually as a result of entering your PIN incorrectly several times You must enter the PUK supplied by your service provider PIN2 When you access a menu requiring the PIN2 you must enter the PIN2 supplied with the SIM or USIM card For details contact your service provider Your device displays network or serv...

Страница 144: ...atest version If the touch screen is scratched or damaged take it to your local Samsung Service Centre Your device freezes or has fatal errors If your device freezes or hangs you may need to close programs or reset the device to regain functionality If your device is frozen and unresponsive press and hold the Power Lock key for 8 10 seconds The device will reboot automatically If this does not sol...

Страница 145: ... covering the built in microphone Ensure that the microphone is close to your mouth If using a headset ensure that it is properly connected Audio quality is poor Ensure that you are not blocking the device s internal antenna When you are in areas with weak signals or poor reception you may lose reception Move to another area and try again When dialling from contacts the call is not connected Ensur...

Страница 146: ...ons on your device for an extended period of time your device may feel hot to the touch This is normal and should not affect your device s lifespan or performance Error messages appear when launching the camera Your Samsung mobile device must have sufficient available memory and battery power to operate the camera application If you receive error messages when launching the camera try the followin...

Страница 147: ...ion with another radio receiver If you can hear the station with another receiver your device may require service Contact a Samsung Service Centre Error messages appear when opening music files Some music files may not play on your Samsung mobile device for a variety of reasons If you receive error messages when opening music files on your device try the following Free some memory by transferring ...

Страница 148: ...connect to if necessary Ensure that your device and the other Bluetooth device are within the maximum Bluetooth range 10 m If the tips above do not solve the problem contact a Samsung Service Centre A connection is not established when you connect the device to a PC Ensure that the PC data cable you are using is compatible with your device Ensure that you have the proper drivers installed and upda...

Страница 149: ...ttery with chargers that are not approved by the manufacturer Do not use your device during a thunderstorm Your device may malfunction and your risk of electric shock is increased Do not handle a damaged or leaking Lithium Ion Li Ion battery For safe disposal of your Li Ion batteries contact your nearest authorised service centre Handle and dispose of batteries and chargers with care Use only Sams...

Страница 150: ...ce in restricted areas Turn off your device where prohibited Comply with all regulations that restrict the use of a mobile device in a particular area Do not use your device near other electronic devices Most electronic devices use radio frequency signals Your device may interfere with other electronic devices Do not use your device near a pacemaker Avoid using your device within a 15 cm range of ...

Страница 151: ... Turn off your device when in an aircraft Using your device in an aircraft is illegal Your device may interfere with the electronic navigation instruments of the aircraft Electronic devices in a motor vehicle may malfunction due to the radio frequency of your device Electronic devices in your car may malfunction due to radio frequency of your device Contact the manufacturer for more information Co...

Страница 152: ...ith aware you are driving and suspend conversations that have the potential to divert your attention from the road Use your device to call for help Dial a local emergency number in the case of fire traffic accident or medical emergencies Use your device to help others in emergencies If you see an auto accident a crime in progress or a serious emergency where lives are in danger call a local emerge...

Страница 153: ...nction If the battery terminals are in contact with metal objects it may cause a fire Do not store your device near magnetic fields Your device may malfunction or the battery may discharge from exposure to magnetic fields Magnetic stripe cards including credit cards phone cards passbooks and boarding passes may be damaged by magnetic fields Do not use carrying cases or accessories with magnetic cl...

Страница 154: ... bite or suck on the device or the battery Doing so may damage the device or cause explosion If children use the device make sure that they use the device properly When speaking on the device Hold the device upright as you would with a traditional phone Speak directly into the mouthpiece Avoid contact with your device s internal antenna Touching the antenna may reduce the call quality or cause the...

Страница 155: ...re allergic to paint or metal parts of the product you may experience itching eczema or swelling of the skin When this happens stop using the product and consult your physician When cleaning your device Wipe your device or charger with a towel or a rubber Clean the terminals of the battery with a cotton ball or a towel Do not use chemicals or detergents Do not use the device if the screen is crack...

Страница 156: ... data and or damage to the card or device Protect cards from strong shocks static electricity and electrical noise from other devices Do not touch gold coloured contacts or terminals with your fingers or metal objects If dirty wipe the card with a soft cloth Ensure access to emergency services Emergency calls from your device may not be possible in some areas or circumstances Before travelling in ...

Страница 157: ...e highest tested SAR value is 0 472 mW g As SAR is measured utilising the devices highest transmitting power the actual SAR of this device while operating is typically below that indicated above This is due to automatic changes to the power level of the device to ensure it only uses the minimum level required to reach the network TheWorld Health Organisation has stated that present scientific info...

Страница 158: ... items for environmentally safe recycling Business users should contact their supplier and check the terms and conditions of the purchase contract This product and its electronic accessories should not be mixed with other commercial wastes for disposal Correct disposal of batteries in this product Applicable in the European Union and other European countries with separate battery return systems Th...

Страница 159: ...LINESS LEGALITY OR COMPLETENESS OF ANY CONTENT OR SERVICE MADE AVAILABLETHROUGHTHIS DEVICE AND UNDER NO CIRCUMSTANCES INCLUDING NEGLIGENCE SHALL SAMSUNG BE LIABLE WHETHER IN CONTRACT ORTORT FOR ANY DIRECT INDIRECT INCIDENTAL SPECIAL OR CONSEQUENTIAL DAMAGES ATTORNEY FEES EXPENSES OR ANY OTHER DAMAGES ARISING OUT OF OR IN CONNECTIONWITH ANY INFORMATION CONTAINED IN OR AS A RESULT OFTHE USE OF ANY C...

Страница 160: ...swering 43 barring 47 forwarding 47 international numbers 43 multiparty 44 rejecting 43 using headset 43 using options during voice 44 viewing missed 45 waiting 48 call waiting 48 camera capturing photos 58 customising camcorder 67 customising camera 63 recording videos 65 connections Bluetooth 101 DLNA 106 PC 111 VPN 113 WLAN 103 contacts copying 84 creating 81 finding 82 importing or exporting 8...

Страница 161: ...weather 100 PC connections mass storage 112 Samsung Kies 111 phonebook creating contacts 81 creating groups 83 creating your namecard 82 finding contacts 82 downloads applications 39 files 40 managing 118 email sending 54 setting accounts 53 viewing 55 file manager 121 fixed dialling number mode 47 flight mode 18 FM radio listening to 77 saving stations 78 gallery file formats 69 playing videos 71...

Страница 162: ... locking 33 video calls answering 43 making 42 using options 45 photo editor 71 photos capturing 58 capturing action 62 capturing by scene 60 capturing in beauty mode 61 capturing in cartoon mode 63 capturing in smile shot 61 capturing panoramic 62 capturing yourself 60 viewing 70 PIN lock 33 Polaris Office 121 readers hub 99 Samsung Apps 98 Samsung Kies 111 settings about phone 141 accessibility ...

Страница 163: ...ng options 44 voice command 123 voice mail 51 voice memos playing 89 recording 88 voice search 123 VPN connections connecting to 114 creating 113 web browser adding bookmarks 92 browsing web pages 90 WLAN activating 104 finding and connecting to networks 104 usingWPS 105 world clock 116 YouTube uploading videos 98 watching videos 97 ...

Страница 164: ...t and that the above named product is in conformity to all the essential requirements of Directive 1999 5 EC The conformity assessment procedure referred to in Article 10 and detailed in Annex IV of Directive 1999 5 EC has been followed with the involvement of the following Notified Body ies BABT Forsyth House Churchfield Road Walton on Thames Surrey KT12 2TD UK Identification mark 0168 The techni...

Отзывы: