background image

Assembling

9

Charge the battery

Before using the device for the first time, you must charge 

the battery.
You can charge the device with the provided travel adapter 

or by connecting the device to a PC with a PC data cable.

Use only Samsung-approved chargers and cables. 

Unauthorised chargers or cables can cause batteries 

to explode or damage your device.
When your battery is low, the device will emit a 

warning tone and display a low battery message. 

The battery icon 

 will also be empty and turn 

red. If the battery level becomes too low, the device 

will automatically power off. Recharge your battery 

to continue using your device.
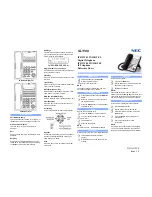
Insert the battery.

Replace the back cover.

Содержание GT-I5800

Страница 1: ...GT I5800 quickstartguide For more information refer to the user manual at www samsungmobile com...

Страница 2: ...e safe and correct use The descriptions in this guide are based on the default settings of your device Please keep this guide for future reference You can get more detailed descriptions and instructio...

Страница 3: ...f Google Inc Bluetooth is a registered trademark of the Bluetooth SIG Inc worldwide Java is a trademark of Sun Microsystems Inc Windows Media Player is a registered trademark of Microsoft Corporation...

Страница 4: ...eo on Demand VOD content To generate the registration code locate the DivXVOD section in the device setup menu Go to http vod divx com with this code to complete the registration process and learn mor...

Страница 5: ...hand strap optional 13 Getting started 14 Turn your device on and off 14 Get to know your device 14 Use the touch screen 17 Lock or unlock the touch screen and keys 18 Get to know the idle screen 19 A...

Страница 6: ...fety and usage information 49 Viewing photos and videos 36 Listening to music 36 Connecting to the internet 40 Download applications from Android Market 41 Download files from the web 42 Connecting to...

Страница 7: ...on the software and accessories available in your region or offered by your service provider You can obtain additional accessories from your local Samsung dealer The supplied accessories perform best...

Страница 8: ...SIM or USIM card you can only use your device s non network services and some menus Do not insert a memory card into the SIM card slot To install the SIM or USIM card and battery If the device is on...

Страница 9: ...g approved chargers and cables Unauthorised chargers or cables can cause batteries to explode or damage your device When your battery is low the device will emit a warning tone and display a low batte...

Страница 10: ...rger to a Samsung Service Centre When the battery is fully charged unplug the travel 4 adapter from the device and then from the power outlet Do not remove the battery before removing the travel adapt...

Страница 11: ...rent file structure your device will ask you to reformat the memory card Frequent writing and erasing of data will shorten the life span of memory cards When you insert a memory card in your device th...

Страница 12: ...m 3 the device Pull the memory card out of the memory card slot 4 Remove the memory card 5 Replace the back cover 6 Do not remove a memory card while the device is transferring or accessing informatio...

Страница 13: ...emory card on a PC may cause incompatibilities with your device Format the memory card only on the device In Idle mode select Applications Settings SD card and phone storage Unmount SD card Format SD...

Страница 14: ...up your device for its first use To turn off your device press and hold and the select Power off Follow all posted warnings and directions from official personnel when in areas where the use of wirele...

Страница 15: ...Open a list of options available on the current screen Open the Google Search bar press and hold Home Return to the idle screen Open the list of recent applications press and hold Back Return to the...

Страница 16: ...ll diverting activated Connected to PC Memory card inserted No SIM or USIM card Indicator icons Icons shown on the display may vary depending on your region or service provider Icon Definition No sign...

Страница 17: ...ical devices Electrostatic discharges can cause the touch screen to malfunction Do not allow the touch screen to come into contact with water The touch screen may malfunction in humid conditions or wh...

Страница 18: ...tection film before using your device Your touch screen has a layer that detects small electrical charges emitted by the human body For best performance tap the touch screen with your fingertip The to...

Страница 19: ...Drag the item to the location you want when the item 2 is magnified Get to know the idle screen When the device is in Idle mode you will see the idle screen From the idle screen you can view your devi...

Страница 20: ...Idle mode press 1 Edit Select 2 to add new panels or to remove a panel Press 3 Save Remove items from the idle screen Tap and hold an item to remove 1 The item is magnified and the trash icon appears...

Страница 21: ...tegories to suit your preferences and needs In the application list press 1 Edit Tap and hold an application 2 Access applications To access your device s applications In Idle mode select 1 Applicatio...

Страница 22: ...volume of the ringtones Press theVolume key up or down to adjust the ringtone volume Drag the application icon to the location you want 3 You can move an application icon to another main menu screen Y...

Страница 23: ...The brightness level of the display will affect how quickly the device consumes battery power Switch to the silent mode To mute or unmute your device do one of the followings In Idle mode open the ap...

Страница 24: ...IM card You can lock your device by activating the PIN supplied with your SIM or USIM card In Idle mode open the application list and select 1 Settings Location and security Set up SIM card lock Lock...

Страница 25: ...or Samsung keypad Once the PIN lock is enabled you must enter the PIN each time you turn on the device If you enter an incorrect PIN too many times your SIM or USIM card will be blocked You must ente...

Страница 26: ...p information for using the Swype keyboard select Enter text using the Swype keyboard Select the first character of a word and drag your finger 1 to the second character without releasing the finger f...

Страница 27: ...p and hold 4 Clear your input 5 Start a new line 6 Insert a space Enter text using the Samsung keypad Select 1 and select a text input method You can select one of key input methods QWERTY or traditio...

Страница 28: ...en the device is ringing press theVolume key to mute the ringtone To end the call select 2 End call View call logs You can view logs of your calls filtered by their types In Idle mode open the applica...

Страница 29: ...3 Enter contact information 4 Select 5 Save to add the contact to memory You can also create a contact from the dialling screen In Idle mode open the application list and select 1 Phone Keypad Enter...

Страница 30: ...send and view text multimedia or email messages For more information see the Messages section of the user manual Send a text message In Idle mode open the application list and select 1 Messaging New m...

Страница 31: ...enter a subject 5 Send a multimedia message In Idle mode open the application list and select 1 Messaging New message Select 2 Contacts You can enter a number or email address manually or select one...

Страница 32: ...fresh to update the messages folder Select an email message from the message thread list 3 Select the text input field to enter your email text 6 Select 7 Attach and attach a file You can select a fil...

Страница 33: ...d make any necessary 3 adjustments Listen to voice mail messages If you have set missed calls to be diverted to the voice mail server callers may leave voice messages when you do not answer incoming c...

Страница 34: ...o zoom in or out 4 Select 5 to take a photo The photo is saved automatically Capture a video In Idle mode open the application list and select 1 Camera Rotate the device anti clockwise to landscape vi...

Страница 35: ...6 Capture a video 7 View the video you captured last Press theVolume key to zoom in or out 5 Select 6 to start recording Select 7 to stop recording The video is saved automatically Select 3 to switch...

Страница 36: ...or more information see the Music Player section of the user manual Viewing photos and videos Learn to view photos and play videos you have captured For more information see the Gallery section of the...

Страница 37: ...d hold 1 1 Add music files to your device Start by transferring files to your device or memory card Download from the wireless web Download from a PC with the optional Samsung Kies Receive via Bluetoo...

Страница 38: ...he FM radio For more information see the FM Radio section of the user manual Number Function 5 Open the current playlist 6 Activate the 5 1 channel surround sound system when a headset is connected 7...

Страница 39: ...nge the frequency by scrolling left or right on the scale bar 8 Set the FM radio to automatically retune frequencies for stations when the current signal is weak Plug the supplied headset into the dev...

Страница 40: ...sited pages and recent internet history Connecting to the internet Learn to access the internet and browse web pages For more information see the Internet section of the user manual To create your own...

Страница 41: ...may be unavailable depending on your region or service provider Your device will save user files from downloaded applications to the internal memory Bookmark your favourite web pages If you know the...

Страница 42: ...y prevent you from downloading copying modifying or transferring some files Install an application In Idle mode open the application list and select 1 Market Select 2 Accept when the terms and conditi...

Страница 43: ...and use wireless connections or 4 copy data and files Refer to the Samsung Kies help for more information To download files from the web In Idle mode open the application list and select 1 Internet Se...

Страница 44: ...cted open the shortcut panel and select USB connected Mount Open the folder to view files 5 Copy files from the PC to the memory card 6 Synchronise withWindows Media Player Ensure thatWindows Media Pl...

Страница 45: ...d provided by your service provider To disconnect the device to the PC click the USB device icon on theWindows task bar and click the option to safely remove the mass storage device Then remove the PC...

Страница 46: ...If the pairing is successful the device will automatically search for available services Some devices especially headsets or hands free car kits may have a fixed Bluetooth PIN such as 0000 Enter the...

Страница 47: ...net or other network devices For more information see the Wi Fi section of the user manual Your device uses non harmonised frequency and is intended for use in all European countries The WLAN can be o...

Страница 48: ...open the application list and select 1 Settings Wireless and network Wi Fi settings AddWi Fi network Enter the SSID for the network and select the security 2 type Set the security settings depending...

Страница 49: ...aring Excessive exposure to sound at high volumes can cause hearing damage Always turn the volume down before plugging the earphones into an audio source and use only the minimum volume setting necess...

Страница 50: ...the keys lightly use special features that reduce the number of keys you have to press such as templates and predictive text and take frequent breaks Handle and dispose of batteries and chargers with...

Страница 51: ...our device or switch to a mode that disables the wireless functions when directed by airline personnel Do not use the device if the screen is cracked or broken Broken glass or acrylic could cause inju...

Страница 52: ...cal devices and other electronic devices in homes or vehicles Consult the manufacturers of your electronic devices to solve any interference problems you experience Protect the device batteries and ch...

Страница 53: ...s or circumstances Before travelling in remote or undeveloped areas plan an alternate method of contacting emergency services personnel Important usage information Use your device in the normal positi...

Страница 54: ...items for environmentally safe recycling Specific Absorption Rate SAR certification information Your device conforms to European Union EU standards that limit human exposure to radio frequency RF ene...

Страница 55: ...device THIRD PARTY CONTENT AND SERVICES ARE PROVIDED AS IS SAMSUNG DOES NOTWARRANT CONTENT OR SERVICES SO PROVIDED EITHER EXPRESSLY OR IMPLIEDLY FOR ANY PURPOSE SAMSUNG EXPRESSLY DISCLAIMS ANY IMPLIE...

Страница 56: ...TAL SPECIAL OR CONSEQUENTIAL DAMAGES ATTORNEY FEES EXPENSES OR ANY OTHER DAMAGES ARISING OUT OF OR IN CONNECTIONWITH ANY INFORMATION CONTAINED IN OR AS A RESULT OFTHE USE OF ANY CONTENT OR SERVICE BYY...

Страница 57: ...r of Samsung Service Centre see the warranty card or contact the retailer where you purchased your product Declaration of Conformity R TTE We Samsung Electronics declare under our sole responsibility...

Страница 58: ...o GH68 29695A English EU 09 2010 Rev 1 1 To install Kies PC Sync Download the latest version of Kies from the Samsung 1 website www samsungmobile com and install it on your PC In Idle mode open the ap...

Отзывы: