background image

20 

EN

Cooking Guide(continued)

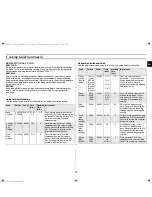
Reheating Baby Food and Milk

Use the power levels and times in this table as guide lines for reheating. 

MANUAL DEFROSTING

Microwaves are an excellent way of defrosting frozen food. Microwaves gently 
defrost frozen food in a short period of time. This can be of great advantage, if 
unexpected guests suddenly show up.
Frozen poultry must be thoroughly thawed before cooking. Remove any metal ties 
and take it out of any wrapping to allow thawed liquid to drain away.
Put the frozen food on a dish without cover. Turn over halfway, drain off any liquid 
and remove any giblets as soon as possible.
Check the food occasionally to make sure that it does not feel warm.
If smaller and thinner parts of the frozen food start to warm up, they can be shield 
by wrapping very small strips of aluminium foil around them during defrosting.
Should poultry start to warm up on the outer surface, stop thawing and allow it to
stand for 20 minutes before continuing.
Leave the fish, meat and poultry to stand in order to complete defrosting. The 

standing time for complete defrosting will vary depending on the quantity 
defrosted. Please refer to the table below.
Hint: 

Flat food defrosts better than thick and smaller quantities need less 
time than bigger ones. Remember this hint while freezing and 
defrosting food.

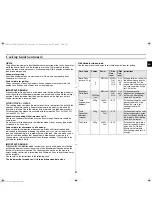
For defrosting of frozen food with a temperature of about -18 to - 20 °C, use the 
fol-lowing table as a guide.

All frozen food should be defrosted using defrosting power level (180 W).

Food

Portion Power Time 

(min.)

Standing 
Time 
(min.)

Instructions

Baby food 
(vegetables 
+ meat)

190g

600W

30sec.

2-3

Empty into ceramic deep 
plate. Cook covered. Stir after 
cooking time. Stand for 2-3 
minutes. Before serving, stir 
well and check the tem-
perature carefully.

Baby 
porridge 
(grain + 
milk + fruit)

190g

600W

20sec.

2-3

Empty into ceramic deep 
plate. Cook covered. Stir after 
cooking time. Stand for 2-3 
minutes. Before serving, stir 
well and check the tem-
perature carefully.

Baby milk

100ml

200ml

300W

30-40 sec.

1 min. to 

1 min. 

10sec.

2-3

Stir or shake well and pour 
into a sterilised glass bottle. 
Place into the centre of 
turntable. Cook uncovered. 
Shake well and stand for at 
least 3 minutes. Before 
serving, shake well and check 
the tempera-ture carefully.

Food

Portion Time 

(min.)

Standing 
Time 
(min.)

Instructions

Meat

Minced beef

Pork steaks

200g
400g
250g

6-7

10-12

7- 8

15-30

Place the meat on a flat ceramic 
plate. Shield thinner edges with 
aluminium foil. Turn over after half 
of defrosting time!

Poultry

Chicken 
pieces
 
Whole 
chicken

500g

(2pcs)

1200g

14-15

32-34

15-60

First, put chicken pieces first skin-
side down, whole chicken first 
breast-side-down on a flat ceramic 
plate. Shield the thinner parts like 
wings and ends with aluminium foil. 
Turn over after half of defrosting 
time!

Fish

Fish fillets/  
Whole fish

200g
400g

6-7

11-13

10-25

Put frozen fish in the middle of a flat 
ceramic plate. Arrange the thinner 
parts under the thicker parts. Shield 
narrow ends of fillets and tail whole 
fish with aluminium foil. Turn over 
after half of defrosting time!

Fruits

Berries

250g

6-7

5-10

Spread fruits on a flat, round glass 
dish (with a large diameter).

Bread

Bread rolls 
(each ca. 50g)
Toast/
Sandwich
German 
bread (wheat 
+ rye flour)

2pcs
4pcs

250g

500g

1-1½
2½-3
4-4½

7-9

5-20

Arrange rolls in a circle or bread 
horizontally on kitchen paper in the 
middle of turntable. Turn over after 
half of defrosting time!

nlXW`tTl|TWZ\W\r†luU”GGwˆŽŒGYWGG~Œ‹•Œš‹ˆ SGh—™“G_SGYWW`GG^aY_Gwt

Содержание GE109M

Страница 1: ...the Auto Power Defrost Feature 10 Auto Power Defrost Settings 10 Using the Auto Crusty Cook Function 11 Using the Manual Crusty Cook Function 12 Choosing the Heating Element Position 13 Choosing the A...

Страница 2: ...over 1 Place the frozen food in the oven Select the type of food that you are cooking by pressing the Power Defrost button one or more times 2 Select the food weight by pressing the and buttons 3 Pres...

Страница 3: ...7 13 3 9 10 11 12 1 Coupler already placed over the motor shaft in the base of the oven Purpose The coupler rotates the turntable 2 Roller ring to be placed in the centre of the oven Purpose The rolle...

Страница 4: ...plastic bags Reason Electric arcing or sparking may occur and may damage the oven When heating food in plastic or paper containers keep an eye on the oven due to the possibility of ignition Do not us...

Страница 5: ...for anyone other than a comperent person to carry out any service or repair operation which involves the removal of a cover which gives protection against exposure to microwave energy WARNING Liquids...

Страница 6: ...ooked or undercooked Was the appropriate cooking length set for the type of food Was an appropriate power level chosen Sparking and cracking occur inside the oven arcing Have you used a dish with meta...

Страница 7: ...g time must be increased 1 Press the button Result The 900W maximum cooking power indications are displayed Select the appropriate power level by pressing the button again until the corresponding watt...

Страница 8: ...It will damage and cause fire to the microwave oven 1 To stop temporarily Open the door Result Cooking stops To resume cooking close the door and press again 2 To stop completely Press the button Resu...

Страница 9: ...lled 300 350g 400 450g 500 550g 3 mins Put the meal on a ceramic plate and cover it with microwave cling film This programme is suitable for the meals consisting of 3 components e g meat with sauce ve...

Страница 10: ...Cake is possible to set up to a maximum of 1000g 3 Press the button Result Defrosting begins The oven beeps half way through defrosting to remind you to turn the food over Press button again to finis...

Страница 11: ...se the door Place the crusty plate on the metal rack or turntable in the microwave 4 Select the type of food that you are cooking by pressing the Crusty Cook button once or more times 5 Select the siz...

Страница 12: ...plate that are not heat resistant e g plastic bowels Never place the crusty plate in the oven without turntable 4 Place the crusty plate on the metal rack or turntable in the microwave 5 Select the a...

Страница 13: ...eck that the heating element is in the horizontal position If you wish to select the combined cooking mode grill and microwave use only dishes that are microwave safe and oven proof Metallic cookware...

Страница 14: ...process 1 Make sure that the heating element is in the horizontal position refer to page 13 for further details 2 Open the oven door Place the food on the rack and the rack on the turntable Close the...

Страница 15: ...s at the same time Result The following indication is displayed The oven does not beep each time you press a button 2 To switch the beeper back on press the and buttons again at the same time Result T...

Страница 16: ...styrene cups containers Paper bags or newspaper Recycled paper or metal trims Can be used to warm food Overheating may cause the polystyrene to melt May catch fire May cause arcing Glassware Oven to t...

Страница 17: ...for frozen vegetables Use a suitable glass pyrex bowl with lid Cook covered for the minimum time see table Continue cooking to get the result you prefer Stir twice during cooking and once after cooki...

Страница 18: ...d It is preferable to underestimate cooking time and add extra heating time if necessary Heating and standing times When reheating food for the first time it is helpful to make a note of the time take...

Страница 19: ...mic plates dishes Cover with microwave cling film Put one plate directly on the turn table other on the rack Plate Meal chilled 2 x 350g 600W 7 9 3 Plate two meals of 2 3 chilled components on two fla...

Страница 20: ...ceramic deep plate Cook covered Stir after cooking time Stand for 2 3 minutes Before serving stir well and check the tem perature carefully Baby porridge grain milk fruit 190g 600W 20sec 2 3 Empty int...

Страница 21: ...brown the top of the food Also this mode can be used for thick food portions that benefit from a browned and crispy top e g chicken pieces turning them over half way through cooking Please refer to t...

Страница 22: ...1 Put the fresh gratin into a small glass pyrex dish Put the dish on the rack After cooking stand for 2 3 minutes Chicken Pieces 450 g 2pcs 650 g 2 3pcs 850 g 4pcs 300W Grill 7 8 9 10 11 12 7 8 8 9 9...

Страница 23: ...well during cooking BROWNING ALMOND SLICES Spread 30 g sliced almonds evenly on a medium sized ceramic plate Stir several times during browning for 3 to 4 minutes using 600 W Let it stand for 2 3 minu...

Страница 24: ...IANCE MUST BE EARTHED This appliance must be earthed In the event of an electrical short circuit earthing reduces the risk of electric shock providing an escape wire for the electric current The appli...

Страница 25: ...acuum sealed for long life Increasingly heating times for such ready meals are being based on the Heating Categories A B C D and E On this instance simply match the heating category of your oven to th...

Страница 26: ...26 EN Note nlXW tT l TWZ W r luU GGw GY GG SGh G_SGYWW GG aY_Gwt...

Страница 27: ...27 EN Note nlXW tT l TWZ W r luU GGw GY GG SGh G_SGYWW GG aY_Gwt...

Страница 28: ...nlXW tT l TWZ W r luU GGw GY_GG SGh G_SGYWW GG aY_Gwt...

Отзывы: