background image

Appendix

87

•  

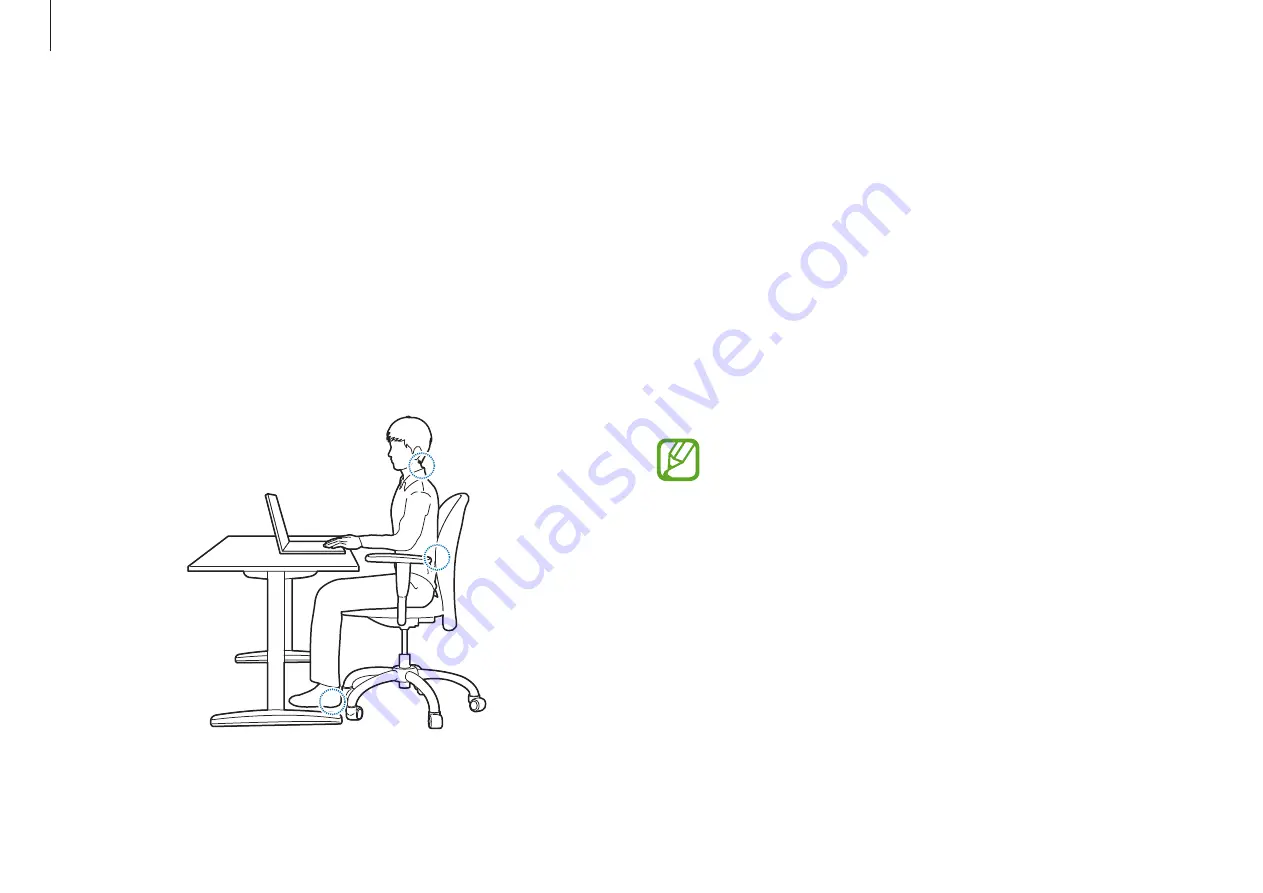
Use an adjustable chair with firm, comfortable support.

•  

Adjust the height of your chair so that thighs are horizontal to 
the floor and feet are flat on the floor.

•  

The back of the chair should support the lower back. Adjust 
the backrest to fit your body properly.

•  

Sit back fully in your chair and straighten the back and neck. 
Avoid leaning forward or craning your neck toward the 
computer screen.

•  

Avoid using the computer while lying down or on your lap. 
If the computer’s temperature increases, there is a danger of 
burn injury.

•  

The instructions in this manual have been prepared 
so that they can be applied to the range of needs of 
general users. If the user is not included in the range, 
the recommendations should be applied according to 
the user’s needs.

•  

Images may differ from actual products.

Ergonomic tips

Maintaining proper posture during computer use is very 
important to prevent physical injury. Improper or prolonged 
keyboard use may result in repetitive strain injury. Viewing the 
monitor screen for extended periods of time may result in eye 
strain. Therefore, please follow these guidelines carefully when 
setting up and using the computer.

Back and neck

Содержание Galaxy Book Flex

Страница 1: ...amsung com User Manual Questo manuale d istruzione fornito da trovaprezzi it Scopri tutte le offerte per Samsung Galaxy Book Flex NP930QCG K01IT o cerca il tuo prodotto tra le migliori offerte di Note...

Страница 2: ...tions 58 Samsung Settings 59 Samsung Security 61 Samsung Update 62 Online Support S Service 63 Samsung PC Help Self help application 64 Samsung PC Cleaner 65 Quick Search Settings Upgrade 66 LCD brigh...

Страница 3: ...e same as your environment Descriptions are based on the computer s default settings and theWindows 10 operating system Available features and additional services may vary depending on the computer or...

Страница 4: ...ifications or the contents of this manual may be changed without prior notice due to an upgrade of the computer s functions Instructional icons and expressions Warning situations that could cause inju...

Страница 5: ...gas emissions and saved energy through voluntary labeling Power management setting of this product has been enabled by default and has various timing settings from 1 minute to 5 hours The product can...

Страница 6: ...on The available memory capacity inWindows is less than the actual capacity of memory This is because some memory is required for regular system operations For example for 1 GB 1 024 MB memory install...

Страница 7: ...depending on the model The items marked as optional may not be provided or may be provided in different locations Since some space on the SSD is reserved for system recovery and operations the availab...

Страница 8: ...Getting started 8 For 15 6 inch models 8 3 4 2 1 6 7 5 Front view For 13 3 inch models 8 3 4 2 1 6 7 5...

Страница 9: ...r Name Description Microphone You can use the built in microphone Camera Using this camera you can take still pictures and record video Camera indicator light This indicates the camera operating statu...

Страница 10: ...arged Blue Turned on Illumination sensor The sensor detects the ambient light If the ambient light level becomes too low the computer s backlight will automatically turn on If there is sufficient ambi...

Страница 11: ...ns the computer on and off Thunderbolt 3 port Connect and charge a USB C andThunderbolt 3 device or connect to an external display device Some features may not be supported depending on your device s...

Страница 12: ...take longer to charge the battery when charging a connected device The battery power level may be reduced when charging a connected device while the computer is powered by the battery The charging sta...

Страница 13: ...may be dangerous Internal battery Provides power to the computer when not connected to an AC adapter To remove or replace the internal battery take it to a Samsung Service Center You will be charged f...

Страница 14: ...computer automatically when the LCD panel is opened 1 Select the Start button Samsung Settings 2 Select System Auto booting Off Turning the computer on and off Fully charge the battery using the AC ad...

Страница 15: ...screen appears Follow the activation procedures according to the instructions on the screen to use the computer The computer s date and time may be incorrect when you turn it on for the first time The...

Страница 16: ...and content may differ depending on the OS version The image displayed on the desktop screen may differ between models and OS versions Unlocking the screen To unlock the lock screen do one of the foll...

Страница 17: ...ceive system notifications such as updates and push notifications such as emails and SNS updates You can also adjust settings conveniently For example you can select wireless network options or adjust...

Страница 18: ...d and touchpad will not be locked The display will rotate automatically depending on the computer s orientation When storing the computer in a bag or carrying it close the LCD panel to protect the com...

Страница 19: ...unlock it When the computer is in sleep mode press the Power button to unlock the screen You can also switch the computer s display to tablet mode without rotating the LCD panel 1 Select on the taskba...

Страница 20: ...orm touch actions on the screen Hover the S Pen over items on the screen to access additional S Pen features such as the Air view feature S Pen button Hover the S Pen over the screen and press the S P...

Страница 21: ...and tweezers are sold separately 1 Firmly hold the nib with the tweezers and remove it Taking out the S Pen Press the end of the S Pen until it clicks to disengage it Then pull the S Pen from the slot...

Страница 22: ...rt a new nib into the S Pen Be careful not to pinch your fingers with the tweezers Do not reuse old nibs Doing so may cause the S Pen to malfunction Do not press the nib excessively when inserting the...

Страница 23: ...ion and check all saved notes Smart select Use the S Pen to select an area and perform actions such as sharing or saving Refer to Smart select for more information Screen write Capture screenshots to...

Страница 24: ...ed area Save the selected area Smart select Use the S Pen to select an area and perform actions such as sharing or saving You can also select an area from a video and capture it as a GIF animation 1 W...

Страница 25: ...an draw or highlight items on the screen using the S Pen Before using this feature you must connect the computer to an external display Showing a selected area on an external display device 1 Connect...

Страница 26: ...d hold the Fn key and press the F4 key repeatedly then select Extend for project mode 4 Select Start A frame for selecting area will appear Start is activated only when the project mode is set to Exte...

Страница 27: ...en you are finished composing the note select Save Samsung Notes Introduction Create notes by entering text from the keyboard or by writing or drawing on the screen with the S Pen You can also insert...

Страница 28: ...ser by dragging the size adjustment bar Erase all Clear the note Even with a smaller eraser you may still not be able to precisely erase the intended part Composing notes in handwriting mode On the no...

Страница 29: ...he front To back Send the input to the back Editing handwritten notes Edit handwritten notes using various editing options such as cutting moving resizing or transforming 1 If a note contains handwrit...

Страница 30: ...ote you want to delete on the note list To delete multiple notes tick the notes you wish to delete 3 Select Painting with brushes On the note composer screen select Brush to paint with various brushes...

Страница 31: ...apps remotely by pressing the S Pen button or making a movement with the S Pen The S Pen must be charged before you can use the Air actions feature 1 Select the Start button Samsung Settings 2 Select...

Страница 32: ...Tapping and holding right clicking To use additional options of an item tap and hold it on the touch screen Touch screen optional Use your fingers on the touch screen to perform actions Touch screen g...

Страница 33: ...two fingers apart on an image or text Pinch to zoom out Dragging To move an item to another location tap and hold it and then drag it on the touch screen to the desired location Scrolling To scroll u...

Страница 34: ...with protective covers or accessories Touch screen gestures are available for touch screen models runningWindows and work only with some applications Do not subject the touch screen to severe impacts...

Страница 35: ...d Entering text Use the on screen keyboard to enter text To open the on screen keyboard select on the taskbar Some languages are not supported by the virtual keyboard To enter text change the input la...

Страница 36: ...to convert spoken words into text Add an item from the clipboard Entering uppercase Select before entering a character For all caps tap it twice Changing language keyboards Add keyboards to enter tex...

Страница 37: ...tions with the keyboard Images and available features may differ depending on the model and operating system The keyboard layout may differ depending on the country The hot keys will be mainly explain...

Страница 38: ...Quick Search Search for content on the device quickly If the hot keys do not work properly install the Samsung Settings application Hot key functions Key Icon Description F1 Samsung Settings Launch t...

Страница 39: ...ad Use the touchpad to move the cursor or select an item The left and right buttons of the touchpad act the same as the left and right buttons of a mouse Use the touchpad only with fingers The touchpa...

Страница 40: ...rt while viewing a website map or image Pinch to zoom out Right clicking This function enables right clicking To right click an item press the right touchpad button Click Dragging To move an icon or a...

Страница 41: ...F5 key to lock the touchpad Configuring touchpad gestures Configure touchpad gestures to use the touchpad more efficiently Select the Start button Devices Touchpad desired options Some options in the...

Страница 42: ...ing sure it s you window 7 Repeatedly lift and rest your finger on the fingerprint recognition sensor until setup is complete The fingerprint recognition sensor s location may vary depending on the mo...

Страница 43: ...ith your finger To improve recognition performance register the fingerprints of the hand you use most often to perform tasks In dry environments static electricity can build up in the computer Avoid u...

Страница 44: ...g on the type and specifications of the memory card Memory card tray Use a memory card to transfer data to other devices You can use data stored on your device such as digital cameras smartphones or t...

Страница 45: ...rt the memory card tray 2 1 Inserting a memory card 1 Insert the ejection pin into the hole on the memory card tray and gently remove the memory card tray from the memory card tray slot 2 Place a memo...

Страница 46: ...u cannot format write or delete data on the card Removing a memory card 1 Insert the ejection pin into the hole on the memory card tray and gently remove the memory card tray from the memory card tray...

Страница 47: ...r Thunderbolt 3 port HDMI port External display Connecting the computer to an external display device can be useful for presentations or when watching a movie The cables and adapters required to conne...

Страница 48: ...Turn on the display and change its display mode to one that supports an external input 5 Press and hold the Fn key and press the F4 key 6 Select a mode PC screen only Show the screen on the computer m...

Страница 49: ...r computer models with aWireless LAN card or device AWireless LAN device is optional The pictures in this manual may differ from the actual product depending on the wireless LAN device model About Acc...

Страница 50: ...er You can use only non network services To activate Airplane mode on the taskbar select Airplane mode 2 Select a network from the list of detected wireless networks and select Connect automatically C...

Страница 51: ...sible for the loss interception or misuse of data sent or received via Bluetooth Always ensure that you share and receive data with devices that are trusted and properly secured If there are obstacles...

Страница 52: ...Devices Your computer will display the paired devices 2 Select the device to unpair from your computer and select Remove device Yes The connection to the Bluetooth device will be disconnected 4 Select...

Страница 53: ...es or share files and printers by connecting two computers that supportThunderbolt 3 UsingThunderbolt 3 devices Connect theThunderbolt 3 device to theThunderbolt 3 port Connecting two computers that s...

Страница 54: ...cessories or cover being used theWireless PowerShare feature may not work properly It is recommended to remove any accessories and cover being used before using this feature 1 Press and hold the Fn ke...

Страница 55: ...ion RFID card such as a transportation card or a key card placed between the touchpad and the other device Do not place the device on the touchpad when conductive materials such as metal objects and m...

Страница 56: ...CD panel The power charged to the other device may be less than the amount shared to it by your computer If you charge the other device while charging your computer the charging speed may decrease or...

Страница 57: ...ng on the model Applications that are provided by Samsung can be installed from Samsung Update Third party software related services For descriptions about and service requests for third party applica...

Страница 58: ...Set sound settings Input Set input functions and settings S Pen Set S Pen features and settings Quick settings Manage the quick settings displayed on the taskbar About View the application version Sa...

Страница 59: ...Privacy Folder and select the Hide switch 2 Enter the password and select OK 3 Check the privacy folder in the File Explorer You can save or move files into the privacy folder Samsung Security Create...

Страница 60: ...microphone You can protect your computer system and your privacy safely Select the Start button Samsung Security Block Recording and then select the switch to turn on the block recording feature Hidi...

Страница 61: ...rs and applications over the Internet Keep the computer performing better and more stably with Samsung Update To check for available updates the computer must be connected to the Internet Only applica...

Страница 62: ...lems you have with your computer using the online chat and remote control program You can receive the help when you are having trouble using Samsung software You can access the online service for free...

Страница 63: ...en you access content When you register your computer in the Settings menu you can view its information on the Samsung PC Help app Samsung PC Help Self help application Use Samsung PC Help to access h...

Страница 64: ...em using theWindows Restore feature System Cleaner You can optimize the computer s performance by freeing up system resources that are not in use Samsung PC Cleaner Samsung PC Cleaner helps your compu...

Страница 65: ...rt button Quick Search Alternatively press and hold the Fn key and press the F12 key 2 Tap to select the types of content you want to search 3 Tap the search field to enter a keyword Content on your c...

Страница 66: ...F3 key Controlling brightness using the taskbar 1 On the taskbar select 2 Drag the adjustment bar to the desired brightness Brightness adjustment bar The LCD screen is automatically set to the bright...

Страница 67: ...based on your activity Some options may not be available depending on the model 1 Select the Start button Samsung Settings 2 Select Display QLED Auto mode and then select an option QLED Auto mode Opt...

Страница 68: ...t on the taskbar 2 Drag the adjustment bar to the desired volume Volume adjustment bar Volume Adjust the system volume or sound volume when playing music or video Controlling volume using the keyboard...

Страница 69: ...screen appears If the password screen or theWindows start screen appears restart the computer and try again BIOS Setup utility Define a boot password change the boot priority or configure the installe...

Страница 70: ...S setup Setup menu SysInfo View the basic specifications of the computer Advanced Configure the chipsets and additional functions Security Configure security functions Boot Configure peripherals and b...

Страница 71: ...d is disabled HDD Password high security level This password is required to access the hard disk drive HDD from another computer This password may not be supported depending on the model Boot password...

Страница 72: ...he computer For some models if the password entered message appears in the Setup Notice window select Ok to complete the setup Setting a boot password 1 Turn on the computer 2 Before the Samsung logo...

Страница 73: ...Ok to save and restart Select Exit Ok to restart without saving the changes Removing a password 1 Turn on the computer 2 Before the Samsung logo appears press the F2 key several times 3 Access the Se...

Страница 74: ...r a short time only the battery usage time may be reduced by the difference between the actual battery charge and the remaining charge display You can make the actual battery charge and the remaining...

Страница 75: ...explode or damage the computer Incorrectly connecting the charger may cause serious damage to the computer This computer is equipped with an internal battery The battery is not user serviceable or us...

Страница 76: ...pter from the computer to view the current battery charge when the computer is turned off 10 00 2013 7 1 3 When the battery is fully charged the operating status LED turns green Disconnect the AC adap...

Страница 77: ...ries please be sure to save your work first Instruction messages related to battery life are displayed properly when the Samsung Settings application is installed on your computer The messages may var...

Страница 78: ...with less than 64 GB of storage If you cannot access the Samsung Recovery application refer toWindows recovery function Some functions may differ or may be unavailable depending on the version Refer...

Страница 79: ...ou can restore the computer to its factory default settings If necessary back up important data to an external storage device before restoring the system See Backing up data 1 When the computer starts...

Страница 80: ...ose a storage device to save the data to and then select Start backup The backed up folders or files can be saved only on an external storage device Connect an external storage device to your computer...

Страница 81: ...he on screen instructions to complete data recovery Recovering after a backup Select a backup point saved on an alternate internal drive or an external storage device to recover the computer to that p...

Страница 82: ...must be large enough to hold the data from the current drive Purchase an external hard drive connector separately to connect the new drive to the computer WhenWindows is installed on a non user replac...

Страница 83: ...ation is not supported by the computer reinstallWindows using the recovery function of Windows ReinstallingWindows will erase all data saved on the computer Back up applications and personal data to a...

Страница 84: ...lications occupy a certain area of the HDD outside ofWindows For models with the Samsung Recovery application the HDD capacity representation inWindows may be smaller than the actual capacity because...

Страница 85: ...certain angle The angle may differ depending on the model If the computer LED does not turn on automatically press the Power button What is a recovery image This refers to the operating system driver...

Страница 86: ...65W Optional components may not be provided or different components may be provided depending on the model The system specifications are subject to change without notice The Storage device capacity of...

Страница 87: ...rature increases there is a danger of burn injury The instructions in this manual have been prepared so that they can be applied to the range of needs of general users If the user is not included in t...

Страница 88: ...aight line Use a light touch when typing or using the touchpad and keep the hands and fingers relaxed Avoid rolling the thumbs under your palms or supporting the wrists on the desk while typing Use an...

Страница 89: ...ver updates without your knowledge Always recheck equalizer and volume settings before listening to audio To prevent possible hearing damage do not listen at high volume levels for long periods Eye po...

Страница 90: ...h use stop using the computer and consult a physician Operating conditions Take at least a 10 minute break every hour Avoid using the computer in dark locations Use the computer with as much ambient l...

Страница 91: ...ection may result in a fire Use the approved adapter or cable included in the product box If you use the unapproved adapter or cable it cause the damage or malfunction of the computer Safety precautio...

Страница 92: ...vice Center Failure to do so may result in an explosion or fire Use only properly earthed electric sockets or extension cords Unearthed electric sockets or extension cords may cause electric shock Any...

Страница 93: ...he head may result in suffocation Never heat the computer or the battery or put the computer or the battery into a fire or microwave Failure to do so may result in an explosion or fire Replace a run d...

Страница 94: ...ers that are supplied with an optional removable battery disconnect the battery Failure to do so may result in electric shock or fire Keep the computer away from water or liquid Water or liquid enteri...

Страница 95: ...f then disconnect the power cord from the wall outlet and phone line from modem There is a danger of electric shock or fire Connect only permitted devices to the connectors or ports of the computer Fa...

Страница 96: ...hod only when the Optical Disc Drive has stopped There is a danger of injury Close the LCD panel only after checking if the notebook computer is turned off The temperature may rise and it may cause de...

Страница 97: ...to the Optical Disc Drive tray when it is operating There is a danger of injury due to an abrupt ejection Do not use the product if it is cracked or broken Broken glass or acrylic could cause injury t...

Страница 98: ...ured or authorized by Samsung enquire at a Samsung Service Center before connecting the device There is a danger of damaging the product Upgrade Related Do not attempt to upgrade the computer unless y...

Страница 99: ...ce e g HDD SSD eMMC please back up the data frequently Storage and movement related Do not store the computer in an enclosed space such as a computer bag while it is running Failure to do so may resul...

Страница 100: ...ls can cause problems with the display but a small number of bad pixels does not generally affect computer performance Samsung s quality standards for bad pixels are as follows Bright dot 2 or fewer B...

Страница 101: ...tch make sure that the switch is in the proper position for your area Openings in the computer case are provided for ventilation Do not block or cover these openings Make sure you provide adequate spa...

Страница 102: ...ed technician performs the task When the computer is turned off a small amount of electrical current still flows through the computer To avoid electrical shock always unplug all power cables remove th...

Страница 103: ...t by authorized service centers 5 Do not allow the portable computer to operate with the base resting directly on exposed skin for extended periods of time The surface temperature of the base will ris...

Страница 104: ...g of old batteries THERE IS RISK OF EXPLOSION IF BATTERY IS REPLACED BY AN INCORRECTTYPE DISPOSE OF USED BATTERIES ACCORDINGTOTHE INSTRUCTIONS Replacement parts and accessories Use only replacement pa...

Страница 105: ...ation when open Avoid exposure to the beam Connecting and disconnecting the AC adapter The socket outlet shall be installed near the equipment and shall be easily accessible Do not unplug the power co...

Страница 106: ...ystem USA only The appliance coupler must meet the mechanical configuration of an EN 60 320 IEC 320 Standard Sheet C7 or C5 connector for mating with appliance inlet on the computer Power cord require...

Страница 107: ...compliance statements Wireless guidance If fitted with 2 4 G band or 5 G band Low power Radio LAN type devices radio frequency RF wireless communication devices operating in the 2 4 GHz 5 GHz Band may...

Страница 108: ...be used See the manufacturer System Restoration Kit or contact the manufacturer s technical support for additional information Radio frequency wireless communication can interfere with equipment on c...

Страница 109: ...merica and Canada USA and Canada Safety Requirements and Notices Do not touch or move antenna while the unit is transmitting or receiving Do not hold any component containing the radio such that the a...

Страница 110: ...ease the separation between the equipment and receiver Connect the equipment into an outlet on a circuit different from that to which the receiver is connected Consult the dealer or an experienced rad...

Страница 111: ...frequency range 5 15 to 5 25 GHz to reduce the potential for harmful interference to co channel Mobile Satellite systems High power radars are allocated as primary users of the 5 25 to 5 35 GHz and 5...

Страница 112: ...perts drawn from industry government and academia after extensive reviews of the scientific literature related to the biological effects of RF energy Before a new model is available for sale to the pu...

Страница 113: ...to a wireless base station antenna the lower the power output For body worn operation this model meets the FCC RF exposure guidelines when used with Samsung accessory designated for this product Non...

Страница 114: ...cs Co Ltd 129 Samsung Ro Yeongtong Gu Suwon City Gyeonggi Do 443 742 Korea Samsung Electronics Suzhou Computer Co Ltd No 198 Fangzhou Road Suzhou Industrial Park Jiangsu Province 215021 China Tel 86 5...

Страница 115: ...sont r serv s uniquement pour une utilisation l int rieur a n de r duire les risques de brouillage pr judiciable aux syst mes de satellites mobiles utilisant les m mes canaux Canada Innovation Scienc...

Страница 116: ...m India only For more information on safe disposal and recycling visit our website www samsung com in or contact our Helpline numbers 18002668282 180030008282 This product is RoHS compliant WEEE symbo...

Страница 117: ...n death or personal injury caused by Samsung s negligence Correct disposal of batteries in this product Applicable in countries with separate collection systems This marking on the battery manual or p...

Страница 118: ...g location go to our website www samsung com recycling or call 1 800 SAMSUNG USA only This Perchlorate warning applies only to primary CR Manganese Dioxide Lithium coin cells in the product sold or di...

Страница 119: ...me content may differ from the computer depending on the region service provider software version or computer model and is subject to change without prior notice English 03 2020 Rev 1 2 www samsung co...

Отзывы: