background image

13

_ Contents

contents

INTRODUCING YOUR NEW RANGE 

14

14  Overview
14  What’s included with your range

SURFACE COOKING 

15

15  About surface cooking
16  How to set the appliance for surface cooking
17  Using the proper cookware
18  Choosing the proper cookware
18  Protecting the smoothtop surface

OPERATING THE OVEN 

19

19  The oven control panel
20  Setting the clock
20  Setting the kitchen timer
21  Minimum and maximum settings
21  Using the oven racks
22  Baking
22  Timed cooking
23  Delay timed cooking
24  Broiling
25  Using the easy cook feature
26  Using the custom cook feature
26  Using the warm function
27  Extra features

MAINTAINING YOUR APPLIANCE 

30

30  Self-cleaning
32  Steam-cleaning
33  Care and cleaning of the oven
34  Care and cleaning of the glass cooktop
36  Removing and replacing the oven door
36  Removing and replacing the storage drawer
37  Changing the oven light

TROUBLESHOOTING 

38

38  Troubleshooting

WARRANTY 

42

42  Warranty

FE-R300_XAA_DG68-00277A-09_EN.indd   13

02/01/2014   11:12:13

Содержание FE-R300SX

Страница 1: ... receive more complete service please register your product at www samsung com register 1 800 SAMSUNG 726 7864 Electric Range user manual ENGLISH This manual is made with 100 recycled paper FE R300SX FE R300SW FE R300SB FE R300_XAA_DG68 00277A 09_EN indd 1 02 01 2014 11 12 12 ...

Страница 2: ...in burners with two that dial heat up to different pot sizes Read and follow all instructions before using your oven to prevent the risk of fire electric shock personal injury or damage when using the range This guide does not cover all possible conditions that may occur Always contact your service agent or manufacturer about problems that you do not understand important safety instructions WHAT Y...

Страница 3: ...To reduce the risk of tipping the range the range must be secured by a properly installed Anti Tip device AFTER THE RANGE HAS BEEN INSTALLED CONFIRM THAT THE ANTI TIP DEVICE HAS BEEN PROPERLY INSTALLED AND VERIFY THAT THE ANTI TIP DEVICE IS PROPERLY ENGAGED Refer to the installation manual for instructions a If the anti tip device is not installed a child or adult can tip the range and be killed b...

Страница 4: ...sing injury if you or a child stand sit or lean on an open door FOR YOUR SAFETY When using electrical appliances basic safety precautions should be followed including the following CAUTION Use this appliance only for its intended purpose as described in this Owner s Manual Potentially hot surfaces include the cooktop areas facing the cooktop oven vent opening surfaces near the opening crevices aro...

Страница 5: ...e or flame by closing the door or use dry chemical baking soda or foam type extinguisher Storage in or on appliance Flammable materials should not be stored in an oven or near surface units Be sure all packing materials are removed from the appliance before operating it Keep plastics clothes and paper away from parts of the appliance that may become hot Wear proper apparel Loose fitting or hanging...

Страница 6: ... will expose a portion of the heating element to direct contact and may result in ignition of clothing Proper relationship of utensil to burner will also improve efficiency Glazed cooking utensils Only certain types of glass glass ceramic ceramic earthenware or other glazed utensils are suitable for range top service without breaking due to the sudden change in temperature Utensil handles should b...

Страница 7: ...ven can ignite Use care when opening door Let hot air or steam escape before you remove or replace food in the oven Protective liners Do not use aluminum foil to line the oven bottoms except as suggested in the manual Improper installation of these liners may result in a risk of electric shock or fire Keep oven vent ducts unobstructed The oven vent is located above the right rear surface unit this...

Страница 8: ...G SURFACES DO NOT TOUCH SURFACE UNITS OR AREAS NEAR UNITS Surface units may be hot even though they are dark in color Areas near surface units may become hot enough to cause burns During and after use do not touch or let clothing or other flammable materials contact surface units or areas near units until they have had sufficient time to cool Among these areas are the cook top and facing the cook ...

Страница 9: ...t This appliance must be properly grounded Do not ground the appliance to a gas pipe plastic water pipe or telephone line This may result in electric shock fire an explosion or problems with the product Do not cut or remove the ground prong from the power cord under any circumstances Connect the oven to a properly grounded circuit Do not install this appliance in a humid oily or dusty location in ...

Страница 10: ... If the oven needs to be repaired contact an authorized service center near you Use the appliance only after closing the door If you use the appliance when it is contaminated by alien substances such as food waste it may result in a problem with the appliance Take care when removing the wrapping when taking food out of the appliance If the food is hot hot steam may be emitted abruptly when removin...

Страница 11: ... Do not store or use oven outdoors Never use this appliance for purposes other than cooking This may result in fire Open the cap or stopper of a sealed container herb tonic tea bottle baby bottle milk bottle and so on and make a hole in food items such as shells or nuts eggs chestnuts etc with a knife before cooking them Failing to do so may result in burns or injury Never heat plastic or paper co...

Страница 12: ...ontents and cause burns Do not stand on top of the appliance or place objects such as laundry oven cover lighted candles lighted cigarettes dishes chemicals metal objects etc on the appliance Items such as a cloth may be caught in the door This may result in electric shock fire problems with the product or injury Do not operate the appliance with wet hands This may result in electric shock Do not ...

Страница 13: ...re CAUTION SEVERE WARNING SIGNS FOR CLEANING Do not clean the appliance by spraying water directly on to it Do not use benzene thinner or alcohol to clean the appliance This may result in discoloration deformation damage electric shock or fire Take care not to hurt yourself when cleaning the appliance external internal You may hurt yourself on the sharp edges of the appliance Do not clean the appl...

Страница 14: ...nimum and maximum settings 21 Using the oven racks 22 Baking 22 Timed cooking 23 Delay timed cooking 24 Broiling 25 Using the easy cook feature 26 Using the custom cook feature 26 Using the warm function 27 Extra features MAINTAINING YOUR APPLIANCE 30 30 Self cleaning 32 Steam cleaning 33 Care and cleaning of the oven 34 Care and cleaning of the glass cooktop 36 Removing and replacing the oven doo...

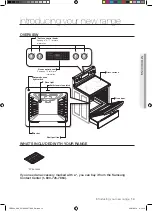
Страница 15: ...from the Samsung Contact Center 1 800 726 7864 introducing your new range Oven door Shelf position Glass surface Automatic oven light switch Oven light Self steam clean latch Gasket Oven control panel See page 19 for more information Surface control knobs See page 16 17 for more information FE R300_XAA_DG68 00277A 09_EN indd 14 02 01 2014 11 12 14 ...

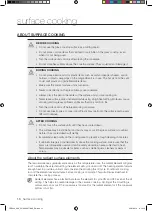
Страница 16: ... the surface units until they have cooled down The surface may be still be hot and burns may occur if the glass surface is touched before it has cooled down sufficiently Immediately clean spills on the cooking area to prevent a tough cleaning chore later If cabinet storage is provided directly above the cooking surface make sure that the items are infrequently used and can be safely stored in an a...

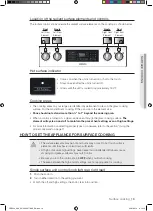
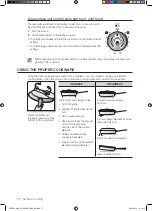
Страница 17: ...w can be seen through the glass cooking surface The element will cycle on and off to maintain the preset heat setting even at high settings For more information on selecting proper types of cookware refer to the section Using the proper cookware on page 17 HOW TO SET THE APPLIANCE FOR SURFACE COOKING The surface elements may be hot and burns may occur Do not touch surface elements until they have ...

Страница 18: ...G THE PROPER COOKWARE Using the right cookware can prevent many problems such as uneven cooking or extended cooking times Using the proper pans will reduce cooking times and cook food more evenly Check for flatness by rotating a ruler across the bottom of the cookware CORRECT INCORRECT Flat bottom and straight sides Tight fitting lids Weight of handle does not tilt pan Pan is well balanced Pan siz...

Страница 19: ...p looking good and can prevent damage If a spillover occurs while cooking immediately clean the spill from the cooking area while it is hot to prevent a tough cleaning chore later Using extreme care wipe the spill with a clean dry towel Do not allow spills to remain on the cooking area or the cooktop trim for a long period of time Do not use abrasive cleansing powders or scouring pads which will s...

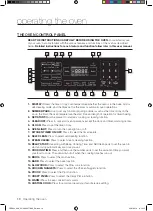
Страница 20: ...e clock and timer warming center 5 CLOCK Press to set the time of day 6 OVEN LIGHT Press to turn the oven light on or off 7 KITCHEN TIMER ON OFF Press to select the timer feature 8 SELF CLEAN Press to select self cleaning function 9 STEAM CLEAN Press to select steam cleaning function 10 DELAY START Use along with Bake Cooking Time and Self Clean pads to set the oven to start and stop automatically...

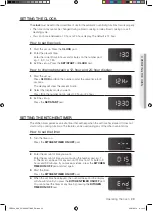
Страница 21: ... want Press 0 on the number pad to select 12 hour or 24 hour 3 Exit the set up Press the SET START pad SETTING THE KITCHEN TIMER The kitchen timer serves as an extra timer that will beep when the set time has elapsed It does not start or stop cooking functions The feature can be used during any of the other oven functions How to set the timer 1 Turn the timer on Press the KITCHEN TIMER ON OFF pad ...

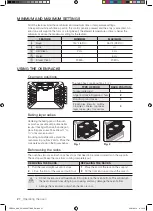
Страница 22: ...yer cakes Centering the baking pans in the oven as much as possible will produce better results If baking with more than one pan place the pans so each has at least 1 to 1 of air space around it If cooking on multiple racks place the oven racks in positions 2 and 5 Place the cookware as shown in the figures below Fig 1 Fig 2 Before using the racks The oven has two racks Each rack has stops that ne...

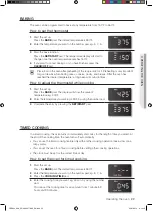
Страница 23: ...ss the BAKE pad The display will show the present temperature eg 375 F 2 Enter the temperature you want eg 425 F by using the number pad 3 Complete the entry by pressing the SET START pad TIMED COOKING In a timed cooking the oven turns on immediately and cooks for the length of time you select At the end of the cooking time the oven turns off automatically You can use the timed cooking feature onl...

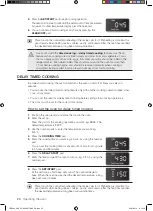
Страница 24: ...lect in advance You can use the delay timed cooking feature only with another cooking operation bake slow cook crispy pizza You can set the oven for a delay timed cooking before setting other cooking operations The clock must be set for the correct time of day How to set the oven for delay timed cooking 1 Position the oven rack s and place the food in the oven 2 Enter the set up Press the pad for ...

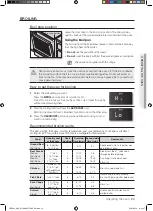
Страница 25: ...side until food is browned turn and cook on the other side 3 Press the CLEAR OFF pad once you have finished cooking or if you want to cancel broiling Recommended broiling guide The size weight thickness starting temperature and your preference of doneness will affect broiling times This guide is based on meats at refrigerator temperature Food Quantity and or thickness Shelf position First side tim...

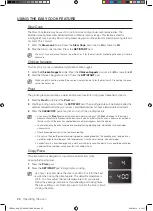
Страница 26: ...herefore does not have a temperature adjustment 3 Press the CLEAR OFF pad at any time to turn off the proofing feature If you press the Proof pad when the oven temperature is above 100 F Hot will appear in the display Because these functions produce the best results when started while the oven is cool we recommend that you wait until the oven has cooled down and Hot disappears from the display To ...

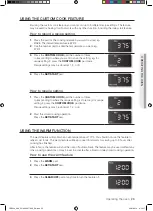
Страница 27: ...ll a setting 1 Press the CUSTOM COOK pad the number of times corresponding to where the recipe setting is stored eg for recipe setting 2 press the CUSTOM COOK pad twice Recipe settings may be stored at 1 2 or 3 2 Start the stored cooking operation Press the SET START pad USING THE WARM FUNCTION The warm feature will maintain an oven temperature of 170 F You should not use this feature to reheat co...

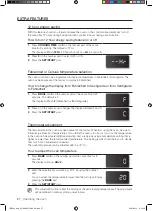
Страница 28: ...ash F Fahrenheit or C Centigrade 2 Press 0 on the number pad changes the display between F and C 3 Press the SET START pad Thermostat adjustment The temperature in the oven has been preset at the factory When first using the oven be sure to follow recipe times and temperatures If you think the oven is too hot or too cool the temperature in the oven can be adjusted Before adjusting test a recipe by...

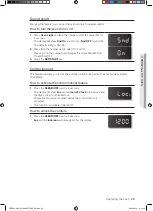
Страница 29: ...and Snd OFF 3 Press the SET START pad Control lockout This feature will allow you to lock the buttons on the touch pad so they cannot be activated accidentally How to activate the control lockout feature 1 Press the CLEAR OFF pad for 3 seconds The display will show Loc and an icon of a lock continuously and the time of day if not blacked out All functions must be cancelled before the control locko...

Страница 30: ...ature is 350 F 2 Enter the temperature you want eg 375 F by using the number pad 3 Press the SET START pad The temperature display will start to change once the oven temperature reaches 150 F 4 Press the CLOCK and the KITCHEN TIMER ON OFF pads at the same time for 3 seconds The display will show SAb Once SAb appears in the display the oven control will no longer beep or display any further changes...

Страница 31: ...the self cleaning cycle is complete Stand to the side of the oven when opening the door to allow hot air or steam to escape The oven may still be VERY HOT Before a self cleaning cycle Fig 1 We recommend venting your kitchen with an open window or using a ventilation fan or hood during the self cleaning cycle Remove the wire rack broil pan broil pan insert all cookware and any aluminum foil from th...

Страница 32: ...OCK and number pads enter the time you want the clean cycle to start 4 Press the SET START pad The display will show Delay start time and Lock icon And the motor driven door lock will engage automatically 5 Self Cleaning cycle will turn on automatically at the set time How to turn off the self cleaning feature You may find it necessary to stop or interrupt a self cleaning cycle due to excessive sm...

Страница 33: ...r in the display Because these functions produce the best results when started while the oven is cool we recommend that you wait until the oven has cooled down and Hot disappears from the display After a steam cleaning cycle Take care when opening the door before a steam cleaning procedure has ended the water on the bottom is hot Open the oven door and remove the remaining water with a sponge Do n...

Страница 34: ...Cleaner or polish well 2 Place a small amount of stainless steel appliance cleaner or polish on a damp cloth or damp paper towel 3 Clean a small area rubbing with the grain of the stainless steel if applicable 4 Dry and buff with a clean dry paper towel or soft cloth 5 Repeat as necessary Do not use a steel wool pad it will scratch the surface If a mineral oil based stainless steel appliance clean...

Страница 35: ...GLASS COOKTOP Normal daily use cleaning Use only a ceramic cooktop cleaner on the glass cooktop Other creams may not be as effective By following these steps you can maintain and protect the surface of your glass cooktop 1 Before using the cooktop for the first time clean it with a ceramic cooktop cleaner This helps protect the top and makes cleanup easier 2 Daily use of a ceramic cooktop cleaner ...

Страница 36: ... roughness that may scratch the cooktop Cleaning the cooktop seal To clean the seal around the edges of the glass lay a wet cloth on it for a few minutes then wipe clean with a nonabrasive cleaner Potential for permanent damage to the glass surface Sugary spillovers such as jellies fudge candy syrups or melted plastics can cause pitting of the surface of your cooktop This is not covered under the ...

Страница 37: ... slot The notch in the hinge arm must be fully inserted into the bottom of the slot 3 Open the door fully If the door will not open fully the indentation is not inserted correctly in the bottom edge of the slot 4 Push the hinge locks up against the front frame of the oven cavity to the locked position 5 Close the oven door REMOVING AND REPLACING THE STORAGE DRAWER How to remove the storage drawer ...

Страница 38: ...e or disconnect power 3 Turn the glass bulb cover in the back of the oven counterclockwise to remove 4 Turn the bulb counterclockwise to remove it from its socket Remove Glass bulb cover Bulb Replace 5 Replace the light bulb and glass bulb cover by turning them clockwise 6 Plug in the range or reconnect power Before changing your oven light bulb disconnect the electrical power to the range at the ...

Страница 39: ...er to make the appliance accessible The carpet is interfering with movement of the range Provide sufficient space so the range can be lifted over the carpet The oven control beeps and displays an F error code You have a function error code CODE CAUSE SE Shorted key E 27 oven sensor opened E 28 Oven sensor shorted E 08 Oven heating error E 0A Oven heating over E 0E Door locking error Press the CLEA...

Страница 40: ...ghts will turn on If required call your local electric company for service The oven light will not turn on The light bulb is loose or defective Tighten or replace the bulb The switch operating light is broken Call for service Oven smokes excessively during broiling The control has not been set properly Refer to the section on setting oven controls Make sure the oven door is opened to the broil sto...

Страница 41: ...mooth bottoms Cookware has been slid across the cooktop surface Brown streaks or specks Boilovers have been cooked onto the surface Use the blade scraper to remove soil See the section on care and cleaning of the glass cooktop on page 34 Areas of discoloration with metallic sheen Mineral deposits from water and food have been left on the surface of the cooktop Remove using a ceramic glass cooktop ...

Страница 42: ...cleaning cycle for a minimum of 3 hours See the section on self cleaning on page 30 Strong odor An odor from the insulation around the inside of the oven is normal for the first few times the oven is used This is temporary Oven racks are difficult to slide The shiny silver colored racks were cleaned in a self cleaning cycle Apply a small amount of vegetable oil to a paper towel and wipe the edges ...

Страница 43: ...e to follow operating instructions maintenance and environmental instructions that are covered and prescribed in the instruction book product removal and reinstallation problems caused by pest infestations and overheating or overcooking by user This limited warranty shall not cover cases of incorrect electric current voltage or supply light bulbs house fuses house wiring cost of a service call for...

Страница 44: ...ile Phones www samsung com ca English www samsung com ca_fr French www samsung com 1 800 SAMSUNG 726 7864 Please be advised that the Samsung warranty does NOT cover service calls to explain product operation correct improper installation or perform normal cleaning or maintenance FE R300_XAA_DG68 00277A 09_EN indd 43 02 01 2014 11 12 22 ...

Отзывы: