background image

050


The items indicated by * are default settings.

Ä

  Menus are subject to change without prior notice.

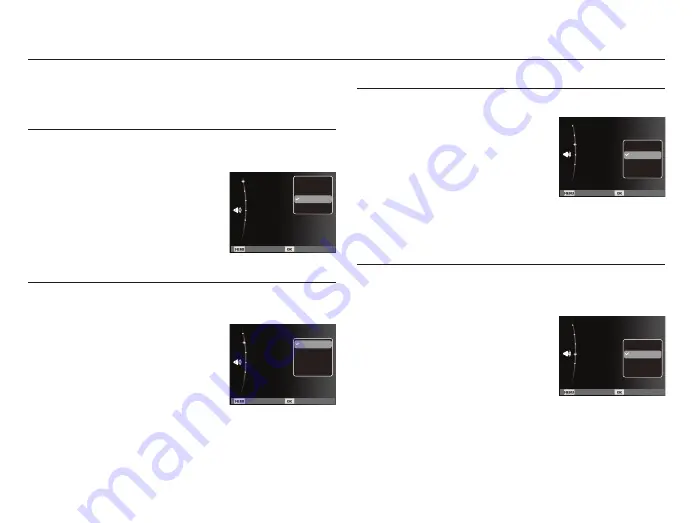
You can select a volume of start up sound, shutter sound, beep 
sound and AF sound.

 - [Volume] sub menus : [Off], [Low], 

[Medium]*, [High]

Volume

You can select the sound that is activated whenever the camera is 
turned on. 

 - Start up sound :  [Off]*, [1], [2], [3]

Start up sound

You can select the shutter sound. 
 -  Shutter sound :  [Off], [1]*, [2], [3]

Shutter sound 

If you set sound to ON, a beep will sound when buttons are pressed, 
letting you know the camera operation status.

 -  [Beep Sound] sub menus :  [Off], [1]*, [2], [3]

Beep sound 

Sound ( 

 )

Back Set

Start Sound 

:Off

Shutter Sound 

:1

Beep Sound 

:1

AF Sound 

:On

Volume :Medium

Off

Low
Medium
High

Back Set

Start Sound 

:Off

Shutter Sound 

:1

Beep Sound 

:1

AF Sound 

:On

Volume :Medium

Off

1
2
3

Back Set

Start Sound 

:Off

Shutter Sound 

:1

Beep Sound 

:1

AF Sound 

:On

Volume :Medium

Off

1
2
3

Back Set

Start Sound 

:Off

Shutter Sound 

:1

Beep Sound 

:1

AF Sound 

:On

Volume :Medium

Off

1
2
3

Содержание ES68

Страница 1: ...anual ES68 Thank you for buying a Samsung Camera This manual will help you learn to capture images share or print your photos and edit photos with the accompanying software Please read this manual thoroughly ...

Страница 2: ...to change without prior notice for upgrading the camera functions Ä Microsoft Windows and Windows logo are registered trademarks of Microsoft Corporation incorporated in the United States and or other countries Ä Adobe and Reader are either trademarks or registered trademarks in the United States and or other countries Ä All brand and product names appearing in this manual are registered trademark...

Страница 3: ...hen in use do not cover the camera or charger This may cause KHDW WR EXLOG XS DQG GLVWRUW WKH FDPHUD ERG RU FDXVH D UH OZD V use the camera and its accessories in a well ventilated area Danger DANGER indicates an imminently hazardous situation which if not avoided will result in death or serious injury Do not attempt to modify this camera in any way To do so may UHVXOW LQ UH LQMXU HOHFWULF VKRFN R...

Страница 4: ...void taking an unclear image and possibly causing camera malfunction YRLG REVWUXFWLQJ WKH OHQV RU WKH ÀDVK ZKHQ RX FDSWXUH DQ LPDJH When using this camera in low temperatures you may experience the following These are not camera malfunctions and usually recover at normal temperature It takes longer to turn on the LCD monitor and the color may differ from the subject When changing the composition t...

Страница 5: ...ng the MENU button 038 Photo Size Movie Size 039 Quality Frame rate 039 Exposure compensation 040 ISO 040 White balance 041 Face Detection 043 Face Tone 043 Face Retouch 044 Auto Focus type 044 Metering 045 Photo Style Selector 046 Image Adjust 047 ACB 047 Drive mode 048 Voice Memo 048 Voice Recording 049 Recording the movie clip without voice 050 Sound 050 Volume 050 Start up sound 050 Shutter so...

Страница 6: ...tton 063 Play Pause OKbutton 064 Left Right Down MENUbutton 064 Deletebutton 065 Settinguptheplaybackfunctionusing theLCDmonitor 067 Edit 067 Resize 068 Rotating an image 068 Photo Style Selector 069 Image Adjust 071 StartingtheMultiSlideShow 071 Start the Multi Slide Show 071 Selecting Images RQ JXUH 0XOWL 6OLGH VKRZ HIIHFWV 072 Setting play interval 072 Setting Background Music 073 FileOptions 0...

Страница 7: ...006 SOFTWARE Contents 088 Transferringfilestoyourcomputer forWindows 088 For Windows users 092 Transferringfilestoyourcomputer forMac 092 For Mac users 094 FAQ ...

Страница 8: ...DHC memory card see p 17 Camera case AV cable Battery charger Please check that you have the correct contents before using this product The contents can vary depending on the sales region To buy the equipment contact your nearest Samsung dealer or Samsung service center Parts and accessories illustrated below may differ from exact appearance System chart ...

Страница 9: ...008 GHQWL FDWLRQ RI IHDWXUHV Front Top Flash Lens Lens cover AF sensor Self timer lamp Shutter button POWER button Microphone Speaker ...

Страница 10: ...entification of features Camera status lamp LCD monitor Play mode button Fn Delete button 5 function button MENU button USB AV DC terminal Zoom Tele T button Digital zoom Zoom Wide W button Thumbnail Strap eyelet ...

Страница 11: ...ation of features 5 Function button Information Up button Macro Down button Self timer Right button Flash Left button OK Play Pause button Battery holder Battery chamber cover Battery chamber Memory card slot Tripod socket ...

Страница 12: ... and turns off when the camera is ready to take a picture KHQ ÀDVK EDWWHU LV FKDUJLQJ The lamp blinks When the USB cable is inserted to a PC The lamp lights up LCD monitor turns off after initializing the device Transmitting Data with a PC The lamp blinks LCD monitor turns off When the USB cable is inserted into a printer The lamp is off When the printer is printing The lamp blinks When the AF act...

Страница 13: ...7KHVH JXUHV DUH PHDVXUHG XQGHU 6DPVXQJ V VWDQGDUG FRQGLWLRQV and shooting conditions and may vary depending on the user s methods Important information about battery usage When camera is not in use turn off the power Please remove the battery if the camera will not be used for long periods Batteries can lose power over time and are prone to leaking if kept inside the camera Low temperatures below ...

Страница 14: ... the charging LED of the AC Charger does not turn on or blink after inserting the rechargeable battery please check whether the battery is inserted correctly If you charge the battery with the camera power on the battery won t be fully charged Turn the camera off while charging the battery Charging LED of the AC charger Charging LED Being Charged Red LED is on Charging is complete Green LED is on ...

Страница 15: ...replacement batteries Do not try to disassemble or perforate the product by using a sharp pin Do not apply pressure to the product Do not let the product fall down from the height or do not give a shock to the product Do not exposure the product to the high temperature over 60Ⳅ 140ⳅ degree Do not exposure the product to the water or humidity Battery shall not be exposed to excessive heat such as s...

Страница 16: ...n the LCD may be different from the actual battery status Insert the battery as shown If the camera does not turn on after you have inserted battery please check whether the battery direction is right When the battery chamber cover is open do not force the battery chamber cover this may damage it Inserting the memory card Insert the memory card as shown Turn off the camera s power before inserting...

Страница 17: ...rent camera Turn off the camera power whenever the memory card is being inserted or removed Repeated use of the memory card will eventually reduce the memory card s performance Should this be the case you will need to purchase a new memory card Wear and tear on the memory card is not covered by the Samsung warranty The memory card is an electronic precision device Do not bend drop or subject the m...

Страница 18: ... 7KHVH JXUHV DUH DSSUR LPDWH DV LPDJH FDSDFLWLHV FDQ EH affected by variables such as subject matter and memory card type The zoom button doesn t function during the movie recording The recording times can be changed by the zoom operation You can record videos of up to 4GB or 2hours each Card pins Write protect switch Label SD Secure Digital memory card Recorded image size Super Fine Fine Normal 3...

Страница 19: ...played again after setting up the date time time zone and language Set up the date time time zone and language before using this camera Setting up the language 1 Select the Language menu by pressing the Up Down button and press the Right button 2 Select the desired sub menu by pressing the Up Down button and press the OK button Setting up the Time Zone 1 Select the Time Zone menu by pressing the U...

Страница 20: ...ry p 15 6 Optical Digital Zoom bar Digital Zoom rate p 29 7 Photo Size Movie Size p 38 8 Image Quality Frame Rate p 39 9 Metering p 44 10 Flash p 33 11 Self timer Drive mode p 36 47 12 Macro p 31 13 Face Detection Self Portrait Smile Shot Blink Detection p 41 14 Date Time 2011 01 01 12 00 PM p 54 15 Camera shake warning p 28 16 Auto Focus Frame p 44 17 Image adjust p 46 18 Photo Style Selector p 4...

Страница 21: ...ter Sound 1 Beep Sound 1 AF Sound On Volume Medium Off Low Medium High Start Sound Off Shutter Sound 1 Beep Sound 1 AF Sound On Volume Medium Exit Back Shooting Sound Display Settings Program DIS Photo Help Scene Movie Smart Auto Exit Change Mode Quality EV ISO White Balance Face Detection Photo Size Exit Change Focus Area Shooting Sound Display Settings Mode Start Sound Shutter Sound Beep Sound A...

Страница 22: ...g note of the polarity 2 Insert the memory card p 15 As this camera has a 9 8MB internal memory you do not need to insert the memory card If the memory card is not inserted an image will be stored on the internal memory If the memory card is inserted an image will be stored on the memory card 3 Close the battery chamber cover 4 Press the POWER button to turn on the camera 5 Select the Smart Auto m...

Страница 23: ...ecognized in the following conditions Landscape When shooting outdoor scenes White When shooting a white background Night When shooting the nighttime scenes Night Portrait When shooting people in a dark outdoor place Backlight When shooting a backlit scenery without a portrait Backlight Portrait When shooting a backlit portrait Portrait When shooting a portrait Macro When shooting close ups Macro ...

Страница 24: ...ons the DIS will not activate I WKH OLJKWLQJ FRQGLWLRQ LV GDUNHU WKDQ ÀXRUHVFHQW OLJKWLQJ conditions camera shake warning indicator à will display For best results only take pictures in situations where the camera shake warning indicator à is not displayed 4 If the subject is moving the captured image may be blurred 5 As the DIS uses the camera s digital signal processor it may take a little longe...

Страница 25: ...hutter button Pressing the Left Right button Pressing the OK button Photo Help Guide Features to reduce camera shake Features to use when adjusting brightness Features to use when the image is out of focus Features to use in low light conditions Features to use when adjusting colors Photo Help Guide When the subject is in focus press the shutter button completely to capture the image or video If t...

Страница 26: ...is mode to shoot a document Sunset For taking pictures of sunsets Dawn Daybreak scenes Backlight Portrait without shadows caused by backlight Fireworks Firework scenes Beach Snow For ocean lake beach and snowscape scenes 8VH WKH PHQX WR HDVLO FRQ JXUH RSWLPDO VHWWLQJV IRU D YDULHW RI shooting situations 1 Select the Scene mode by using the MENU button p 21 2 Press the Right button then press the U...

Страница 27: ...orded if the shutter button is released If you wish to stop recording press the shutter button again Ä Movie clip size and type are listed below Movie clip size 640x480 320x240 selectable 0RYLH FOLS OH W SH 9 0 3 Frame Rate 30 FPS 15 FPS selectable How to use the Frame Guide mode Set Frame Guide mode when you want someone else to take a picture for you from the angle you choose 1 Take a picture fr...

Страница 28: ...unwanted scenes while recording a movie clip Using this function you can record your favorite scenes into a movie clip without having to create multiple movie clips Pausing while recording a movie clip Successive Recording You can record the movie clip without sound Steps from 1 3 are the same as those for Movie mode 4 Press the MENU button 5 Press the Up Down button to select the Shooting menu an...

Страница 29: ...ation p 39 or ACB p 47 function YRLG REVWUXFWLQJ WKH OHQV RU WKH ÀDVK ZKHQ RX FDSWXUH DQ LPDJH Things to watch out for when taking pictures Pressing the shutter button down half way LJKWO SUHVV WKH VKXWWHU EXWWRQ WR FRQ UP IRFXV DQG ÀDVK EDWWHU charge Press the shutter button all way down to take the picture Compose the image by using the LCD monitor Under certain conditions the auto focus system ...

Страница 30: ...lfway activates the autofocus DQG FKHFNV WKH FRQGLWLRQ RI WKH ÀDVK 3UHVVLQJ WKH VKXWWHU EXWWRQ down fully takes and stores the image If you select voice memo UHFRUGLQJ WKH UHFRUGLQJ ZLOO VWDUW DIWHU WKH FDPHUD KDV QLVKHG storing the image data If the menu is not displayed this button works as the OPTICAL ZOOM or DIGITAL ZOOM button This camera has a 5X optical zoom and a 3X digital zoom function U...

Страница 31: ...e quality when using the digital zoom To view a clearer digital zoom image press the shutter button halfway at the maximum optical zoom position and press the ZOOM T button again The digital zoom can t be activated in some Scene modes Beauty Shot Night Portrait Children Close up Text Fireworks DIS mode Movie mode Self Portrait Smile Shot Blink Detection and Face Detection Take care not to touch th...

Страница 32: ...the next page Press the Macro button until the desired macro mode indicator appears on the LCD monitor Auto Focus Macro Info DISP Up button While the menu is showing the Up button operates as a direction button In the recording modes or playback mode pressing this button will display the image information Information screen Filming screen Auto Macro Show all photographic information Show only basi...

Страница 33: ...range W Wide T Tele Unit cm When the macro mode is selected be particularly careful to avoid camera shake When you take a picture within 40cm Wide zoom or 100cm Tele zoom in the Macro mode select the Flash off mode Macro Down button Available focusing method by recording mode o Selectable Q QLW IRFXV UDQJH Mode Auto macro Macro Normal o o o o o o o o Mode SCENE Auto macro Macro Normal o o o o o o ...

Страница 34: ...ur picture as desired and then press the shutter button completely to take the picture If you release RXU QJHU IURP WKH VKXWWHU EXWWRQ WKH IRFXV ORFN IXQFWLRQ ZLOO EH cancelled Flash Left button When the menu is displayed on the LCD monitor pressing the Left button makes the cursor shift to the left tab When the menu is not displayed on the LCD monitor the Left button operates as the Flash button ...

Страница 35: ...sh Left button Flash mode indicator Icon Flash mode Description Flash off 7KH ÀDVK GRHV QRW UH Select this mode when capturing images in D SODFH RU VLWXDWLRQ ZKHUH ÀDVK SKRWRJUDSK is prohibited When you capture an image in poorly lit conditions the camera shake warning indicator à will appear on the LCD monitor Red eye reduction When a shot with red eye is detected this mode will reduce the red ey...

Страница 36: ...pher would also like to be in the image If you operate the self timer button during the self timer operation the self timer function is cancelled Use a tripod to prevent the camera from shaking In Movie mode only the 10 Sec self timer will work Depending on the selected face detection option the timer is not available or some timer options are not available Mode o o o o o o o o o o o o o o Mode SC...

Страница 37: ...conds after pressing the Shutter button and the picture is taken when the movement is stopped 7KH 0RWLRQ 7LPHU ÀRZV DUH DV IROORZLQJV 0RYLH PRGH H FOXGHG Selecting the Motion Timer Pressing the Shutter button RQ UPLQJ WKH FRPSRVLWLRQ LWKLQ VHF 1 Starting the detec tion Swing your hands fully 2 Stopping the detection Do not move Taking an image after 2 sec 1 The camera detects the subject s movemen...

Страница 38: ... enables the functions or the Fn button to bring up the menus below Mode Menu Available mode Page Shooting Photo Size Movie Size p 38 Quality Frame Rate p 39 EV p 39 ISO p 40 White Balance p 40 Face Detection p 41 Face Tone p 43 Face Retouch p 43 Focus Area p 44 Metering p 44 Photo Style Selector p 45 Image Adjust p 46 ACB p 47 Drive p 47 Voice p 48 49 Shooting OK button Pressing the OK button Men...

Страница 39: ...Movie Size You can select the photo size movie size appropriate for your application Still image mode Movie mode Unit pixel Still image mode Icon Size 4000X 3000 3984X 2656 3840X 2160 3264X 2448 2560X 1920 2048X 1536 1920X 1080 1024X 768 Movie mode Icon Size 640 x 480 320 x 240 Photo Size Set the photo size Back Move Movie Size Set the video size Back Move Appropriate for outdoor photography on a ...

Страница 40: ...tically adjusts the exposure according to the ambient lighting conditions You can also select the exposure value by using the EV menu Compensating Exposure 1 Click the Up Down button from the Shooting menu to select EV 2 Use the Left and Right buttons to set the desired exposure compensation factor 3 Press the OK button The value you set will be saved and the Exposure Compensation setup mode will ...

Страница 41: ...uto The camera s sensitivity is automatically changed by variables such as lighting value or subject brightness ISO 80 100 200 400 800 1600 You can increase the shutter speed while the same amount of light is present by increasing the ISO sensitivity However the image may be saturated in high luminance The higher the ISO value the higher the camera s sensitivity to light and therefore the greater ...

Страница 42: ...ess of the face is also adjusted You can also capture natural facial expressions by using self portrait Using the Custom White Balance White balance settings may vary slightly depending on the shooting environment You can select the most appropriate white balance setting for a given shooting environment by setting up the custom white balance 1 Select the Measure Shutter menu of the White Balance a...

Страница 43: ...detect a face as the brightness is too dark or too bright The distance between the camera and object is far The maximum available Face Detection range is 2 5m Wide The nearer the subject the faster the camera can recognize the subject In Beauty Shot Portrait and Children mode the Face Detection function setting is set to its default value Self Portrait When taking pictures of yourself the area of ...

Страница 44: ...he Shutter button If you press the Shutter button the picture is taken in the normal way When taking a picture of smile shot showing teeth or keeping the smiley face of your subject helps detecting the smile face of the subject Blink Detection öSelectable modes Program Photo Help Guide Portrait Children Beach Snow If the eyes of the subject are closed when the shutter button is pressed the camera ...

Страница 45: ...owever the calculation will be biased towards the center of the image area This is suitable for general use Spot Only the rectangular area in the center of the LCD monitor will be metered for light This is suitable when the subject in the center is exposed correctly regardless of the back lighting Center weighted Exposure will be calculated based on an average of the available light in the image a...

Страница 46: ... Icon Description Normal No style effect is applied Soft Soft style is applied Vivid Vivid style is applied Forest Forest style is applied Retro Sepia style is applied Cool Cool style is applied Calm Calm style is applied Classic Black white effect is applied Negative Negative effect is applied Custom RGB H QH DQ 5 WRQH WR FUHDWH RXU RZQ SKRWR style Photo Style Selector When picture style is set f...

Страница 47: ...n button 2 Change the Sharpness by pressing the Left Right button 3 Press the Shutter button to take an image Saturation You can change the saturation of the image 1 Select Saturation by pressing the Up Down button 2 Change the saturation by pressing the Left Right button 3 Press the Shutter button to take an image Image Adjust When Image Adjust is set Photo Style Selector function is not availabl...

Страница 48: ...en the shutter is pressed and held down After completing the continuous shooting images are saved and the images play back on the Rear LCD The maximum number of shots is 30 and the LPDJH VL H LV HG DV 9 AEB Take three consecutive photos with varying exposure values Use this mode if it is hard to decide exposure of the object LJK UHVROXWLRQ DQG SLFWXUH TXDOLW LQFUHDVHV OH VDYLQJ WLPH which increase...

Страница 49: ...op the voice memo Voice Recording A voice can be recorded for as long as the available recording time Max 10 hours allows Press the shutter button to record a voice Press the shutter button once and voice is recorded for as long as the available recording time Max 10 hours allows The recording time will be displayed on the LCD monitor Voice will still be recorded if the Shutter button is released ...

Страница 50: ...stance of 40cm between you and the camera microphone is the best distance to record sound If the camera power is turned off while the voice recording is paused the voice recording is cancelled Shooting Recording the movie clip without voice You can record the movie without voice Select Off of Voice menu in the Movie mode icon will appear on the LCD monitor Press the Shutter button and a movie will...

Страница 51: ...und Shutter sound Off 1 2 3 Shutter sound If you set sound to ON a beep will sound when buttons are pressed letting you know the camera operation status Beep Sound sub menus Off 1 2 3 Beep sound Sound Back Set Start Sound Off Shutter Sound 1 Beep Sound 1 AF Sound On Volume Medium Off Low Medium High Back Set Start Sound Off Shutter Sound 1 Beep Sound 1 AF Sound On Volume Medium Off 1 2 3 Back Set ...

Страница 52: ... You can select whether the function description can be displayed on the window in recording mode Function Description sub menus Off The function description function can t be activated On The name and description of the option is displayed Function Description Display Sound Back Set Start Sound Off Shutter Sound 1 Beep Sound 1 AF Sound On Volume Medium Off On Back Set Function Description On Star...

Страница 53: ...t the LCD brightness Sub menus Auto Dark Normal Bright Display Brightness RX FDQ VHOHFW WKH LPDJH WKDW LV UVW GLVSOD HG RQ WKH PRQLWRU whenever the camera is turned on Sub menus Off Logo User Image Use a saved image for the start up image with the Start Image in the Resize menu in the play mode The start up image will not be deleted by Delete or Format menu The user images will be deleted by Reset...

Страница 54: ...nu A Formatting message appears and the memory will be formatted A Format is completed message DSSHDUV DQG IRUPDWWLQJ LV QLVKHG No The memory will not be formatted Be sure to run Format on the following types of memory card A new memory card or an unformatted memory card PHPRU FDUG WKDW KDV D OH WKLV FDPHUD FDQ W UHFRJQL H RU RQH that has been taken from another camera Always format the memory car...

Страница 55: ...on Cape Verde Mid Atlantic Buenos Aires Sao Paulo Newfoundland Caracas La Paz NewYork Miami Chicago Dallas Denver Phoenix LA San Francisco Alaska Honolulu Hawaii Samoa Midway Wellington Auckland Okhotsk Guam Sydney Darwin GHODLGH 6HRXO 7RN R HLMLQJ RQJ RQJ DQNRN DNDUWD Yangon Almaty Kathmandu Mumbai New Delhi Tashkent Kabul Abu Dhabi Teheran Moscow Athens Helsinki Rome Paris Berlin Ä DST Daylight ...

Страница 56: ...FL HG After replacing the battery the power off setting will be preserved Note that the automatic power off function will not operate if the camera is in the PC Printer mode slide show playing back a voice recording and playing back a movie clip Auto power off There is an option to include Date Time on still images Sub menus Off The Date Time will not be imprinted on the image OH Date Only the Dat...

Страница 57: ... is connected to an external monitor the image and menus on the LCD monitor will be visible on the external monitor Selecting Video out type Settings Yellow Video White Sound You can turn on and off the Auto Focus lamp Sub menus Off The AF lamp will not light up in low light conditions On The AF lamp will light up in low light conditions Auto Focus lamp Back Set Video Out On USB Auto AF Lamp On NT...

Страница 58: ...um China Denmark Finland Germany U K Holland Italy Kuwait Malaysia New Zealand Singapore Spain Sweden Switzerland Thailand Norway etc When using a TV as an external monitor you will need to select the external or AV channel of the TV There will be digital noise on the external monitor but it is not a malfunction If the image is not in the center of the screen use the TV controls to center it When ...

Страница 59: ...ode button for more than 5 seconds In the Manner mode Operating sound Effect sound Start up sound and Shutter sound will not be generated To cancel the Manner mode turn on the camera by pressing the POWER button Playing back a still image 1 Select the Play mode by pressing the play mode button Î Playing back a movie clip 1 Select the recorded movie clip that you want to play back by using the Left...

Страница 60: ...ovie clip file is the same size as the original movie clip 640x480 320x240 Ä When you press the down button at the beginning of the movie clip the first frame of the movie clip will be saved as a still image Playing back a recorded voice 1 Select the recorded voice that you want to play back by using the Left Right button 2 Press the OK button to play back a recorded voice file To pause a recorded...

Страница 61: ...Page 1 Playback mode Î p 58 2 Voice Memo p 74 3 DPOF p 75 4 Protect p 73 5 Folder name File name 100 0010 p 54 6 Memory indicator 7 Battery p 15 8 ISO 80 1600 p 40 9 Aperture value F3 5 F15 10 Shutter speed 8 1 2 000 11 Flash On Off p 33 12 Photo Size Movie Size 4000x3000 320x240 p 38 13 Recording date 2011 01 01 p 54 ...

Страница 62: ... are displayed in Smart Album screen 3 Select the file by pressing the Up Down Left Right buttons 4 Press the Delete Õ button to delete the selected file Pressing the enlargement button í Pressing the thumbnail button º Smart Album 3 Thumbnail Window 9 Thumbnail Window 20 Thumbnail Window 3 Thumbnail Window When Smart Album feature runs or a category is selected it may take few seconds depends on ...

Страница 63: ...zoom back to the original full sized image You can tell whether the image displayed is an enlarged view by checking the image enlargement indicator shown at the top left of the LCD monitor If the image is not an enlarged view the indicator will not be displayed You can also check the area of enlargement Movie clips and WAV files can t be enlarged If an image is enlarged a loss of quality may occur...

Страница 64: ...image with a voice memo a voice file or a movie clip During playback Temporarily stops playback In Pause mode Resumes playback Info DISP Up button When the menu is displayed on the LCD monitor the Up button operates as a direction button When the menu is not displayed on the LCD monitor pressing the Info button will display image information on the LCD monitor Info DISP button Info DISP button Inf...

Страница 65: ...U button Left Right Down MENU buttons activate the following Left button While the menu is showing the Left button operates as a direction button While the menu is not showing press the Left button to select the previous image Right button While the menu is showing the Right button operates as a direction button While the menu is not showing press the Right button to select the next image Down but...

Страница 66: ...changed by using the LCD monitor In the Play mode pressing the MENU button displays the menu on the LCD monitor The menus you can set up in Play mode are as follows To capture an image after setting up the play menu press the Play mode button or shutter button Menu Tab Main Menu Sub Menu Page Edit Resize 2560x1920 2048x1536 p 67 1024X768 2592X1728 1776X1184 2560X1440 1920X1080 Start Image Rotate 5...

Страница 67: ...he camera is connected to a PictBridge supporting printer direct connection to the camera sold separately with a USB cable Setting up the play back function using the LCD monitor Ä Menus are subject to change without prior notice Menu Tab Main Menu Sub Menu Secondary Menu Page Type Auto p 79 Plain Photo Fast Photo Quality Auto Draft Normal Fine Date Auto Off On File Name Auto Off On Reset Yes p 80...

Страница 68: ...mage can be resized to a smaller sized image but not vice versa 2QO 3 LPDJHV FDQ EH UHVL HG 0RYLH FOLS 9 9RLFH recording WAV files can t be resized You can change the resolution of only those files compressed in WKH 3 IRUPDW The resized image will have a new file name The Start Image image is stored not on the memory card but on the internal memory If a new user image is saved the original user im...

Страница 69: ...and press the MENU button 2 Click the Up Down button from the Edit menu to select Photo Style Selector menu tab and press the OK button 3 Select a desired sub menu by pressing the Left Right button and press the OK button Rotating an image Photo Style Selector Style mode Icon Description Normal No style effect is applied Soft Soft style is applied Vivid Vivid style is applied Forest Forest style i...

Страница 70: ...on Change the values Custom RGB You can change the R Red G Green and B Blue values of the image Face Retouch You can make the skin in an image appear clear and beautiful 1 Select by pressing the Left Right button and press the OK button Then a bar for selecting the face retouch will be displayed 2 Change the face retouch by pressing the Left Right button 3 Press the OK button and the image will be...

Страница 71: ...tion by pressing the Left Right button 3 Press the OK button and the image will be saved as a new file name Contrast control You can change the contrast of the image 1 Select by pressing the Left Right button and press the OK button Then a bar for selecting the contrast will be displayed 2 Change the contrast by pressing the Left Right button 3 Press the OK button and the image will be saved as a ...

Страница 72: ...tart menu to start the multi slide show Selecting Images Starting the Multi Slide Show Images can be displayed continuously at preset intervals You can view the Multi Slide Show by connecting the camera to an external monitor 1 Press the play mode button and press the MENU button 2 Press the Up Down button and select the Multi Slide Show menu tab and press the OK button Start the Multi Slide Show ...

Страница 73: ... Music Setting play interval Set the Multi Slide Show play interval 1 Select the Interval sub menu by pressing the Up Down button and press the Right button 2 Use the Up Down button to select the desired interval 3 Press the OK button to save the configuration The loading time depends on the image size and quality While the Multi Slide Show is playing the Movie clips and voice recording files will...

Страница 74: ...f all the files stored on the memory the unprotected files in the DCIM subfolder will be deleted Remember that this will permanently delete unprotected images Important shots should be stored on a computer before deletion takes place The startup image is stored on the camera s internal memory i e not on the memory card and it will not be deleted even if you delete all files on the memory Protectin...

Страница 75: ...ecording Voice memo menu All Protect release all saved images If you protect an image the protect icon will be displayed on the LCD monitor An unprotected image has no indicator An image in LOCK mode will be protected from the delete function or Delete function but will NOT be protected from the Format function Start Stop Protect All Lock Unlock Set Back Set Protect Voice memo Off DPOF Copy to Car...

Страница 76: ...ting information on your memory card s MISC folder Select the pictures to be printed and how many prints to make The DPOF indicator will display on the LCD monitor when an image that has DPOF information plays back Images can then be printed on DPOF printers or at an increasing number of photo labs This function is not available for Movie clips and Voice recording files When the wide angle image i...

Страница 77: ...s the Right button again Sub menu will display 3 Select a desired sub menu by pressing the Up Down button and press the OK button Select Selection window to change the printed size of the image is displayed Up Down Left Right Select an image Zoom W T Button Change the print size Fn button Your changes will be saved and the menu will disappear All Change print size of all saved images Up Down butto...

Страница 78: ...t 7 5MB the Copy to Card command will copy only some of the images and display Memory Full message Then the system will return to the playback mode Please be sure to delete any unnecessary files to free up space before inserting the memory card into the camera When you move the images that are stored on the internal memory by doing Copy to Card to the card the next number of file names will be cre...

Страница 79: ...SB cable 2 Once the camera is turned on the camera automatically recognizes the printer and is connected to it Ä If automatic connection fails set the USB menu to Printer p 57 Ä For a printer that can enable removable disk set the USB menu to Printer Easy printing When you connect the camera to printer in the Play back mode you can print a picture easily Pressing the Left Right button Selects a pr...

Страница 80: ... Date Print and File Name Print menus for printed pictures 1 Press the MENU button and the PictBridge menu will display 2 Use the Up Down button to select the desired menu and then press the Right button 3 Use the Up Down button to select the desired sub menu value and then press the OK button Ä Some menu options are not supported on all printers If not supported the menus are still displayed on t...

Страница 81: ...es or highly flammable materials Do not leave this camera in places subject to dust chemicals like naphthalene and mothballs high temperature and high humidity Keep this camera with silica gel in a hermetically VHDOHG ER ZKHQ QRW SODQQLQJ WR XVH WKH FDPHUD IRU D ORQJ period of time Sand can be particularly troublesome to cameras Do not let sand get inside the camera when using it on beaches coasta...

Страница 82: ... gently clean the lens and LCD assemblies If this does not work lens cleaning paper with lens cleaning fluid can be used Clean the camera body with a soft cloth Do not allow this camera to come into contact with solvent materials such as benzol insecticide thinners etc This may damage the body shell of the camera and also affect its performance Rough handling can damage the LCD monitor Take care t...

Страница 83: ...ocked SD SDHC memory card Slide the write protect switch to the top of the memory card Memory Full The memory card or internal memory is full Insert new memory card Delete unnecessary image files No Image File There are no images stored on the memory Take images Insert a memory card that is storing some images File Error File error Delete the file Memory card error Contact a camera service center ...

Страница 84: ...he Shutter button There is insufficient memory capacity Delete unnecessary image files The memory card has not been formatted Format the memory card p 53 The memory card is exhausted Insert a new memory card The memory card is locked Refer to Card Locked error message p 82 The camera s power is off Turn the camera power on The battery is exhausted Insert fresh battery p 15 Battery is inserted inco...

Страница 85: ...RU The external monitor has not been connected properly with the camera Check the connection cables There are incorrect files on the memory card Insert a memory card that has correct files KHQ XVLQJ WKH 3 V H SORUHU WKH 5HPRYDEOH LVN OH GRHV QRW VKRZ Cable connection is incorrect Check the connection The camera is off Turn the camera on The operating system is not Windows XP Vista 7 Mac OS 10 3 Al...

Страница 86: ... Detection AE Compensation 2EV 1 3EV steps ISO Auto 80 100 200 400 800 1600 Flash Modes Auto Auto Red eye reduction Fill in flash Slow sync Flash off Red eye Fix Range Wide 0 2m 2 85m Tele 0 5m 1 59m ISO AUTO Recharging Time Approx 4 sec Sharpness Soft Soft Normal Vivid Vivid White Balance Auto Daylight Cloudy Fluorescent_H Fluorescent_L Tungsten Custom Voice Recording Voice Recording max 10 hours...

Страница 87: ...2 About 870 About 1471 Fine About 284 About 309 About 367 About 374 About 566 About 802 About 1144 About 1670 Normal About 403 About 441 About 528 About 537 About 792 About 1065 About 1437 About 1872 Ä These figures are measured under Samsung standard conditions and may vary depending on shooting conditions and camera settings Effect Shooting Photo Style Selector Image Adjust Sharpness Contrast Sa...

Страница 88: ... region Dimensions WxHxD 96 3 X 58 X 21 9mm excluding protrusions Weight Approx 112 4g without battery and card Operating Temperature 0 40 C Operating Humidity 5 85 Software Intelli studio Specifications are subject to change without prior notice All trademarks are the property of their respective owners Specifications ...

Страница 89: ...ndows users Transfer files by connecting your camera to your PC Installing programs Hardware and software requirements Using a self assembled PC or a PC and OS that are not supported may void your warranty The programs may not work properly on 64 bit Edition of Windows XP Vista and 7 Intelli studio may not perform correctly on some computers even when the computer meets the requirements If your co...

Страница 90: ...mplete the installation and restart your computer Transferring files to your PC Once you connect the camera to your PC the camera will be recognized as a removable drive 1 Connect your camera to your PC with the USB cable The battery will be charged while the camera is connected to a PC with the USB cable RX PXVW SOXJ WKH HQG RI WKH FDEOH ZLWK WKH LQGLFDWRU OLJKW Ÿ into your camera If the cable is...

Страница 91: ...onnecting the camera for Windows XP The way to disconnect the USB cable for Windows Vista 7 is similar 1 If the status lamp on your camera is blinking wait until it stops 2 Click on the tool bar at the bottom right of your PC screen 3 Click the pop up message 4 Remove the USB cable If the camera fails to connect a pop up window will appear Select Computer 7UDQVIHUULQJ OHV WR RXU FRPSXWHU IRU LQGRZ...

Страница 92: ...gram on your computer You cannot use Intelli studio on Macintosh computers 7UDQVIHUULQJ OHV WR RXU FRPSXWHU IRU LQGRZV Using Intelli studio Once you have installed the Intelli studio on your PC the Intelli studio starts automatically when a camera is connected with your PC If the Intelli studio does not start after you have connected the camera to your PC double click the Intelli studio icon on yo...

Страница 93: ...Album or on a map 12 Browse folders in the connected device 13 Browse folders in your computer 14 Move to the previous or next folder 15 Print files view files on a map store files in My Folder or register faces For Mac users When you connect the camera to a Macintosh computer the computer will recognize the device automatically You can transfer files directly from the camera to the computer witho...

Страница 94: ...mera The computer recognizes the camera automatically and a removable disk icon will be displayed 3 Double click the removable disk icon 4 Transfer photos or videos to the computer 7UDQVIHUULQJ OHV WR RXU FRPSXWHU IRU 0DF ...

Страница 95: ...connected to the USB port located on the front of the computer the computer may not recognize the camera Connect the camera to the USB port located on the back of the computer Case 1 USB cable is not connected or it is not the supplied USB cable Connect the supplied USB cable Case 2 The camera is not recognized by your PC Sometimes the camera may appear under Unknown Devices in Device Manager Turn...

Страница 96: ...ding the DirectX If a PC connected with the camera stops responding while Windows is starting In this case disconnect the PC and the camera and Windows will start If the problem happens continuously set the Legacy USB Support to disable and re start the PC The Legacy USB Support is in the BIOS setup menu The BIOS setup menu differs from the PC manufacturers and some BIOS menus don t have Legacy US...

Страница 97: ... the European Union and other European countries with separate battery return systems This marking on the product accessories or literature indicates that the product and its electronic accessories e g charger headset USB cable should not be disposed of with other household waste at the end of their working life To prevent possible harm to the environment or human health from uncontrolled waste di...

Страница 98: ...of the following measures Reorientate or relocate the receiving antenna Increase the distance between the equipment and receiver Connect the equipment into an outlet on a circuit different from that to which the receiver is connected Consult the dealer or an experienced radio TV technician for help CAUTION Changes or modifications not expressly approved by the manufacturer responsible for complian...

Страница 99: ......

Отзывы: