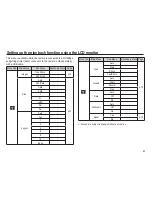
background image

75

Extremes in temperature may cause problems.

 -  If the camera is transferred from a cold to a warm and humid 

environment, condensation can form on the delicate electronic 
circuitry. If this occurs, turn the camera off and wait for at least 
1 hour until all moisture is dispersed. Moisture built up can also 
occur on the memory card. If this happens, turn off the 
camera and remove the memory card. Wait until the moisture 
has dispersed.

 Caution on Using the Lens

 -  If the lens is subjected to direct sunlight, it could result in the 

discoloration and deterioration of the image sensor.

 -  Take care not to get fingerprints or foreign substances on the 

surface of the lens.

If the digital camera is not used for a long period, an electric 
discharge can occur. It is a good idea to remove the battery and 
the memory card if you do not intend using the camera for an 
extended period of time.

If the camera is exposed to an electronic interference, it will turn 
itself off to protect the memory card.

Important notes

Camera Maintenance

 -  Use a soft brush (available from photo stores) to gently clean the 

lens and LCD assemblies. If this does not work, lens-cleaning 
paper with lens cleaning fluid can be used.
Clean the camera body with a soft cloth. Do not allow this 
camera to come into contact with solvent materials such as 
benzol, insecticide, thinners etc. This may damage the body 
shell of the camera and also affect its performance. Rough 
handling can damage the LCD monitor. Take care to avoid 
damage and keep the camera in its protective carry case at all 
times when not in use.

Do not attempt to disassemble or modify the camera.

Under certain conditions, static electricity can cause the flash unit 
to fire. This is not harmful to the camera and is not a malfunction.

When images are uploaded or downloaded, the data transfer may 
be affected by static electricity. In this case, disconnect and re-
connect the USB cable before trying the transfer again.

Before an important event or going on a trip, you should check 
the camera condition. 

 -  Take a picture for testing the camera condition and prepare extra battery.
 -  Samsung cannot be held responsible for camera malfunctions. 

If the digital camera is not used for a long period, the date and time 
may adopt the default settings by automatical battery discharged. In 
this case, reset the date and time correctly before the recording.

Содержание ES60

Страница 1: ......

Страница 2: ...lustrations of this manual are subject to change without prior notice for upgrading the camera functions Microsoft Windows and Windows logo are registered trademarks of Microsoft Corporation incorpora...

Страница 3: ...e do not cover the camera or Charger This may cause heat to build up and distort the camera body or cause a fire Always use the camera and its accessories in a well ventilated area Danger DANGER indic...

Страница 4: ...king an unclear image and possibly causing camera malfunction Avoid obstructing the lens or the flash when you capture an image When using this camera in low temperatures you may experience the follow...

Страница 5: ...ption 048 Start up image SETUP 46 024 How to use the Movie clip mode 024 Recording the movie clip without sound 024 Pausing while recording a movie clip Successive Recording 025 Things to Watch Out fo...

Страница 6: ...tor 056 Using the camera buttons to set the camera 056 Thumbnail Enlargement button 058 Info DISP Up button PLAY 54 058 Play Pause OK button 059 Left Right Down MENU button 059 Delete button 060 Setti...

Страница 7: ...rvice centre 079 Specifications 082 Software Notes 082 System Requirements 083 About the software 084 Setting up the application software 086 Starting PC mode 089 Removing the removable disk 090 Samsu...

Страница 8: ...optional equipment contact your nearest Samsung dealer or Samsung service centre Parts and accessories illustrated below may differ from exact appearance Package Contents Camera Rechargeable battery A...

Страница 9: ...8 Identification of features Front Top Shutter button Lens Lens cover Flash Power button Microphone Self timer lamp AF sensor Speaker...

Страница 10: ...n of features Back 5 function button Play mode button MENU button LCD monitor Camera status lamp Fn Delete button Strap eyelet Zoom Tele T button Digital zoom Zoom Wide W button Thumbnail USB AV conne...

Страница 11: ...open the battery chamber cover slide it in the direction shown above Information Up button Flash Left button Self timer Right button Macro Down button OK Play Pause button Tripod socket Battery chamb...

Страница 12: ...g the image data and turns off when the camera is ready to take a picture When flash battery is charging The lamp blinks When the USB cable is inserted to a PC The lamp lights up LCD monitor turns off...

Страница 13: ...s frame rate These figures are measured under Samsung s standard conditions and shooting conditions and may vary depending on the user s methods Important information about battery usage When camera i...

Страница 14: ...arging LED of the AC Charger does not turn on or blink after inserting the rechargeable battery please check whether the battery is inserted correctly If you charge the battery with the camera power o...

Страница 15: ...status on the LCD may be different from the actual battery status Insert the battery as shown Inserting the memory card Insert the memory card as shown Turn off the camera s power be fore inserting t...

Страница 16: ...ith a different camera Turn off the camera power whenever the memory card is being inserted or removed Repeated use of the memory card will eventually reduce the memory card s performance Should this...

Страница 17: ...will be as follows These figures are approximate as image capacities can be affected by variables such as subject matter and memory card type Recorded image size Super Fine Fine Normal 30 FPS 15 FPS S...

Страница 18: ...y fully before using the camera for the first time When the camera is turned on for the first time a menu will be displayed in the LCD monitor to set date time and language This menu will not be displ...

Страница 19: ...Full Status No Description Icons Page 5 Memory card icon Internal memory icon 6 Battery p 14 7 Flash p 30 8 Self timer p 32 9 Macro p 28 10 Photo Style Selector p 42 11 Face Detection p 37 12 Face To...

Страница 20: ...Self Portrait On Volume Medium Off Low Medium High Mode Start Sound Shutter Sound Beep Sound AF Sound Self Portrait Volume Functions Sound Display Settings Mode Photo Size Quality Focus Area Photo Sty...

Страница 21: ...the Auto mode by pressing the MENU button 6 Point the camera towards the subject and compose the image by using the LCD monitor 7 Press the shutter button to capture an image Select this mode for quic...

Страница 22: ...gs to watch out for using the DIS mode 1 The digital zoom will not operate in the DIS mode 2 If the lighting condition is brighter than fluorescent lighting condi tions the DIS will not activate 3 If...

Страница 23: ...shutter button Press the shutter button to practice using this feature Guide list Photo Help Guide Features to reduce camera shake Features to use when adjusting brightness Features to use when the im...

Страница 24: ...of a person with options to hide facial imperfections Night Use this for shooting still images at night or in other dark conditions Portrait To take a picture of a person Children To take a picture o...

Страница 25: ...mode 4 Press the Menu button 5 Press the Up Down button to select the Functions menu and press the Right button Recording the movie clip without sound Using Successive Recording Steps from 1 2 are the...

Страница 26: ...e compensation see page 35 Avoid obstructing the lens or the flash when you capture an image Compose the image by using the LCD monitor Things to Watch Out for When Taking Pictures Pressing the shutte...

Страница 27: ...way activates the autofocus and checks the condition of the flash Pressing the shutter button down fully takes and stores the image If you select voice memo recording the recording will start after th...

Страница 28: ...ice will not be recorded You may notice a decrease in image quality when using the digital zoom To view a clearer digital zoom image press the shutter button halfway at the maximum optical zoom positi...

Страница 29: ...n below Press the Macro button until the desired macro mode indicator appears on the LCD monitor Auto Focus Macro Info DISP Up button While the menu is showing the Up button operates as a direction bu...

Страница 30: ...inity W 80 Infinity T 80 Infinity Types of focus mode and focus range W Wide T Tele Unit cm When the macro mode is selected be particularly careful to avoid camera shake When you take a picture within...

Страница 31: ...en press the SHUTTER button completely to take the picture If you release your finger from the SHUTTER button the focus lock function will be cancelled Flash Left button When the menu is displayed on...

Страница 32: ...c dust Flash Left button Flash mode indicator Icon Flash mode Description Auto flash If the subject or background is dark the camera flash will operate automatically Auto Red eye reduction If a subjec...

Страница 33: ...button operates as the Self timer button This function is used when the photographer would also like to be in the image If you operate the Self timer button during the self timer operation the self t...

Страница 34: ...after pressing the Shutter button and the picture is taken when the movement is stopped The Motion Timer flows are as followings Movie Clip mode excluded Selecting the Motion Timer Pressing the Shutt...

Страница 35: ...enu that enables the functions or the Fn button to bring up the menus below Mode Menu Available mode Page Functions EV p 35 White Balance p 36 ISO p 37 Face Detection p 37 Face Tone p 39 Face Retouch...

Страница 36: ...tness Back Move 3 Select a desired menu by pressing the Up Down button and then press the OK button 1 Press the MENU button in an available mode 2 Press the Up Down button to select the Functions menu...

Страница 37: ...the shooting condition Different lighting conditions may cause a colour cast on your images Using the Custom White Balance White balance settings may vary slightly depending on the shooting environme...

Страница 38: ...ISO Adjust the sensitivity of the camera Back Move Face Detection Adjust face detection settings Back Move Normal Selectable modes Auto Program DIS Photo Help Guide Beauty Shot Portrait Children Beach...

Страница 39: ...at the camera Camera doesn t detect a face as the brightness is too dark or too bright The distance between the camera and object are far The maximum available Face Detection range is 2 5m Wide The n...

Страница 40: ...he Up Down button 2 Select a desired face retouch by pressing the Left Right button and then press the OK button 3 Press the Shutter button to take an image Face Tone Set the level of face tone bright...

Страница 41: ...ulti Exposure will be calculated based on an average of the available light in the image area However the calculation will be biased towards the centre of the image area This is suitable for general u...

Страница 42: ...i AF This camera selects all of available AF point from the 9 AF points When the camera focuses on the subject the auto focus frame turns to green When the camera doesn t focus on the subject the auto...

Страница 43: ...ct the desired Photo style selector by pressing the Left Right button and press the OK button 2 Press the Shutter button to take an image Style mode Icon Description Normal No style effect is applied...

Страница 44: ...e 1 Select Sharpness by pressing the Up Down button 2 Change the Sharpness by pressing the Left Right button 3 Press the Shutter button to take an image Saturation You can change the saturation of the...

Страница 45: ...p the voice memo Voice Recording A voice can be recorded for as long as the available recording time Max 10 hour allows Press the shutter button to record a voice Press the shutter button once and voi...

Страница 46: ...recording mode A distance of 40cm between you and the camera microphone is the best distance to record sound If the camera power is turned off while the voice recording is paused the voice recording i...

Страница 47: ...ct the shutter sound Shutter sound Off 1 2 3 Shutter sound Sound menu If you set sound to ON a beep will sound when buttons are pressed letting you know the camera operation status Beep Sound sub menu...

Страница 48: ...he items indicated by are default settings Menus are subject to change without prior notice You can select whether the function description can be displayed on the window in recording mode Function De...

Страница 49: ...t the LCD brightness Sub menus Auto Dark Normal Bright Display Bright You can select the image that is first displayed on the LCD monitor whenever the camera is turned on Sub menus Off Logo User Image...

Страница 50: ...era can t recognise or one that has been taken from another camera Always format the memory card using this camera If you insert a memory card that has been formatted using other cameras memory card r...

Страница 51: ...me Available cities London Cape Verde Mid Atlantic Buenos Aires Newfoundland Caracas La Paz NewYork Miami Chicago Dallas Denver Phoenix LA San Francisco Alaska Honolulu Hawaii Samoa Midway Wellington...

Страница 52: ...f after a set amount of time in order to prevent unnecessary battery drainage Sub menus Off The power off function will not operate 1 min 3 min 5 min 10 min The power will turn off automatically if no...

Страница 53: ...ark Finland Germany U K Holland Italy Kuwait Malaysia New Zealand Singapore Spain Sweden Switzerland Thailand Norway When using a TV as an external monitor you will need to select the external or AV c...

Страница 54: ...nal device cannot be recognized automatically Printer Sets printer connection mode if the connected external device cannot be recognized automatically You can turn on and off the Auto Focus lamp Sub m...

Страница 55: ...ed in the camera all the camera functions apply only to the internal memory Playing back a still image 1 Select the PLAY mode by pressing the play mode button Playing back a movie clip 1 Select the re...

Страница 56: ...e is the same size as the original movie clip 640x480 320x240 When you press the down button at the beginning of the movie clip the first frame of the movie clip will be saved as a still image Press t...

Страница 57: ...ed 3 Press the 5 function button to move to a desired image 4 To view an image separately press the enlargement button LCD monitor Indicator The LCD monitor displays shooting information about the dis...

Страница 58: ...med image the image can t be trimmed Image enlargement 1 Select an image that you want to enlarge and press the enlargement button 2 Different parts of the image can be viewed by pressing the 5 functi...

Страница 59: ...age with a voice memo a voice file or a movie clip During playback Temporarily stops playback In Pause mode Resumes playback Info DISP Up button When the menu is displayed on the LCD monitor the UP bu...

Страница 60: ...n MENU button LEFT RIGHT DOWN MENU buttons activate the following LEFT button While the menu is showing the LEFT button operates as a direction button While the menu is not showing press the LEFT butt...

Страница 61: ...can be changed by using the LCD monitor In the PLAY mode pressing the MENU button displays the menu on the LCD monitor The menus you can set up in Play mode are as follows To capture an image after se...

Страница 62: ...he camera is connected to a PictBridge supporting printer direct connection to the camera sold separately with a USB cable Setting up the play back function using the LCD monitor Menus are subject to...

Страница 63: ...o user images will be deleted in order If the memory capacity is insufficient to store the resized image a Memory Full message will appear on the LCD monitor and the resized image can t be stored Chan...

Страница 64: ...es by using this function 1 Press the play mode button and press the MENU button 2 Click the Up Down button from the Edit menu to select Photo Style Selector menu tab and press the OK button 3 Select...

Страница 65: ...Blue values of the image Face Retouch You can make the skin in an image appear clear and beautiful 1 Select by pressing the Left Right button and press the OK button Then a bar for selecting the face...

Страница 66: ...ack press the OK button again Pressing the OK button again will cause the Multi Slide Show restart To stop playback of the Multi Slide Show press the OK button and then press the Left or Right button...

Страница 67: ...r image which had been saved as Select1 will be saved as Select2 automatically You can change and cancel the images which were saved as Select1 Select2 and Select3 Press the Fn button and the settings...

Страница 68: ...utton to delete all unprotected images If there aren t protected images all the images are deleted and a No Image File message will appear 3 After deletion the screen will be changed to the play mode...

Страница 69: ...r an image to be protected released is displayed Up Down Left Right Select an image OK button Protect release the image Fn button Your changes will be saved and the menu will disappear File Options Yo...

Страница 70: ...oto labs may not support the wide angle size print DPOF File Options Standard This function allows you to embed printing quantity information on a stored image 1 Press the Up Down button and select th...

Страница 71: ...Size menu and press the Right button again Sub menu will display 3 Select a desired sub menu by pressing the UP DOWN button and press the OK button Select Selection window to change the printed size...

Страница 72: ...11MB the Copy To Card command will copy only some of the images and display Memory Full message Then the system will return to the playback mode Please be sure to delete any unnecessary files to free...

Страница 73: ...SB cable 2 Once the camera is turned on the camera automatically recognizes the printer and is connected to it If automatic connection fails set the USB menu to Printer p 53 For a printer that can ena...

Страница 74: ...Date Print and File Name Print menus for printed pictures 1 Press the Menu button and the PictBridge menu will display 2 Use the Up Down buttons to select the desired menu and then press the Right but...

Страница 75: ...ves or highly flammable materials Do not leave this camera in places subject to dust chemicals like naphthalene and mothballs high temperature and high humidity Keep this camera with silica gel in a h...

Страница 76: ...n the lens and LCD assemblies If this does not work lens cleaning paper with lens cleaning fluid can be used Clean the camera body with a soft cloth Do not allow this camera to come into contact with...

Страница 77: ...SD SDHC memory card Slide the write protect switch to the top of the memory card Memory Full The memory card or internal memory is full Insert new memory card Delete the unnecessary image files No Im...

Страница 78: ...the Shutter button There is insufficient memory capacity Delete unnecessary image files The memory card has not been formatted Format the memory card p 49 The memory card is exhausted Insert a new me...

Страница 79: ...e external monitor has not been connected properly with the camera Check the connection cables There are incorrect files in the memory card Insert a memory card that has correct files When using the P...

Страница 80: ...Control Program AE Metering Multi Spot Center Weighted Face Detection AE Compensation 2EV 1 3EV steps ISO Auto 80 100 200 400 800 1600 Flash Modes Auto Auto Red eye reduction Fill in flash Slow sync...

Страница 81: ...B Size Super Fine About 147 About 168 About 203 About 212 About 340 About 511 About 737 About 1290 Fine About 285 About 314 About 368 About 375 About 568 About 804 About 1146 About 1673 Normal About 4...

Страница 82: ...region Dimensions WxHxD 90 4 x 59 x 21 4mm excluding protrusions Weight Approx 120g without batteries and card Operating Temperature 0 40 C Operating Humidity 5 85 Software Samsung Master Adobe Reader...

Страница 83: ...manual you should have a basic knowledge of computers and O S Operating Systems For Windows For Macintosh USB Connection Specifications PC with processor better than Pentium III 500MHz Pentium III 80...

Страница 84: ...edia software solution You can download view edit and save your digital images and movie clips with this software This software is only compatible with Windows You should allow 5 10 seconds for runnin...

Страница 85: ...diting program You can visit the Samsung web site through the internet http www samsungcamera com English http www samsungcamera co kr Korean 1 The auto run frame will display Click the Samsung Digita...

Страница 86: ...dware Wizard will open and the computer will recognise the camera If your OS is Windows XP Vista an image viewer program will open 3 After restarting the computer connect the PC to the camera with the...

Страница 87: ...dobe Reader 6 0 1 correctly Internet Explorer 5 01 or later has to be installed Visit www microsoft com and upgrade the Internet Explorer If you connect the USB cable to a USB port on your PC and then...

Страница 88: ...ad the still images stored on the camera to your PC s hard disk and print them or use a photo editing software to edit them 1 Connect the camera to your PC with the USB cable 2 On your computer s desk...

Страница 89: ...By using Samsung Master you can see the stored images in the memory directly on the PC monitor and you can copy or move the image files We recommend that you should copy the images to the PC to view...

Страница 90: ...ose shown depending on the Windows O S 1 Check whether the camera and PC are transferring a file If the camera status lamp blinks please wait until the lamp has finished blinking and is constantly on...

Страница 91: ...e Start button to download the images 7 Downloaded images will be displayed You can download view edit and save your images and movies with this software This software is only compatible with Windows...

Страница 92: ...selected image Image display window Images of the selected folder are displayed Refer to the Help menu in Samsung Master for further information Image edit You can edit the still image Image edit fun...

Страница 93: ...nsert a narration Produce You can save the edited multi media as a new file name You can select AVI Windows media wmv and Windows media asf file types Frame display window You can insert multi media i...

Страница 94: ...patible with MAC OS 10 3 3 Connect the camera to the Macintosh and turn the camera power on 4 A new icon will be displayed on the desktop after connecting the camera to the MAC 1 Double click a new ic...

Страница 95: ...onnected to the USB port located on the front of the computer the computer may not recognise the camera Connect the camera to the USB port located on the back of the computer Case 1 USB cable is not c...

Страница 96: ...ly the Samsung Master the problems mentioned above occasionally happen Close the Samsung Master program by clicking the Samsung Master icon on the Taskbar Install all the application programs included...

Страница 97: ...disposed with other household waste at the end of its working life To prevent possible harm to the environment or hu man health from uncontrolled waste disposal please separate this from other types o...

Страница 98: ......

Отзывы: