background image

48 - 

English

P

layback

Playing back an Audio
CD (CD-DA)

Each disc has a variety of menu functions available.

❚ 

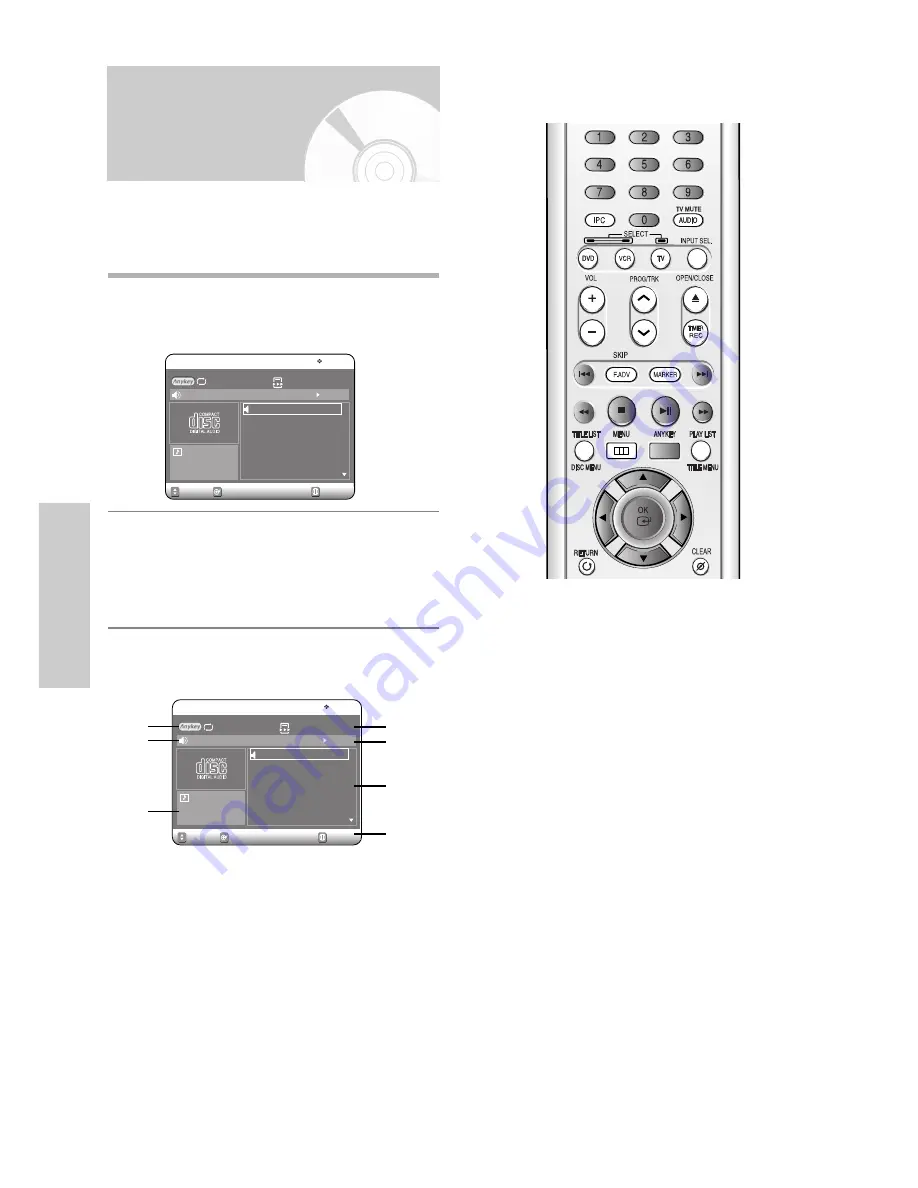
Playing back an Audio CD (CD-DA)

1

Insert an audio CD (CD-DA) into the disc tray.
• The audio CD menu appears and the tracks

(songs) are played automatically.

2

Press the 

…†

buttons to select the track (song) to

start playback from, and then press the 

OK

button.
• You can also select the track (song) by pressing

the number buttons on the remote.

❚ 

Audio CD (CD-DA) Screen Elements

!

Repeat mode

: Repeat off/Repeat Track/Repeat

Disc.

@

Current track (song)

: Displays the number of the

track currently being played.

#

Displays the current play index and total track  num-
ber.

$

This shows the operating state of a disc and a play-
back time corresponding to a portion that is 
currently played.

%

Displays the track list (song list) and the playing time
of each track.

^

Button display.

&

Play Option

: Normal, Random, Intro or Playlist

OK

EXIT

MOVE

Music

CD

Repeat : Off

Play Option : Normal

01. TRACK 1

02. TRACK 2

03. TRACK 3

04. TRACK 4

05. TRACK 5

06. TRACK 6

4:39

4:31

4:30

3:53

4:23

4:24

00 : 52

01. TRACK 1

01/12

OK

MOVE

Music

CD

Repeat : Off

Play Option : Normal

01. TRACK 1

02. TRACK 2

03. TRACK 3

04. TRACK 4

05. TRACK 5

06. TRACK 6

4:39

4:31

4:30

3:53

4:23

4:24

00 : 52

01. TRACK 1

01/12

!
@

#

^

%

$

&

Buttons on the Remote Control 
used for CD playback

1. 

…†

, 0~9 :

Selects a track (song).

2. 

:

Plays the selected track (song).

3. 

OK button :

Plays the selected track (song).

4. 

√√

l

button :

Plays the next track.

5. 

l

œœ

button :

Returns to the beginning of the current

track when pressed during playback. 
If pressed again, your DVD recorder moves to and
plays the previous track. 
If you press this button within three seconds after
playback starts, the previous track will be played. 
If you press this button after three seconds, the 
current track will be replayed from the beginning.

6. 

Press the (

œœ 

/

√√

) buttons :

Fast Play 

(

√√

2, 

√√

4, 

√√

8)

7. 

:

Stops a track (song).

8. 

ll :

Plays a track (song) or pauses playback.

9. 

ANYKEY :

To select the top menu on screen display

(Repeat or Play Option).

EXIT

Содержание DVD-VR320

Страница 1: ...Instruction Manual DVD VR320 www samsung com AK68 00676D 00 PAL ...

Страница 2: ...se is indicated on the pin face of the plug If it requires replacing a fuse approved to BS1362 of the same rating must be used Never use the plug with the fuse cover omitted if the cover is detachable If a replacement fuse cover is required it must be of the same colour as the pin face of the plug Replacement covers are available from your dealer If the fitted plug is not suitable for the power po...

Страница 3: ...Before connecting other components to this recorder be sure to turn them all off Do not move the recorder while a disc is being played or the disc may be scratched or broken and the recorder s internal parts may be damaged Do not put a flower vase filled with water or any small metal objects on the recorder Be careful not to put your hand into the disc tray Do not place anything other than the dis...

Страница 4: ...ing deleting and editing can not be performed after finalisation If you want to record the disc in VR Mode and then record in V Mode be sure to execute Format Be careful when executing Format because all the recorded data may be lost A DVD RW blank disc is initialized to VR Mode when first initialized Disc Storage Be careful not to harm the disc because the data on these discs is highly vulnerable...

Страница 5: ...ted picture from copy protected DVD discs This product incorporates copyright protection technolo gy that is protected by methods claims of certain U S patents and other intellectual property rights owned by Macrovision Corporation and other rights owners Use of this copyright protection technology must be authorized by Macrovision Corporation and is intended for home and other limited viewing use...

Страница 6: ...jacks 19 Case 3 Connecting a DV Dvice to the DV IN jack 19 System Setup System Setup On Screen Menu Navigation 20 Plug Auto Setup 21 Setting the Date and Time 22 Auto Setup 23 Manual Setup 24 Clearing a Preset Station 25 Changing the Preset Manual Setup Table 26 Selecting the RF OUT Sound Mode B G D K 27 VIDEO Output CH 27 Setting Up the Language Options 28 Setting Up the Audio Options 29 Setting ...

Страница 7: ...eting the Scheduled Record List 62 VCR Recording Basic VCR Recording 63 Check Remaining Time 64 Special Recording Features 64 Copy to DVD or VCR 65 Editing Editing Playing the Title List 67 Basic Editing Title List 69 Renaming Labeling a Title 69 Locking Protecting a Title 70 Deleting a Title 70 Deleting a Section of a Title 71 Advanced Editing Playlist 73 Creating a Playlist 73 Playing Titles in ...

Страница 8: ...94 4pin See page 19 High quality progressive scan Progressive scanning provides high resolution and flicker free images The 10 bit 54 MHz DAC 2D Y C Separating circuitry and Time Base Corrector processor technology provide you with the highest image playback and recording quality See page 18 A variety of functions with easy to use user inter face Integrated menu system and messaging functionality ...

Страница 9: ...nents only when they have been finalised You can only use either the VR or V mode on a DVD RW but not both at the same time You can change the DVD RW format to another format It should be noted that the data of the disc may be lost when changing formats Note Step 3 Recording Step 4 Playing Step 5 Editing a recorded disc You can select the title you want to play in a displayed menu and then immedia...

Страница 10: ... finalise the disc to play it on a component other than this recorder You cannot edit or record on the disc once it has been finalised Accessories Audio Video Cable RF Cable for TV Control Remote Control Batteries for Remote Control AAA Size User s Manual Quick Guide Preparing the Remote Control Install Batteries in the Remote Control Open the battery cover on the back of the remote control Insert...

Страница 11: ...he Remote Control Your DVD Recorder VCR remote control will work with Samsung televisions and compatible brands Result If your television is compatible with the remote control it will switch off It is now programmed to operate with the remote control BRAND SELECT NUMBER SAMSUNG TV 01 02 03 04 05 06 35 AKAI TV 12 BANG OLUFSEN TV 22 BLAUPUNKT TV 09 BRANDT TV 14 BRIONVEGA TV 22 CGE TV 21 CONTINENTAL ...

Страница 12: ... 12 RECORD BUTTON 13 PROG BUTTONS 14 COPY BUTTONS 15 PLAY STILL REW SKIP F F SKIP STOP BUTTONS Description Front Panel Display 1 2 3 4 5 6 8 7 9 10 1 DVD is activated 2 DVD RAM is activated 3 DVD R or DVD RW is activated 4 Progressive Scan mode is activated 5 Record function is activated 6 VCR is activated 7 DVD or CD media is loaded 8 The time counter position or current deck status is indicated ...

Страница 13: ... COAXIAL 4 LINE IN 1 JACKS Video Audio 5 LINE OUT JACKS Video Audio 6 COMPONENT VIDEO OUT JACKS 7 OUT TO TV CONNECTOR 8 AERIAL IN CONNECTOR 8 7 5 4 1 3 6 2 Fan The fan always revolves when the power is on Ensure a minimum of 4 clear space on all sides of the fan when installing the product Rear Panel ...

Страница 14: ...okmark or mark a position while playing a disc 25 PLAY LIST TITLE MENU Button Press this to enter the Edit playlist Title menu 26 ANYKEY Button Press this to view the status of the disc that is being played 27 CLEAR Button 28 SUBTITLE Button Press this to switch the DVD s subtitle language 29 ANGLE Button Press this to access various camera angles on a disc if the disc contains multiple camera ang...

Страница 15: ...rder VCR to the TV using the Audio Video Cable Connecting the S Video Cable Connecting the Component Video Cable AV Receiver Connections Connecting an External Devices Quick Overview 15 Connecting DVD Recorder VCR to the TV using the RF Cable 16 Connecting DVD Recorder VCR to the TV using the Audio Video Cable 16 Connecting the S Video Cable 17 Connecting the Component Video Cable 17 AV Receiver C...

Страница 16: ...connect your DVD Recorder VCR to the television using the Audio Video cable if the appropri ate input is available on the television You thus Obtain better quality sound and pictures Simplify the setting up procedure of your DVD Recorder VCR 1 Connect the RF Cable 2 Connect one end of the Audio Video cable to the Video output and Audio L R output jack on the rear of the DVD Recorder VCR 3 Plug the...

Страница 17: ...ft and right channels 4 Plug the other end of the audio cables into the appropriate input connectors on the television Connecting the S Video Cable You will enjoy high quality accurate colour reproduction images Component video seperates the picture element into black and white Y blue PB red PR signals to present most clear and clean images 1 Connect Component video cables between the COMPONENT VI...

Страница 18: ... Progressive Scan settings in the TV s menu system Depending on your TV the method of connection may differ from the illustration above What is Progressive Scan Progressive scan has twice as many scanning lines as the interlace output method has Progressive scanning method can provide better and clearer picture quality You must connect the DVD Recorder VCR to the component s before using the Progr...

Страница 19: ...DEO LINE IN 1 jacks of the DVD Recorder VCR You can record from connected equipment VCR STB or DVD Case 2 Connecting a Camcorder to the LINE IN 2 jacks You can use the LINE IN 2 jacks on the front panel of the DVD Recorder VCR You can record from con nected equipment You can also use the LINE IN 2 jacks on the front panel of the DVD Recorder VCR Copy protected content cannot be recorded Note Case ...

Страница 20: ...ton on the remote control to return to the previous MENU screen displayed or to exit the on screen MENU On Screen Menu Navigation 20 Plug Auto Setup 21 Setting the Date and Time 22 Auto Setup 23 Manual Setup 24 Clearing a Preset Station 25 Changing the Preset Manual Setup Table 26 Selecting the RF OUT Sound Mode B G D K 27 VIDEO Output CH 27 Setting Up the Language Options 28 Setting Up the Audio ...

Страница 21: ... Connect the RF cable as indicated on page 16 Connecting Your DVD Recorder VCR to the TV using the RF Cable 2 Plug the DVD Recorder VCR into the mains Auto in the front panel display flickers 3 The Language Set menu is displayed Press the buttons to select desired language then press OK button 4 Start the auto setup Auto Setup OK RETURN Auto setup wil be started Check antenna and TV cable connecti...

Страница 22: ...d to Automatically stop programme recording Preset your DVD Recorder VCR to record a programme automatically You must set the date and time when you purchase the DVD Recorder VCR Do not forgot to reset the time when you change clocks from winter to summer time and vice versa 1 With the unit in Stop mode No Disc mode press the MENU button 2 Press the buttons to select Setup then press the OK or but...

Страница 23: ...VD Recorder VCR searches for the second station and so on When the automatic scanning procedure has finished the DVD Recorder VCR switches automatically to programme 1 The number of stations automatically stored by the DVD Recorder VCR depends on the number of stations that it has found 6 If you wish to cancel the auto scanning before the end press the OK button Once the auto scanning procedure ha...

Страница 24: ... press the OK or button 3 Press the buttons to select Install then press the OK or button 4 Press the buttons to select Manual Setup then press the OK or button 5 Press the buttons to select the desired PR number then press the OK or button No Disc Setup System Clock Set Install Language Audio Video Parental Control MOVE OK RETURN EXIT Programme Setup Manual Setup MOVE OK PR CH Name MFT 01 Save Ma...

Страница 25: ... select Manual Setup then press the OK or button 5 Press the buttons to select the desired PR number then press the OK or button No Disc Setup System Clock Set Install Language Audio Video Parental Control MOVE OK RETURN EXIT Programme Setup No Disc Install Auto Setup Manual Setup TV System G VIDEO Output CH Ch 36 MOVE OK RETURN EXIT Programme Setup Then Press the buttons to select MFT Press the œ...

Страница 26: ...ttons to select required position then press the OK button again to swap the position 8 Press the MENU button to exit the menu Changing the Preset Manual Setup Table No Disc Setup System Clock Set Install Language Audio Video Parental Control MOVE OK RETURN EXIT Programme Setup No Disc Manual Setup PR CH Name Edit 01 4 AADD 02 3 AACC 03 2 AABB 04 05 06 07 MOVE OK RETURN EXIT Edit Delete Swap No Di...

Страница 27: ...RETURN EXIT Programme Setup Your DVD Recorder VCR output channel may need to be changed if the pictures suffer from interference or if your TV cannot find the pictures 1 With the unit in Stop mode No Disc mode press the MENU button 2 Press the buttons to select Setup then press the OK or button 3 Press the buttons to select Install then press the OK or button 4 Press the buttons to select VIDEO Ou...

Страница 28: ...age Subtitle For the disc subtitles Disc Menu For the disc menu contained on the disc On Screen Menu For the on screen menu of your DVD Recorder VCR No Disc Language Audio Original Subtitle Automatic Disc Menu English On Screen Menu English MOVE OK RETURN EXIT Programme Setup No Disc Language Audio Original Subtitle Automatic Disc Menu English On Screen Menu English MOVE OK RETURN EXIT Programme S...

Страница 29: ... you to setup the audio device and sound status settings depending on the audio system in use 1 With the unit in Stop mode No Disc mode press the MENU button 2 Press the buttons to select Setup then press the OK or button 3 Press the buttons to select Audio then press the OK or button Audio setup menu will be displayed 4 Press the buttons to select the desired audio option then press the OK or but...

Страница 30: ...atio screen DVD sup plies even though you have a TV with a 4 3 ratio screen Black bars will appear at the top and bottom of the screen 4 3 Pan Scan Select this for conventional size TV when you want to see the cen tral portion of the 16 9 screen Extreme left and right side of movie picture will be cut off 16 9 Wide You can view the full 16 9 picture on your widescreen TV 3D Noise Reduction motion ...

Страница 31: ...then press the OK or button 2 Press the buttons to select the rating level you want then press the OK or button For example if you select up to Level 6 discs that contain Level 7 8 will not play A larger number indicates that the programme is intended for adult use only Press the RETURN or œ button to return to the previous menu Press the MENU button to exit the menu Refer to Troubleshooting if yo...

Страница 32: ...remote control The Confirm the password message will be displayed 3 Enter your password again using the 0 to 9 but tons on the remote control Press the RETURN or œ button to return to the previous menu Press the MENU button to exit the menu Note No Disc System VCR DVD EP Mode Time 6 Hours Chapter Creator Off Front Display Automatic NICAM On MOVE OK RETURN EXIT Programme Setup No Disc Parental Cont...

Страница 33: ...System Before recording or playing back a tape you can select the required system standard Otherwise the system automatically selects the reception standard when you select Automatic When playing back a tape the standard is automat ically selected by the DVD Recorder VCR Automatic When playing back a tape the system standard is automatically selected by the DVD Recorder VCR PAL PAL video system B ...

Страница 34: ...tton 2 Press the buttons to select Setup then press the OK or button 3 Press the buttons to select System then press the OK or button 4 Press the buttons to select Chapter Creator then press the OK or button 5 Press the buttons to select On then press the OK or button Press the MENU button to exit the menu No Disc Setup System Clock Set Install Language Audio Video Parental Control MOVE OK RETURN ...

Страница 35: ...utton to stop recording 10To display the created titles finalise the disc See page 83 and then press the TITLE MENU button The title menu will be displayed 11To display the created chapters select the desired Title and then press the DISC MENU but ton The chapter menu for the selected Title will be displayed On DVD RW discs additional chapters and titles can be added to a finalised disc by unfinal...

Страница 36: ... Parental Control MOVE OK RETURN EXIT Programme Setup NICAM programmes are divided into 3 types NICAM Stereo NICAM Mono and Bilingual transmission in another language NICAM programmes are always accompanied by a standard mono sound broadcast and you can select the desired sound 1 With the unit in Stop mode No Disc mode press the MENU button 2 Press the buttons to select Setup then press the OK or ...

Страница 37: ...ress No Yes No Please set your TV to Interlace input To deactivate press STOP key OK Video Output Mode Interlace Scan Canceling the Progressive scan If your TV supports Progressive Scan press the P SCAN button on the front of the DVD Recorder VCR to enjoy 1 With the unit in Stop mode press the P SCAN but ton on the front of the DVD Recorder VCR The message Press Yes to confirm Progressive scan mod...

Страница 38: ...otion Play 41 About ANYKEY 41 Repeat Play 42 Selecting the Subtitle Audio Language 44 Changing the Camera Angle 45 Zooming In 45 Using the Bookmarks 46 Using the Markers 47 Playing back an Audio CD CD DA 48 Playing back an MP3 Disc 49 Play Option Mode 50 To Programme Tracks 50 Playing back a Picture Disc 51 Playing back an MPEG4 Disc 52 VCR Playback Playing back a VHS Tape VCR 53 Tracking 53 Speci...

Страница 39: ...rm differently or be disabled depending on the disc type If this occurs refer to the instructions written on the disc case Be especially careful that children s fingers are not caught between the disc tray and the tray chassis when it closes After turning power on it will take a few seconds until the DVD Recorder VCR operates CAUTION 1 Press the OPEN CLOSE button 2 Place a disc gently into the tra...

Страница 40: ...ome discs contain a dedicated menu system that allows you to select special functions for title chapters audio track subtitles film previews information on char acters etc Disc Menu Press the DISC MENU button to enter the disc menu of the disc Move to the setup menu related to playback operation You can select audio language and subtitle etc provid ed by the disc When playing a VCD2 0 you can choo...

Страница 41: ...ctions allows you to easily search for a desired scene by accessing title chapter track and time You can also change the subtitle and audio settings and set some features including Repeat Angle and Zoom Moving to a scene directly using the ANYKEY If you want to move to a title a chapter or a track to find a desired scene 1 Press the ANYKEY button during playback 2 Press the buttons to select Title...

Страница 42: ...ot appear The Time Search function does not operate in some discs To make the screen disappear press the ANYKEY button again When VCD2 0 is in Menu Off mode only this function works See page 40 Note Repeat Play Playing Repeatedly Repeat Playback 1 Press the ANYKEY button during playback 2 Press the buttons to select Repeat 3 Select repeat mode using œ œ button Press the OK button To make the scree...

Страница 43: ...NYKEY button during playback 2 Press the buttons to select Repeat 3 Press the œ œ button to select the A B then press the OK button 4 Press the OK button at the point where you want the repeat play to start A and press it again at the point where you want the repeat play to stop B Repeat playback of the A B section starts To return to normal playback 5 Press the CLEAR button to return to normal pl...

Страница 44: ... desired subtitle language Selecting the Audio language Audio languages may not work depending on the disc type This is only available during playback 1 Press the ANYKEY button during playback 2 Press the buttons to select Audio then press the œ œ buttons to select the desired audio language CHANGE MOVE DVD VIDEO 1 10 1 40 00 01 45 Off ENG D 5 1CH Off 1 1 Off CHANGE MOVE DVD VIDEO 1 10 1 40 00 01 ...

Страница 45: ...1 10 1 40 00 01 45 Off ENG D 5 1CH Off 1 3 Off This function is disc dependent and may not work all DVDs This function does not work when a DVD has not been recorded with a multi camera angle system Note 1 Press the ANYKEY button during playback 2 Press the buttons to select Zoom then press the OK button will be displayed 3 Press œ buttons to move to the area you want to enlarge 4 Press the OK but...

Страница 46: ... to bookmark other positions You can bookmark up to 10 scenes RETURN OK MOVE Bookmark RETURN CANCEL MOVE Bookmark 1 PLAY RETURN CANCEL MOVE Bookmark 1 2 PLAY V mode Playing back a Bookmark 1 Press the MARKER button 2 Press the œ buttons to select a bookmarked scene 3 Press the OK or ll button to start playing from the selected scene Clearing a Bookmark 1 Press the MARKER button 2 Press the œ butto...

Страница 47: ...lect a marked scene 3 Press the OK or ll button to start playing from the selected scene If you press the NEXT SKIP l button or the PREVIOUS SKIP lœœ button in marker mode When the next or current marked point plays for shorter than three seconds playback starts from the previous marked point Clearing a Marker 1 Press the MARKER button during playback 2 Press the œ buttons to select a marked scene...

Страница 48: ... Playlist OK EXIT MOVE Music CD Repeat Off Play Option Normal 01 TRACK 1 02 TRACK 2 03 TRACK 3 04 TRACK 4 05 TRACK 5 06 TRACK 6 4 39 4 31 4 30 3 53 4 23 4 24 00 52 01 TRACK 1 01 12 OK MOVE Music CD Repeat Off Play Option Normal 01 TRACK 1 02 TRACK 2 03 TRACK 3 04 TRACK 4 05 TRACK 5 06 TRACK 6 4 39 4 31 4 30 3 53 4 23 4 24 00 52 01 TRACK 1 01 12 Buttons on the Remote Control used for CD playback 1 ...

Страница 49: ...Off Play Option Normal ROOT Bryan Adams Bryan Adams_2 Straight from the heart Run to you Heaven 00 22 Straight from the heart ROOT 03 06 OK RETURN MOVE Music CD Repeat Off Play Option Normal ROOT Bryan Adams Bryan Adams_2 Straight from the heart Run to you Heaven 00 22 Straight from the heart ROOT 03 06 Buttons on the Remote Control used for MP3 playback 1 0 9 Selects a track song 2 Plays the sele...

Страница 50: ...ng Stop Play option will be highlighted 2 Press the œ buttons to select Play Option 3 Press the buttons to select Playlist then press the OK button Playlist screen is displayed 4 Press the buttons to select tracks in the order in which you want them to play then press the OK button 5 If you playlisted a wrong track press the button then press the buttons to select wrong track Press the CLEAR butto...

Страница 51: ...n 5 2 Press the œ buttons to select a picture file in Album screen and then press the OK button Returns to the Album screen The unit enters slide show mode Before the slide show can begin the picture interval Slide show speed must be set Each time the OK button is pressed the picture rotates 90 degrees clockwise Each time the OK button is pressed the picture is enlarged up to 4X four times the nor...

Страница 52: ...ster speed 2X 4X 8X In pause or step mode press the SEARCH button on the remote control 1 8X 1 4X 1 2X Press the F ADV SKIP button on the remote control in the still mode RETURN OK MOVE EXIT Disc Navigation CD DivX Photo Music Disc Navigation Programme Setup RETURN OK MOVE EXIT Disc Navigation CD DivX Photo Music Disc Navigation Programme Setup RETURN EXIT MOVE OK DivX CD ROOT DivX 01 avi DivX 01 ...

Страница 53: ...anually 1 Adjust Tracking Manually During playback press the PROG TRK buttons to remove white lines from the picture While a videotape is playing you can enjoy a variety of special playback features including Still Frame Advance Skip Slow motion and more Pause In Play mode press II PLAY PAUSE button to still a single frame Frame Advance In the pause mode press F ADV SKIP button to advance to the n...

Страница 54: ... Search Use this feature when you want to search for a blank position to record a programme on a cassette Variable Search System 1 While a cassette is stopped press the ANYKEY button 2 Press the buttons to select End Search then press the OK button The VCR will fast forward searching for a blank position and then automatically stop at that posi tion If the VCR reaches the end of the tape during en...

Страница 55: ... Company s Recorder Disc Types Recording Recording Device Finalising Additional Recording format in Samsung Recorder DVD RAM VR Mode VR Mode V Mode V Mode Samsung Other Company Samsung Other Company Samsung Other Company Samsung Other Company X X finalised not finalised finalised not finalised finalised not finalised finalised not finalised finalised not finalised Not recordable Recordable Not rec...

Страница 56: ...t one of four recording modes by pressing the REC SPEED button repeatedly while the unit is in Stop mode for the desired recording time and picture quality In general picture quality improves as the recording time decreases In AUTO Mode the most suitable record mode is adjust ed automatically according to remaining time on the disc and length of the timer recording This function is selected only o...

Страница 57: ... recording 1 Press the OPEN CLOSE button and place a recordable disc on the disc tray 2 Press the OPEN CLOSE button to close the disc tray Wait until LOAD disappears from the front panel display 3 Press the PROG TRK buttons or number buttons to select the station you want to record 4 Press the REC SPEED button repeatedly to select the recording speed quality XP High approx 1 hour SP Standard appro...

Страница 58: ...CR and switch to DV mode by pressing the INPUT SEL button on the remote control If the input is set to DV a playback record menu that enables camcorder control appears on the top of the screen 4 Select the Play icon on the upper part of the screen to playback the camcorder and find the starting position to copy You can press the PLAY button on the remote control to playback the camcorder 5 To star...

Страница 59: ...The message Updating the Information of disc Please wait for a moment is displayed The timer counter decreases by the minute from 9 00 to 0 00 then the DVD Recorder VCR stops recording Note 1 Check the antenna cable is connected 2 Check the remaining time of the disc 3 Check the date and time are correct Make sure the Clock Setup Clock Set must be set before you proceed with a timer recording See ...

Страница 60: ...ut source PR LINE 1 or LINE 2 or the broadcasting channel you want to make a timer recording from Day Set the recording day Daily MO SA MO FR W SA W SU MON01 WED31 Start End Time Start and end time of the timer recording Recording Speed DVD AUTO Select when you want to set video quality automatically In AUTO Mode the most suitable record mode is adjusted automatically according to remaining time o...

Страница 61: ... OK button to confirm the edited setting 7 Press the MENU button after finishing the opera tion The menu screen will disappear RETURN OK MOVE EXIT Programme DVD RAM VR Standard Timer Disc Navigation Playlist Disc Manager Copy Programme Setup RETURN OK MOVE EXIT Scheduled Record List DVD RAM VR 01 DVD LINE 1 SAT01 11 00 13 00 SP 02 DVD LINE 1 SAT01 09 22 10 30 SP 03 04 05 06 No To PR Day Start End ...

Страница 62: ...le will be deleted from the list 7 Press the MENU button after finishing the operation The menu screen will disappear You can not delete programmes that are currently recording Note RETURN OK MOVE EXIT Scheduled Record List DVD RAM VR 01 DVD LINE 1 SAT01 11 00 13 00 SP 02 DVD LINE 1 SAT01 09 22 10 30 SP 03 04 05 06 No To PR Day Start End Speed Edit Edit Delete RETURN OK MOVE EXIT Scheduled Record ...

Страница 63: ...k the remaining time on the tape You can record a TV show in progress by inserting a blank tape and pressing the REC button You can even add time in 30 minute increments up to 9 hours by pressing the REC button repeatedly 1 Insert a blank VHS tape into the VCR deck Make sure the tape is long enough to record the entire programme 2 Press the 0 9 buttons or the PROG TRK buttons to select the desired...

Страница 64: ...d VCR at the same time but both modes must be set up to record separately Press the DVD VCR button to set the unit to DVD or VCR mode Choose input mode PR LINE 1 LINE 2 or DV for DVD or VCR Choose REC SPEED mode for DVD or VCR Press REC button for DVD or VCR Special Recording Features When DVD Recorder VCR is connected to your TV using S Video or component video cable the playback screen on the vi...

Страница 65: ...ed DivX is played back or highlighted in the file list If the DivX disc has various files only the selected file will be played back Copy to DVD or VCR RETURN OK MOVE EXIT Copy DVD RAM VR DVD VCR VCR DVD Disc Navigation Playlist Disc Manager Copy Programme Setup RETURN OK MOVE EXIT DVD VCR DVD RAM VR New Copylist Edit Copylist Direct Copy Disc Navigation Playlist Disc Manager Copy Programme Setup ...

Страница 66: ...r a start position and then automatically start a copy It may not be match up with Start and END point exactly If you want to copy all copylists select Copy All Direct copy VCR to DVD Insert the VHS tape you want to copy Insert Recordable DVD disc Press DVD copy button on front panel or remote control TO DVD To stop recording press the STOP button RETURN OK MOVE EXIT Copy DVD RAM VR DVD VCR VCR DV...

Страница 67: ...screen is displayed 2 Press the buttons to select a title you want to play from Title List and then press the PLAY button The selected title will be played back 3 To stop title play press the STOP button To return the title list screen press the TITLE LIST button Using the MENU button 1 Press the MENU button RETURN OK MOVE EXIT Title List DVD RAM VR No Title Length Edit 19 JAN 2005 12 00 PR1 22 JA...

Страница 68: ...sing the ANYKEY button Press the buttons to select Title Press the œ buttons to select to play the title list then press the OK button Note CHANGE MOVE DVD RAM VR 1 4 00 01 45 Off ENG D 5 1CH Off Off Title List Screen Elements Playback screen for recorded titles Information window for the selected title Title name recording date recording time lock status recording mode Recorded title No Recorded ...

Страница 69: ...Title List DVD RAM VR No Title Length Edit Sports A1 20 JAN 2005 12 00 SP 01 19 JAN 2005 1 00 00 21 02 19 JAN 2005 1 00 00 03 03 Sports A1 00 00 15 04 20 JAN 2005 1 00 00 16 A B C D E a b c d e f g h i j k l m n o p q r s t u z n w x y F G H I J K L M N O P Q R S T U V W X Y Z Back Space Space Delete Clear Save RETURN OK MOVE EXIT Rename DVD RAM VR A B C D E a b c d e f g h i j k l m n o p q r s t...

Страница 70: ...usic 00 00 03 03 Sports 00 00 15 04 Movie 00 00 16 05 Sports A1 00 06 32 06 Edu 1 00 08 16 RETURN OK MOVE EXIT Title List DVD RAM VR No Title Length Edit Sports A1 20 JAN 2004 12 00 SP 01 Drama 00 00 21 02 Music 00 00 03 03 Sports 00 00 15 04 Movie 00 00 16 05 Sports A1 00 06 32 06 Edu 1 00 08 16 Play Rename Delete Edit Protection RETURN OK MOVE EXIT Title List DVD RAM VR No Title Length Edit Spor...

Страница 71: ...ete Related playlists may be deleted No Yes RETURN OK MOVE EXIT Title List DVD RAM VR No Title Length Edit Sports A1 19 JAN 2005 12 00 SP 01 Drama 00 00 21 02 Music 00 00 03 03 Sports 00 00 15 04 Movie 00 00 16 05 Sports A1 00 06 32 06 Edu 1 00 08 16 Play Rename Delete Edit Protection You cannot delete a protected title If you want to delete a protected title select Off in the Title Protection men...

Страница 72: ...VE EXIT Edit Title List DVD RAM VR Sports A1 19 JAN 2005 11 50 00 00 10 Start End Delete Return Title List No 05 Start 00 00 10 End 00 00 00 RETURN OK MOVE EXIT Edit Title List DVD RAM VR Sports A1 19 JAN 2005 11 50 00 00 10 Start End Delete Return Title List No 05 Start 00 00 10 End 00 00 00 RETURN OK MOVE EXIT Edit Title List DVD RAM VR Sports A1 19 JAN 2005 11 50 00 10 10 Start End Delete Retur...

Страница 73: ...ton The Edit Playlist screen is displayed 8 Press the MENU or PLAY LIST button after the operation has finished The Edit Playlist screen will disappear VR mode RETURN OK MOVE EXIT Make Scene DVD RAM VR New Playlist 19 JAN 2005 12 00 00 00 10 Start End Make Return Scene No 001 Start 00 00 10 End 00 00 00 RETURN OK MOVE EXIT Make Scene DVD RAM VR New Playlist 19 JAN 2005 12 00 00 10 00 Start End Mak...

Страница 74: ...e OK or button 2 Press the buttons to select the title you want to play from the Playlist then press the OK or button The Edit Playlist menu is displayed Play Rename Edit Scene Copy Delete RETURN OK MOVE EXIT Edit Playlist DVD RAM VR No Title Length Edit 19 JAN 2005 12 00 4 Scenes 19 JAN 2005 12 00 01 19 JAN 2005 00 00 21 02 19 JAN 2005 00 00 03 03 20 JAN 2005 00 00 15 04 20 JAN 2005 00 00 16 VR m...

Страница 75: ...E EXIT Edit Playlist DVD RAM VR No Title Length Edit 19 JAN 2005 12 00 4 Scenes 19 JAN 2005 12 00 01 19 JAN 2005 00 00 21 02 19 JAN 2005 00 00 03 03 20 JAN 2005 00 00 15 04 20 JAN 2005 00 00 16 VR mode OK OK MOVE EXIT Edit Playlist DVD RAM VR No Title Length Edit 20 JAN 2005 12 00 4 Scenes 20 JAN 2005 12 00 01 19 JAN 2005 00 00 21 02 19 JAN 2005 00 00 03 03 20 JAN 2005 00 00 15 04 20 JAN 2005 00 0...

Страница 76: ...ected scene will be played back To stop scene play press the STOP button RETURN OK MOVE EXIT Edit Playlist DVD RAM VR No Title Length Edit Science 7 Scenes 20 JAN 2005 06 43 01 Science 00 00 17 02 Sky 00 00 06 03 Dolphin 00 00 06 04 Natural 00 00 37 Play Rename Edit Scene Copy Delete RETURN OK MOVE EXIT Edit Playlist DVD RAM VR No Title Length Edit Dolphin 7 Scenes 20 JAN 2005 06 43 01 Science 00 ...

Страница 77: ...Modifying a Scene Replacing a Scene RETURN OK MOVE EXIT Modify Scene DVD RAM VR Dolphin 20 JAN 2005 06 43 00 00 20 Start End Change Cancel Scene No 002 Start 00 00 20 End 00 00 00 RETURN OK MOVE EXIT Modify Scene DVD RAM VR Dolphin 20 JAN 2005 06 43 00 00 30 Start End Change Cancel Scene No 002 Start 00 00 20 End 00 00 30 RETURN OK MOVE EXIT Edit Scene DVD RAM VR Scene No 2 7 Playlist No 2 Play Mo...

Страница 78: ...re that position which requires no action Depending on the kind of disc the displayed screen may have a slight difference Note RETURN OK MOVE EXIT Edit Scene DVD RAM VR Scene No 3 7 Playlist No 3 Play Modify Move Add Delete 01 00 00 26 02 00 00 07 03 00 00 04 04 00 00 03 05 00 00 11 06 00 00 04 RETURN OK MOVE EXIT Edit Scene DVD RAM VR Scene No 6 7 Playlist No 3 Play Modify Move Add Delete 01 00 0...

Страница 79: ...disappear RETURN OK MOVE EXIT Add Scene DVD RAM VR Sclence 20 JAN 2005 06 43 00 00 35 Start End Add Cancel Scene No 003 Start 00 00 15 End 00 00 35 RETURN OK MOVE EXIT Edit Scene DVD RAM VR Scene No 4 4 Playlist No 4 Play Modify Move Add Delete 01 00 00 26 02 00 00 07 03 00 00 20 04 00 00 04 Deleting a Scene RETURN OK MOVE EXIT Edit Scene DVD RAM VR Scene No 4 4 Playlist No 4 Play Modify Move Add ...

Страница 80: ...lete operation has finished RETURN OK MOVE EXIT Edit Playlist DVD RAM VR No Title Length Edit Science 7 Scenes 20 JAN 2005 06 43 01 Science 00 00 17 02 Sky 00 00 06 03 Dolphin 00 00 06 04 Natural 00 00 37 RETURN OK MOVE EXIT Edit Playlist DVD RAM VR No Title Length Edit Dolphin 7 Scenes 20 JAN 2005 06 43 01 Science 00 00 17 02 Sky 00 00 06 03 Dolphin 00 00 06 04 Natural 00 00 37 Play Rename Edit S...

Страница 81: ...n o p q r s t u z n w x y F G H I J K L M N O P Q R S T U V W X Y Z Back Space Space Delete Clear Save RETURN OK MOVE EXIT Rename DVD RAM VR A B C D E a b c d e f g h i j k l m n o p q r s t u z n w x y F G H I J K L M N O P Q R S T U V W X Y Z Back Space Space Delete Clear Save RETURN OK MOVE EXIT Rename DVD RAM VR Disc RETURN OK MOVE EXIT Disc Manager DVD RAM VR Disc Name Disc Disc Protection No...

Страница 82: ...Disc Name Disc Protection Not protected Disc Format Delete All Title Lists Not Protected Portected RETURN OK MOVE EXIT Disc Manager DVD RAM VR Disc Name Disc Protection Not protected Disc Format Delete All Title Lists RETURN OK MOVE EXIT Disc Manager DVD RAM VR Disc Name Disc Protection Not protected Disc Format Delete All Title Lists RETURN OK MOVE EXIT Disc Manager DVD RAM VR Disc Name Disc Prot...

Страница 83: ...sc Format DVD VR Disc Finalise Delete All Title Lists Disc Navigation Playlist Disc Manager Copy Programme Setup RETURN OK MOVE EXIT Disc Manager DVD RW VR Disc Name Disc Protection Not protected Disc Format DVD VR Disc Finalise Delete All Title Lists Disc Navigation Playlist Disc Manager Copy Programme Setup RETURN OK MOVE EXIT Disc Manager DVD R V Disc Name Disc Protection Not protected Disc Fin...

Страница 84: ...rding protection and deletion are possible Finalise Unfinalise Mark DVD RW VR F DVD RW VR mode Additional recording Additional recording Operation deletion editing and deletion editing and protection are impossible protection are possible RETURN OK MOVE EXIT Disc Manager DVD RW VR F Disc Name Disc Format DVD VR Disc UnFinalise Disc Navigation Playlist Disc Manager Copy Programme Setup RETURN OK MO...

Страница 85: ...ttons to select Yes then press the OK button All title lists are deleted RETURN OK MOVE EXIT Disc Manager DVD RAM VR Disc Name Disc Protection Not protected Disc Format Delete All Title Lists RETURN OK MOVE EXIT Disc Manager DVD RAM VR Disc Name Disc Protection Not protected Disc Format Delete All Title Lists RETURN OK MOVE EXIT Disc Manager DVD RAM VR Disc Name Disc Protection Not protected Disc ...

Страница 86: ...86 English Reference Reference Troubleshooting Specifications Troubleshooting 87 Specifications 90 ...

Страница 87: ... is available on DVD RAM RW R discs only If a programme is copy protected you cannot record it Press and hold I button of your DVD Recorder VCR when the power is on All settings including password will revert to factory settings Do not use it if not absolutely required Note that this function is available only when there is no disc inserted Check whether the disc is inserted correctly with the lab...

Страница 88: ...ly the screen may jitter temporarily but it is not a defect Audio languages and subtitle languages are disc specific Only the sound and subtitle languages contained on a DVD disc are available and displayed on the disc menu Check whether PSO is displayed on front panel Make sure to change the component video output using the P SCAN button when the disc is stopped Point the remote control at the re...

Страница 89: ...t see normal broadcasts Check the tuner external setting It should be on tuner Check the TV antenna connections Noise bars or streaks on playback Press the PROG TRK buttons to minimize this effect When the II button is pressed A still picture may have noise bars depending on the during playback the still picture condition of the tape Press the PROG TRK buttons has severe noise bar streaks during s...

Страница 90: ...VHS type video tape Colour system PAL Tuning system B G D K VCR Video S N Above 43dB standard recording Resolution Above 240 lines standard recording Audio S N Above 68dB Hi Fi 39dB Mono Audio frequency characteristics 20Hz 20KHz Hi Fi Picture Compression format MPEG II Audio Compression format Dolby AC 3 256kbps DVD Recording Quality XP 8 Mbps SP 4 Mbps LP 2 Mbps EP 1 2 0 8 Mbps Video S N Ratio M...

Страница 91: ......

Страница 92: ......

Страница 93: ......

Страница 94: ......

Страница 95: ......

Страница 96: ......

Страница 97: ......

Страница 98: ......

Страница 99: ......

Страница 100: ......

Страница 101: ......

Страница 102: ......

Страница 103: ......

Страница 104: ......

Страница 105: ......

Страница 106: ......

Страница 107: ......

Страница 108: ......

Страница 109: ......

Страница 110: ...www samsung com ...

Отзывы: