background image

51

50

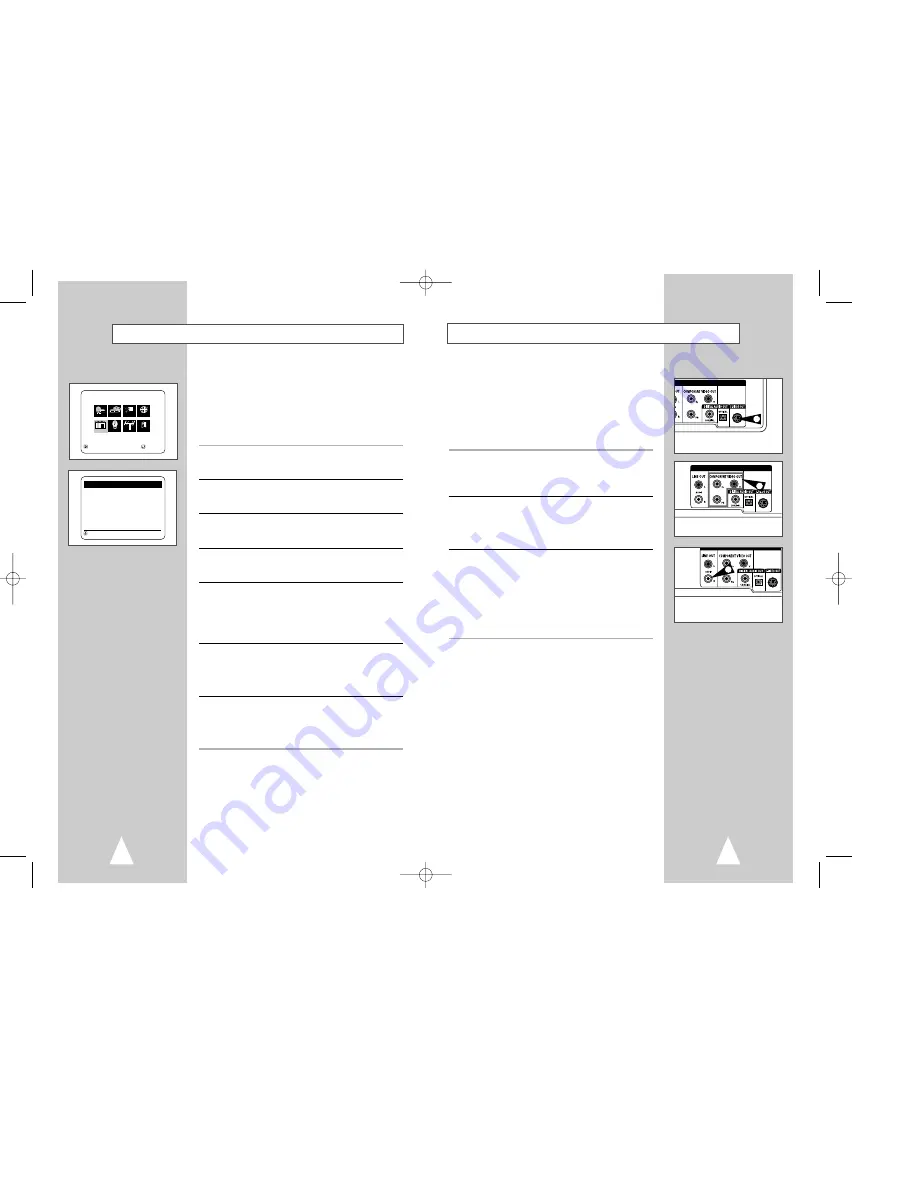
The S-Video or Component Video connection is only for the DVD
player. The tuner and VCR will still be viewed through the RF or
line inputs.
You must follow the “Alt Video Out” instructions on page 31 to
activate your alternative (S-Video, Component) video selection.
You can choose EITHER S-Video OR Component, but NOT both.
If your television is equipped with S-Video or Component Video
inputs, you can enjoy superior video quality when watching DVDs
with your DVD-VCR.

1

Connect S-VIDEO OUT to TV

Connect an S-Video cable from the S-VIDEO OUT on the back
panel of the DVD-VCR to the S-Video Input on your television.

2

Connect Component Video Out to TV

Connect a component video cable from the COMPONENT VIDEO
OUT (Y, Pb, Pr) on the back panel of the DVD-VCR to the
Component Video Input on your television. 

3

Connect Audio Out (DVD only)

Connect RCA audio cables from the Left/Right Line Out jacks on
the back panel of the DVD/VCR to the Left/Right Audio Line In
jacks on your television.

•  You must use these Line Out jacks when connecting the DVD-

VCR to your TV with the S-Video or Component Video Output.

•  Please refer to “Alt Video Out” on page 31 to activate your

connection.

S-Video/Component Video Connections (for DVD)

How to Set a Timer Recording

Insert a blank tape with a Record Safety Tab into the VCR deck.
The Timer Recording Feature allows you to program up to 8 events
at a time to record up to a month in advance. 
Set the TV to channel 3 or 4. 

Before You Begin...

•  Power on the DVD-VCR
•  Power on the TV

1

Open “SETUP MENU”

With the DVD in stop mode, press the SETUP button or press the 
TIMER button.

2

Select “Program”

Using the up/down and left/right buttons, move the selection cursor 
to “Set Timer Recording,” then press ENTER to select.

3

Select Channel Number 

Press right and up/down buttons to set the channel. Press the right 

button to move to the next setting.

4

Set “Time/Date/Speed”

Repeat step 3 to set start time, end time, date and record speed.
Date can be set for one time, daily or weekly recording. See below.

5

Save “Timer Recording” 

Press the RETURN button to complete programming of the timer
recording. Stop the VCR or turn the power off. The timer indicator
comes on the VCR. The VCR will automatically turn on and begin
recording at the time you set. To stop a timer recording, press the
POWER button or STOP button on the VCR.

6

Auto Speed Select 

If you are not sure the tape is long enough for timer program
recording in the SP tape speed, set the recording tape speed to
“AUTO”. Recording starts in the SP tape speed. If the tape length is
not long enough, the tape speed automatically changes from SP to
SLP.

7

Daily/Weekly Date Programming

Weekly [SUN’S~SAT’S]: You can record TV programs on the same
channel at the same time every week.
Daily [MO 

FR] : You can record TV programs on the same

channel at the same time every day Monday through Friday. 

MAIN MENU

Set Timer Recording

RETURN          

œ❷

➛❿

ENTER

Program       Clock      Channel        Exit

DVD           VCR         Option      Language

Program   

CH      START      END   DATE     SPD

_ _    _ : _ _    _ : _ _    _ _ _    _ _

_ _    _ : _ _    _ : _ _    _ _ _    _ _

_ _    _ : _ _    _ : _ _    _ _ _    _ _

_ _    _ : _ _    _ : _ _    _ _ _    _ _

_ _    _ : _ _    _ : _ _    _ _ _    _ _

_ _    _ : _ _    _ : _ _    _ _ _    _ _

_ _    _ : _ _    _ : _ _    _ _ _    _ _

_ _    _ : _ _    _ : _ _    _ _ _    _ _

RETURN                        

œ❷

➛❿

DVD Only

DVD Only

DVD Only

To S-Video Input on Your TV

To Component Video Input

on Your TV

To Left/Right Audio Inputs 

on Your TV

1

3

2

00044A DVD-V7070/AFR-Eng4  3/21/03 2:34 PM  Page 50

Содержание DVD-V7070

Страница 1: ... VCR DVD 2 3 4 5 6 7 8 9 0 100 SHUTTLE OPEN CLOSE POWER SCREEN FIT 3D SOUND CLEAR DVD VCR TV SELECT ZOOM VIEW VOL CH TRK DISPLAY REC DISC MENU F ADV SKIP SETUP ENTER RETURN TITLE SUBTITLE MARK SPEED TIMER SEARCH MODE REPEAT DIGEST TV MUTE TV VCR AUDIO ANGLE INPUT SEL 00044A DVD V7070 AFR Eng1 3 21 03 2 29 PM Page 1 ...

Страница 2: ...nt of cable entry as practical Copy Notification Federal law provides severe civil and criminal penalties for the unauthorized reproduction distribution or exhibition of copyrighted motion pictures and videotapes Title 17 United States Code Sections 501 and 506 Macrovision Notification This product incorporates copyright protection technology that is protected by method claims of certain U S paten...

Страница 3: ...nd 43 4 Table of Contents Safety 3 Important Safety Instructions 3 Welcome 7 Feature Summary 7 Unpacking 7 Disc Type and Characteristics 8 1 System Overview 9 Front Panel Overview 9 Rear Panel 10 Front Panel Display 10 Remote Control Overview 11 Insert Remote Control Batteries 11 Using the TV Buttons on the Remote Control 12 2 Getting Started 13 Basic Connections Auto Setup 13 3 Basic Operation 14...

Страница 4: ...timer recording Time remaining counter real time counter Note Discs which cannot be played with this player Ability to play back may depend on recording DVD ROM DVD RAM conditions CD ROM CDV DVD R CD RW CDI DVD RW RW HD layer of super Audio CD CDGs play audio only not graphics Unpacking As you unpack please check that the following items are included in your DVD VCR packing case DVD VCR User s Gui...

Страница 5: ... disc Stereo disc Digital Audio disc DTS disc MP3 disc Both the DVD player and the discs are coded by region These regional codes must match in order for the disc to play If the codes do not match the disc will not play The Region Number for this player is described on the rear panel of the player 5 31 2 Single sided 240 min Double sided 480 min Single sided 80 min Double sided 160 min Audio Video...

Страница 6: ...Y p 16 35 26 CHANNEL p 12 16 TRACKING p 44 27 FAST FORWARD p 33 44 SKIP NEXT p 33 44 28 DISC MENU p 34 29 PLAY PAUSE p 14 15 30 RIGHT p 16 31 DOWN p 16 32 MARK p 40 SEARCH p 46 33 SUBTITLE p 37 TIMER p 50 10 Front Panel Display TITLE CHAP STEREO 1 2 3 4 5 6 7 8 9 10 11 12 1 The DVD Deck is active 2 A DVD CD VCD or SVCD is loaded 3 The number to the right of the TITLE symbol is the current title nu...

Страница 7: ...sure to use the same channel you selected in Step 2 If you used the Line Connection set your TV to its Line Input DVD VCR DVD VCR From Antenna or Cable To TV s Antenna Input 1 2 2 POWER 2 4 5 7 8 SHUTTLE POWER SCREEN FIT 3D SOUND CL ZOOM MODE REPEAT 3 4 4 Using the TV Buttons on the Remote Control Your VCR remote control will work with Samsung televisions and compatible brands To determine whether...

Страница 8: ...nt panel to turn on the DVD VCR 2 DVD Button Press the DVD button on the remote control or front panel when you want to control the DVD deck The DVD indicator will light on the Front Panel Display to show that the DVD deck is selected 3 VCR Button Press the VCR button on the remote control or front panel when you want to control the VCR deck The VCR indicator will light on the Front Panel Display ...

Страница 9: ...our DVD VCR The following buttons are used to open and navigate through the on screen menu system 1 SETUP Button With the DVD in stop mode press to access the DVD VCR on screen menu system 2 Up Down and Left Right Moves menu selection cursor up down left and right to cycle through menu options 3 ENTER Button Press to confirm settings in certain menus 4 RETURN Button Returns to the last menu viewed...

Страница 10: ... up down and left right buttons move the selection cursor to Clock Set Adjust then press ENTER to select 3 Select MANUAL Move the selection arrow to MANUAL then press ENTER to turn this feature Off The Set Clock Menu will change as shown 4 Set the Clock Press LEFT RIGHT to select each of the following options then press UP DOWN to set each option Set Hour Set the hour using the up and down buttons...

Страница 11: ... up down and left right buttons move the selection cursor to Channel Setup then press ENTER to select 3 Run Auto channel memory Move the selection arrow to Auto channel memory then press ENTER to select The DVD VCR will automatically search for all available channels in the selected Tuner Band This procedure may take a few minutes to complete When finished the lowest channel found will be displaye...

Страница 12: ...l the time Dim Front Panel Display will be dim all the time RF Output Channel 1 Open SETUP MENU With the DVD in stop mode press the SETUP button 2 Select Option Using the up down and left right buttons move the selection cursor to Option Setup then press ENTER to select 3 Select RF Output Channel Move the selection bar to RF Output Channel then press right to change 4 Change RF Output Channel Pres...

Страница 13: ...selection cursor to DVD Setup then press ENTER to select 3 Select Audio Move the selection bar to Audio then press ENTER to select 4 Set Audio Language Preference Move the selection bar to your preferred language for DVD audio soundtracks then press ENTER to select RETURN ENTER DVD SETUP Disc Menu English Audio English Subtitle Automatic Parental Unlocked Audio Options Display Options RETURN ENTER...

Страница 14: ...equired to view some DVD discs and to view Rating Control options The menu will change as shown NOTES The first time Require Password is set to Yes you will be prompted to enter a new password If the Enter Password screen appears then Require Password has already been set to Yes Please skip to Step 5 5 Enter Password Enter a 4 digit password using the 0 9 buttons on the remote control Write your p...

Страница 15: ... Select On ONLY if you have connected a DTS equipped A V receiver to the DIGITAL AUDIO OUT optical or coaxial on the DVD VCR back panel 1 Open SETUP MENU With the DVD in stop mode press the SETUP button 2 Select DVD Using the up down and left right buttons move the selection cursor to DVD Setup then press ENTER to select 3 Select Audio Options Move the selection bar to Audio Options then press ENT...

Страница 16: ... 2 Select DVD Using the up down and left right buttons move the selection cursor to DVD Setup then press ENTER to select 3 Set Display Options Move the selection bar to Display Options then press ENTER to select 4 Select Alt Video Out Move the selection bar to Alt Video Out then press right to select from the following options S Video Indicates that you are using the S VIDEO OUT jack on the rear p...

Страница 17: ...reases the slow motion speed playback to 1 8 1 4 or 1 2 normal speed Audio is muted during slow motion playback Front Panel Slow Motion Buttons Press and hold the Forward buttons on the front panel to activate slow motion playback Press the ll Play Pause button to resume normal playback 5 Stop Resume Press the Stop button once to stop playback To resume the DVD CD from the point where the disc sto...

Страница 18: ... their own menu systems where you can select Titles Chapters Audio Tracks Subtitles and special disc features such as movie trailers and information on the cast Use these buttons to make selections in the Disc menus 1 DISC MENU Button Press to access the DVD s Disc menu if applicable 2 Press or to navigate through DVD s Disc menu options Press up down left and right to highlight menu choices 3 ENT...

Страница 19: ... ENTER RETURN TITLE SUBTITLE MARK SPEED TIMER SEARCH 1 DVD VCR TV SELECT VIEW VOL CH TRK DISPLAY REC DISC MENU F ADV SKIP DIGEST 1 7 8 9 0 100 3D SOUND CLEAR DVD VCR TV SELECT ZOOM VIEW VOL CH TRK DISPLAY F ADV SKIP DIGEST TV MUTE ANGLE INPUT SEL You can zoom in at 2 or 4 times the normal magnification while watching a DVD 1 Open Zoom Magnifying Glass During Playback or STILL mode press the ZOOM b...

Страница 20: ...e Repeat Chapter Title A B Repeat The A B Repeat function allows you to repeat any segment of a DVD or CD Simply mark the beginning point A and the ending point B of the segment you want to review 1 Select A B Repeat Function In Play mode press the REPEAT button then press left right to select A B Repeat A will highlight when A B Repeat is selected NOTE If you are playing a CD the menu will displa...

Страница 21: ...ickly to your favorite scene or song 1 Open Bookmark Menu During playback press the MARK button on the remote control The Mark header will appear on the screen 2 Select Bookmark Placeholder Press the left right buttons to move to one of the three bookmark placeholders The selected placeholder will highlight 3 Set the Bookmark Play the DVD to the scene you want to bookmark then press the ENTER butt...

Страница 22: ...lder Press the up down buttons to select the folder on the CD R which contains the MP3 files you want to hear then press Enter to select If there are more than 8 folders on the disc press RETURN to view additional folders If there are no folders on the CD R skip to Step 3 3 Select MP3 File Press the up down buttons to select the desired MP3 file If there are more than 8 MP3 files in the selected f...

Страница 23: ...ack heads to solve this problem You may also set tracking manually 1 Adjust Tracking Manually During playback press the TRK or TRK buttons to move the white lines out of the picture DVD VCR TV SELECT VIEW VOL CH TRK DISPLAY REC DISC MENU F ADV SKIP DIGEST 1 1 REC DISC MENU F ADV SKIP SETUP ENTER While a videotape is playing you can enjoy a variety of special playback features including Still Frame...

Страница 24: ...recorded on a VCR without VISS If you want to index two programs in a row set your VCR to stop then start recording each program Pause has no effect on index marks 1 Scan and play Use scan and play when you don t know exactly where a program is located on a cassette tape Press right arrow for forward scan or left arrow for reverse scan The display will show Scan and Play When an index mark is foun...

Страница 25: ...gth 0 30 appears on the On Screen Display and the DVD VCR will record for exactly 30 minutes 3 Add Recording Time Continue pressing REC to add recording time in 30 minute increments up to 4 hours The DVD VCR stops recording automatically when the time has elapsed One Touch Recording OTR RECORD SP Record length 0 30 07 0 30 1 00 1 30 2 00 3 00 4 00 POWER OPEN CLOSE 4 VOL CH TRK DISPLAY REC DISC MEN...

Страница 26: ...IMER button 2 Select Program Using the up down and left right buttons move the selection cursor to Set Timer Recording then press ENTER to select 3 Select Channel Number Press right and up down buttons to set the channel Press the right button to move to the next setting 4 Set Time Date Speed Repeat step 3 to set start time end time date and record speed Date can be set for one time daily or weekl...

Страница 27: ...tape press the Audio button until Hi Fi appears on the on screen display DVD VCR Monitor style televisions offer improved sound and picture over regular televisions because they receive the audio and video signals directly from the DVD VCR through the line inputs NOTE A monitor television is not the same as a computer monitor 1 Connect VCR to Monitor TV Connect RCA cables from the Audio Video Line...

Страница 28: ...dio Video Outputs of External Device Technical Specifications AUDIO 2 Stereo audio inputs RCA Connector 8dbm 47KΩ front and rear Inputs VIDEO 2 Composite video inputs RCA Connector 75Ω 1Vp p RF Antenna or CATV Input F Connector 75Ω AUDIO 1 Stereo audio outputs RCA Connector 8dbm 1 5KΩ AUDIO DVD only 2 Digital audio outputs 1 optical 1 coaxial 1 Stereo audio outputs VIDEO 1 Composite video output R...

Страница 29: ...AK68 00044A ELECTRONICS 00044A DVD V7070 AFR Eng4 3 21 03 2 34 PM Page 56 ...

Отзывы: