background image

26

Dolby Digital Out

- PCM : Converts to PCM(2CH) audio.
- Bitstream : Outputs Dolby Digital via the digital out

put.Select Bitstream when connecting to a
Dolby Digital Decoder.

MPEG-2 Digital Out

- PCM : Converts to PCM(2CH) audio. 
- Bitstream : Converts to MPEG-2 Digital Bitstream

(5.1CH or 8CH). Select Bitstream when using the 
Digital Audio Output.

Dynamic Compression

- On : To select dynamic compression.
- Off : To select the standard range.

PCM Down Sampling

- On : Select this when the Amplifier connected to the 

player is not 96KHz compatible. In this case, the   
96KHz signals will be down converted to 48KHZ.

- Off : Select this when the Amplifier connected to the 

player is 96KHz compatible. In this case, all signals
will be output without any changes.

Note

Even when PCM Down sampling is Off

• Some discs will only output down sampled 

audio through the digital outputs.

• To make the Setup menu disappear, press the 

MENU button.

Output Channel 

- 2 Ch : Select this when using 2 channel connection only.
- 5.1Ch : Select this when using 5.1Ch channel connec

tion.

Manufactured under license from Dolby
Laboratories. “Dolby” and the double-D symbol
are trademarks of Dolby Laboratories.

“DTS” and “DTS Digital Out” are trademarks of
Digital Theater Systems, Inc.

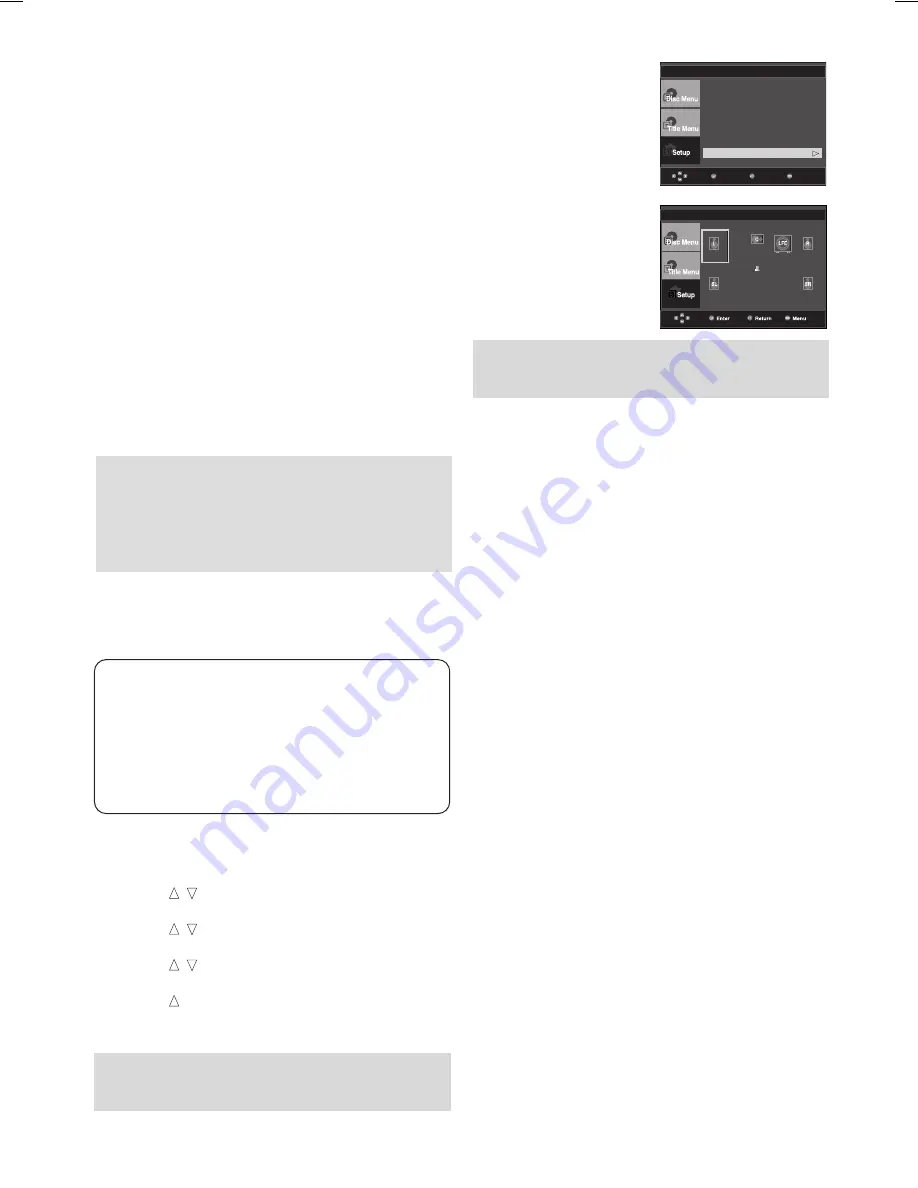
Surround Sound Speaker Setup

1. With the unit in Stop mode, press the 

MENU

button.

2. Press the 

/

buttons to select 

Setup

, then press the 

or

ENTER

button.

3. Press the 

/

buttons to select 

Audio Setup

, then press

the

or

ENTER

button.

4. Press the 

/

buttons to select 

Speaker Setup

, then 

press the 

or

ENTER

button.

5. Press the 

/

/

/

buttons to select the desired item, 

then press the 

ENTER

button to set the speaker.

Note

To make the setup menu disappear, press the MENU

button.

Enter

Return

Menu

AUDIO SETUP

The default settings : FRONT L, R (Small), 

CENTER (Small), SURROUND (Small). 

Select the size of the speakers to be connected.

Front (FL, FR)

- Large: Normally select this.

- Small: When the sound distorts or the suround

sound effects are difficult to hear, select this. 
This activates the Dolby Digital bass redirec
tion circuitry and outputs the bass frequencies 
of the speaker from the subwoofer.

❷ 

Center

- None: If you do not connect a center speaker,

select this.

- Large: Normally select this.

- Small: When the sound distorts, select this.

This activates the Dolby Digital bass redirec-

tion circuitry and outputs the bass frequencies

of the center speaker from other speakers.

SPEAKER SETUP

Small

Small

User

Test

Small

Small

Small

On

Surround (SL, SR)

- None: If you do not connect a center speaker,

select this.

- Large (Rear/Side): Normally select either of

these according to the rear speaker’s position.

- Small (Rear/Side): When the sound ditorts or

the surround sound effects are dificult to hear,

select either of these according to the rear

speaker’s position. 

This activates the Dolby Digital bass rediretion

circuitry and outputs the bass frequencies of

the rear speaker from other speakers.

Setting up Test

The test output signals come clockwise starting

from the Front Speaker(L). 

Adjust Channel Balance so that speakers output

equally in your room.

FRONT(L)

➝ 

CENTER

➝ 

SUBWOOFER

FRONT(R)

➝ 

SURROUND(R)

➝ 

SURROUND(L)

put.

lay

e

e
s

he

Dolby Digital Out

:PCM

MPEG-2 Digital Out

:PCM

Dynamic Compression:On
PCM Down Sampling :On
Output Channel  

:5.1CH

Speaker Setup

Note

To make speaker setup menu appear, Select output

channel to 5.1Ch.

Содержание DVD-P182

Страница 1: ...www samsung com AK68 01505A DVD Player DVD P182 ...

Страница 2: ...ayer will operate normally When condensation forms inside the player due to sharp changes in temperature the player may not operate correctly If this occurs leave the player at room temperature until the inside of the player becomes dry and operational 4 Disc Do not clean record cleaning sprays ben zene thinner or other volatile solvents that may cause damage to the disc surface Do not touch the d...

Страница 3: ... you start 3 Setup General Features 4 Disc Type and Characteristics 5 Description 6 Tour of the Remote Control 8 Connections Choosing a Connection 9 Basic Functions Playing a Disc 15 Using the Search and Skip Functions 16 Using the Display Function 16 Using the Disc and Title Menu 16 Repeat Play 17 Slow Play 17 Advanced Functions Adjusting the Aspect Ratio EZ View 18 Selecting the Audio Language 1...

Страница 4: ...V SET COMPATIBILITY WITH THIS MODEL 525p DVD PLAYER PLEASE CONTACT SAMSUNG S CUSTOMER SERVICE CENTER 4 SETUP SETUP General Features Excellent Sound Dolby Digital a technology developed by Dolby Laboratories provides crystal clear sound reproduc tion Screen Both regular and widescreen 16 9 pictures can be viewed Slow Motion An important scene can be viewed in slow motion Parental Control DVD The pa...

Страница 5: ...G 2 system Various screen and audio func tions can be easily selected through the on screen menu Disc Types Logos Recording Types Disc Size Max Playing Time Characteristics DVD 12 Cm 8 Cm 74 min 20 min Audio Video Video with CD sound VHS quali ty MPEG 1 compression tech nology VIDEO CD 12 Cm 8 Cm 74 min 20 min Audio CD is recorded as a Digital Signal with better audio quality less distortion and l...

Страница 6: ...ps disc play Press to open and close the disc tray 6 PLAY PAUSE Begin or pause disc play 1 6 3 2 4 5 6 Description Front Panel Controls Front Panel Display Total playing time Displays various messages concerning operations such as PLAY STOP LOAD nodSC No disc loaded OPEn The disc tray is open LOAd Player is loading disc information 1 STANDBY ON When STANDBY ON is pressed on the indicator goes out ...

Страница 7: ...ed in Setup Menu progressive scan mode will work If Component I SCAN Video Output is select ed in Setup Menu interlaced scan mode will work 4 DIGITAL AUDIO OUT JACKS Use coaxial digital cable to connect to a com patible Dolby Digital receiver Use coaxial digital cable to connect to an A V Amplifier that contains a Dolby Digital MPEG2 or DTS decoder Note Consult your TV User s Manual to find out if...

Страница 8: ...se this button to access various audio functions on a disc 15 DVD Button Use to operate DVD 16 TV Button Use to operate TV 17 STEP TV SOURCE Button Advances play one frame at a time 18 TV CH Buttons Use to change channel 19 SUBTITLE Button 20 PLAY PAUSE Button Begin Pause disc play 21 RETURN Button Returns to a previous menu 22 INFO Button Displays the current disc mode 23 CANCEL Button Use to rem...

Страница 9: ... VIDEO yel low AUDIO red and white IN terminals of TV 2 Turn on the DVD player and TV 3 Press the TV VIDEO button on the TV s remote control to select Video Note Noise may be generated if the audio cable is too close to the power cable If you want to connect to an Amplifier please refer to the Amplifier connection page See pages 12 to 14 The number and position of terminals can vary depending on y...

Страница 10: ...e OUT terminals of 5 1CH Front L R on the rear of the DVD player to the AUDIO red and white IN terminals of TV Turn on the DVD player and TV 3 Press the TV VIDEO button on the TV s remote control to select Component or DVD 4 Set the Video Output to Component I SCAN in the Display Setup menu See pages 27 28 Note If you want to connect to an Amplifier please refer to the Amplifier connection page Se...

Страница 11: ...nt P SCAN in the Display Setup menu See pages 27 to 28 To see the progressive video output You need a TV set supporting the progressive scan input function And you have to set up the TV Consult your TV User s Manual to find out if your TV supports Progressive Scan If Progressive Scan is supported follow the TV User s Manual regarding Progressive Scan settings in the TV s menu system Depending on y...

Страница 12: ...ONENT IN terminal of your TV 3 Turn on the DVD player TV and Amplifier 4 Press the input select button of the Amplifier to select exter nal input in order to hear sound from the DVD player Note Please turn the volume down when you turn on the Amplifier Sudden loud sound may cause damage to the speakers and your ears Please set the audio in the menu screen according to the Amplifier See pages 27 Th...

Страница 13: ...yer to the VIDEO COMPONENT IN terminal of TV 3 Turn on the DVD player TV and Amplifier 4 Press the input select button of the Amplifier to select external input in order to hear sound from the DVD player Note Please turn the volume down when you turn on the Amplifier Sudden loud sound may cause damage to the speakers and your ears Please set the audio in the menu screen according to the Amplifier ...

Страница 14: ...io cables for 5 1 CH Analog Amplifier not included connect the 5 1CH ANALOG AUDIO OUT termi nals on the rear of the DVD player to the 5 1CH ANALOG AUDIO IN terminals of the 5 1CH Analog Amplifier 2 Using the video signal cable s connect the VIDEO COM PONENT terminals on the rear of the DVD player to the VIDEO COMPONENT terminals of your TV as described on pages 9 to 11 3 Turn on the DVD player TV ...

Страница 15: ...you stopped so when you press PLAY PAUSE button again it will pick up where you left off unless the disc is removed or the player is unplugged or if you press the STOP button twice 4 Stopping Play Press the STOP button during play 5 Removing Disc Press the OPEN CLOSE button 6 Pausing Play Press the PLAY PAUSE or STEP button on the remote control during play Screen stops no sound To resume press th...

Страница 16: ...g the Disc Menu 1 During Stop mode press the MENU button on the remote control 2 Press the buttons to select Disc Menu then press the or ENTER button 2 Press the buttons to select the desired item Only Menu Off is available for VCD2 0 Each press of the DISC MENU button toggles between Menu On and Menu Off 3 Press the buttons to make the desired setup and then press the ENTER button You may use the...

Страница 17: ...e that is playing Disc repeats the disc that is playing Track repeats the track that is playing A B repeats a segment of the disc that you select Off 01 01 A B REPEAT ENTER T Off 01 01 A B REPEAT ENTER T D DVD VCD Using the A B Repeat function 1 Press the REPEAT A B button at the point where you want repeat play to start A 2 Press the REPEAT A B button at the point where you want the repeat play t...

Страница 18: ...d on a 16 9 TV black bars will appear at the left and right of the screen in order to prevent the picture from looking horizontally stretched EZ VIEW 4 3 letter box If you are using a 4 3 TV For 16 9 aspect ratio discs 4 3 Letter Box Displays the content of the DVD title in 16 9 aspect ratio The black bars will appear at the top and bottom of the screen 4 3 Pan Scan The left and right portions of ...

Страница 19: ...uage come up whenever you play a DVD Refer to Using the Subtitle Language on page 25 DVD Off SUBTITLE AUDIO MPEG4 PCM 1 2 2 To remove the AUDIO icon press the CANCEL or RETURN button 1 5 SUBTITLE MPEG4 Press SUBTITLE button at remocon repeatedly to select the desired subtitle language on MPEG4 Changing the Camera Angle When a DVD contains multiple angles of a particular scene you can use the ANGLE...

Страница 20: ...te control 2 Press the buttons to select Shortcut 4 When you reach the scene you want to mark press the ENTER button Up to three scenes may be marked at a time 3 Press the buttons to select Bookmark except VCD then press the ENTER button DVD VCD 1 CANCEL 1 2 CANCEL 1 2 3 CANCEL 20 Depending on the disc these functions may not work Using the Bookmark Function This feature lets you bookmark sections...

Страница 21: ...d of file is played back when a disc or a folder contains both MP3 and WMA files 2 Press the or buttons to select a song file Press ENTER to begin playback of the song file Repeat Random playback Press the REPEAT button to change the playback mode There are four modes such as Off Track Folder and Random Off Normal Playback Track Repeats the current song file Folder Repeats the song files which hav...

Страница 22: ... such files Important The above recommendations cannot be taken as a guarantee that the DVD player will play MP3 recordings or as an assurance of sound quality You should note that certain technologies and methods for MP3 file recording on CD Rs prevent optimal playback of these files on your DVD player degraded sound quality and in some cases inability of the player to read the files This unit ca...

Страница 23: ...on t press any button the slide show will start automatically in about 10 seconds by default CD R JPEG Discs When this icon is selected and ENTER is pressed the pictures change automatically with about a 6 second interval The pictures change automatically with about a 12 second interval The pictures change automatically with about a 18 second interval Only files with the jpg and JPG extensions can...

Страница 24: ...up Display Setup Parental Setup DivX R Registration Setting Up the Language Features If you set the player menu disc menu audio and subtitle language in advance they will come up automatically every time you watch a movie Using the Player Menu Language 1 With the unit in Stop mode press the MENU button 2 Press the buttons to select Setup then press the or ENTER button 3 Press the buttons to select...

Страница 25: ... to select Setup then press the or ENTER button 3 Press the buttons to select Audio Setup then press the or ENTER button 4 Press the buttons to select the desired item then press the or ENTER button Language Setup Audio Setup Display Setup Parental Setup DivX R Registration Dolby Digital Out PCM MPEG 2 Digital Out PCM Dynamic Compression On PCM Down Sampling On Output Channel 5 1CH Speaker Setup A...

Страница 26: ... to select the desired item then press the ENTER button to set the speaker Note To make the setup menu disappear press the MENU button Enter Return Menu AUDIO SETUP The default settings FRONT L R Small CENTER Small SURROUND Small Select the size of the speakers to be connected Front FL FR Large Normally select this Small When the sound distorts or the suround sound effects are difficult to hear se...

Страница 27: ...an Letter Box DISPLAY SETUP TV Aspect Still mode Screen Messa Black Level Off TV System PAL Video Output I SCAN Video Output Select Video Output I SCAN Select when you want to use Component Interlace 525i Out P SCAN Select when you want to use Component Progressive 525p Out If you press the VIDEO SEL button Video output mode is changed in regular sequence in no disc mode I SCAN P SCAN Enter Return...

Страница 28: ...elect Rating Level then press the or ENTER button Rating level Kids Safe Change Password PARENTAL SETUP 5 Enter your password By default password is set to 0000 Menu Return Enter Rating Level Kids Safe Change Password Enter Password PARENTAL SETUP 6 Press the buttons to select the Rating Level you want then press the or ENTER button e g Setting up in Kids Safe Rating Level Kids Safe Menu Return En...

Страница 29: ...assword again Menu Return Enter Enter Password Rating Level Kids Safe Change Password Rating Level Kids Safe Change Password PARENTAL SETUP PARENTAL SETUP Setup Menu Return Enter Note If you have forgotten your password see Forgot Password in the Troubleshooting Guide Enter New Password Rating Level Kids Safe Change Password PARENTAL SETUP ...

Страница 30: ...g played has the 5 1 ch mark on the outside Check if your audio system is connected and working properly In SETUP Menu is the Audio Output set to Bitstream The features or action cannot be completed at this time because 1 The DVD s software restricts it 2 The DVD s software doesn t support the feature e g angles 3 The feature is not available at the moment 4 You ve requested a title or chapter num...

Страница 31: ...ay Time Single Sided Single Layer Disc 135 min Reading Speed 4 8 5 6 m sec Maximum Play Time 74 min Reading Speed 4 8 5 6 m sec Maximum Play Time 20 min Reading Speed 4 8 5 6 m sec Maximum Play Time 74 min Video Audio 1 channel 1 0 Vp p 75 1 load Y 1 0 Vp p 75 1 load Pr 0 70 Vp p 75 1 load Pb 0 70 Vp p 75 1 load F L F R R L R R CT S W 48 kHz Sampling 4 Hz to 22 kHz 96 kHz Sampling 4 Hz to 44 kHz 1...

Страница 32: ...amsung com ITALIA 800 SAMSUNG 726 7864 www samsung com LUXEMBURG 0035 0 2 261 03 710 www samsung com be NETHERLANDS 0900 SAMSUNG 726 7864 0 10 Min www samsung com nl NORWAY 815 56 480 www samsung com no POLAND 0 801 801 881 022 607 93 33 www samsung com pl PORTUGAL 80820 SAMSUNG 726 7864 www samsung com pt SLOVAKIA 0800 SAMSUNG 726 7864 www samsung com sk SPAIN 902 10 11 30 www samsung com SWEDEN ...

Страница 33: ...34 Memo Memo ...

Страница 34: ...AK68 01505A Contact SAMSUNG WORLD WIDE If you have any questions or comments relating to Samsung products please contact the SAMSUNG customer care centre 3030 8282 1800 1100 11 www samsung com ...

Отзывы: