background image

ENG-25

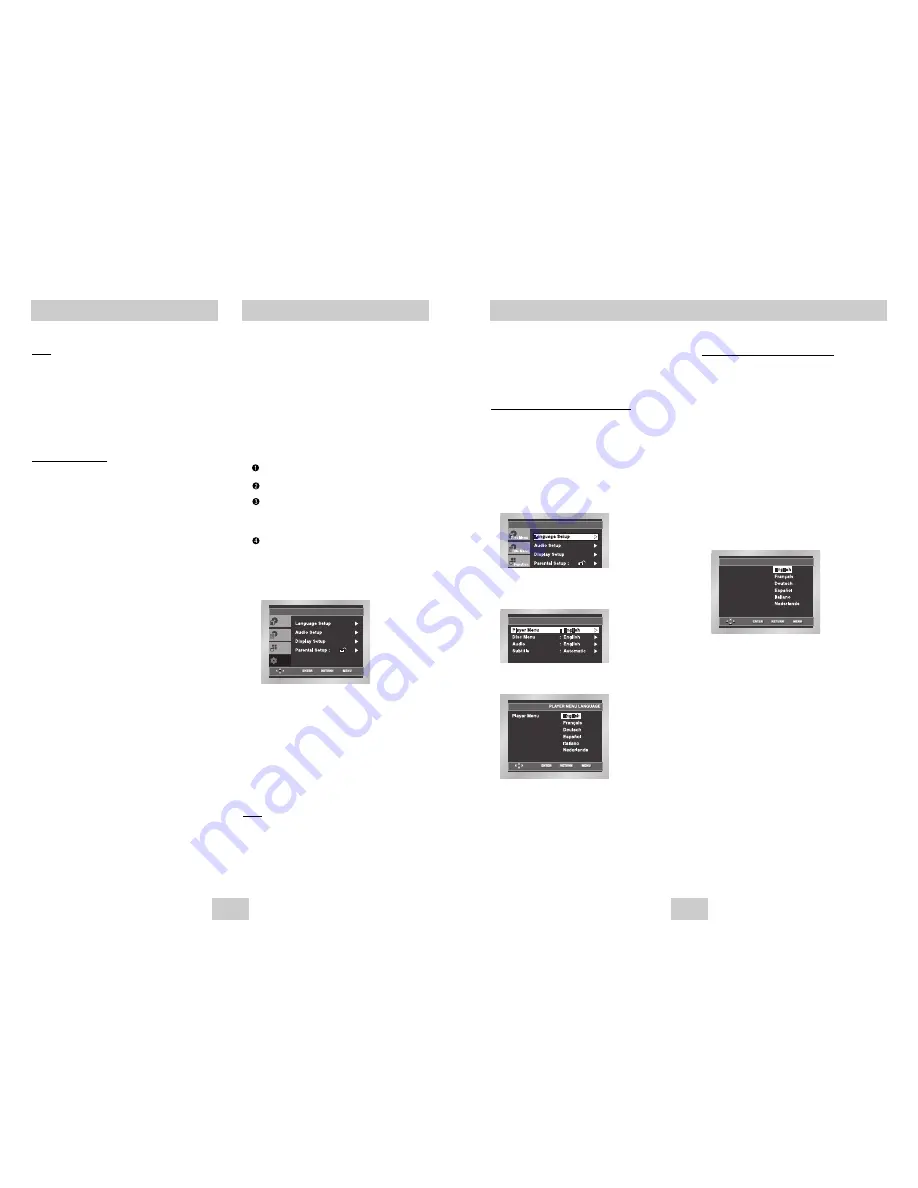
Using the Disc Menu Language

This function changes the text language only on the
disc menu screens.

1. With the unit in Stop mode, press the MENU

button.

2. Select 

Setup

using UP/DOWN buttons, then

RIGHT or ENTER button.  

3. Select 

Language Setup

using UP/DOWN

buttons, then press the RIGHT or ENTER button. 

4. Select 

Disc Menu

using UP/DOWN buttons, then

press the RIGHT or ENTER button. 

5. Use the UP/DOWN buttons to select 

‘English’

.

- Select “Others” if the language you want is not listed.

6. Press the ENTER button.

- English is selected and the screen returns to SETUP

menu.

e.g) 

Setting up in English.

DISC MENU LANGUAGE

IIII

   Others

Disc Menu

Setting Up the Language Features

If you set the player menu, disc menu, audio
and subtitle language in advance, they will
come up automatically every time you watch a
movie.

Using the Player Menu Language

1. With the unit in Stop mode, press the MENU

button.

2. Select 

Setup

using UP/DOWN buttons, then

RIGHT or ENTER button.     

3. Select 

Language Setup

using UP/DOWN

buttons, then press the RIGHT or ENTER button.

4. Select 

Player Menu

using UP/DOWN buttons,

then press the RIGHT or ENTER button.

5. Use the UP/DOWN buttons to select 

‘English’

.

6. Press the ENTER button.

- English is selected and the screen returns to SETUP

menu.

- To make the SETUP menu disappear, press the

RETURN or LEFT button.

e.g) 

Setting up in English.

LANGUAGE SETUP

The Setup menu lets you customize your DVD 
player by allowing you to select various 
language preferences, set up a parental level,
even adjust the player to the type of television
screen you have.

1. With the unit in Stop mode, press the MENU

button on the remote. Select 

Setup

using

UP/DOWN buttons, then press the RIGHT or
ENTER button.

Language Setup

: Setup of the Language.

Audio Setup

: Setup of the Audio Options

Display Setup

: Setup of the Display Options

Use to select which type of screen you want to
watch and several display options.

Parental Setup

: Setup of the Parental Level

Allows users to set the level necessary to
prevent children from viewing unsuitable
movies such as those with violence, adult
subject matter, etc.

2. Use the UP/DOWN buttons on the remote to

access the different features.

3. Press the ENTER or RIGHT button to access the

sub features.

To make the setup screen disappear after setting
up, press the MENU button again.

Note

Note

Depending on the disc, some Setup Menu 
selections may not work.

Using the Setup Menu

Setup

Disc Menu

Title Menu

Function

ENG-24

Picture CD Playback

Note

Note

• If no buttons on the remote control pressed for 10

seconds, the menu will disappear.
Press the INFO button on the remote control to
display the menu again.

• Press the STOP button to return to the clips menu.
• When playing a Kodak Picture CD, the unit 

displays the Photo directly, not the clips menu.

CD-R JPEG Discs

• Only files with the “.jpg” and “.JPG” extensions can be

played.

• If the disc is not closed, it will take longer to start

playing and not all of the recorded files may be
played.

• Only CD-R discs with JPEG files in ISO 9660 or Joliet

format can be played.

• The name of the JPEG file may not be longer than 8

characters and should contain no blank spaces or
special characters (. / = +).

• Only a consecutively written multisession disc can be

played. If there is a blank segment in the multisession
disc, the disc can be played only up to the blank
segment.

• A maximum of 500 images can be stored on a single

CD.

• Kodak Picture CDs are recommended.

• When playing a Kodak Picture CD, only the JPEG

files in the pictures folder can be played.

• Kodak Picture CD : The JPEG files in the pictures

folder can be played automatically.

• Konica Picture CD : If you want to see the Picture,

select the JPEG files in the clips menu.

• Fuji Picture CD : If you want to see the Picture, select

the JPEG files in the clips menu.

• QSS Picture CD : The unit cannot play QSS Picture

CD.

• If a number of files in 1 Disc are over 3000, only 3000

JPEG file can be played.

• If a number of folders in 1 Disc are over 300, only

JPEG files in 300 folders can be played.

Содержание DVD-P147

Страница 1: ...DVD Player DVD Speler DVD P147 DVD P247A AK68 00412K ...

Страница 2: ...wer outlet The player will operate normally When condensation forms inside the player due to sharp changes in temperature the player may not operate correctly If this occurs leave the player at room temperature until the inside of the player becomes dry and operational 4 Disc Do not clean record cleaning sprays benzene thinner or other volatile solvents that may cause damage to the disc surface Do...

Страница 3: ...ain U S patents and other intellectual property rights owned by Macrovision Corporation and other rights owners Use of this copyright protection technology must be authorized by Macrovision Corporation and is intended for home and other limited viewing uses only unless otherwise authorized by Macrovision Corporation Reverse engineering or disassembly is prohibited PROGRESSIVE SCAN OUTPUTS 525p 625...

Страница 4: ...c X X O Stop X X O Loading X X Blinks Play Skip X O X Search Pause X Blinks X Error Blinks Blinks Blinks Function LED DVD P147 DVD P247A Description Front Panel STANDBY ON EZ VIEW 1 2 3 4 5 6 7 8 9 Front Panel Controls 1 STANDBY ON When the player is plugged in the Power LED lights If you press the STANDBY ON button to turn on the player the LED goes out 2 SKIP SEARCH Allows you to search backward...

Страница 5: ... OUT ANALOG AUDIO OUT COMPONENT VIDEO OUT OPTICAL Rear Panel 1 DIGITAL AUDIO OUT JACKS Use either a coaxial digital cable to connect to a compatible Dolby Digital receiver Use to connect to an A V Amplifier that contains a Dolby Digital MPEG 2 or DTS decoder 2 DIGITAL AUDIO OUT JACKS DVD P247A only Use either an optical cable to connect to a compatible Dolby Digital receiver Use to connect to an A...

Страница 6: ...ur TV supports Progressive Scan If Progressive Scan is supported follow the TV User s Manual s instructions regarding Progressive Scan settings in the TV s menu system Depending on your TV the Method of connection may differ from the illustration above R L ANALOG AUDIO OUT Pr Pb Y S VIDEO OUT VIDEO OUT COMPONENT VIDEO OUT Pr Pb Y COMPONENT VIDEO OUT Good picture Better picture Optimum picture Basi...

Страница 7: ...utton to select the video mode Turn on your Audio System and select AUX CD or DVD After plugging in the player the first time you press the DVD POWER button this screen comes up If you want to select the language press a NUMBER button This screen will only appear when you plug in the player for the first time Play 1 Press the OPEN CLOSE button The STANDBY indicator light goes out and the tray open...

Страница 8: ...s the function Note Note You can also directly select these functions using their respective buttons on the remote Off 01 01 A B REPEAT ENTER T Off 01 01 A B REPEAT ENTER T D DVD VCD CD T Using the Display Function Using the Disc and Title Menu Using the Disc Menu 1 During the playback of a DVD disc press the MENU button on the remote 2 Select Disc Menu using the UP DOWN buttons then press the RIG...

Страница 9: ... title in 4 3 aspect ratio Screen Fit The top and bottom of the screen are cut off and the full screen appears The picture would look vertically stretched Zoom Fit The top bottom left and right of the screen are cut off and the central portion of the screen is enlarged Note Note This function may behave differently depending on the type of disc Program Play Random Play Program Play CD 1 Press the ...

Страница 10: ...ANGLE Selecting the Audio Language You can select a desired language quickly and easily with the AUDIO button Using the AUDIO button 1 Press the AUDIO button 2 The Audio changes when the button is pressed repeatedly The audio languages are represented by abbreviations 3 Press the AUDIO button to select Stereo Left or Right On VCD CD Note Note This function depends on what languages are encoded on ...

Страница 11: ...During DVD play press ENTER to zoom in 2X 4X 2X Normal in order During VCD play press ENTER to zoom in 2X Normal in order This feature lets you bookmark sections of a DVD or VCD MENU OFF mode so you can quickly find them at a later time Using the Bookmark Function DVD VCD 1 During play press the MENU button on the remote 2 Use the UP DOWN buttons to highlight Function then press the RIGHT or ENTER...

Страница 12: ...epends on the rate of compression decompression you choose Getting CD audio sound requires an analog digital sampling rate that is conversion to WMA format of at least 64Kbps and up to 192Kbps Conversely files with decompression rates below 64Kbps or over 192Kbps will not be played properly Do not try recording copyright protected MP3 files Certain secured files are encrypted and code protected to...

Страница 13: ...ptions Parental Setup Setup of the Parental Level Allows users to set the level necessary to prevent children from viewing unsuitable movies such as those with violence adult subject matter etc 2 Use the UP DOWN buttons on the remote to access the different features 3 Press the ENTER or RIGHT button to access the sub features To make the setup screen disappear after setting up press the MENU butto...

Страница 14: ...e from Dolby Laboratories Dolby and the double D symbol are trademarks of Dolby Laboratories DTS and DTS Digital Out are trademarks of Digital Theater Systems Inc Setting Up the Language Features Using the Audio Language 1 With the unit in Stop mode press the MENU button 2 Select Setup using UP DOWN buttons then RIGHT or ENTER button 3 Select Language Setup using UP DOWN buttons then press the RIG...

Страница 15: ... buttons then RIGHT or ENTER button 3 Select Display Setup using UP DOWN buttons then press the RIGHT or ENTER button 4 Use the UP DOWN buttons to select the desired item Then press the RIGHT or ENTER button TV Aspect Depending on the type of television you have you may want to adjust the screen setting aspect ratio 1 4 3 Letter Box Select when you want to see the total 16 9 ratio screen DVD suppl...

Страница 16: ...ly on the front panel for three seconds The SELECT MENU LANGUAGE display will appear Select the number button of the desired language Press power on from a cold start with no disc in the unit Press the STOP and PLAY buttons simultaneously on the front panel for three seconds The SELECT MENU LANGUAGE display will appear Select the number button of the desired language Press the MENU button and then...

Страница 17: ...c Approx Play Time Single Sided Single Layer Disc 135 min Reading Speed 4 8 5 6 m sec Maximum Play Time 74 min Reading Speed 4 8 5 6 m sec Maximum Play Time 20 min Reading Speed 4 8 5 6 m sec Maximum Play Time 74 min Video Audio 1 channel 1 0 Vp p 75 Ω load Y 1 0 Vp p 75 Ω load Pr 0 70 Vp p 75 Ω load Pb 0 70 Vp p 75 Ω load Luminance Signal 1 0 Vp p 75 Ω load Chrominance Signal 0 3 Vp p 75 Ω load L...

Страница 18: ... voor sommige gevoelige onderdelen U riskeert een elektrische schok of contact met de laserstraal Probeer niet in de dvd speler de ventilatieopeningen of andere openingen te kijken 3 Opgelet Bescherm de speler tegen vocht zet bijvoorbeeld geen vaas bloemen of glas met drinken op de dvd speler en tegen hitte bijv open haard Zet de dvd speler niet vlakbij een installatie die sterke magnetische of el...

Страница 19: ...order kan leiden tot vervormde weergave van tegen kopiëren beveiligde dvd s Dit product bevat technieken ter bescherming van de auteursrechten waarvan de methoden beschermd zijn onder bepaalde V S patenten en andere intellectuele eigendomsrechten van Macrovision Corporation en andere rechthebbenden Het gebruik van deze technieken ter bescherming van de auteursrechten moet worden geautoriseerd door...

Страница 20: ... STANDBY ON drukt om de speler aan te zetten gaat het lampje uit 2 SKIP SEARCH Hiermee kunt u achteruit door de disk zoeken en een titel hoofdstuk of track overslaan 3 STOP Weergave stoppen 4 PLAY PAUSE Weergave starten of onderbreken 5 SKIP SEARCH Hiermee kunt u vooruit door de disk zoeken en een titel hoofdstuk of track overslaan 6 EZ VIEW Met Easy View kunt u beelden in Letterbox weergave omzet...

Страница 21: ...k naar keuze een coaxiale digitale kabel om de speler aan te sluiten op een Dolby Digital ontvanger of een versterker met Dolby Digital decoder MPEG 2 of DTS decoder 2 DIGITAAL AUDIO UITAANSLUITING Alleen DVD P247A Gebruik naar keuze een optische digitale kabel om de speler aan te sluiten op een Dolby Digital ontvanger of een versterker met Dolby Digital decoder MPEG 2 of DTS decoder 3 ANALOOG AUD...

Страница 22: ...uiksaanwijzing van uw tv om na te gaan of uw tv Progressive Scan ondersteunt Is dit het geval volg dan de in deze gebruiksaanwijzing genoemde instructies voor het instellen van het menu van uw tv op Progressive Scan Afhankelijk van uw TV kan uw verbindingsmethode afwijken van de bovenstaande illustratie R L ANALOG AUDIO OUT Pr Pb Y S VIDEO OUT VIDEO OUT COMPONENT VIDEO OUT Pr Pb Y COMPONENT VIDEO ...

Страница 23: ... op de TV VIDEO toets voor videoweergave Zet uw audiosysteem aan en kies de ingang AUX CD of DVD Wanneer u de stekker van de speler in het stopcontact hebt gedaan en deze voor het eerst aanzet verschijnt het volgende scherm Voor het kiezen van een taal drukt u op de betreffende cijfertoets Dit scherm verschijnt alleen de eerste keer dat u de speler aanzet Weergeven 1 Druk op de OPEN CLOSE toets He...

Страница 24: ...an de 5 functies te selecteren Druk vervolgens op de toets RECHTS of ENTER om naar deze functie te gaan NB NB U kunt deze functie ook direct selecteren met behulp van de betreffende toets op de afstandsbediening Bladwijzer Uit 01 01 A B REPEAT ENTER T Uit 01 01 A B REPEAT ENTER T D DVD VCD CD T Display functie disk informatie weergeven Diskmenu en Titelmenu Diskmenu openen 1 Druk tijdens het afspe...

Страница 25: ...oot 2 Bij disks met een breedte hoogteverhouding van 4 3 Normaal 4 3 Hiermee geeft u de dvd weer in een verhouding van 4 3 Automatisch Het bovenste en het onderste deel van het scherm vallen weg en het volledige beeld wordt weergegeven Het beeld ziet er uit alsof het in verticale richting is uitgerekt Zoom Aanpassen De boven onder linker en rechterkant van het scherm vallen weg en het middelste ge...

Страница 26: ...ezen Met de AUDIO toets 1 Druk tijdens het afspelen op de AUDIO toets 2 De audio wordt gewijzigd wanneer u meerdere keren op deze toets drukt De geluidstalen worden aangegeven met afkortingen 3 Druk op de toets AUDIO om Stereo Left Links of Right Rechts te selecteren Op een vcd cd NB NB De mogelijkheden van deze functie hangen af van de talen die op de disk staan Bij sommige disks is deze functie ...

Страница 27: ...Druk tijdens het afspelen op de MENU toets van de afstandsbediening en selecteer Bladwijzer 2 Ga met de pijltjestoetsen LINKS RECHTS naar een gemarkeerde scène 3 Druk op de PLAY PAUSE toets om de gemarkeerde scène af te spelen Bladwijzer wissen 1 Druk tijdens het afspelen op de MENU toets van de afstandsbediening en selecteer Bladwijzer 2 Ga met de pijltjestoetsen LINKS RECHTS naar het nummer van ...

Страница 28: ...eluidskwaliteit wilt die gelijk is aan die van audio cd s moet u een analoge digitale samplingfrequentie conversie naar WMA indeling kiezen tussen 64Kbps en 192 Kbps Daar staat tegenover dat bestanden met een samplingfrequentie van minder dan 64 Kbps of meer dan 192 Kbps niet correct worden afgespeeld Probeer geen MP3 bestanden op te nemen waarop copyright rust Bepaalde beveiligde bestanden zijn g...

Страница 29: ...jk niet alle opgenomen bestanden afgespeeld Alleen CD R disks met JPEG bestanden in ISO 9660 of Joliet indeling kunnen worden afgespeeld De bestandsnaam van het JPEG bestand mag niet langer zijn dan 8 tekens en mag geen spaties of speciale tekens bevatten Alleen een in een doorlopende sessie beschreven multisessiedisk kan worden afgespeeld Als er een blanco segment op de multisessiedisk staat kan ...

Страница 30: ...bbele D symbool zijn handelsmerken van Dolby Laboratories DTS en DTS Digital Out zijn handelsmerken van Digital Theater Systems Inc Taalfuncties instellen Taalkeuze geluidsspoor 1 Druk met de speler in de stand STOP op de toets MENU van de afstandsbediening 2 Selecteer met behulp van de toetsen OMHOOG OMLAAG Setup en druk vervolgens op de toets RECHTS of ENTER 3 Selecteer met behulp van de toetsen...

Страница 31: ...OOG OMLAAG Setup en druk vervolgens op de toets RECHTS of ENTER 3 Selecteer met behulp van de toetsen OMHOOG OMLAAG Instellingen Beeld en druk vervolgens op de toets RECHTS of ENTER 4 Gebruik de toetsen OMHOOG OMLAAG om het gewenste item te selecteren Druk vervolgens op de toets RECHTS of ENTER Normaal Breedbeeld Afhankelijk van het soort televisie dat u bezit is het mogelijk dat u de scherminstel...

Страница 32: ...onder disk in de lade Houd de STOP en PLAY toetsen op het frontpaneel drie seconden lang tegelijk ingedrukt Het menu voor het selecteren van de menutaal verschijnt op het tv scherm Druk op de toets voor de gewenste taal Druk op de afstandsbediening op de MENU toets en selecteer TOEGANGSCODE GEBRUIKEN Deze optie staat uit zoals ook op het tv scherm wordt aangegeven Selecteer met de NEER toets KINDE...

Страница 33: ... sec Speelduur enkelzijdige disk met 1 laag circa 135 min Leessnelheid 4 8 5 6 m sec Maximale speelduur 74 min Leessnelheid 4 8 5 6 m sec Maximale speelduur 20 min Leessnelheid 4 8 5 6 m sec Maximale speelduur 74 min Video Audio 1 kanalen 1 0 Vp p 75 Ω Y 1 0 Vp p 75 Ω Pr 0 70 Vp p 75 Ω Pb 0 70 Vp p 75 Ω Luminantiesignaal 1 0 Vp p 75 Ω Kleursignaal 0 3 Vp p 75 Ω L 1 L R 2 R 48 kHz sampling 4 Hz tot...

Отзывы: