background image

ENG-35

ENG-34

Setting Up the Audio Options

PCM Down Sampling

1. On : Select this when the amplifier connected to the

player is not 96KHz compatible. In this case, the
96KHz signals will be down converted to 48KHZ.

2. Off : Select this when the amplifier connected to the

player is 96KHz compatible. In this case, all
signals will be output without any changes.

Note

Even when PCM Down sampling is Off

Some discs will only output down sampled
audio through the digital outputs.

High sampling rate DVD-Audio discs
(192KHz or 176.4KHz) always output audio
down sampled to 96KHz or 88.2KHz through
the digital outputs.

When playing LPCM or PPCM DVD
protected by copyright. If digital audio source
is 48KHz/16bit the Digital output is mute.

Speaker Setup (See pages 34~35)

Note

• 

How to make the SETUP menu disappear or
return to menu screen during set up; 

Press RETURN or LEFT button.

• Manufactured under license from Dolby

Laboratories. “Dolby” and the double-D symbol are
trademarks of Dolby Laboratories.

• “DTS” and “DTS Digital Out” are trademarks of

Digital Theater Systems, Inc.

• DVD-AUDIO

- Outputs 2 channel digital audio only.
- Some DVD-AUDIO discs do not downmix, so

they will not output 2 channel digital audio.

- MULTI channel DVD-AUDIO discs play back

through the analog outputs.

• SACD

- Outputs analog signals only.

• HDMI

- If your TV is not compatible with compressed

multi-channel formats(Dobly Digital, DTS,
MPEG), you should set Digital Audio to PCM.

- If your TV is not compatible with LPCM sampling

rate over 48kHz, you should set PCM Down sam-
pling to On.

- SACD audio is only available through the analog

outputs. It is not possible to output SACD audio
via the HDMI output or Digital Audio Output.

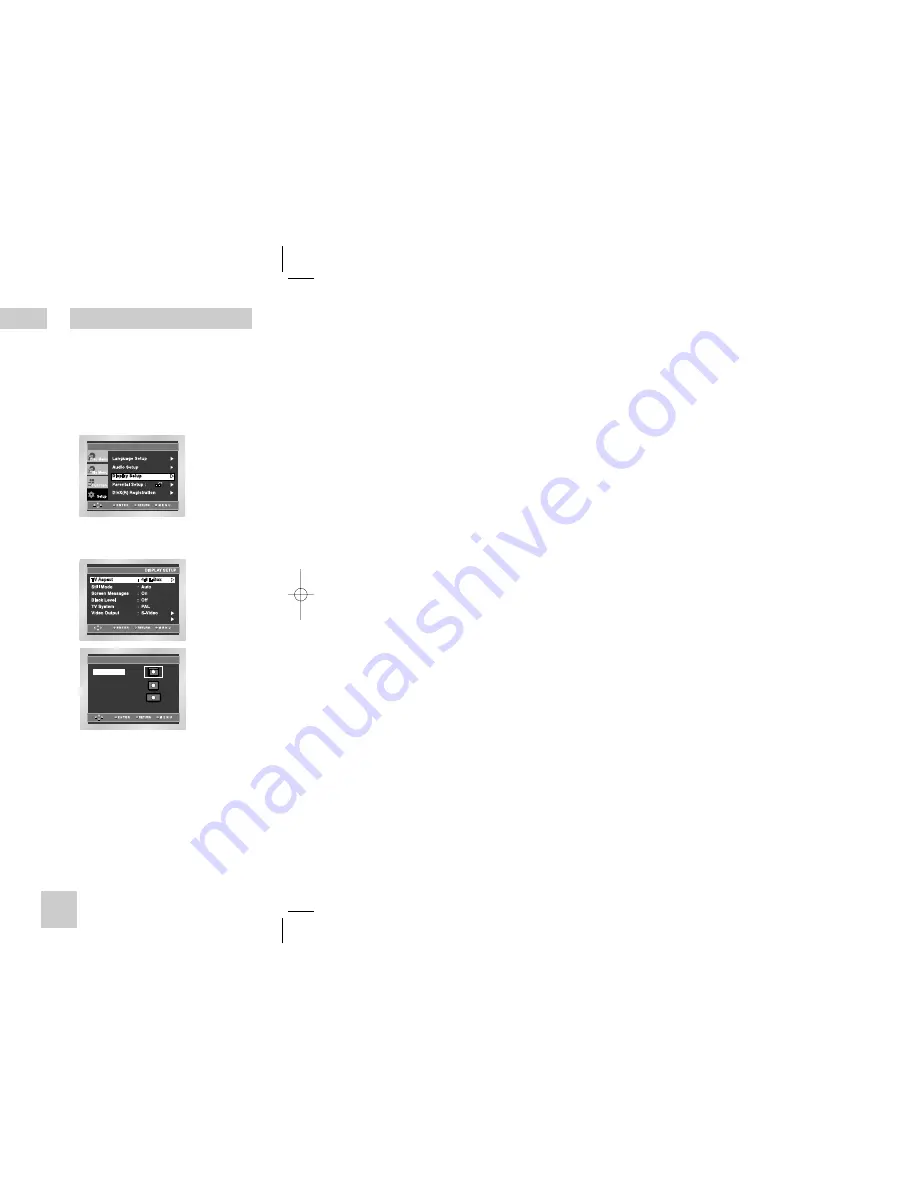
1. With the unit in Stop mode, press the MENU

button.

2. Select 

Setup

using UP/DOWN buttons, then

press the RIGHT or ENTER button.

3. Select 

Audio Setup

using UP/DOWN buttons,

then press the RIGHT or ENTER button.

4. Use the UP/DOWN buttons to select 

Speaker

Setup

. Then press the RIGHT or ENTER button.

5. Use the UP/DOWN or LEFT/RIGHT buttons to

select the desired item. Then press the ENTER
button.

Surround Sound Speaker Setup

AUDIO SETUP

Dynamic Compression 

:  On

PCM Down Sampling 

:  On

Speaker Setup

Dolby/DTS Digital Out

:  PCM

MPEG-2 Digital Out

:  PCM

SPEAKER SETUP

On

1. With the unit in Stop mode, press the MENU

button.

2. Select 

Setup

using UP/DOWN buttons, then

press the RIGHT or ENTER button.

3. Select 

Display Setup

using UP/DOWN buttons,

then press the RIGHT or ENTER button.

4. Use the UP/DOWN buttons to select the desired

item. Then press the RIGHT or ENTER button.

Setting Up the Display Options

HDMI/DVI

The default settings : FRONT L, R (Small),
CENTER (Small), SURROUND (Small). 
Select the size of the speakers to be connected.

• Front (FL, FR)

Large

: Normally select this.

Small

: When the sound distorts or the surround

sound effects are difficult to hear, select this. 
This activates the Dolby Digital bass redirection
circuitry and outputs the bass frequencies of the
speaker from the subwoofer.

• Center

None

: If you do not connect a center speaker,

select this.

Large

: Normally select this.

Small

: When the sound distorts, select this. 

This activates the Dolby Digital bass redirection
circuitry and outputs the bass frequencies of the
center speaker from other speakers.

• 

Surround (SL, SR)

None

: If you do not connect a center speaker,

select this.

Large (Rear/Side)

: Normally select either of these

according to the rear speaker’s position.

Small (Rear/Side)

: When the sound distorts or the

surround sound effects are difficult to hear, select
either of these according to the rear speaker’s
position. This activates the Dolby Digital bass
redirection circuitry and outputs the bass
frequencies of the rear speaker from other
speakers.

Setting up TEST

The test output signals come clockwise starting from
the Front Speaker(L). Adjust Channel Balance to
match to the volume of test signals memorized in
the system.

FRONT(L)

➝ 

CENTER

➝ 

SUBWOOFER

FRONT(R)

➝ 

SURROUND(R)

➝ 

SURROUND(L)

Note

How to make the SETUP menu disappear or return
to menu screen during set up. Press RETURN or
LEFT button.

• The subwoofer test output signal is lower than the

other speakers.

• The MPEG Multichannel logo is a trademark 

registered by PHILIPS Corporation.

• If you set Front (L, R) “Small”, LFE (Subwoofer) is

set “On” automatically.

Surround Sound Speaker Setup

TV ASPECT

4:3 Pan Scan

16:9 Wide

4:3 Letter Box

HD948-XST(00518D)GB  12/22/04 10:50 AM  Page 34

Содержание DVD-HD948

Страница 1: ... Ùj nvdkiB h ko DVD Player DVD HD948 ...

Страница 2: ...andom Play 18 Advanced Functions Adjusting the Aspect Ratio EZ View 19 Selecting the Audio Language 20 Selecting the Subtitle Language 20 Changing the Camera Angle 21 Using the Instant Replay Skip Function 21 Using the Bookmark Function 22 Using the Zoom Function 23 SACD Playback 23 DVD AUDIO Playback 25 Clips Menu for MP3 WMA JPEG MPEG4 26 Folder Selection 27 MP3 WMA Playback 27 MPEG4 Playback 28...

Страница 3: ... screen and audio functions can be easily selected through the on screen menu s Disc Size Max Playing Time Characteristics 12 Cm 8 Cm 74 min 20 min Video with CD sound VHS quality MPEG 1 compression technology 12 Cm 8 Cm 12 Cm 12 Cm 74 min 20 min 400 min 74 min CD is recorded as a Digital Signal with better audio quality less distortion and less deterioration of audio quality over time DVD AUDIO i...

Страница 4: ...NG 7 ng tput r Audio CD Track number CD CD ted to the HDMI Jack is a DVI device ted to the HDMI Jack is a HDMI device ncerning operations such as PLAY STOP LOAD ormation 7 8 9 10 11 12 13 14 15 16 17 18 ...

Страница 5: ...revious 10 seconds of a movie from the current position 22 CH Buttons Channel selection 23 OPEN CLOSE Button To open and close the disc tray 24 HDMI SEL Button HDMI or DVI Output resolution setup 25 SKIP Buttons Use to skip the title chapter or track 26 PLAY PAUSE Button Begin Pause disc play 27 INFO Button Displays the current disc mode 28 DISC MENU Button Brings up the Disc menu 29 ENTER DIRECTI...

Страница 6: ... disc mode k t be set to S Video or Component Iscan ack t be set to S Video eo Jacks t be set to Component Iscan Video output mode is changed in regular sequence in no disc mode Method 1 Method 2 Video S Video Method 3 Interlace scan OR OR AV Cable S Video Cable Video Cables Video Output Jack S Video Jack Component Jacks ...

Страница 7: ...io signal However when playing a DVD the data transmitted to a TV alog converter in the dvd player or an analog to digital converter in the n the picture quality is degraded due to noise and signal loss requires no D A conversion and is a pure digital signal from the player to t Protection is a system for protecting DVD content outputted via DVI re digital link between a video source PC DVD etc an...

Страница 8: ...access a title chapter or to start the playback from the desired time 4 To make the screen disappear press the INFO button again unctions y through a nction to Track or but er speed mote by 1 2 Play 8X 8X ff you can use on button it button it e more press ious chapter e a VCD 1 1 he button button it more press ious track g a VCD and 5 minutes in n it moves oose Menu ENU DVD Title Time Audio Chapte...

Страница 9: ... repeat play to stop B To terminate the function press the CLEAR button A B REPEAT does not allow you to set point B until at least 5 seconds has elapsed after point A has been set 3 Press ENTER 4 To return to normal play press REPEAT again then press the LEFT RIGHT buttons to select Off and press ENTER Note DVD repeats play by chapter or title CD and VCD repeat play by disc or track Depending on ...

Страница 10: ...t off and displays the central portion of the 16 9 screen Screen Fit The top and bottom of the screen are cut off and the full screen appears The picture will look vertically stretched Zoom Fit The top bottom left and right of the screen are cut off and the central portion of the screen is enlarged 2 For 4 3 aspect ratio discs Normal Screen Displays the content of the DVD title in 4 3 aspect ratio...

Страница 11: ...gain using this function If you press the INSTANT REPLAY button the current scene moves backward about 10 seconds and plays back Depending on a disc the Instant Replay function may not work Using the Instant Skip function DVD Use this function to skip playback about 10 seconds ahead of the current scene Press the INSTANT SKIP button Playback will skip ahead 10 seconds Depending on a disc this func...

Страница 12: ...ENTER button to begin playback of the music title If you want to use the Repeat Function press the REPEAT button to change the mode such as Off Track Disc Off Normal Playback Track Repeats the current music title Disc Repeats the music titles in the SACD If you want to see information about the Disc title and Artist press the INFO button If you want to convert into regular CD mode press the SACD C...

Страница 13: ...you can use this Function If a slide show is included with the DVD AUDIO you can see this icon In this case you cannot use PAGE PRE NEXT buttons If a video zone is included with the DVD AUDIO you can see this icon In this case you cannot use PAGE PRE NEXT buttons Allows playback of the music from a desired time by using the number buttons Page Index Function 1 Use PAGE PRE NEXT buttons to Skip the...

Страница 14: ...nction 1 Select the desired folder 2 Use the UP DOWN or LEFT RIGHT buttons to select a song file 3 Press ENTER to begin playback of the song file Repeat Random playback Press the REPEAT button to change playback mode There are 4 modes such as Off Track Folder and Random Off Normal Playback Track Repeats the current song file Folder Repeats the song files which have the same extension in the curren...

Страница 15: ...n Description Reference page Skip or Search or Slow Motion Play Step Motion Play ZOOM when there is from a er the starting age of the AC3 and an use this utton he subtitle turn them off se this LE button with ger file size displayed it scales up ee the larger on the the desired ke the R f the remote o start the s the INFO During play press the or button it moves forward or backward 5 minutes Durin...

Страница 16: ...s the RIGHT or ENTER button 4 Select Player Menu using UP DOWN buttons then press the RIGHT or ENTER button 5 Use the UP DOWN buttons to select the desired language 6 Press the ENTER button The language is selected and the screen returns to Language Setup menu To make the SETUP menu disappear press the RETURN or LEFT button LANGUAGE SETUP e your DVD rious rental level of television e MENU using RI...

Страница 17: ...by Digital and DTS Decoder Note There is no analog audio output when you play DTS sound disc MPEG 2 Digital Out 1 PCM Converts to PCM 2CH audio 2 Bitstream Outputs MPEG 2 Bitstream via digital output Select Bitstream when connecting to an MPEG 2 Decoder Dynamic Compression 1 On To select dynamic compression 2 Off To select the standard range Setting Up the Audio Options AUDIO SETUP Dynamic Compres...

Страница 18: ...to select the desired item Then press the RIGHT or ENTER button Setting Up the Display Options HDMI DVI all onnected e surround ect this redirection cies of the speaker ct this redirection cies of the speaker ither of these on distorts or the hear select peaker s tal bass ass other e starting from Balance to morized in ER ROUND L ear or return ETURN or wer than the demark ubwoofer is r Setup TV AS...

Страница 19: ...r family watches There are up to 8 rating levels on a disc 1 With the unit in Stop mode press the MENU button 2 Select Setup using UP DOWN buttons then press the RIGHT or ENTER button 3 Select Parental Setup using UP DOWN buttons then press the RIGHT or ENTER button 4 Use RIGHT or ENTER to select Yes if you want to use a password The Enter Password screen appears 5 Enter your password The Re enter...

Страница 20: ... SELECO 74 SHARP 36 37 38 39 48 SIEMENS 71 SINGER 57 SINUDYNE 57 SONY 35 48 TELEAVA 73 TELEFUNKEN 67 73 75 76 THOMSON 72 73 75 THOMSON ASIA 80 81 TOSHIBA 47 48 49 50 51 52 WEGA 57 YOKO 06 ZENITH 63 TV Codes n down enter ER button 4 If the TV turns off setup is complete Enter other codes of the same brand if the first code does not work 5 To operate the TV use the TV Function Buttons described on p...

Страница 21: ...ter number or search time that of range the disc has a Menu the functions selected in the Setup Menu may not work if the disc is not encoded with the corresponding function een Ratio is fixed on your DVDs re you have selected the correct Digital Output in the ptions Menu wer on from a cold start with no disc in the unit e SEARCH SKIP button on the front panel for 5 The SELECT MENU LANGUAGE display...

Страница 22: ...g Speed 4 8 5 6 m sec Maximum Play Time 20 min Reading Speed 4 8 5 6 m sec Maximum Play Time 74 min Video Audio 1 channel 1 0 Vp p 75 Ω load Y 1 0 Vp p 75 Ω load Pr 0 70 Vp p 75 Ω load Pb 0 70 Vp p 75 Ω load Luminance Signal 1 0 Vp p 75 Ω load Chrominance Signal 0 3 Vp p 75 Ω load High Definition Multimedia Interface L 1 L R 2 R F L F R R L R R C T S W 48 kHz Sampling 4 Hz to 22 kHz 96 kHz Samplin...

Отзывы: