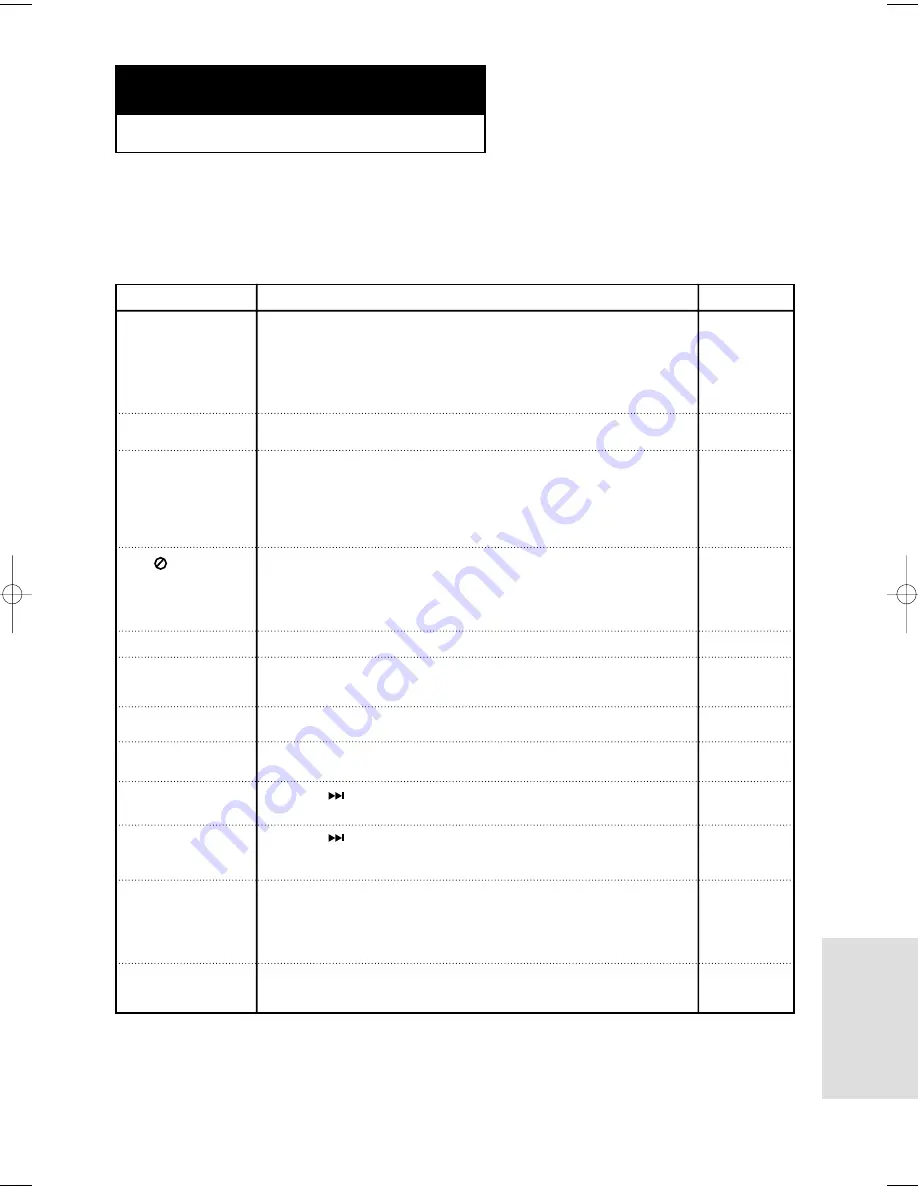
Samsung DVD-HD860 Скачать руководство пользователя страница 55

ENG-55

Reference

Troubleshooting

Before requesting service (troubleshooting), please check the following.

No operations can be
performed with the
remote control.

The screen ratio 
cannot be changed.

No audio.

Play mode differs from
the Setup Menu 
selection.

Disc Menu doesn’t appear.

The       icon appears
on screen.

Forgot password

The screen is blocked 

If you experience other
problems.

5.1 channel sound is
not being reproduced.

Disc does not play.

•  Check the batteries in the remote control.

They may need replacing.

•  Operate the remote control at a distance of no more than 20 feet.
•  Remove batteries and hold down one or more buttons for several minutes to

drain the microprocessor inside the remote control to reset it. Reinstall 
batteries and try to operate the remote control again.

•  Ensure that the disc is installed with the label side facing up.
•  Check the region number of the DVD.

•  5.1 channel sound is reproduced only when the following conditions are met. :

1) The DVD player is connected with the proper Amplifier
2) The disc is recorded with 5.1 channel sound.

•  Check whether the disc being played has the “5.1 ch” mark on the outside.
•  Check if your audio system is connected and working properly.
•  In a SETUP Menu, is the Audio Output set to Bitstream?

•  The features or action cannot be completed at this time because:
1. The DVD’s software restricts it.
2. The DVD’s software doesn’t support the feature (e.g., angles).
3. The feature is not available at the moment.
4. You’ve requested a title or chapter number or search time that is out of range.

•  Check if the disc has a Menu.

•  Some of the functions selected in the Setup Menu may not work properly if the

disc is not encoded with the corresponding function.

•  The Screen Ratio is fixed on your DVDs.

•  Make sure you have selected the correct Digital Output in the Audio Options

Menu.

•  Press the 

button (in front panel) for more than 5 seconds under no disc

inside. All settings  will revert to the factory settings.

•  Press the 

button (in front panel) for more than 5 seconds under no disc

inside. All settings including the password  will revert to the factory settings.
Don't use this unless absolutely necessary.

•  Go to the contents and find the section of the instruction book that contains

the explanations regarding the current problem, and follow the procedure once
again.

•  If the problem still cannot be solved, please contact your nearest authorized

service center.

•  Make sure that the disc is not dirty or scratched.

•  Clean the disc.

Action

Problem

Page

The picture is noisy or
distorted

P5

P8

P19

P48~49

P43~54

P50~52

P48~49

P20

P53

P4

C h a p t e r   6

R

E F E R E N C E

DVD_HD860_Eng2  2/10/06 5:53 PM  Page 55

Содержание DVD-HD860

Страница 1: ...DVD Player DVD HD860 www samsung com...

Страница 2: ...the provided plug does not fit into your outlet consult an electrician for replacement of the obsolete outlet 10 Protect the power cord from being walked on or pinched particularly at plugs convenienc...

Страница 3: ...rence to radio or television reception which can be determined by turning the equipment off and on The user is encouraged to try to correct the interference by one or more of the following measures Re...

Страница 4: ...n the player Be careful not to put your hand into the disc tray Do not place anything other than the disc in the disc tray Exterior interference such as lightning and static electricity can affect nor...

Страница 5: ...rectly 3 Replace the battery cover If the remote control doesn t operate properly Check the polarity of the batteries Dry Cell Check if the batteries are drained Check if remote control sensor is bloc...

Страница 6: ...er 4 Advanced Functions Adjusting the Aspect Ratio EZ View 28 Selecting the Audio Language 30 Selecting the Subtitle Language 31 Changing the Camera Angle 32 Using the Instant Replay Skip Function 33...

Страница 7: ...ayer to your TV Note Discs which cannot be played with this player DVD ROM DVD RAM CD ROM CDV CDI CVD Super Audio CD except CD layer CDGs play audio only not graphics Ability to play back may depend o...

Страница 8: ...o DVD contains excellent sound and video due to Dolby Digital and MPEG 2 system Various screen and audio functions can be easily selected through the on screen menu Disc Types Logos Recording Types Di...

Страница 9: ...en and close the disc tray 5 DISPLAY Operation indicators are displayed here 6 VIDEO SEL Press to change Video output mode Progressive ON or Progressive OFF 7 STOP Stops disc play 8 SKIP SEARCH Use to...

Страница 10: ...ut in Setup Menu must be set to S Video 6 HDMI OUT JACK Use the HDMI cable to connect this jack to the HDMI jack on your television for the best quality picture If an HDMI cable is connected to an HDM...

Страница 11: ...e switch 10 EZ VIEW Button The aspect ratio of a picture can easily be adjusted according to the screen size of your TV 16 9 or 4 3 11 DISC MENU Button Brings up the Disc menu 12 SUBTITLE Button 13 AU...

Страница 12: ...3 Press the input selector on your TV remote control until the Video signal from the DVD player appears on the TV screen Note Noise may be generated if the audio cable placed too close to the power c...

Страница 13: ...usly as they may interfere and degrade both video output quality If you set the HDMI output resolution 720p or 1080i Video S Video and component output cannot be used 1 Using an S Video cable not incl...

Страница 14: ...minals may vary depending on the TV set Please refer to the user s manual of your TV If you set the HDMI output resolution 720p or 1080i Video S Video and component output cannot be used 1 Using compo...

Страница 15: ...supports Progressive Scan If Progressive Scan is supported follow the TV User s Manual regarding Progressive Scan settings in the TV s menu system Depending on your TV the connection method may differ...

Страница 16: ...ut selector on your TV remote control until the HDMI signal from the DVD player appears on your TV screen HDMI VIDEO Specifications When you press the HDMI SEL button 480p 720p 1080i are selected in o...

Страница 17: ...on the screen Why does Samsung use HDMI Analog TVs require an analog video audio signal However when playing a DVD the data transmitted to a TV is digital Therefore either a digital to analog converte...

Страница 18: ...ect the AUDIO red and white OUT terminals on the rear of the DVD player to the AUDIO red and white IN terminals of the Amplifier 2 Using the video signal cable s connect the VIDEO S VIDEO COMPONENT or...

Страница 19: ...igital MPEG2 or DTS Amplifier 1 If using an optical cable not included connect the DIGITAL AUDIO OUT OPTICAL terminal on the rear of the DVD player to the DIGITAL AUDIO IN OPTICAL terminal of the Ampl...

Страница 20: ...e whenever you turn the power on or off Therefore make sure that you select the language you want to use Once you select a menu language you can change it by pressing the button on the front panel of...

Страница 21: ...the PLAY PAUSE button once again Note If the player is left for about 5 minutes in pause mode it will stop 7 Step Motion Play Except CD Press the STEP button on the remote control during play Each tim...

Страница 22: ...ction may be different from the actual playback speed No sound is hearing during search mode Except CD DVD CD 2X 4X 64X 128X 2X 4X 8X Skipping Tracks When playing a DVD if you press the SKIP button it...

Страница 23: ...button 2 Press the buttons to select the desired item 3 Press the buttons to make the desired setup and then press the ENTER button You may use the number buttons of the remote control to directly ac...

Страница 24: ...e on a DVD each movie will be identified Most DVD discs are recorded in chapters so that you can quickly find a specific passage similar to tracks on an audio CD Allows playback of the film from a des...

Страница 25: ...Menu Using the Function Menu Using the Function Menu DVD 1 Press the MENU button during playback 2 Press the buttons to select Function then press the or ENTER button Info See pages 23 to 24 Zoom See...

Страница 26: ...unction 1 Press the REPEAT button on the remote control 2 Press the button to select A B button 3 Press the ENTER button at the point where you want repeat play to start A B is automatically highlight...

Страница 27: ...repeat scenes containing sports dancing musical instruments being played etc so you can study them more closely When playing a DVD 1 During play press the PLAY PAUSE button 2 Press the SEARCH button t...

Страница 28: ...ill look vertically stretched Depending on a type of disc the black bars may not disappear completely Zoom Fit The top bottom left and right of the screen are cut off and the central portion of the sc...

Страница 29: ...off and a full screen appears The picture will look vertically stretched Zoom Fit The top bottom left and right of the screen are cut off and the central portion of the screen is enlarged For 4 3 asp...

Страница 30: ...tton is pressed repeatedly The audio languages are represented by abbreviations 2 To remove the AUDIO icon press the CANCEL or RETURN button ENG DOLBYDIGITAL 5 1CH AUDIO DVD Note This function depends...

Страница 31: ...nguages are represented by abbreviations 2 To remove the SUBTITLE icon press the CANCEL or RETURN button Note Depending on DVDs you have to change the desired subtitle in the Disc Menu Press the DISC...

Страница 32: ...control 2 Press the buttons to select Function then press the or ENTER button Info Zoom Bookmark Repeat EZ View Angle 3 Press the buttons to select Angle then press the or ENTER button Info Zoom Book...

Страница 33: ...ing this function Press the INSTANT REPLAY button The current scene moves backward about 10 seconds and plays back Using the Instant Skip function DVD Use this function to skip playback about 10 secon...

Страница 34: ...n the remote control 4 When you reach the scene you want to mark press the ENTER button Up to three scenes may be marked at a time Note Depending on a disc the Bookmark function may not work CANCEL In...

Страница 35: ...e 34 5 Press the PLAY PAUSE button to skip to the marked scene 4 Press the buttons to select a marked scene Clearing a Bookmark 1 3 The first 1 3 steps are the same as those for Using the Bookmark Fun...

Страница 36: ...ess the ENTER button During DVD play press ENTER to zoom in 2X 4X 2X Normal in order 1 During play press the MENU button on the remote control 2 Press the buttons to select Function then press the or...

Страница 37: ...REPEAT button Off Normal Playback Track Repeats the current track Folder Repeats the current folder Random Files in the disc will be played in random order MP3 file icon WMA file icon JPEG file icon C...

Страница 38: ...T button to change the playback mode There are four modes Off Track Folder and Random Off Normal Playback Track Repeats the current song file Folder Repeats the song files which have the same extensio...

Страница 39: ...rsely files with decompression rates below 128 Kbps will not be played properly Use a decompression transfer rate of at least 64Kbps when recording WMA files Sound quality with WMA files basically dep...

Страница 40: ...rt of the screen you want to zoom in on Press the ENTER button Each time the ENTER button is pressed the picture is enlarged up to 2X Slide Show The unit enters slide show mode Before beginning the Sl...

Страница 41: ...ctly not the clips menu Note Only available in PROGRESSIVE ON To make the setup menu disappear press the MENU button Note Depending on a file size the amount of time between each picture may be differ...

Страница 42: ...s in the pictures folder can be played Kodak Picture CD The JPEG files in the pictures folder can be played automatically Konica Picture CD If you want to see the Picture select the JPEG files in the...

Страница 43: ...Setup of the Parental Level Allows users to set the level necessary to prevent children from viewing unsuitable movies such as those with violence adult subject matter etc 1 With the unit in Stop mode...

Страница 44: ...buttons to select Player Menu then press the or ENTER button 5 Press the buttons to select the desired language then press the or ENTER button The language is selected and the screen returns to Langua...

Страница 45: ...turns to Language Setup menu To make the setup menu disappear press the MENU button 1 With the unit in Stop mode press the MENU button 2 Press the buttons to select Setup then press the or ENTER butto...

Страница 46: ...anguage Setup menu To make the setup menu disappear press the MENU button 1 With the unit in Stop mode press the MENU button 2 Press the buttons to select Setup then press the or ENTER button 3 Press...

Страница 47: ...age setting The language is selected and the screen returns to setup menu To make the setup menu disappear press the MENU button 1 With the unit in Stop mode press the MENU button 2 Press the buttons...

Страница 48: ...he buttons to select the desired item then press the or ENTER button 1 With the unit in Stop mode press the MENU button 2 Press the buttons to select Setup then press the or ENTER button Setup Languag...

Страница 49: ...puts Dolby Digital via digital output Select Bitstream when connecting to a Dolby Digital Decoder DTS Select On when connecting to DTS Decoder On Outputs DTS Bitstream via digital output Off Doesn t o...

Страница 50: ...d item then press the or ENTER button 1 With the unit in Stop mode press the MENU button 2 Press the buttons to select Setup then press the or ENTER button Setup Language Setup Audio Setup Display Set...

Страница 51: ...setting is used when the unit is connected by HDMI to Display devices TV Projector etc Resolution Setting Auto Resolution setting automatically Manual Resolution setting manually Resolution 480p 720 x...

Страница 52: ...ector For details see the user s manual of your TV or projector When the resolution is changed during playback it may take a few seconds for a normal image to appear If you set the HDMI output resolut...

Страница 53: ...e MENU button 2 Press the buttons to select Setup then press the or ENTER button Setup Language Setup Audio Setup Display Setup Parental Setup Setup Language Setup Audio Setup Display Setup Parental S...

Страница 54: ...buttons to select Setup then press the or ENTER button Setup Language Setup Audio Setup Display Setup Parental Setup Setup Language Setup Audio Setup Display Setup Parental Setup Note If you have forg...

Страница 55: ...n a SETUP Menu is the Audio Output set to Bitstream The features or action cannot be completed at this time because 1 The DVD s software restricts it 2 The DVD s software doesn t support the feature e...

Страница 56: ...80p 720p 1080i DVD player If snow noise appears on the screen it means that TV does not support HDCP High bandwidth Digital Content Protection Check your TV system setup correctly The screen Judder ph...

Страница 57: ...9 4 06 m sec Approx Play Time Single Sided Single Layer Disc 135 min Reading Speed 4 8 5 6 m sec Maximum Play Time 74 min Reading Speed 4 8 5 6 m sec Maximum Play Time 20 min 1 channel 1 0 Vp p 75 loa...

Страница 58: ...MEMO...

Страница 59: ...MEMO...

Страница 60: ...MEMO...

Страница 61: ...MEMO...

Страница 62: ...fi FRANCE 08 25 08 65 65 0 15 Min www samsung com fr GERMANY 01805 121213 0 12 Min www samsung de HUNGARY 06 40 985 985 www samsung com hu ITALIA 199 153 153 www samsung com it LUXEMBURG 02 261 03 710...

Страница 63: ...purchaser must contact SAMSUNG for problem determination and service procedures SAM SUNG does not warrant uninterrupted or error free operation of the product All replaced parts and products become th...

Страница 64: ...y questions or comments relating to Samsung products please contact the SAMSUNG customer care centre 1 800 SAMSUNG 7267864 www samsung com Samsung Electronics America Inc 105 Challenger Road Ridgefiel...

Отзывы: