background image

FRA-38

F

O N C T I O N S

A

VA N C E E S

Menu Clips pour MP3/WMA/JPEG

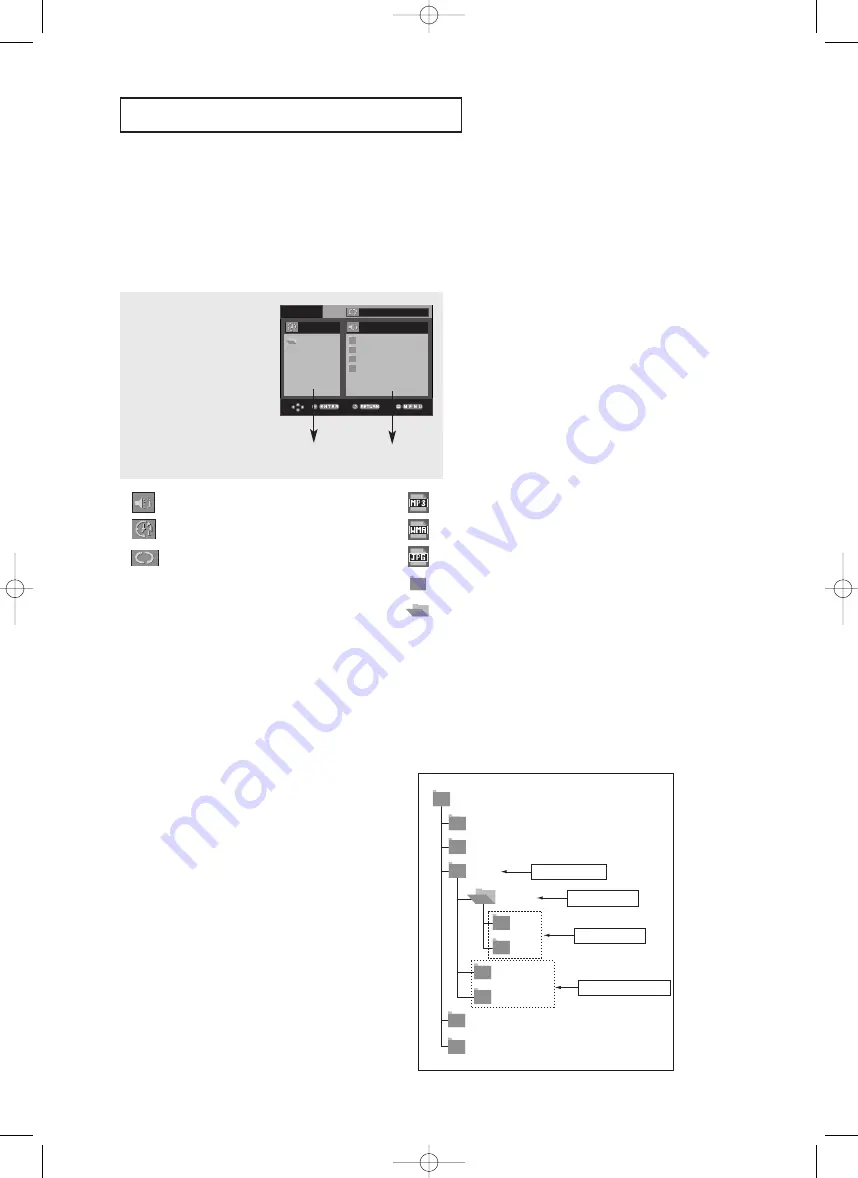
Les disques au format MP3/WMA/JPEG contiennent des chansons et/ou des images qui
peuvent être classées dans des dossiers comme indiqué ci-dessous. La méthode est
similaire à celle qui vous permet de placer des fichiers dans différents dossiers sur votre
ordinateur.

Ouvrez le tiroir de disques.
Placez le disque sur le
plateau.
Fermez le tiroir.
Le tiroir se ferme et cet
écran s’affiche.

O f f

R O O T

W M A

J P E G

M P 3

R O O T

Dossier Parent, Dossier Actuel et

Dossiers Homologues

Dossiers et Fichiers

dans le dossier actuel

-

: Nom du fichier en cours de lecture.

-

: Durée de lecture actuelle.

-

: Mode de lecture actuelle : Il y a 4 modes,

activés grâce à la touche REPEAT.

- Non : Lecture normale
- Plage : Répétition de la piste actuelle.
- Folder : Répétition du dossier actuel.
- Aléatoire : Les fichiers du disque sont lus

dans un ordre aléatoire.

: Icône d’un fichier MP3.

-

: Icône d’un fichier WMA.

-

: Icône d’un fichier JPEG.

-

: Icône d’un dossier.

-

: Icône du dossier actuel.

- Dossier Parent

Appuyez sur la touche 

RETURN

pour accéder au

dossier Parent ou utilisez les touches 

/

pour

sélectionner “..” et appuyez sur 

ENTER

pour accéder

au dossier Parent.

- Dossier Homologue

Appuyez sur les boutons 

œ

/

pour mettre en

surbrillance la fenêtre de gauche.
Appuyez sur les boutons 

/

pour sélectionner le

dossier souhaité, puis appuyez sur 

ENTER

.

- Sous-Dossier

Appuyez sur les boutons 

œ

/

pour mettre en

surbrillance la fenêtre de droite.
Appuyez sur les boutons 

/

pour sélectionner le

dossier souhaité, puis appuyez sur 

ENTER

.

Modifier un Dossier

Le dossier ne peut être modifié qu’en mode Stop.

R o o t

W M A

J P E G

M P 3

S O N G   F I L E   3

M P E G 4   F I L E S

M U S I C

S O N G   F I L E   1

S O N G   F I L E   2

1 s t

2 n d

P a r e n t   F o l d e r

C u r r e n t   F o l d e r

S u b - F o l d e r s

P e e r   F o l d e r s

Root

WMA

JPEG

MP3

MUSIC

SONG FILE 1

SONG FILE 2

SONG FILE 3

MPEG4 FILES

1st

2nd

Dossler Parent 

Dossler actuel

Sous-dossiers

Dossiers Collègues 

AK68-00627E-00_FRA2  1/25/05  5:36 PM  Page 38

Содержание DVD-HD850

Страница 1: ...Lecteur DVD DVD HD850 CA CA AK68 00627E 00 www samsung ca AK68 00627E 00_Cover_Fra 1 25 05 10 44 AM Page 1 ...

Страница 2: ...avec mise à la masse sont prévues par mesure de sécurité Si la fiche fournie ne convient pas à la prise murale consultez un électricien et faites remplacer la prise 10 Protégez le cordon d alimentation Placez le de telle sorte qu on ne puisse pas marcher dessus ni l écraser Prenez grand soin du cordon en particulier au niveau de la fiche de la prise murale et à la sortie de l appareil 11 N utilise...

Страница 3: ...ation de cet appareil ATTENTION Le lecteur DVD utilise un rayonnement laser visible qui peut provoquer des lésions en cas d exposition aux radiations dangereuses Assurez vous de respecter correctement les instructions pour manipuler le lecteur ATTENTION Attention Pour éviter les chocs électriques introduisez complètement et correctement la fiche mâle dans la prise secteur Pour prévenir une interfé...

Страница 4: ...ou décoder des fichiers audio conformément aux normes ISO IEC 11172 3 ou ISO IEC 13818 3 Aucun droit n est accordé par cette licence concernant des fonctions ou des caractéristiques du produit non conformes aux normes ISO IEC 11172 3 ou ISO IEC 13818 3 Attention Avant de connecter d autres éléments au lecteur assurez vous que tout est débranché Ne déplacez pas le lecteur pendant qu il est en march...

Страница 5: ...indiquée 3 Refermez le couvercle du compartiment Si la télécommande ne fonctionne pas Vérifiez la polarité des piles Vérifiez l état d usure des piles Vérifiez que le capteur de la télécommande n est pas obstrué Vérifiez l absence de lumière fluorescente à proximité Avant de commencer Accessoires Télécommande Piles pour la télécommande AAA Mode d emploi Câble de connexion Vidéo Audio Cinch Câble H...

Страница 6: ...ctions Avancees Réglage du rapport d aspect hauteur largeur de l écran EZ View 30 Sélection de la langue d écoute 32 Sélection de la langue des psous titres 33 Sélection de l angle de prise pde vue à l écran 34 Fonction Instant Replay Skip 34 Utilisation des repères 35 Utilisation des fonctions avancées 37 Menu Clips pour MP3 WMA JPEG 38 Modifier un Dossier 38 Lecture de MP3 WMA 39 Lecture de CD i...

Страница 7: ... faire avancer la lecture de 10 secondes HDMI High Definition Multimedia Interface HDMI diminue le bruit d image en permettant un cheminement pur du signal vidéo audio numérique entre le lecteur et votre TV Remarque Disques ne pouvant être lus par ce lecteur DVD ROM DVD RAM CD ROM CDV CDI CVD Super Audio CD sauf couche CD Disques CDG uniquement lecture audio sans les graphiques La capacité de lect...

Страница 8: ...o et vidéo Les fonctions vidéo et audio peuvent être facilement sélectionnées sur le menu à l écran Type de disque Type d enregistrement Taille des disques Durée maximale de lecture Caractéristiques DVD 5 31 2 74 min 20 min Audio Vidéo Qualité vidéo identique au système VHS avec un son de la qualité d un CD audio et une technologie de compression MPEG1 VIDEO CD 5 31 2 74 min 20 min Audio Les disqu...

Страница 9: ...vision 16 9 ou 4 3 6 Touche STOP Pour arrêter la lecture du disque 7 Récepteur de la télécommande 8 Touche SKIP SEARCH Permet une recherche avant Utilisez pour sauter un titre chapitre ou piste 9 SKIP SEARCH Permet une recherche arrière Utilisez pour sauter un titre chapitre ou piste 10 Touche PLAY PAUSE Pour démarrer ou arrêter temporairement la lecture du disque 1 8 7 9 10 2 3 4 5 6 Afficheur 1 ...

Страница 10: ...ette prise à la prise HDMI ou DVI de votre téléviseur pour augmenter la qualité de l image Si le câble HDMI est branché sur un téléviseur doté d une sortie HDMI le mode HDMI s active automatiquement au bout de 10 secondes Si vous souhaitez utiliser les sorties Video S Video ou Component débranchez le câble HDMI Remarque Référez vous au manuel de l utilisateur de votre récepteur pour savoir si votr...

Страница 11: ... le menu ou l affichage à l écran 19 Touche INSTANT SKIP Cette fonction vous permet d effectuer des sauts de pistes pour faire avancer la lecture de 10 secondes 20 Touche INSTANT REPLAY Cette fonction est utilisée pour une relecture des 10 secondes précédant la scène du film en cours 21 Touches CH Cette touche permet de sélectionner les chaînes 22 Touche OPEN CLOSE Pour ouvrir et fermer le tiroir ...

Страница 12: ...seur jusqu à ce que le signal vidéo du lecteur DVD apparaisse à l écran Remarque Un bruit peut se faire entendre si le câble audio est trop proche du cordon d alimentation Si vous souhaitez relier l appareil à un amplificateur reportez vous à la rubrique Raccordement d un amplificateur voir pp 18 19 Le nombre et l implantation des prises peuvent varier en fonction de votre téléviseur Veuillez vous...

Страница 13: ...er au manuel d utilisation de celui ci pour plus de détails 1 Munissez vous d un câble S Video non fourni pour raccorder la sortie S VIDEO OUT située à l arrière du lecteur DVD à l entrée S VIDEO IN de votre téléviseur 2 A l aide des câbles audio raccordez les sorties AUDIO OUT rouge et blanche situées à l arrière du lecteur DVD aux entrées AUDIO IN rouge et blanche de votre téléviseur Allumez le ...

Страница 14: ...re et l implantation des prises peuvent varier en fonction de votre téléviseur Veuillez vous reporter au manuel d utilisation de celui ci pour plus de détails 1 À l aide de câbles de composant vidéo non compris raccordez les prises COMPONENT VIDEO OUT situées à l arrière du lecteur DVD aux prises COMPONENT IN de votre téléviseur 2 A l aide des câbles audio raccordez les sorties AUDIO OUT rouge et ...

Страница 15: ...du téléviseur relatives aux réglages du balayage progressif dans les menus du téléviseur En fonction du modèle de votre téléviseur le branchement peut différer de celui représenté sur le schéma ci dessus 2 A l aide des câbles audio raccordez les sorties AUDIO OUT rouge et blanche situées à l arrière du lecteur DVD aux entrées AUDIO IN rouge et blanche de votre téléviseur Allumez le lecteur DVD et ...

Страница 16: ...léviseur 2 Appuyez sur le sélecteur d entrée de la télécommande de votre téléviseur jusqu à ce que le signal HDMI du lecteur DVD apparaisse à l écran Spécifications Vidéo HDMI Si vous possédez un téléviseur NTSC et que vous appuyiez plusieurs fois sur le bouton HDMI SEL la résolution change dans l ordre suivant 480p 720p 768p et 1080i Le premier appui sur le touche HDMI SEL permet d afficher la ré...

Страница 17: ...ogiques nécessitent un signal vidéo audio analogique Cependant les données transmises à la TV lors de la lecture d un DVD sont numériques De ce fait un convertisseur numérique vers analogique sur le lecteur dvd ou un convertisseur analogique vers numérique sur la TV est nécessaire Pendant cette conversion la qualité d image se dégrade à cause du bruit ou de la perte du signal DVI est une technolog...

Страница 18: ...s audio raccordez les sorties AUDIO OUT rouge et blanche situées à l arrière du lecteur DVD aux entrées AUDIO IN rouge et blanche de votre téléviseur 2 À l aide du ou des câble s vidéo raccordez les prises VIDEO S VIDEO COMPONENT ou HDMI OUT situées à l arrière du lecteur DVD à la prise VIDEO S VIDEO COMPONENT ou DVI IN de votre téléviseur de la façon décrite aux pages 12 à 16 3 Allumez le lecteur...

Страница 19: ...cateur Dolby digital MPEG2 ou DTS 1 Si vous utilisez un câble optique non fourni raccordez la sortie DIGITAL AUDIO OUT OPTICAL située à l arrière du lecteur DVD à l entrée DIGITAL AUDIO IN OPTICAL de votre amplificateur Si vous utilisez un câble coaxial non fourni raccordez la sortie DIGITAL AUDIO OUT COAXIAL située à l arrière du lecteur DVD à l entrée DIGITAL AUDIO IN COAXIAL de votre amplificat...

Страница 20: ...ns la modifier en appuyant sur le bouton situé en façade de l appareil pendant plus de cinq secondes aucun disque n étant chargé L écran SELECT MENU LANGUAGE SELECTION DE LA LANGUE D AFFICHAGE réapparaît afin que vous puissiez activer la langue de votre choix Lecture 1 Appuyez sur la touche OPEN CLOSE Le voyant STANDBY s éteint et le tiroir à disque s ouvre 2 Placez le disque avec soin sur le tiro...

Страница 21: ...laissez le lecteur en pause l appareil se met en position arrêt après 5 minutes 7 Lecture pas à pas Sauf CD Tournez la molette Jog dans le sens horaire ou appuyez sur la touche STEP incrément sur la télécommande durant la lecture A chaque pression sur la touche une image vient remplacer la précédente En mode STEP le son est coupé Appuyez sur PLAY PAUSE pour retourner au mode normal La lecture imag...

Страница 22: ...cture d un DVD vous passerez au chapitre suivant Si vous appuyez sur SKIP vous retournerez au début du chapitre En appuyant de nouveau sur la touche vous passerez au début du chapitre précédent Lors de la lecture d un VCD version 2 0 mode MENU Non d un VCD version 1 1 ou d un Super Audio CD DVD AUDIO ou CD si vous appuyez sur SKIP vous passerez à la plage suivante Si vous appuyez sur SKIP vous ret...

Страница 23: ...ons œ pour effectuer le réglage souhaité et appuyez sur ENTER Vous pouvez vous servir des touches numériques de la télécommande pour accéder directement à un titre à un chapitre ou pour démarrer la lecture à l heure souhaitée Title Time Audio Chapter Subtitle 01 02 0 00 13 ENG 5 1CH Off DVD DVD VCD Track Time 01 0 00 48 VCD CD Track Time 01 0 00 48 CD Cette fonction n est utilisable qu en format V...

Страница 24: ...ndiquer l heure de début comme référence La fonction de recherche temporelle n est pas compatible avec certains disques Indique la langue de la piste sonore du film Dans l exemple la piste sonore en lecture en mode 5 1CH est en anglais Un disque DVD peut comporter un maximum de huit pistes sonores Indique la langue des sous titres sur le disque Vous pouvez choisir cette langue ou si vous le préfér...

Страница 25: ...ISC MENU de la télécommande En format VCD 2 0 le bouton DISC MENU sert à sélectionner le mode Menu On Menu activé ou Menu Off Menu désactivé Utilisation du menu Titres DVD 1 Lors de la lecture d un disque DVD appuyez sur la touche MENU de la télécommande 2 Utilisez les boutons pour sélectionner Title Menu puis appuyez sur ou sur ENTER Remarque Le menu Titres peut ne pas être compatible avec certai...

Страница 26: ...ilisez les boutons pour sélectionner Function puis appuyez sur ou sur ENTER Info voir pp 23 24 Zoom voir pp 37 Signet voir pp 35 36 Répétition voir pp 27 28 EZ View voir pp 30 31 Vous pouvez également sélectionner directement les parties de ces fonctions en utilisant les touches correspondantes de la télécommande 3 Utilisez les boutons pour sélectionner l une des cinq fonctions Ensuite appuyez sur...

Страница 27: ...EPEAT A B à l instant A où vous souhaitez faire démarrer la lecture répétée B s affiche automatiquement en surbrillance 2 Appuyez sur le bouton REPEAT A B à l instant B où la lecture répétée doit s arrêter Pour repasser en lecture normale appuyez sur le bouton CLEAR Remarque La fonction A B REPEAT ne vous permet pas de choisir un instant B étant postérieur à l instant A de moins de cinq secondes 3...

Страница 28: ...tée A B réglez d abord l instant A puis l instant B en respectant le délai minimal entre les deux instants associé à la vitesse de lecture sélectionnée Ces délais sont les suivants 1 8 de la vitesse normale 40 secondes 1 4 de la vitesse normale 20 secondes 1 2 de la vitesse normale 10 secondes Fonction A B Repeat 1 Pendant la relecture au ralenti appuyez sur le bouton REPEAT A B à l instant A où v...

Страница 29: ...jouter à la programmation Appuyez sur la touche ENTER La sélection des chiffres apparaît dans la boîte Program Order commande du programme Appuyez sur le bouton RETURN pour revenir au menu précédent Pour effacer l ordre de programmation sélectionné appuyez sur le bouton CLEAR Cet appareil supporte jusqu à 20 plages Remarque Sur certains disques les fonctions Program programme et Random Play lectur...

Страница 30: ...e cas de certains disques il se peut que les bandes noires ne disparaissent pas complètement Elargissement Les extrémités et les parties supérieure et inférieure de l écran sont amputées alors que la partie centrale de l écran s agrandit Les disques au rapport d aspect 4 3 Format Large Affichage du DVD au rapport 16 9 L image s étire verticalement Ajustement à l écran Des bandes noires cachent les...

Страница 31: ...sement Les extrémités et les parties supérieure et inférieure de l écran sont amputées alors que la partie centrale de l écran s agrandit Les disques au rapport d aspect 4 3 Format Classique Le contenu des DVD s affiche au rapport 4 3 SCREEN FIT Des bandes noires cachent les parties supérieure et inférieure de l écran L image remplit l espace entre les deux bandes et a l apparence étirée à la vert...

Страница 32: ...our retirer l icône AUDIO appuyez sur le bouton CLEAR ou RETURN ENG DOLBYDIGITAL 5 1CH AUDIO DVD Au cours de la lecture d un VCD ou d un CD vous pouvez sélectionner Stereo Right ou Left Stereo AUDIO VCD CD Remarque Cette fonction varie en fonction des langues audio présentes sur le disque et peut ne pas fonctionner Un disque DVD peut proposer jusqu à 8 langues d écoute Pour bénéficier de la même l...

Страница 33: ...iquées en abrégé 2 Pour retirer l icône SUBTITLE appuyez sur le bouton CLEAR ou RETURN Remarque Selon les DVD vous devez modifier le sous titre souhaité dans le Disc Menu menu Disque Appuyez sur le bouton DISC MENU La possibilité d utiliser cette fonction dépend de la langue enregistrée sur le disque Un disque DVD peut proposer jusqu à 32 langues Pour bénéficier de la même langue de sous titre à c...

Страница 34: ...ette fonction ne fonctionne pas Les disques ayant cette caractéristique sont cependant très rares 4 6 ANGLE Fonction Instant Replay Skip Utilisation de la fonction Lecture instantanée Instant Replay DVD Si vous avez manqué une scène cette fonction vous permet de la visionner une nouvelle fois Appuyez sur la touche INSTANT REPLAY La scène en cours retourne en arrière d environ 10 secondes pour rele...

Страница 35: ...ner Signet puis appuyez sur ou sur ENTER 2 Lorsque vous avez trouvé la séquence que vous voulez repérer appuyez sur la touche ENTER Vous pouvez marquer simultanément jusqu à trois scènes différentes Remarque Cette fonction n est utilisable qu en format VCD 2 0 mode Menu Off Menu désactivé Sélectionnez Menu Off Menu désactivé en appuyant sur la touche DISC MENU Avec certains disques cette fonction ...

Страница 36: ...équence marquée 2 Appuyez sur les boutons œ pour sélectionner une scène marquée Suppression d un repère 1 Pendant la lecture appuyez sur la touche BOOKMARK 3 Appuyez sur la touche CLEAR pour effacer le numéro du signet 2 Appuyez sur les boutons œ pour sélectionner le numéro du signet à supprimer 1 2 3 1 2 3 AK68 00627E 00_FRA2 1 25 05 5 36 PM Page 36 ...

Страница 37: ...e de l écran sur laquelle vous souhaitez effectuer un zoom avant Appuyez sur ENTER Pendant la lecture d un DVD zoomez à 2X 4X 2X par une simple pression sur la touche ENTER Pendant la lecture d un VCD vous pouvez zoomer uniquement à 2X Utilisez les boutons pour sélectionner Function puis appuyez sur ou sur ENTER Info Zoom Signet Répétition EZ View Info Zoom Signet Répétition EZ View Remarque Cette...

Страница 38: ... dans un ordre aléatoire Icône d un fichier MP3 Icône d un fichier WMA Icône d un fichier JPEG Icône d un dossier Icône du dossier actuel Dossier Parent Appuyez sur la touche RETURN pour accéder au dossier Parent ou utilisez les touches pour sélectionner et appuyez sur ENTER pour accéder au dossier Parent Dossier Homologue Appuyez sur les boutons œ pour mettre en surbrillance la fenêtre de gauche ...

Страница 39: ...e REPEAT pour modifier le mode de lecture Il y a quatre modes Non Plage Folder et Aléatoire Non Lecture normale Plage Répétition du fichier musical actuel Folder Répétition des fichiers musicaux ayant la même extension dans le dossier actuel Aléatoire Les fichiers musicaux ayant la même extension sur le disque sont lus dans un ordre aléatoire Pour reprendre la lecture normale appuyez sur la touche...

Страница 40: ...ant des fréquences d échantillonnage inférieures à 128 Kbps ne seront pas correctement lus Utilisez un taux de compression d au moins 64 Kpbs pour l enregistrement des fichiers WMA La qualité sonore des fichiers WMA dépend principalement du taux de compression ou de décompression choisi L obtention d un CD audio de bonne qualité sonore nécessite une fréquence d échantillonnage analogique numérique...

Страница 41: ...d une montre Zoom Appuyez sur les boutons ou œ pour sélectionner la partie de l écran sur laquelle vous souhaitez effectuer un zoom avant À chaque pression sur la touche ENTER l image agrandit jusqu à 4X 2X 4X 2X Taille normale Diaporama L unité passe au mode Diaporama Avant de commencer la lecture en mode Diaporama vous devez régler l intervalle d affichage des photos Appuyez sur les touches œ po...

Страница 42: ...CD possède une capacité de stockage maximale de 3000 images Nous vous recommandons les CD Kodak Picture Sur les CD photos de Kodak seuls les fichiers JPEG dans le dossier des images peuvent être lus CD d images Kodak Les fichiers JPEG dans le dossier images peuvent être lus automatiquement CD d images Konica Si vous souhaitez voir l image sélectionnez les fichiers JPEG dans le menu clips CD d imag...

Страница 43: ... utilisateurs de définir le seuil au delà duquel ils désirent interdire à leurs enfants de regarder certains films comprenant des scènes de violence ou réservés aux adultes etc 1 L unité étant en mode Stop arrêt appuyez sur la touche MENU de la télécommande Utilisez les boutons pour sélectionner Setup puis appuyez sur ou sur ENTER 2 Appuyez sur les boutons pour accéder aux différentes fonctionnali...

Страница 44: ... Utilisez les boutons pour sélectionner Menus du lecteur puis appuyez sur ou sur ENTER 5 Appuyez sur les boutons pour sélectionner la langue souhaitée puis appuyez sur le bouton ou sur ENTER La langue est sélectionnée et l écran revient au menu d installation Pour faire disparaître le menu de configuration appuyez sur le bouton MENU Setup Réglage de la langue Options Audio Options D affichage Cont...

Страница 45: ...ngue est sélectionnée et l écran revient au menu d installation Pour faire disparaître le menu de configuration appuyez sur le bouton MENU 1 L unité étant en mode Stop arrêt appuyez sur la touche MENU 2 Utilisez les boutons pour sélectionner Setup puis appuyez sur ou sur ENTER 3 Utilisez les boutons pour sélectionner Réglage de la langue puis appuyez sur ou sur ENTER Setup Réglage de la langue Opt...

Страница 46: ...onnée et l écran revient au menu d installation Pour faire disparaître le menu de configuration appuyez sur le bouton MENU 1 L unité étant en mode Stop arrêt appuyez sur la touche MENU 2 Utilisez les boutons pour sélectionner Setup puis appuyez sur ou sur ENTER 3 Utilisez les boutons pour sélectionner Réglage de la langue puis appuyez sur ou sur ENTER Setup Réglage de la langue Options Audio Optio...

Страница 47: ...t pas enregistrée sur le disque le système sélectionne la langue d origine préenregistrée La langue est sélectionnée et l écran revient au menu d installation Pour faire disparaître le menu de configuration appuyez sur le bouton MENU 1 L unité étant en mode Stop arrêt appuyez sur la touche MENU 2 Utilisez les boutons pour sélectionner Setup puis appuyez sur ou sur ENTER 3 Utilisez les boutons pour...

Страница 48: ...ment souhaité puis appuyez sur le bouton ou ENTER 1 L unité étant en mode Stop arrêt appuyez sur la touche MENU 2 Utilisez les boutons pour sélectionner Setup puis appuyez sur ou sur ENTER Setup Réglage de la langue Options Audio Options D affichage Cont Parental Setup Réglage de la langue Options Audio Options D affichage Cont Parental Dolby DTS Digital Out PCM Compression Dynamique Oui Echantill...

Страница 49: ...gital ou du Train de bit DTS via une sortie numérique Sélectionnez Train de bits lors de la connexion au Dolby digital ou au Décodeur DTS Remarque Il n y a pas de sortie audio analogique lorsque vous lisez un son DTS Compression Dynamique Oui Réduit la dynamique sonore Non Conserve la dynamique standard ˇ Echantillonnage PCM Oui A sélectionner lorsque l amplificateur connecté au lecteur n est pas ...

Страница 50: ...ENTER 1 L unité étant en mode Stop arrêt appuyez sur la touche MENU 2 Utilisez les boutons pour sélectionner Setup puis appuyez sur ou sur ENTER Setup Réglage de la langue Options Audio Options D affichage Cont Parental Setup Réglage de la langue Options Audio Options D affichage Cont Parental Format écran Large Mode arrêt sur image Auto Messages écran Oui Niveau des Noirs Oui Sortie Vidéo COMPOSI...

Страница 51: ...s qu en mode Auto ˇ Messages Écran Utilisez cette fonction pour activer ou supprimer l affichage des messages à l écran Niveau des Noirs Règle la luminosité de l écran Non Arrêt ou Oui Marche N est pas disponible en mode Progressif ˆ Sortie Vidéo Sélectionnez la sortie vidéo COMPOSITE S VIDEO A sélectionner lorsque vous souhaitez utiliser la sortie Vidéo et S Vidéo Component I SCAN A sélectionner ...

Страница 52: ...us pouvez utiliser cette fonction pour configurer la luminosité de la sortie HDMI COMPONENT P SCAN Sortie DVI Vous pouvez utiliser cette fonction au format de sortie DVI Cette fonction corrige un écran TV incliné en assurant une visualisation normale Si la sortie HDMI ou DVI n est pas réglée correctement l écran peut être déformé Affichage en mode Balayage progressif Reportez vous au manuel d util...

Страница 53: ...asse s affiche alors 5 Composez un code secret Le menu Confirmer le Nouveau Code Secret s affiche à l écran pour la confirmation du code Composez de nouveau le même code Vous pouvez voir que le lecteur est verrouillé 1 L unité étant en mode Stop arrêt appuyez sur la touche MENU 2 Utilisez les boutons pour sélectionner Setup puis appuyez sur ou sur ENTER Setup Réglage de la langue Options Audio Opt...

Страница 54: ...ner le Niveau de contrôle souhaité puis appuyez sur le bouton ou ENTER Ex Configuration du niveau 6 1 L unité étant en mode Stop arrêt appuyez sur la touche MENU 2 Utilisez les boutons pour sélectionner Setup puis appuyez sur ou sur ENTER Setup Réglage de la langue Options Audio Options D affichage Cont Parental Setup Réglage de la langue Options Audio Options D affichage Cont Parental Utiliser le...

Страница 55: ...he MENU 2 Utilisez les boutons pour sélectionner Setup puis appuyez sur ou sur ENTER Remarque Si vous avez oublié votre mot de passe reportez vous à la rubrique Mot de passe oublié dans le Guide de dépannage Problèmes et solutions Setup Réglage de la langue Options Audio Options D affichage Cont Parental Setup Réglage de la langue Options Audio Options D affichage Cont Parental MODIFICATION DU COD...

Страница 56: ... 06 SELECO 74 SHARP 36 37 38 39 48 SIEMENS 71 SINGER 57 SINUDYNE 57 SONY 35 48 TELEAVA 73 TELEFUNKEN 67 73 75 76 THOMSON 72 73 75 THOMSON ASIA 80 81 TOSHIBA 47 48 49 50 51 52 WEGA 57 YOKO 06 ZENITH 63 Codes des téléviseurs Chapitre 6 FICHE TECHNIQUE 1 Allumez le téléviseur 2 Orientez la télécommande du lecteur DVD vers le téléviseur 3 En gardant la touche TV POWER enfoncée composez le code de la m...

Страница 57: ...glée sur Bitstream Impossible de terminer les options ou l action en cours car 1 Le logiciel du DVD s y oppose 2 Le logiciel du DVD n accepte pas cette option ex pas de multi angles 3 L option n est pas disponible à cet instant 4 Vous avez demandé un titre ou un chapitre ou cherché une durée ne correspondant pas aux données Vérifiez si le disque possède un Menu Certaines fonctions sélectionnées da...

Страница 58: ...eige à l écran cela veut dire que le téléviseur n est pas compatible au HDCP High bandwidth Digital Content Protection Vérifiez que l installation de votre téléviseur est correcte Le phénomène de vibrations de l écran peut se produire lorsque la fréquence de l image passe de 50Hz à 60Hz pour une sortie 720P 1080i HDMI Interface Multimédia Haute Définition Référez vous au manuel de l utilisateur de...

Страница 59: ...5 18 37 pi sec Durée maximale de lecture 74 min Vitesse de lecture 15 75 18 37 pi sec Durée maximale de lecture 20 min Vitesse de lecture 15 75 18 37 pi sec Durée maximale de lecture 74 min Vidéo Audio 1 canaux 1 0 Vcc impédance de75 Ω Y 1 0 Vcc impédance de 75 Ω Pr 0 70 Vcc impédance de 75 Ω Pb 0 70 Vcc impédance de 75 Ω Signal de luminescence 1 0 Vcc impédance de 75Ω Signal de chrominance 0 286 ...

Страница 60: ...FRA 60 MEMO AK68 00627E 00_FRA2 1 25 05 5 36 PM Page 60 ...

Страница 61: ...FRA 61 MEMO Fiche Technique AK68 00627E 00_FRA2 1 25 05 5 36 PM Page 61 ...

Страница 62: ...FRA 62 MEMO AK68 00627E 00_FRA2 1 25 05 5 36 PM Page 62 ...

Страница 63: ...où il fait la demande d une réparation sous garantie Cette garantie ne couvre pas les dommages causés par un accident un incendie une inondation un cas de force majeure un mauvais usage ou une tension incorrecte La garantie ne couvre pas une mauvaise installation une mauvaise réparation une réparation non autorisée et tout usage commercial ou dommages survenus durant le transport Le fini extérieur...

Страница 64: ...DVD Player DVD HD850 CA CA AK68 00627E 00 www samsung ca AK68 00627E 00_Cover_Eng 1 25 05 10 42 AM Page 1 ...

Страница 65: ...s not fit into your outlet consult an electrician for replacement of the obsolete outlet 10 Protect the power cord from being walked on or pinched particularly at plugs convenience receptacles and the point where they exit from the apparatus 11 Only use attachments accessories specified by the manufacturer 12 Use only with cart stand tripod bracket or table specified by the manufacturer or sold wi...

Страница 66: ...uipment To prevent electromagnetic interference with electric appliances such as radios and televisions use shielded cables and connectors for connections FCC NOTE for U S A This equipment has been tested and found to comply with the limits for a Class B digital device pursuant to Part 15 of the FCC rules These limits are designed to provide reasonable protection against harmful interference in a ...

Страница 67: ...d or decode audio files conforming to the ISO IEC 11172 3 or ISO IEC 13818 3 No rights are granted under this license for product features or functions that do not conform to the ISO IEC 11172 3 or ISO IEC 13818 3 Handling Cautions Before connecting other components to this player be sure to turn them all off Do not move the player while a disc is being played or the disc may be scratched or broke...

Страница 68: ...ry cover If the remote control doesn t operate properly Check the polarity of the batteries Dry Cell Check if the batteries are drained Check if remote control sensor is blocked by obstacles Check if there is any fluorescent lighting nearby Before you start Accessories Remote Control Batteries for Remote Control AAA Size User s Manual Video Audio Cable HDMI Cable AK68 00627E 00_Eng1 1 25 05 12 39 ...

Страница 69: ...Advanced Functions Adjusting the Aspect Ratio EZ View 30 Selecting the Audio Language 32 Selecting the Subtitle Language 33 Changing the Camera Angle 34 Using the Instant Replay Skip Function 34 Using the Bookmark Function 35 Using the Zoom Function 37 Clips Menu for MP3 WMA JPEG 38 Folder Selection 38 MP3 WMA Playback 39 Picture CD Playback 41 Chapter 5 Changing Setup Menu Using the Setup Menu 43...

Страница 70: ...from the player to your TV Note Discs which cannot be played with this player DVD ROM DVD RAM CD ROM CDV CDI CVD Super Audio CD except CD layer CDGs play audio only not graphics Ability to play back may depend on recording conditions DVD R R CD RW DVD RW RW V mode The unit may not play certain CD R CD RW and DVD R due to the disc type or recording conditions COPY PROTECTION Many DVD discs are enco...

Страница 71: ...stem Various screen and audio functions can be easily selected through the on screen menu Disc Types Logos Recording Types Disc Size Max Playing Time Characteristics DVD 12 Cm 8 Cm 74 min 20 min Audio Video Video with CD sound VHS quality MPEG 1 compression technology VIDEO CD 12 Cm 8 Cm 74 min 20 min Audio CD is recorded as a Digital Signal with better audio quality less distortion and less deter...

Страница 72: ... aspect ratio of a picture can easily be adjusted to your TV s screen size 16 9 or 4 3 6 STOP Stops disc play 7 REMOTE CONTROL RECEIVER 8 SKIP SEARCH Use to forward skip a scene or music 9 SKIP SEARCH Use to reverse skip a scene or music 10 PLAY PAUSE Begin or pause disc play 1 8 7 9 10 2 3 4 5 6 Front Panel Display 1 Disc type indicators 2 Play Pause 3 Displays various messages concerning operati...

Страница 73: ...st be set to COMPOSITE S VIDEO 6 HDMI OUT JACK Use the HDMI cable to connect this jack to the HDMI jack on your television for the best quality picture If an HDMI cable is connected to an HDMI compatible TV HDMI will be output automatically a maximum of 10 seconds later If you want to use a Video S Video or Component Output unplug HDMI cable Note Consult your TV User s Manual to find out if your T...

Страница 74: ...lays from the screen 19 INSTANT SKIP Button This function skips playback ahead 10 seconds 20 INSTANT REPLAY Button This function is used to replay the previous 10 seconds of a movie from the current position 21 CH Buttons Channel selection 22 OPEN CLOSE Button To open and close the disc tray 23 PLAY PAUSE Button Begin Pause disc play 24 INFO Button Displays the current disc mode 25 DISC MENU Butto...

Страница 75: ...remote control until the Video signal from the DVD player appears on the TV screen Note Noise may be generated if the audio cable placed too close to the power cable If you want to connect to an Amplifier please refer to the Amplifier connection page See pages 18 to 19 The number and position of terminals may vary depending on your TV set Please refer to the user s manual of your TV If there is on...

Страница 76: ... manual of your TV 1 Using an S Video cable not included connect the S VIDEO OUT terminal on the rear of the DVD player to the S VIDEO IN terminal of your TV 2 Using the audio cables connect the AUDIO red and white OUT terminals on the rear of the DVD player to the AUDIO red and white IN terminals of your TV Turn on the DVD player and TV 3 Press the input selector on your TV remote control until t...

Страница 77: ...The number and position of terminals may vary depending on the TV set Please refer to the user s manual of your TV 1 Using component video cables not included connect the COMPONENT VIDEO OUT terminals on the rear of the DVD player to the COMPONENT IN terminals of your TV 2 Using the audio cables connect the AUDIO red and white OUT terminals on the rear of the DVD player to the AUDIO red and white ...

Страница 78: ...er s Manual regarding Progressive Scan settings in the TV s menu system Depending on your TV the connection method may differ from the illustration above 2 Using the audio cables connect the AUDIO red and white OUT terminals on the rear of the DVD player to the AUDIO red and white IN terminals of your TV Turn on the DVD player and TV 3 Press the input selector on your TV remote control until the C...

Страница 79: ...rminal of your TV 2 Press the input selector on your TV remote control until the HDMI signal from the DVD player appears on your TV screen HDMI VIDEO Specifications When you press the HDMI SEL button 480p 720p 768p 1080i are selected in order The first press of the HDMI SEL button brings up the current resolution The second press allows you to change the HDMI output resolution Depending on your TV...

Страница 80: ... Samsung use HDMI Analog TVs require an analog video audio signal However when playing a DVD the data transmitted to a TV is digital Therefore either a digital to analog converter in the DVD player or an analog to digital converter in the TV is required During this conversion the picture quality is degraded due to noise and signal loss DVI technology is superior because it requires no D A conversi...

Страница 81: ...white OUT terminals on the rear of the DVD player to the AUDIO red and white IN terminals of the Amplifier 2 Using the video signal cable s connect the VIDEO S VIDEO COMPONENT or HDMI OUT terminals on the rear of the DVD player to the VIDEO S VIDEO COMPONENT or DVI IN terminal of your TV as described on pages 12 to 16 3 Turn on the DVD player TV and Amplifier 4 Press the input select button of the...

Страница 82: ...plifier 1 If using an optical cable not included connect the DIGITAL AUDIO OUT OPTICAL terminal on the rear of the DVD player to the DIGITAL AUDIO IN OPTICAL terminal of the Amplifier If using a coaxial cable not included connect the DIGITAL AUDIO OUT COAXIAL terminal on the rear of the DVD player to the DIGITAL AUDIO IN COAXIAL terminal of the Amplifier 2 Using the video signal cable s connect th...

Страница 83: ...u select the language you want to use Once you select a menu language you can change it by pressing the button on the front panel of the unit for more than 5 seconds with no disc in the unit Then the SELECT MENU LANGUAGE window appears again where you can reset your preferred language Playback 1 Press the OPEN CLOSE button The STANDBY indicator light goes out and the tray opens 2 Place a disc gent...

Страница 84: ...or about 5 minutes in pause mode it will stop 7 Step Motion Play Except CD Turn the JOG DIAL clockwise or press the STEP button on the remote control during play Each time the button is pressed or Jog Dial is turned a new frame will appear No sound is heard during STEP mode Press the PLAY PAUSE button to resume normal play You can only perform step motion play in the forward direction No sound is ...

Страница 85: ...ying a DVD if you press the SKIP button it moves to the next chapter If you press the SKIP button it moves to the beginning of the chapter One more press makes it move to the beginning of the previous chapter When playing a VCD 2 0 in Menu Off mode or a VCD 1 1 or a CD if you press the SKIP button it moves to the next track If you press the SKIP button it moves to the beginning of the track One mo...

Страница 86: ...œ buttons to make the desired setup and then press the ENTER button You may use the number buttons of the remote control to directly access a title chapter or to start the playback from a desired time Title Time Audio Chapter Subtitle 01 02 0 00 13 ENG 5 1CH Off DVD DVD VCD Track Time 01 0 00 48 VCD CD Track Time 01 0 00 48 CD When VCD 2 0 is in Menu Off mode only this function works Select Menu O...

Страница 87: ...ng time as a reference The time search function does not operate on some discs Refers to the film s soundtrack language In the example the soundtrack is played in English 5 1CH A DVD disc can have up to eight different soundtracks Refers to the subtitle languages available in the disc You will be able to choose the subtitle languages or if you prefer turn them off from the screen A DVD disc can ha...

Страница 88: ... the DISC MENU button on the remote control In VCD 2 0 the DISC MENU button is used to select Menu On or Menu Off mode Using the Title Menu DVD 1 During the playback of a DVD disc press the MENU button on the remote control 2 Press the buttons to select Title Menu then press the or ENTER button Note Depending on a disc the Title Menu may not work Title Menu will only be displayed if there are at l...

Страница 89: ... 36 Repeat See pages 27 to 28 EZ View See pages 30 to 31 You can also directly select these functions using their respective buttons on the remote control Note When VCD 2 0 is in Menu Off mode only this function works Select Menu Off by pressing the DISC MENU button 3 Press the buttons to select one of the five functions Then press the or ENTER button to access the function Info Zoom Bookmark Repe...

Страница 90: ...s the REPEAT A B button at the point where you want repeat play to start A B is automatically highlighted 2 Press the REPEAT A B button at the point where you want the repeat play to stop B To return to normal play press the CLEAR button Note A B REPEAT does not allow you to set point B until at least 5 seconds of playback time has elapsed after point A has been set 3 To return to normal play pres...

Страница 91: ...A B REPEAT set A first then set B after the following slow play time has elapsed 1 8x wait 40 seconds then press B 1 4x wait 20 seconds then press B 1 2x wait 10 seconds then press B Using the A B Repeat function 1 During slow playback press the REPEAT A B button at the point where you want repeat play to start A B is automatically highlighted 2 Press the REPEAT A B button at the point where you w...

Страница 92: ...am Press the ENTER button The selection numbers appear in the Program Order box To return to the previous menu screen press the RETURN button To cancel the selected program order press the CLEAR button This unit can support a maximum of 20 programmed tracks Note Depending on a disc the Program and Random Play functions may not work While in playback mode press the CLEAR button on the remote contro...

Страница 93: ...stretched Depending on a type of disc the black bars may not disappear completely ZOOM FIT The top bottom left and right of the screen are cut off and the central portion of the screen is enlarged For 4 3 aspect ratio discs Normal Wide Displays the content of the DVD title in 16 9 aspect ratio The picture will look horizontally stretched SCREEN FIT The top and bottom portions of the screen are cut...

Страница 94: ...n appears The picture will look vertically stretched ZOOM FIT The top bottom left and right of the screen are cut off and the central portion of the screen is enlarged For 4 3 aspect ratio discs Normal Screen Displays the content of the DVD title in 4 3 aspect ratio SCREEN FIT The top and bottom portions of the screen are cut off and the full screen appears The picture will look vertically stretch...

Страница 95: ...ed by abbreviations 2 To remove the AUDIO icon press the CLEAR or RETURN button ENG DOLBYDIGITAL 5 1CH AUDIO DVD When playing a VCD or CD you can select among Stereo Right or Left Stereo AUDIO VCD CD Note This function depends on audio languages are encoded on the disc and may not work A DVD disc can contain up to 8 audio languages To have the same audio language come up whenever you play a DVD Re...

Страница 96: ...ed by abbreviations 2 To remove the SUBTITLE icon press the CLEAR or RETURN button Note Depending on DVDs you have to change the desired subtitle in the Disc Menu Press the DISC MENU button This function depends on what subtitles are encoded on the disc and may not work on all DVDs A DVD disc can contain up to 32 subtitle languages To have the same subtitle language come up whenever you play a DVD...

Страница 97: ...the CLEAR or RETURN button Note If the disc has only one angle this feature won t work Currently very few discs have this feature 4 6 ANGLE Using the Instant Replay Skip Function Using the Instant Replay function DVD If you miss a scene you can see it again using this function Press the INSTANT REPLAY button The current scene moves backward about 10 seconds and plays back Using the Instant Skip fu...

Страница 98: ... the remote control Press the buttons to select Bookmark then press the or ENTER button 2 When you reach the scene you want to mark press the ENTER button Up to three scenes may be marked at a time Note When VCD 2 0 is in Menu Off mode only this function works Select Menu Off by pressing the DISC MENU button Depending on a disc the Bookmark function may not work Press the buttons to select Functio...

Страница 99: ...ton to skip to the marked scene 2 Press the œ buttons to select a marked scene Clearing a Bookmark 1 During play press the BOOKMARK button on the remote control 3 Press the CLEAR button to delete a bookmark number 2 Press the œ buttons to select the bookmark number you want to delete 1 2 3 1 2 3 AK68 00627E 00_Eng2 1 25 05 1 46 PM Page 36 ...

Страница 100: ...2 Press the or œ buttons to select the part of the screen you want to zoom in on Press the ENTER button During DVD play press ENTER to zoom in 2X 4X 2X Normal in order During VCD play press ENTER to zoom in 2X Normal in order Press the buttons to select Function then press the or ENTER button Info Zoom Bookmark Repeat EZ View Info Zoom Bookmark Repeat EZ View Note When VCD 2 0 is in Menu Off mode ...

Страница 101: ...eats the current track Folder Repeats the current folder Random Files in the disc will be played in random order MP3 file icon WMA file icon JPEG file icon Folder icon Current Folder icon To select the Parent Folder Press the RETURN button to go to the parent folder or press the buttons to select and press ENTER to go to the parent folder To select the Peer Folder Press the œ buttons to highlight ...

Страница 102: ...AT button to change the playback mode There are four modes Off Track Folder and Random Off Normal Playback Track Repeats the current song file Folder Repeats the song files which have the same extension in the current folder Random Song files which have the same extension will be played in random order To resume normal play press the CLEAR button 0 0 0 0 2 3 B e c a u s e Yo u O f f B e c a u s e ...

Страница 103: ...rates below 128 Kbps will not be played properly Use a decompression transfer rate of at least 64Kbps when recording WMA files Sound quality with WMA files basically depends on the rate of compression decompression you choose Getting CD audio sound requires an analog digital sampling rate that is conversion to WMA format of at least 64Kbps and up to 192Kbps Conversely files with decompression rate...

Страница 104: ...rotates 90 degrees clockwise Zoom Press the or œ buttons to select the part of the screen you want to zoom in on Press the ENTER button Each time the ENTER button is pressed the picture is enlarged up to 4X 2X 4X 2X Normal Slide Show The unit enters slide show mode Before beginning the Slide Show the picture interval must be set Press the œ buttons to select a desired icon then press the ENTER but...

Страница 105: ...layed only up to the blank segment A maximum of 3000 images can be stored on a single CD Kodak Picture CDs are recommended When playing a Kodak Picture CD only the JPEG files in the pictures folder can be played Kodak Picture CD The JPEG files in the pictures folder can be played automatically Konica Picture CD If you want to see the Picture select the JPEG files in the clips menu Fuji Picture CD ...

Страница 106: ...al Level Allows users to set the level necessary to prevent children from viewing unsuitable movies such as those with violence adult subject matter etc 1 With the unit in Stop mode press the MENU button on the remote control Press the buttons to select Setup then press the or ENTER button 2 Press the buttons to access the different features Press the or ENTER button to access the sub features 3 T...

Страница 107: ...n 4 Press the buttons to select Player Menu then press the or ENTER button 5 Press the buttons to select the desired language then press the or ENTER button The language is selected and the screen returns to Language Setup menu To make the setup menu disappear press the MENU button Setup Language Setup Audio Setup Display Setup Parental Setup Setup Language Setup Audio Setup Display Setup Parental...

Страница 108: ...language is selected and the screen returns to Language Setup menu To make the setup menu disappear press the MENU button 1 With the unit in Stop mode press the MENU button 2 Press the buttons to select Setup then press the or ENTER button 3 Press the buttons to select Language Setup then press the or ENTER button Setup Language Setup Audio Setup Display Setup Parental Setup Setup Language Setup A...

Страница 109: ...d The language is selected and the screen returns to Language Setup menu To make the setup menu disappear press the MENU button 1 With the unit in Stop mode press the MENU button 2 Press the buttons to select Setup then press the or ENTER button 3 Press the buttons to select Language Setup then press the or ENTER button Setup Language Setup Audio Setup Display Setup Parental Setup Setup Language S...

Страница 110: ... use its original language setting The language is selected and the screen returns to setup menu To make the setup menu disappear press the MENU button 1 With the unit in Stop mode press the MENU button 2 Press the buttons to select Setup then press the or ENTER button 3 Press the buttons to select Language Setup then press the or ENTER button Setup Language Setup Audio Setup Display Setup Parenta...

Страница 111: ...t the desired item then press the or ENTER button 1 With the unit in Stop mode press the MENU button 2 Press the buttons to select Setup then press the or ENTER button Setup Language Setup Audio Setup Display Setup Parental Setup Setup Language Setup Audio Setup Display Setup Parental Setup Dolby DTS Digital Out PCM Dynamic Compression On PCM Down Sampling On AUDIO SETUP To make the setup menu dis...

Страница 112: ...ts to PCM 2CH audio Bitstream Outputs Dolby Digital or DTS Bitstream via digital output Select Bitstream when connecting to a Dolby Digital and DTS Decoder Note There is no analog audio output when you play a DTS disc Dynamic Compression On To select dynamic compression Off To select the standard range ˇ PCM Down Sampling On Select this when the Amplifier connected to the player is not 96KHz compa...

Страница 113: ... ENTER button 1 With the unit in Stop mode press the MENU button 2 Press the buttons to select Setup then press the or ENTER button Setup Language Setup Audio Setup Display Setup Parental Setup Setup Language Setup Audio Setup Display Setup Parental Setup TV Aspect Wide Still Mode Auto Screen Messages On Black Level On Video Output COMPOSIT S VID HDMI 480p DISPLAY SETUP To make the setup menu disa...

Страница 114: ...when you want to see small letters more clearly in the Auto mode ˇ Screen Messages Use to turn on screen messages On or Off Black Level Adjusts the brightness of the screen On or Off It does not function in Progressive mode ˆ Video Output Select Video Output COMPOSITE S VIDEO Select when you want to use Video and S Video Out COMPONENT I SCAN Select when you want to use Video and Component 525i Int...

Страница 115: ...s You can use this function to set HDMI COMPONENT P SCAN output brightness DVI Output You can use this function to set HDMI to DVI output format This function corrects a TV screen when it is not centered to secure a normal view If HDMI to DVI Output is set incorrectly the screen can be biased Consult your TV User s Manual to find out if your TV supports Progressive Scan If Progressive Scan is supp...

Страница 116: ... use a password The Enter Password screen appears 5 Enter your password The Re enter Password screen appears to confirm the password Enter your password again The player is locked 1 With the unit in Stop mode press the MENU button 2 Press the buttons to select Setup then press the or ENTER button Setup Language Setup Audio Setup Display Setup Parental Setup Setup Language Setup Audio Setup Display...

Страница 117: ...he buttons to select the Rating Level you want then press the or ENTER button e g Setting up in Level 6 1 With the unit in Stop mode press the MENU button 2 Press the buttons to select Setup then press the or ENTER button Setup Language Setup Audio Setup Display Setup Parental Setup Setup Language Setup Audio Setup Display Setup Parental Setup Use Password Yes Rating Level 8 Change Password PARENT...

Страница 118: ... in Stop mode press the MENU button 2 Press the buttons to select Setup then press the or ENTER button Setup Language Setup Audio Setup Display Setup Parental Setup Setup Language Setup Audio Setup Display Setup Parental Setup CHANGE PASSWORD Enter New Password CHANGE PASSWORD Re enter Password Use Password Yes Rating Level 8 Change Password PARENTAL SETUP Note If you have forgotten your password ...

Страница 119: ... 11 12 13 14 15 16 17 18 AIWA 82 BANG OLUFSEN 57 BLAUPUNKT 71 BRANDT 73 BRIONVEGA 57 CGE 52 CONTINENTALEDISON 75 DAEWOO 19 20 23 24 25 26 27 28 29 30 31 32 33 34 EMERSON 64 FERGUSON 73 FINLUX 06 49 57 FORMENTI 57 FUJITSU 84 GRADIENTE 70 GRUNDIG 49 52 71 HITACHI 60 72 73 75 IMPERIAL 52 JVC 61 79 LG 06 19 20 21 22 78 LOEWE 06 69 LOEWE OPTA 06 57 MAGNAVOX 40 METZ 57 MITSUBISHI 06 48 62 65 MIVAR 52 77...

Страница 120: ...operly In a SETUP Menu is the Audio Output set to Bitstream The features or action cannot be completed at this time because 1 The DVD s software restricts it 2 The DVD s software doesn t support the feature e g angles 3 The feature is not available at the moment 4 You ve requested a title or chapter number or search time that is out of range Check if the disc has a Menu Some of the functions selec...

Страница 121: ...player If snow noise appears on the screen it means that TV does not support HDCP High bandwidth Digital Content Protection Check your TV system setup correctly The screen Judder phenomenon may occur when frame rate is converted from 50Hz to 60Hz for 720P 1080i HDMI High Definition Multimedia Interface Output Please refer to the user s manual of your TV Action Problem Page P16 17 P16 17 P50 52 AK6...

Страница 122: ...er Disc 135 min Reading Speed 4 8 5 6 m sec Maximum Play Time 74 min Reading Speed 4 8 5 6 m sec Maximum Play Time 20 min Reading Speed 4 8 5 6 m sec Maximum Play Time 74 min Video Audio 1 channel 1 0 Vp p 75 Ω load Y 1 0 Vp p 75 Ω load Pr 0 70 Vp p 75 Ω load Pb 0 70 Vp p 75 Ω load Luminance Signal 1 0 Vp p 75 Ω load Chrominance Signal 0 3 Vp p 75 Ω load 480p 720p 768p 1080i L 1 L R 2 R 48 kHz Sam...

Страница 123: ...ENG 60 MEMO AK68 00627E 00_Eng2 1 25 05 1 46 PM Page 60 ...

Страница 124: ...ENG 61 MEMO AK68 00627E 00_Eng2 1 25 05 1 46 PM Page 61 ...

Страница 125: ...ENG 62 MEMO AK68 00627E 00_Eng2 1 25 05 1 46 PM Page 62 ...

Страница 126: ... of purchase It must be presented to the authorized service center at the time service is requested This warranty does not cover damage due to accident fire flood and or other acts of God misuse incorrect line voltage improper installation improper or unauthorized repairs commercial use or damage that occurs in shipping Exterior and interior finish lamps glass are not covered under this warranty C...

Отзывы: