background image

English

Operations

English

38

Special features

Smart Control

You can connect to the SmartThings app and control your dryer remotely.

Connecting your dryer

•  Download and open the SmartThings app on your mobile device
•  Tap and hold   to turn on the dryer.
•  Tap and hold   on the dryer.

a. 

The dryer enters AP mode and connects to your mobile device.

b. 

Tap   to authenticate your dryer on your mobile device.

c. 

Once the authentication process is complete, your dryer is successfully connected to the app. Use 

various features available in the SmartThings app.

NOTE

•  If your dryer fails to connect with the SmartThings app, try again.
•  Check your router if you experience any Internet connection problem after connecting your dryer with 

the SmartThings app.

•  If the Wi-Fi is off, tap and hold   for 3 seconds to navigate to 

System Functions

, select 

Wi-Fi

 and tap   

to turn it on.

•  Turning the dryer's Wi-Fi on allows you connect to the dryer via SmartThings app on your smartphone 

regardless of the power status of the dryer. However, the dryer appears offline on the SmartThings app 
if the dryer's Wi-Fi is off.

•  Close the door before starting the Smart Control function.
•  If you use the dryer 20 times without being connected to SmartThings, the next time you turn the dryer 

on, a pop-up about Smart Control connection will appear for 3 seconds.

•  If the dryer's Wi-Fi is not connected to an AP (access point), the Wi-Fi will turn off when you turn of the 

power.

Stay Connect

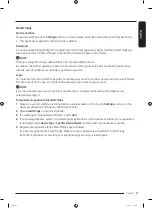
Set up the Stay Connect function in your SmartThings app. Your dryer stays connected to the app so you can 
use the dryer when you are away from home.

1. 

If you turn on the Stay Connect function on the SmartThings app, the dryer will stay in standby power 

saving mode after completing a cycle.


-

The Stay Connect function will remain active for up to 24 hour if the door remains closed.

2. 

When the Stay Connect function is active, the Smart Control   and Wi-Fi   turn on your dryer display.

3. 

Conveniently control your dryer using the SmartThings app

NOTE

The dryer switches to standby power saving mode when operation is paused even if the machine is not 
connected to the SmartThings app.

Untitled-2   38

8/11/2020   3:36:03 PM

Содержание DV8 T5 Series

Страница 1: ...DV9 T 2 DV8 T 2 Untitled 2 1 8 11 2020 3 35 26 PM Questo manuale d istruzione fornito da trovaprezzi it Scopri tutte le offerte per Samsung DV80T5220TW o cerca il tuo prodotto tra le migliori offerte...

Страница 2: ...reezing 11 Instructions about the WEEE 12 Installation 13 What s included 13 Installation requirements 15 Step by step installation 16 Door reversal 20 Before you start 25 Initial setup 25 Drying guid...

Страница 3: ...English English 3 Appendix 51 Fabric care chart 51 Protecting the environment 52 Specification 53 Contact information 54 QUESTIONS OR COMMENTS 54 Untitled 2 3 8 11 2020 3 35 27 PM...

Страница 4: ...y result in severe personal injury death and or property damage CAUTION Hazards or unsafe practices that may result in personal injury and or property damage NOTE Indicates that a risk of personal inj...

Страница 5: ...with the appliance Cleaning and user maintenance shall not be made by children without supervision 3 Children should be supervised to ensure that they do not play with the appliance 4 If the supply c...

Страница 6: ...mble dryer 16 Fabric softeners or similar products should be used as specified by the fabric softener instructions 17 The final part of a tumble dryer cycle occurs without heat cool down cycle to ensu...

Страница 7: ...minals and contact points using a dry cloth on a regular basis Unplug the power plug and clean it with a dry cloth Failure to do so may result in electric shock or fire Keep all packaging materials we...

Страница 8: ...water supply taps and the drain pipes are accessible Critical usage warnings WARNING Do not let children or pets on or into the product In addition when disposing of this product disassemble the door...

Страница 9: ...Samsung for malfunctions or damages resulting from such misuse If the product generates strange noise smells of something burning or generates smoke immediately cut off the power and contact the serv...

Страница 10: ...oks and eyelets button up covers If necessary use the laundry net for small and lightweight laundry such as fabric tie belt apron strings and underwire bras which can dissolve or break during a cycle...

Страница 11: ...g an authorized service engineer Clean the Heat Exchanger with a soft brush or vacuum cleaner once a month Do not touch the heat exchanger with your hand Otherwise it may cause an injury The interior...

Страница 12: ...from other types of waste and recycle them responsibly to promote the sustainable reuse of material resources Household users should contact either the retailer where they purchased this product or t...

Страница 13: ...differ from your dryer Before installation make sure the dryer has all the parts listed here If the dryer and or parts are damaged or missing contact the nearest Samsung customer service center Dryer...

Страница 14: ...h Accessories not supplied Stacking kit bracket Part SK DH SK DA SKK DF NOTE For stacking instructions with the dryer see the installation manual included in the stacking kit For information on which...

Страница 15: ...ce center Do not unplug the dryer while it is operating Do not place flammable objects near the dryer Electrical and grounding requirements The dryer requires an AC 220 240 V 50 Hz electrical supply T...

Страница 16: ...r make sure you have read Installation requirements on page 15 STEP 1 Select a location Location requirements Select a level well constructed surface that will withstand vibrations Select a location w...

Страница 17: ...dryer is level make sure the dryer stands firmly on the floor 5 Plug in the dryer C D NOTE To set the dryer to the same height as the washing machine turn the levelling feet to the right until it ful...

Страница 18: ...Use the built in water tank only if you cannot connect the drain hose to a drainage system NOTE As a factory default this dryer is set to use the built in water tank to drain condensed water A B 1 Rem...

Страница 19: ...with the cable tie C 3 You can drain the condensed water by connecting the accessory hose long drain hose to the drain outlet directly CAUTION Do not extend the drain hose Water may leak from the con...

Страница 20: ...allation we recommend that you wait at least 1 hour before using the dryer STEP 5 Power on Plug the power cord into a wall socket protected by a fuse or circuit breaker Then tap to turn on the dryer N...

Страница 21: ...se a thin object to remove the door sealing 3 Remove the upper 3 screws and the lower 3 screws on the glass holder 4 Remove the glass holder and then rotate the door cover by 180 degrees Untitled 2 21...

Страница 22: ...e sure the door hinge is in the same position as in the figure 6 Tighten the upper 3 screws and the lower 3 screws on the glass holder NOTE The screw shapes differ by dimension Make sure you tighten t...

Страница 23: ...crews on the door lock Remove the door lock and then reinsert it to the opposite side 10 Tighten the 2 screws that were removed from step 8 on the hinge frame at the opposite side Note that you must t...

Страница 24: ...hinge 12 Put the door hinge on the opposite side and then tighten the 2 screws to fix the door to the dryer NOTE To return the door to the initial position follow the steps again Please note that the...

Страница 25: ...rial When tapping a button tap exactly over the icon Operating the washing machine and dryer at the same time may result in a loss of power depending on where they are installed and your electrical po...

Страница 26: ...drying them This will prevent fabric damage due to friction during the drying process and protect internal parts of the dryer from discoloration and damage Turn the items with buttons or embroideries...

Страница 27: ...move items into or from the dryer with the lint filter installed If the filter is not in place small items can fall into the filter slot and cause the dryer to malfunction STEP 5 After finishing the d...

Страница 28: ...ay The display shows the current cycle estimated time remaining cycle options and other useful or alert messages 05 OK Tap to confirm your selection of function or setting 06 Dry Level Tap to change t...

Страница 29: ...Control function is activated you can control your dryer remotely using the SmartThings app in your smartphone Icon description Wi Fi This icon indicates that the dryer is connected to Wi Fi Smart Co...

Страница 30: ...the Navigation dial to select additional function For more information on Additional functions see page 34 5 Tap to change the settings for selected additional function Not all cycles have additional...

Страница 31: ...of polyester Diolen Trevira polyamide Perlon nylon or other similar blends 4 5 4 0 Delicates For the delicate items to be handled with care such as lingerie 2 0 Towels Use to dry loads such as bath t...

Страница 32: ...le for additional drying after finishing one of the Sensor Dry cycles listed on page 31 set the minimum drying time 20 minutes Excessive drying may cause damage or deform to an item Warm Air For small...

Страница 33: ...Other cycles Cycle Description Max load kg Air Wash Use this cycle to disinfect clothes and make them feel fresher and cleaner DV9 T82 DV9 T72 DV8 T72 DV9 T62 DV8 T62 models only 1 0 Untitled 2 33 8...

Страница 34: ...r the first ten times of use If you do not manipulate the control panel for 7 seconds after entering the Additional Functions menu the display returns to the main screen Damp Alert This function alert...

Страница 35: ...the Navigation dial to select Delay End and then tap 4 Turn the Navigation dial to select the desired time and then tap 5 Tap and hold To cancel Delay End tap restart the dryer Child Lock To prevent c...

Страница 36: ...I Pattern This function saves your frequently used cycles and settings 1 Tap and hold for 3 seconds 2 Turn the Navigation dial to select AI Pattern and then tap 3 Tap to select On or Off The default s...

Страница 37: ...he dryer s Wi Fi and connect to a network the dryer remains connected to the network even when you turn off the power The Wi Fi indicates that the dryer is connected to the router through the Wi Fi co...

Страница 38: ...status of the dryer However the dryer appears offline on the SmartThings app if the dryer s Wi Fi is off Close the door before starting the Smart Control function If you use the dryer 20 times withou...

Страница 39: ...nstructions on the app You don t need a separate app to create your account NOTE If you have a Samsung account use the account to log in A registered Samsung smartphone user automatically logs in To r...

Страница 40: ...tp opensource samsung com opensource SMART_AT_051 seq 0 leads to the open source license information as related to this product This offer is valid to anyone in receipt of this information NOTE Hereby...

Страница 41: ...he drying rack in the drum inserting the front lips of the rack into the holes of the door diaphram A A Drying rack 2 Place items on the rack leaving enough space where air can circulate For clothing...

Страница 42: ...from becoming wrinkled Stuffed toys cotton or polyester fiber filled Stuffed toys foam or rubber filled Foam rubber pillows Sneakers To dry sports shoes place the shoes on the rack so that the soles o...

Страница 43: ...Be careful when removing the full water tank It is very heavy and can cause injury if you drop it B 2 Empty the water through the drain hole B and then clean inside the water tank Mix some neutral de...

Страница 44: ...r Control panel Clean with a soft damp cloth Do not use abrasive cleaners Do not spray cleaners directly on the panel Immediately wipe up any spills or liquids from the control panel Drum Clean with a...

Страница 45: ...Remove the lint from both filters and then clean the filters with the cleaning brush NOTE To clean the filters thoroughly clean the filters in running water and then dry them completely 5 Put the inn...

Страница 46: ...age the filters Heat exchanger When it is time to clean the heat exchanger the dryer will alert you by displaying the Clean heat exchanger message A dirty heat exchanger will hinder the product s perf...

Страница 47: ...spray some water on the heat exchanger and clean using a brush 4 Clean the inner cover with a smooth damp cloth There may be moisture and or foreign substances around the inner cover 5 Reinsert the i...

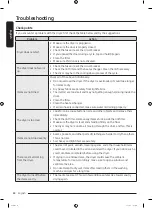
Страница 48: ...d make sure water is draining properly The dryer is too loud Look for coins loose buttons nails and other objects and remove them immediately Check the lint filter Remove any items stuck inside the li...

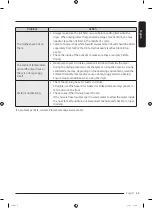
Страница 49: ...ers circulate ambient air inside and outside the dryer during the drying process to cool the system Using the dryer in a poorly ventilated area may depending on the operating environment raise the amb...

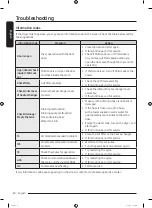
Страница 50: ...bly If this continues call for service Check drainage Empty the tank Draining malfunction Draining pump malfunction Frozen draining hose Water tank full Make sure the draining hose is not bent or dama...

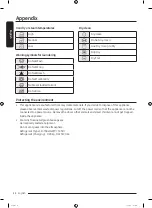
Страница 51: ...inkle Control Gentle Delicates Hand Wash Water Temperature Hot Warm Cold NOTE The dot symbols represent appropriate wash water temperatures for various items The temperature range for Hot is 41 52 C f...

Страница 52: ...manufactured from recyclable materials If you decide to dispose of this appliance please observe local waste disposal regulations Cut off the power cord so that the appliance cannot be connected to a...

Страница 53: ...V9 T7 DV8 T7 DV9 T6 DV8 T6 DV9 T5 DV8 T5 DV9 T8 DIMENSIONS A 600 mm 600 mm B 850 mm 850 mm C 600 mm 600 mm D 650 mm 660 mm E 1100 mm 1110 mm WEIGHT 50 0 kg 54 0 kg ELECTRICAL REQUIREMENTS AC 220 240 V...

Страница 54: ...samsung com fi support SWEDEN 0771 726 786 www samsung com se support AUSTRIA 0800 72 67 864 0800 SAMSUNG www samsung com at support SWITZERLAND 0800 726 786 www samsung com ch support German www sam...

Страница 55: ...LIA 800 SAMSUNG 800 7267864 www samsung com it support CYPRUS 8009 4000 only from landline toll free www samsung com gr support GREECE 80111 SAMSUNG 80111 726 7864 only from land line 30 210 6897691 f...

Страница 56: ...Untitled 2 56 8 11 2020 3 36 13 PM...

Отзывы: