background image

91

Setting up the application software

If you select [Exit] at the step 3, the application program installation will be cancelled.

INFORMATION 

If you select [Cancel] at step 4, a window for installing PhotoImpression will be displayed.

INFORMATION 

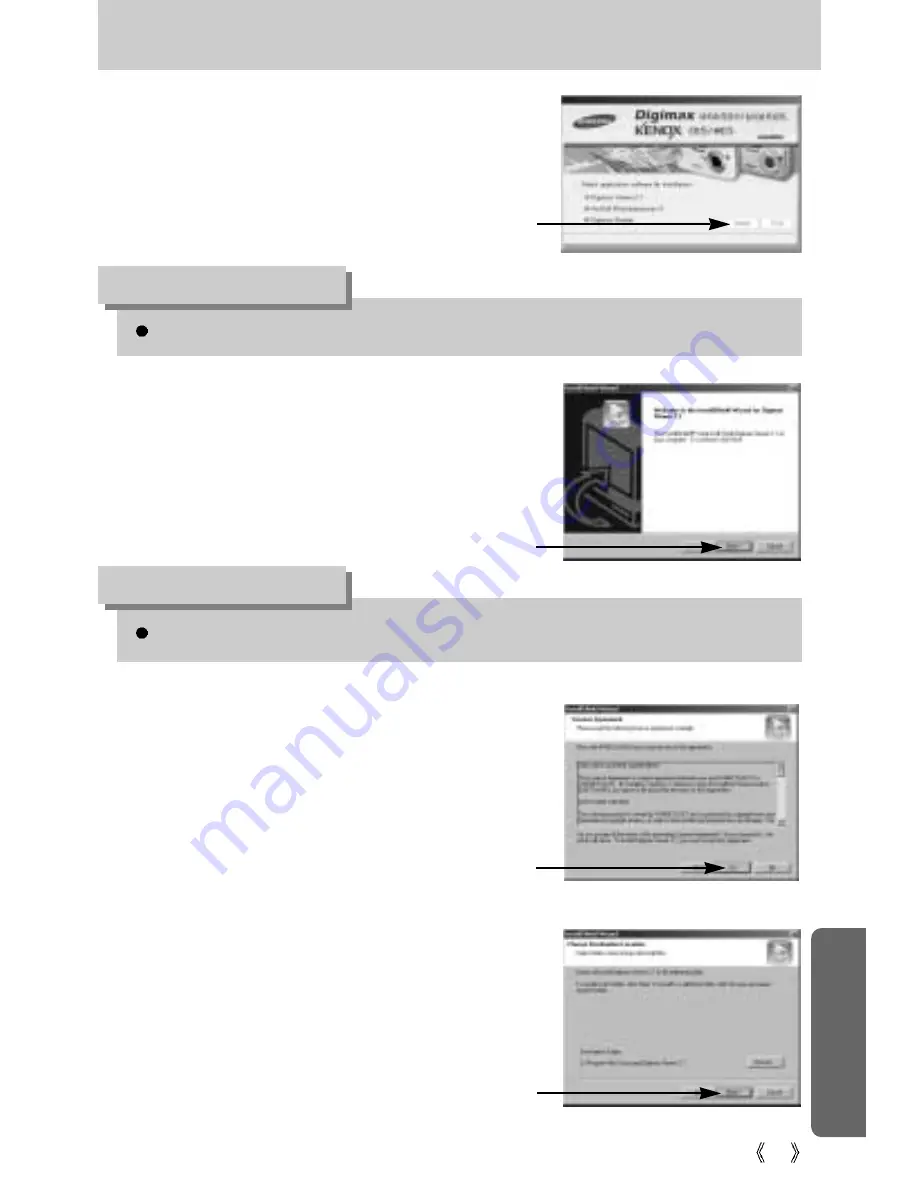
3. A window for which you can select application

software will be displayed. Select the
application program and click the [Install]
button. 
Refer to page 89 for more information about
the application program.

4. Install Digimax Viewer. 

Click [Next >] button.

5. The Software License Agreement window will

be displayed. If you agree to this, click [Yes],
the window will then move to the next step. 
If you disagree, click [No] and the installation
program will be canceled.

6. A destination selection window will open. 

Click [Next >]. To copy to the files to another
folder, click [Browse..] and choose a folder
you want.

[Click!]

[Click!]

[Click!]

[Click!]

Содержание digimax U-CA 501

Страница 1: ...h using the camera including capturing images downloading images and using the application software Please read this manual carefully before using your new camera Figures Images used for the manual are based on model Digimax U CA 501 ENGLISH Digimax U CA 505 User s Manual ...

Страница 2: ...nal p 98 Check the camera s power If the power is turned off press the camera button to turn on Take a picture Check the camera s power Check Removable Disk Open Window s EXPLORER and search for Removable Disk p 99 If you use a card reader to copy the images on the memory card to your PC the images could be damaged When transferring the images taken with the camera to your PC be sure to use the su...

Страница 3: ...ecording a voice memo 24 Macro Down button Focusing 24 Focus lock 25 FLASH LEFT button 26 Self timer Right button 28 MENU OK button 29 button 29 LCD button 33 Using the LCD monitor to adjust the camera settings 34 How to use the menu 36 Mode 36 Size 37 Quality 38 Metering 39 Continuous shot 39 Effect 40 Photo Frame 41 Sharpness 42 Save Load the camera configuration MYSET 43 Starting play mode 44 P...

Страница 4: ...lecting an External Device USB 75 Selecting Video out type 76 Quick view 77 Initialization RESET ALL 77 Setting up the MYCAM menu 78 Start up image 78 Start up sound 79 Shutter sound 79 Important notes 80 Warning indicator 82 Before contacting a service center 83 Specifications 86 Software Notes 88 System Requirements 88 About the software 89 Setting up the application software 90 Starting PC Mode...

Страница 5: ...ft Windows and Windows logo are registered trademarks of Microsoft Corporation incorporated in the United States and or other countries All brand and product names appearing in this manual are registered trademarks of their respective companies This manual contains instructions on using this camera that will help you to use this camera safely and correctly This will help prevent danger and injury ...

Страница 6: ...se to your subject s eyes may cause eyesight damage When taking photographs never point the lens of the camera directly into very strong light This may result in permanent damage to your eyesight For safety reasons keep this product and accessories out of reach of children or animals to prevent accidents e g Swallowing batteries or small camera accessories If an accident should occur please consul...

Страница 7: ...ords or cables and cause a fire or electric shock An FCC warning This device has been tested in accordance with the limits of a class B digital device under item 15 of the FCC rules These limits are designed to provide protection against harmful interference in commercial installation This equipment generates absorbs and can emit radio frequency energy If it is not installed and used in accordance...

Страница 8: ...uy the optional equipment contact your nearest Samsung dealer or Samsung service centre Pouch User manual Camera strap Software CD see p 90 SD memory card see p 15 DPOF compatible printer see p 59 Rechargeable battery SLB 1137 Battery charger CHARGE AC cord Duracell CP 1 battery Included items ...

Страница 9: ...pace USB port CD ROM drive 800x600 pixels 16 bit colour display compatible monitor 24 bit colour display recommended For Macintosh Power Mac G3 or later Mac OS 9 0 10 2 Minimum 64MB RAM 110MB of available hard disk space USB port CD ROM drive QuickTime 6 01 or later for Movie Clip System Requirements When you connect the camera to a computer printer or external monitor you have to use the USB Vide...

Страница 10: ...port Video connection terminal Mode switch Microphone Speaker Self timer lamp Auto Focus lamp Power button LCD monitor Camera status lamp Strap eyelet ZoomTbutton Digitalzoom ZoomWbutton Thumbnail Play mode button Tripod socket LCD button DELETE button 5 function button Mirrorforselfportrait ...

Страница 11: ...ed for as long as the available recording time of the memory capacity allows Max 1 hour File type wav Movie clip mode You can select the desired working mode by using the mode switch located on the top of the camera This digital camera has 3 recording modes These are listed below Battery holder Memory card slot Battery chamber Battery chamber cover FLASH LEFTbutton MENU OK button MACRO DOWN button...

Страница 12: ... 2 seconds later a second picture will be taken Camera Status Lamp Function Description The lamp turns on and off when the camera is ready to take a picture The lamp blinks while saving the image data and turns off when the camera is ready to take a picture While movie recording The lamp blinks at a 1 second interval While voice recording The lamp blinks at a 1 second interval When the USB cable i...

Страница 13: ...e and are prone to leaking if kept inside the camera Low temperatures below 0 C can affect the performance of the batteries and you may experience reduced battery life Batteries will usually recover at normal temperatures During extended use of the camera the camera body may become warm This is perfectly normal INFORMATION We recommend using batteries for a digital camera Within a year from the da...

Страница 14: ... aside The battery will be released 2 Take out the battery and close the battery chamber cover If the camera does not turn on after you have inserted batteries please check whether the batteries are inserted with the correct polarity 1 Open the battery chamber cover by pushing in the direction of the arrow 2 Insert the batteries taking note of the polarity 3 To close the battery chamber cover push...

Страница 15: ...into contact with any liquid Should this happen clean the memory card with a soft cloth Please keep the memory card in its case when not in use During and after periods of extended use you may notice that the memory card is warm This is perfectly normal Do not use a memory card that is used in another digital camera or memory card reader Do not use a memory card formatted by another digital camera...

Страница 16: ...SD memory card the data protection will be canceled Slide the switch to the top of the SD memory card before taking a picture As this camera has a 16MB internal memory you do not need to insert the memory card To expand memory capacity insert a memory card If the memory card is not inserted an image will be stored in the internal memory When using a 16MB internal memory the specified shooting capa...

Страница 17: ...thly do not attempt to insert it by force Check the direction of insertion and then insert it correctly Do not insert the memory card the wrong way round Doing so may damage the memory card slot 2 Have the front of the memory card facing toward the front ofthe camera lens and the card pins toward the back of the camera LCD monitor and then push the memory card into the card slot until you hear a c...

Страница 18: ... 5 Self timer p 28 6 Macro p 25 7 Metering p 39 8 Card inserted indicator 9 Auto focus frame 10 Camera shake warning p 27 11 Date Time 2004 10 01 01 00 PM p 73 74 12 Exposure compensation LT p 29 p 32 13 White Balance p 30 14 ISO p 31 The LCD monitor displays information about the shooting functions and selections Image Full Status ...

Страница 19: ...nal memory you do not need to insert the memory card If the memory card is not inserted an image will be stored in the internal memory To expand memory capacity insert a memory card If the memory card is inserted an image will be stored on the memory card 3 Close the battery chamber cover 4 Press the power button to turn on the camera 5 Select the MOVIE CLIP mode by sliding the mode switch 6 Point...

Страница 20: ...rd a voice Press the shutter button once and voice is recorded for as long as the available recording time Max 1 hour allows The recording time will be displayed on the LCD monitor Voice will still be recorded if the shutter button is released If you wish to stop recording press the shutter button again File type wav A distance of 40cm between you and the camera microphone is the best distance to ...

Страница 21: ... compensated shots When taking an outdoor shot avoid facing the sun as the image may be dark because of the strong backlight In backlight conditions please use Fill in flash p 27 Spot metering p 39 or Exposure compensation p 29 Avoid obstructing the lens or the flash when you capture an image Under certain conditions the auto focus system may not perform as expected When photographing a subject th...

Страница 22: ...mode the camera power will be turned off automatically to save battery life Refer to page 70 for more information about the auto power off function Used for taking an image or recording voice in the RECORDING STILL IMAGE VOICE RECORDING MOVIE CLIP mode In MOVIE CLIP mode Pressing the shutter button down fully starts the process for recording a movie clip Press the shutter button once and the movie...

Страница 23: ...om 5 0X Pressingthe ZOOMTbutton Pressingthe ZOOMTbutton WIDE Zoom Digital zoom WIDE Pressing the ZOOM W button will reduce the digital zooming in steps Releasing ZOOM W button stops digital zooming Digital zoom 5 0X Digital zoom 2 0X WIDE zoom Pressingthe ZOOMWbutton Pressingthe ZOOMWbutton To use the digital zoom the LCD monitor has to be turned on Images taken using the digital zoom may take a l...

Страница 24: ...d on the memory card 4 Voice memo will be recorded for ten seconds from the moment the picture is stored In the middle of the sound recording pressing the shutter button will stop the voice memo Recording Voice Memo Preparing for Voice Memo When the macro mode is selected it is possible that camera shake will occur If this is the case use a tripod to eliminate this INFORMATION While the menu is sh...

Страница 25: ...picture 3 With the SHUTTER button still pressed down only halfway move the camera to recompose your picture as desired and then press the SHUTTER button completely to take the picture If you release your finger from the SHUTTER button the focus lock function will be canceled The image to be captured Press the SHUTTER button halfway and focus on the subject Recomposethepicture andfullydepresstheSHU...

Страница 26: ... monitor 3 A flash mode indicator will be displayed on the LCD monitor Use the correct flash to suit the environment Using the flash frequently will reduce the life of the batteries Under normal operating conditions the charging time for the flash is normally within 5 seconds If the batteries are weak the charging time will be longer During the continuous shot movie clip mode the flash function wi...

Страница 27: ...or this function When you take an image in a condition with poor light the camera shake warning indicator will display on the LCD monitor The flash fires regardless of available light The intensity of the flash will be controlled according to the prevailing conditions The brighter the background or subject is the less intense the flash will be The flash does not fire Select this mode when capturin...

Страница 28: ...layed for longer than 2 seconds depending on the flash charge time 3 When you press the SHUTTER button the picture will be taken after the specified time has elapsed When the menu is displayed on the LCD monitor pressing the Right button makes the cursor shift to the right tab When the menu is not displayed on the LCD monitor the RIGHT button operates as the Selftimer button This function is used ...

Страница 29: ...ll appear as shown button You can use the button to adjust the values for the exposure compensation white balance and ISO value Main menu Sub menu Available camera mode 2 0 0 0 2 0 0 5EV steps LT WHITE BALANCE ISO Exposure compensation MENU button When you press the MENU button a menu related to each camera mode will be displayed on the LCD monitor Pressing it again will return the LCD to the init...

Страница 30: ... the white balance icon The white balance menu bar will appear as shown 2 Use the LEFT and RIGHT buttons to set the white balance to the desired value The value you set will be displayed on the LCD monitor AUTO The camera automatically selects the appropriate white balance settings depending on the prevailing lighting conditions DAYLIGHT For taking images outside CLOUDY For taking images under a c...

Страница 31: ... greater its capacity to take pictures in dark conditions However the noise level in the image will increase as the ISO value increases making the image appear coarse 3 When you press the button again the value you set will be saved and ISO setup mode will end Using the Custom White Balance White balance settings may vary slightly depending on the shooting environment You can select the most appro...

Страница 32: ...ts the shutter speed and aperture values to the shooting environment However in Night scene you can set the shutter speed and aperture values to your preference Press the button after selecting the Night scene mode 1 Selecting the Night scene Mode 1 Slide the MODE switch to select Still Image mode 2 Press the MENU button 3 Use the LEFT and RIGHT buttons to select the MODE menu tab Press the UP and...

Страница 33: ...e recording status in the LCD monitor Pressing the LCD button in the RECORDING STILL IMAGE MOVIE CLIP mode will change the display as shown below If the LCD monitor is turned off the camera status lamp will light up Pressing the LCD button Pressing the LCD button Pressing the LCD button ...

Страница 34: ...button displays the menu on the LCD monitor The menu will not be displayed on the LCD monitor in the following circumstances When another button is being operated While image data is being processed When there is no battery capacity When the menu is showing on the LCD monitor it is not possible to operate the shutter button i e capture an image To capture an image simply cancel the menu display by...

Страница 35: ...re subject to change without prior notice Menu tab Main menu Sub menu Camera working mode Page SINGLE 2 4 8 SHOTS NORMAL B W SEPIA RGB OFF 1 9 SOFT NORMAL VIVID SHOOTING EFFECT P FRAME SHARPNESS MYSET p 39 p 40 p 41 p 42 p 43 CANCEL MYSET1 2 3 LOAD SAVE MYSET1 2 3 ...

Страница 36: ...048X1536 1600X1200 1024X768 P QUALITY S FINE FINE NORMAL P 2560 1 2560 MODE AUTO PROGRAM SCENE MOVE NIGHT PORTRAIT LANDSCAPE CHANGE 2560 You can select the desired Still Image mode AUTO Use this for shooting basic still images PROGRAM Selecting the automatic mode will configure the camera with optimal settings You can still manually configure all functions except the aperture value and shutter spe...

Страница 37: ... image sizes in the AUTO mode are listed below P 2560 X 1920 For printing the image M 1600X1200 For saving the image to a PC E 640X480 For sending the image by e mail INFORMATION SIZE 2560X1920 2048X1536 1600X1200 1024X768 P STILL IMAGE mode SIZE 640X480 320X240 MOVIE CLIP mode 2560 320 FPS 15 NOR Mode Icon 2560 2048 1600 1024 640 640 320 Size 2560X1920 2048X1536 1600X1200 1024X768 640X480 640X480...

Страница 38: ...le Format jpeg jpeg jpeg avi avi STILL IMAGE mode MOVIE CLIP mode S FINE is the highest quality and NORMAL is the lowest setting Choose the setting appropriate for your needs This file format complies with the DCF Design rule for Camera File system JPEG Joint Photographic Experts Group JPEG is the image compression standard developed by the Joint Photographic Experts Group This type of compression...

Страница 39: ...subject in the center is exposed correctly regardless of the back lighting The default metering mode is Multi pattern metering If the subject is not the centre of the focus area do not use the spot metering as this may result in an exposure error In this circumstance It is better to use exposure compensation INFORMATION Continuous shot Select the number of pictures in continuous shooting SINGLE Ta...

Страница 40: ... 2048 EFFECT NORMAL NOR B W SEPIA RGB 2048 EFFECT NORMAL NOR B W SEPIA RGB 640 Effect High resolution and picture quality increases file saving time which increases stand by time If the 2 4 8 SHOTS sub menu is selected the flash will be off automatically If you change the image size and quality after selecting the number of continuous shots the SHOOTING sub menu will be changed to the SINGLE autom...

Страница 41: ...value of each icon 3 When you press the OK button the value you set will be saved and RGB setup mode will end EXIT SH1 SET OK When you press the Shutter button half way autofocus will be performed and the selected photo frame will appear simultaneously You can check the photo frame you added to pictures in Quick View or Play mode If you select the OFF sub menu in the P FRAME menu or turn on and of...

Страница 42: ...his function is applied only when the captured image is stored on the memory PROGRAM mode 2048 SHARPNESS SOFT NORMAL VIVID RGB Sharpness Sub menu Icon Description The edges of the image are softened This effect is suitable for editing images on your PC The edges of the image are sharp This is suitable for printing The edges of the image are emphasized The edges will appear sharp but noise may occu...

Страница 43: ...ve the current configuration in the selected MYSET slot EXIT MENU MOVE Loading the saved camera configuration available in the PROGRAM mode 1 Select the STILL IMAGE mode by sliding the mode switch 2 Press the MENU button and select PROGRAM menu 3 Press the Left Right buttons to select the MYSET menu tap 4 Press the UP DOWN buttons to select the LOAD menu and press the right button 5 Press the UP D...

Страница 44: ...de and press it again to switch to Recording mode You can set up the PLAY mode function by using the camera buttons and LCD monitor Playing back a still image 1 Select the PLAY mode by pressing the play mode button 2 The last image stored on the memory is displayed on the LCD monitor 3 Select an image that you want to play back by pressing the LEFT RIGHT button Press and hold the LEFT or RIGHT but...

Страница 45: ...n To stop playback of the movie clip press the play pause button and then press the LEFT or RIGHT button Playing back a recorded voice Steps from 1 2 are the same as those to play back a still image 3 Select the recorded voice that you want to play back by using the LEFT RIGHT button If you select a recorded voice file the voice indicator will be displayed on the LCD monitor 4 Press the play pause...

Страница 46: ...ZE 2560X1920 AV F3 2 TV 1 18 FLASH OFF DATE 2004 10 01 If you press the LCD button you can check the following recording information The LCD monitor displays information about the shooting conditions 100 0009 No Description Icon Page 1 Battery p 14 2 Play mode 3 File Type 4 Voice memo p 48 5 Protect indicator p 58 6 DPOF indicator p 59 7 Stored image number 100 0009 ...

Страница 47: ...ged view the indicator will not be displayed You can also check the area of enlargement Movie clips and WAV files can t be enlarged If an image is enlarged a loss of quality may occur You can view multiple pictures enlarge a selected picture and crop and save a selected area of an image Thumbnail display 1 While an image is displayed full screen press the thumbnail button 2 The thumbnail display w...

Страница 48: ...EL cancels trimming If there is little memory space to save the trimmed image the image can t be trimmed Voice memo Up button When the menu is displayed on the LCD monitor pressing the UP button makes the menu cursor move up When the menu is not displayed on the LCD monitor the UP button operates as the voice memo button You can add your audio to a stored still image Adding a Voice Memo to a Still...

Страница 49: ...sound The voice memo will be saved in wav format but has the same file name as the still image to which it corresponds If you add a new voice memo to the still image that already has a voice memo the existing voice memo will be erased Play Pause Down button Play mode the play pause down button works as follows If the menu is displayed Press the DOWN button to move from the main menu to a sub menu ...

Страница 50: ...monitor Pressing it again will return the LCD to the initial display OK button When the menu is displayed on the LCD monitor the OK button is used for confirming data that is changed by using the 5 function button The shooting information will be displayed on the LCD monitor The last image stored in the memory is displayed on the LCD monitor by pressing the play mode button Pressing the LCD button...

Страница 51: ...ton and then press the OK button If DELETE is selected deletes the selected images If CANCEL is selected cancels Delete Image Deleting Images in Thumbnail Display Mode 1 Use the UP DOWN LEFT and RIGHT buttons to select the image you want to delete and then press the DELETE button 2 The following message will be displayed on the LCD monitor 3 Select the submenu values by pressing the UP DOWN button...

Страница 52: ... after setting up the play menu press the PLAY button Menu tab Main menu Sub menu Secondary menu Page ROTATE SLIDE p 56 p 55 1 3 5 10SEC OFF ON RIGHT90 LEFT90 180 HORIZONTAL VERTICAL INTERVAL REPEAT START DELETE ALL p 59 NO YES COPY TO CARD p 62 NO YES DPOF STANDARD INDEX SIZE CANCEL ONE PIC ALL PICS NO YES DEFAULT 3X5 4X6 5X7 8X10 STANDARD INDEX SIZE p 59 p 61 PROTECT p 58 ONE PIC ALL PICS UNLOCK...

Страница 53: ...Bridge supporting printer direct connection to the camera sold separately with a USB cable Menu tab Main menu Sub menu Secondary menu Page STANDARD INDEX NO YES AUTO POSTCARD 4X6 8X10 A6 A4 B5 AUTO INDEX FULL 1 2 4 6 8 AUTO SET CUSTOM SET IMAGES p 66 p 66 p 64 NO YES SIZE LAYOUT ONE PIC ALL PICS PRINT p 65 p 65 DPOF PRINT ...

Страница 54: ...he LCD monitor Menu tab Main menu Sub menu Secondary menu Page AUTO PLAIN PHOTO FAST PHO AUTO DRAFT NORMAL FINE AUTO OFF ON AUTO OFF ON NO YES CUSTOM SET p 67 p 66 RESET Menus are subject to change without prior notice TYPE QUALITY DATE FILE NAME ...

Страница 55: ...buttons to select the desired sub menu OFF Selected The slide show is closed after one cycle ON selected The slide show is repeated until canceled 3 Press the OK button to save the configuration Start the slide show The slide show can start only in the START menu 1 Use the Up Down buttons to select the START menu 2 Press the OK button to start the slide show Press the Pause button to pause the sli...

Страница 56: ...ated image will be saved with a new file name and the menu will disappear If you display the rotated image on the LCD monitor empty spaces may appear to the left and right of the image LEFT 90 Rotate picture in a counter clock wise direction RIGHT 90 Rotate picture in a clock wise direction 180 Rotate picture 180 degrees HORIZONTAL Rotate picture horizontally VERTICAL Rotate picture vertically 204...

Страница 57: ... 480 LOGO A large sized image can be resized to a smaller sized image but not vice versa Only JPG images can be resized MOVIE and WAV files can t be resized You can change the resolution of only those files compressed in the JPEG 4 2 2 format The resized image will have a new file name The LOGO image is stored not on the memory card but on the internal memory Only one LOGO image can be saved If yo...

Страница 58: ... menu by pressing the UP DOWN button and press the OK button UNLOCK Cancels the protect function LOCK Sets up the protect function If you select the ONE PIC sub menu at step 3 you can protect or unprotect another image by pressing the LEFT RIGHT button If you press the SHUTTER button the Image Protection menu will disappear If you selected ALL PICS in Step 3 the Image Protection menu will disappea...

Страница 59: ...and press the OK button Selecting NO cancels Delete All Selecting YES Displays the dialogue box to confirm the delete If DELETE is selected press the OK button and all unprotected pictures are deleted If CANCEL is selected press the OK button and images are not deleted DPOF Digital Print Order Format allows you to embed printing information on your memory card s MISC folder Select the pictures to ...

Страница 60: ...lect the number of copies and then press the OK button The DPOF icon will appear by the pictures for which the number of copies to print is set Images except for movie clips and voice file are printed as index type 1 Press the play mode button and press the menu button 2 Press the LEFT RIGHT button and select the DPOF menu tab 3 Select the INDEX menu by pressing the UP DOWN button and press the RI...

Страница 61: ...inter s default value please refer to the user s guide that came with your printer DPOF CANCEL You can cancel the STANDARD INDEX or SIZE settings Cancel the setting to reset the value to its default 1 Press the play mode button and press the menu button 2 Press the LEFT RIGHT button and select the DPOF menu tab 3 Select the CANCEL menu by pressing the UP DOWN button and press the RIGHT button 4 Se...

Страница 62: ...n the memory card to copy saved images in the internal memory 16MB the COPY TO CARD command will copy only some of the images and display CARD FULL message Then the system will return to the playback mode Please be sure to delete any unnecessary images to free up space before inserting the memory card into the camera When you move the images that are stored in the internal memory by doing COPY TO ...

Страница 63: ...R SETUP Setting up printing AUTO SET CUSTOM SET PRINT Printing pictures DPOF PRINT Printing the DPOF files RESET Initializing the PictBridge functions Connecting the Camera to a Printer 1 Press the power button to turn the camera power on 2 In a mode other than Voice Recording mode press the MENU button 3 Press the LEFT RIGHT button and select SETUP menu tab 4 Select USB menu by pressing the UP DO...

Страница 64: ...lied to all pictures excluding movie clips and voice files When ONE PIC is selected When ALL PICS is selected Press the Up Down button to select the number of prints Maximum 30 prints Use the Left Right button to select another picture and select the number of prints for another picture After setting the number of prints press the OK button to save Press the Shutter button to return to the menu wi...

Страница 65: ...o select the DPOF PRINT menu tab 3 Use the UP and DOWN buttons to select the desired submenu value and then press the OK button NO Cancel the printing YES Directly print the file with the DPOF information Depending on the manufacturer and printer model some menus may not be available With a printer without supporting the DPOF the menu is still displayed but not available 4 The screen shown on the ...

Страница 66: ...he LEFT and RIGHT buttons to select the CUSTOM SET menu tab 3 Use the UP and DOWN buttons to select the desired submenu value and then press the RIGHT button 4 Use the UP and DOWN buttons to select the desired submenu value and then press the OK button CUSTOM SET You can select the Paper Size Print Format Paper Type Print Quality Date Print and File Name Print menus for printed pictures Menu SIZE ...

Страница 67: ...tons to select the RESET menu tab 3 Use the UP and DOWN buttons to select the desired submenu value and then press the OK button If NO is selected Settings will not be reset If YES is selected All print and image settings will be reset Default print setting varies depending on the printer manufacturer For your printer s default setting refer to the user s guide that came with your printer RESET NO...

Страница 68: ...DATE D TIME OFF LOW MEDIUM HIGH FILE PWR SAVE LANGUAGE FORMAT DATE TYPE IMPRINT SOUND p 69 p 71 p 72 p 73 p 74 p 74 p 75 ENGLISH DEUTSCH DANSK FRANÇAIS SVENSKA ESPAÑOL ITALIANO MELAYU P CCK PORTU DUTCH In this mode you can set up basic settings You can use the setup menu in all camera modes except Voice Recording mode The items indicated by are default settings ...

Страница 69: ... UP DOWN button and press the RIGHT button 4 Select a desired sub menu by pressing the UP DOWN button and press the OK button RESET After using the reset function the next file name will be set from 0001 even after formatting deleting all or inserting a new memory card SERIES New files are named using numbers that follow the previous sequence even when a new memory card is used or after formatting...

Страница 70: ... is connected to an external device with the video cable INFORMATION Auto power off Setting Power Off 1 In any mode with the exception of Voice Recording mode press the MENU button 2 Press the LEFT RIGHT button and select the SETUP menu tab 3 Select the PWR SAVE menu by pressing the UP DOWN button and press the RIGHT button 4 Select a desired sub menu by pressing the UP DOWN button and press the O...

Страница 71: ...pressing the UP DOWN button and press the OK button LANGUAGE sub menu English Korean French German Spanish Italian Russian Dutch Portuguese S Chinese T Chinese Danish Swedish Thai Malaysian and Arabic 5 Press the menu button twice and the menu will disappear There is a choice of languages that can be displayed on the LCD monitor Even if the batteries are removed and inserted again the language set...

Страница 72: ...rmatted If you ran FORMAT in Play mode a NO IMAGE message will appear This is used for formatting the memory card If you run FORMAT on the memory card all images including the protected images will be deleted Be sure to download important images to your PC before formatting the memory card If the memory card is not inserted the internal memory will be formatted SETUP PWRSAVE LANGUAGE FORMAT BACK S...

Страница 73: ... current position UP and DOWN buttons Changes the setting value 5 Press the menu button twice and the menu will disappear Setting Time 1 In any mode with the exception of Voice Recording mode press the MENU button 2 Press the LEFT RIGHT button and select the SETUP menu tab 3 Select the TIME menu by pressing the UP DOWN button and press the RIGHT button 4 Use the UP DOWN LEFT and RIGHT buttons to s...

Страница 74: ...ton and select the SETUP menu tab 3 Select the IMPRINT menu by pressing the UP DOWN button and press the RIGHT button 4 Use the UP and DOWN buttons to select the desired date imprint type and then press the OK button OFF The DATE TIME will not be imprinted on the image file DATE Only the DATE will be imprinted on the image file D TIME The DATE TIME will be imprinted on the image file 5 Press the m...

Страница 75: ... to connect the camera to your printer 5 Press the menu button twice and the menu will disappear SETUP IMPRINT SOUND USB COMPUTER PRINTER BACK SET OK P 2560 Sound If you set the operation sound to ON various sounds will be activated for camera startup when button are pressed and if there is a card error so that you can be aware of the camera operation status Setting Operation Sounds 1 In any mode ...

Страница 76: ...e clips by connecting the camera to an external monitor via the Video cable When the camera is connected to an external monitor the LCD monitor will be turned off automatically Yellow color Video NTSC U S A Canada Japan South Korea Taiwan Mexico PAL Australia Austria Belgium China Denmark Finland Germany U K Holland Italy Kuwait Malaysia New Zealand Singapore Spain Sweden Switzerland Thailand Norw...

Страница 77: ... Press the menu button twice and the menu will disappear Initialization RESET ALL All camera menu and function settings will be restored to their default values However values for DATE TIME LANGUAGE and VIDEO OUT will not be changed Initializing the Camera 1 In any mode with the exception of Voice Recording mode press the MENU button 2 Press the LEFT RIGHT button and select the SETUP menu tab 3 Se...

Страница 78: ...turned on Setting a Startup Image 1 In any mode with the exception of Voice Recording mode press the MENU button 2 Press the LEFT RIGHT button and select the MYCAM menu tab 3 Select the S IMAGE menu by pressing the UP DOWN button and press the RIGHT button 4 Select a desired sub menu by pressing the UP DOWN button and press the OK button 5 Press the menu button twice and the menu will disappear St...

Страница 79: ... Press the menu button twice and the menu will disappear Shutter sound MY CAM S IMAGE S SOUND SH SOUND BACK SET OK OFF SOUND 1 SOUND 2 P You can select the shutter sound Selecting the Shutter Sound 1 In any mode with the exception of Voice Recording mode press the MENU button 2 Press the LEFT RIGHT button and select the MYCAM menu tab 3 Select the SH SOUND menu by pressing the UP DOWN button and p...

Страница 80: ... sand Doing so may result in failure or may permanently render the unit unusable Extremes in temperature may cause problems If the camera is transferred from a cold to a warm and humid environment condensation can form on the delicate electronic circuitry If this occurs turn the camera off and wait for at least 1 hour until all moisture is dispersed Moisture build up can also occur in the memory c...

Страница 81: ... as benzol insecticide thinners etc This may damage the body shell of the camera and also affect its performance Rough handling can damage the LCD monitor Take care to avoid damage and keep the camera in its protective carry case at all times when not in use Do not attempt to disassemble or modify the camera Under certain conditions static electricity can cause the flash unit to fire This is not h...

Страница 82: ...ted Insert a memory card The camera can t recognize the memory card Insert the memory card again Turn off the camera power and turn it on again CARD LOCKED The memory card is locked SD memory card Slide the write protect switch to the top of the memory card CARD FULL There is insufficient memory capacity to take an image Insert a new memory card Delete unnecessary image files to free up some memor...

Страница 83: ...drain quickly The Camera is being used in low temperatures Keep the camera in warm conditions i e inside a coat or jacket and only remove it in order to take images Please check the following Before contacting a service center LOW BATTERY There is low battery capacity Insert fresh batteries LOW LIGHT When taking pictures in dark places Use a tripod and take pictures in Flash Photography mode SET U...

Страница 84: ...rity marks The camera suddenly stops working while in use The camera was stopped due to a malfunction Remove re insert batteries and switch the camera on The images are unclear A picture was taken within 0 6m from the subject without setting an appropriate macro mode If the subject is closer than 0 6m select macro shot mode Taking a picture beyond the flash range Take a picture within the flash ra...

Страница 85: ...onitor has not been connected properly with the camera Check the connection cables There are incorrect files in the memory card Insert a memory card that has correct files When using the PC s explorer the Removable Disk file does not show Cable connection is incorrect Check the connection The camera is off Turn the camera on The operating system is not Windows 98 98SE 2000 ME XP Mac OS 9 0 10 2 Al...

Страница 86: ...rmal B W Sepia RGB White Balance Auto Daylight Cloudy Sunset Fluorescent H Fluorescent L Tungsten Custom Photo Frame 9 Frames Voice Recording max 1 hour Voice Memo on Still Image max 10 sec Date Imprinting Off Date Date Time User selectable Mode Auto Program Scene Scene Night Portrait Landscape Text Fireworks Shooting Single continuous Self timer 2 sec 10 sec Double Self Timer 10 2sec With audio r...

Страница 87: ... Trimming Resizing Digital output connector USB 1 1 Video output NTSC PAL User selectable Primary battery 3V Lithium battery CP1 Rechargeable battery 3 7V Li ion battery SLB 1137 Charger SBC L3 Included battery may vary depending on sales region Dimensions WxHxD 97 x 52 x 23 mm Weight Approx 110g without batteries and card Operating Temperature 0 40 C Operating Humidity 5 85 Camera Driver Storage ...

Страница 88: ...opriate use Using a Hand made PC or a PC and OS that has not been guaranteed by the manufacturer is not covered by the Samsung warranty Before reading this manual you should have a basic knowledge of computers and O S Operating Systems System Requirements For Windows For Macintosh Power Mac G3 or later Windows 98 98SE 2000 ME XP Mac OS 9 0 10 2 Minimum 32MB RAM XP 128MB Minimum 64MB RAM 140MB of a...

Страница 89: ...with Mac OS 9 0 10 2 Digimax Viewer This is a program for viewing stored images You can see the stored images in the memory directly on a PC monitor You can also copy move or delete the images and enlarge downscale the image sizes with Digimax Viewer This software is only compatible with Windows PhotoImpression Image editing program You can edit or store still images that you download from the cam...

Страница 90: ...gh the internet http www samsungcamera com English http www samsungcamera co kr Korean Setting up the application software Close other programs before installing the application software Before installing the application software disconnect the USB connection INFORMATION 1 Click the Install menu in the Autorun frame The camera driver is installed automatically 2 Camera driver installation is compl...

Страница 91: ...he application program and click the Install button Refer to page 89 for more information about the application program 4 Install Digimax Viewer Click Next button 5 The Software License Agreement window will be displayed If you agree to this click Yes the window will then move to the next step If you disagree click No and the installation program will be canceled 6 A destination selection window w...

Страница 92: ...ents 9 The PhotoImpression installation window will be displayed as shown alongside Click the OK button If you select Cancel at step 9 a window for installing Digimax Reader will be displayed INFORMATION 10 A Welcome window will be displayed Click the Next button Click 7 A window will open asking you to choose a folder to which program icons will be added Click Next button If you want to add the p...

Страница 93: ... A window will open asking you to choose a folder to which program icons will be added Click Next button If you want to add the program icons to a different folder choose another folder and then click Next button Click 11 The Software License Agreement window will be displayed If you agree to this click Yes the window will then move to the next step If you disagree click No and the installation pr...

Страница 94: ... not appear according to the system requirements Setting up the application software 16 Digimax Reader installation window will be displayed as shown alongside Click the INSTALL button Check the MANUAL button Instructions for using Digimax reader will be displayed Click the EXIT button and Digimax reader installation will be canceled and the Restart window will appear 17 A window will open Click t...

Страница 95: ...ill be canceled 19 A destination selection window will open Click Next To copy to the files to another folder click Browse and choose a folder you want 20 Installation is complete To apply changes you must restart the computer Select Yes I want to restart my computer now and then click OK The frame 20 may be displayed according to the system requirements Click the Finish button to restart the comp...

Страница 96: ...e computer will recognise the camera If you have ever installed an image viewer program or your OS is Windows XP an image viewer program will open If the image viewer program opens the camera driver was setup successfully 23 If you can see Removable Disk under My computer the camera driver installation was successful Now you can transfer image files from the camera to PC via the USB cable ...

Страница 97: ...the camera to the PC before installing the camera driver the Found New Hardware Wizard will open In this case cancel the Found New Hardware Wizard and disconnect the camera Install the camera driver and connect the camera to the PC again Should the computer not find the camera driver after installation please try one or more of the following measures 1 Delete the camera driver p 101 and re install...

Страница 98: ...ress the OK button 7 Press the menu button twice and the menu will disappear 8 Connect the PC and the camera via the USB cable Insert the small plug of the USB cable into the camera USB connection terminal Insert the large connector of the USB cable into the USB port of the PC The plugs must be firmly inserted The camera driver must be installed before using PC mode When you connect the camera to ...

Страница 99: ...mages You can download the still images stored on the camera to your PC s hard disk and print them or use a photo editing software to edit them 1 Connect the camera to your PC with the USB cable 2 On your computer s desktop display select My computer and double click Removable Disk DCIM 100SSCAM The image files will then be displayed 5 Click a folder where you want to paste the file ...

Страница 100: ...se button and a pop up menu will open Click Paste 7 An image file is transferred from the camera to your PC By using Digimax Viewer you can see the stored images in the memory directly on the PC monitor and you can copy or move the image files ...

Страница 101: ...wn below 1 Select Start Settings and click Control Panel Click 4 Uninstallation is complete Click the Finish button and the window will disappear Click 2 Double click Add Remove programs 3 The Add Remove Programs Properties window will open Click Digimax U CA 501 and click the Add Remove button ...

Страница 102: ...the PC to view them Opening images directly from the removable disk may be subject to unexpected disconnection When uploading images from the PC to the camera ensure that the uploaded file names are not the same as those already stored on the memory When you upload a file that is not taken by this camera to Removable Disk the FILE ERROR message will be displayed on the LCD monitor in the PLAY mode...

Страница 103: ...with the Windows O S 1 Check whether the camera and PC are transferring a file If the camera status lamp blinks you have to wait until the lamp is turned off 2 Double click the Unplug or Eject Hardware icon on the task bar 3 The Unplug or Eject Hardware window will open Select the USB Mass Storage Device and click the Stop button 4 The Stop a Hardware device window will open Select the USB Mass St...

Страница 104: ...ed on the desktop after connecting the camera to the MAC Using the USB Driver for MAC Setting up the USB Driver for MAC 1 Double click a new icon on the desktop and the folder in the memory will be displayed 2 Select an image file and copy or move it to MAC For Mac OS 10 0 or later First complete uploading from computer to camera and then remove the removable disk with the Extract command INFORMAT...

Страница 105: ...de show Export Sending e mail On line print Web album etc Before deleting images from the camera you should protect or download images to your computer that you wish to keep Refer to the Help menu in Digimax viewer 2 1 for further information INFORMATION This software is only compatible with Windows 1 To open Digimax Viewer click the Start Programs Samsung Digimax Viewer 2 1 Digimax Viewer 2 1 and...

Страница 106: ...and Button Tool Bar Help Button Command Button Button Description Imports a picture from an album a source folder or the camera scanner or captures screen shots of what is being viewed on the current monitor Selects Cut Resize Edit Image Insert Text Enhance Picture Insert Effects or Layer Performs Insert Frame Insert Borders Insert Calendar Insert Greeting Cards Insert Template or Connect with Oth...

Страница 107: ...or detailed instructions on how to use PhotoImpression please refer to the program s Help INFORMATION Digimax Reader is a Text recognition program You can save an image file that is captured in the Text mode as a text file with this program This software is only compatible with Windows To start the program click Start Programs Digimax Reader The following screen will appear Digimax Reader ...

Страница 108: ...a and PC Downloading images 2 Run the Digimax Reader 3 Click the Open icon as shown alongside 4 Select the image you want to save as a text file Only an image that was taken with SAMSUNG camera can be opened 5 Click the Area Analysis icon to scan the image 6 Part of the image you selected will be displayed as shown 7 Click the Character Recognition icon The part selected in the previous step will ...

Страница 109: ...ncorrect specification Use a USB cable with the correct specification FAQ To get an image that can be recognized as a text Keep a distance of 20cm between the subject and the camera The subject need to be centered Avoid the camera shake to get a good image Refer to the Help menu in Digimax Reader for further information INFORMATION 8 To save the section as a text click the Save icon A window as sh...

Страница 110: ...evice Manager Universal Serial Bus controllers Win XP Select Start Control Panel System Hardware Device Manager Universal Serial Bus controllers There must be USB Host Controller and USB root hub under Universal Serial Bus controllers In addition double click on the USB Universal Host Controller and the USB Root Hub to check if the Device Status states This device is working properly If the Device...

Страница 111: ...e codec will be installed Case 9 When I open the Device Manager by clicking Start Settings Control Panel Performance and Maintenance System Hardware Device Manager there are Unknown Devices or Other Devices entries with a yellow question mark beside them or devices with an exclamation mark beside them Right click on the entry with the question or exclamation mark and select Remove Restart the PC a...

Страница 112: ... the camera again For more information visit the samsung website www samsungcamera com and see the FAQ page 2 When the movie clip plays back the blue and red colors are reversed or the movie clip doesn t open It isn t compatible with the ffdshow Codec or K lite Codec Pack Disable the ffdshow program Select Start Programs ffdshow Disable ffdshow Uninstall the K Lite Codec Pack or set the default pr...

Страница 113: ...113 MEMO ...

Страница 114: ...114 MEMO ...

Страница 115: ...115 MEMO ...

Страница 116: ...PTO ELECTRONICSUKLIMITED SAMSUNGHOUSE 1000HILLSWOODDRIVE HILLSWOODBUSINESSPARK CHERTSEYKT16OPSU K TEL 0080012263727 FAX 0027114619110 www samsungcamera co uk SAMSUNGOPTO ELECTRONICSGMBH AMKRONBERGERHANG6 D 65824SCHWALBACH TS GERMANY TEL 49 6196665303 FAX 49 6196665366 www samsungcameras de SAMSUNGFRANCES A S BP51TOURMAINEMONTPARNASSE 33 AV DUMAINE 75755 PARISCEDEX15 FRANCE HOTLINEPHOTONUMÉRIQUE 00...

Отзывы: