background image

GB

Microwave oven Installation Requirements

Requirements

The requirements for proper microwave oven operation are as follows: 

Operating Voltage: 24V DC.

Breaking Voltage: Min. 21.5V, Max. 29.5V.

Battery life must be at least 45Ah at  24V .

If possible, connect the oven to a separate supply battery (a secondary battery).

Supplied Items 

Microwave oven, Turntable, Terminal Post Cover (plastic cover), Install 
bracket(Left/Right), 6-#5 Tap screws, 7-#4 screws and Owner’s Manual. The 
battery connection power cable is not included. 

Items needed for Installation  

Before installing the appliance, make sure you have the following items:

6-#5 Tap screws (The length of the screw is subject to the installation 
requirements.)

7-#4 Tap screws (Outer panel screws).

2 connection power cables : one red, one black(refer to the page 6 for the 
length and size of the connection cables) 

Power cable terminal, power cable binder, and electrical tape.

Depending on the installation location, the following tools may be required. 

Stick ruler, chalk, hammer, and gimlet.

Drill and borer.

Ring/Fork type spanner set.

Crimp pincers, soldering iron.

Screw driver.

Installation

Installation Location Tips

Before installing the oven, be sure to comply with the following: The 
installation location for the oven should be even, flat, and sturdy. 

Do not allow humidity or heat to affect the oven. 

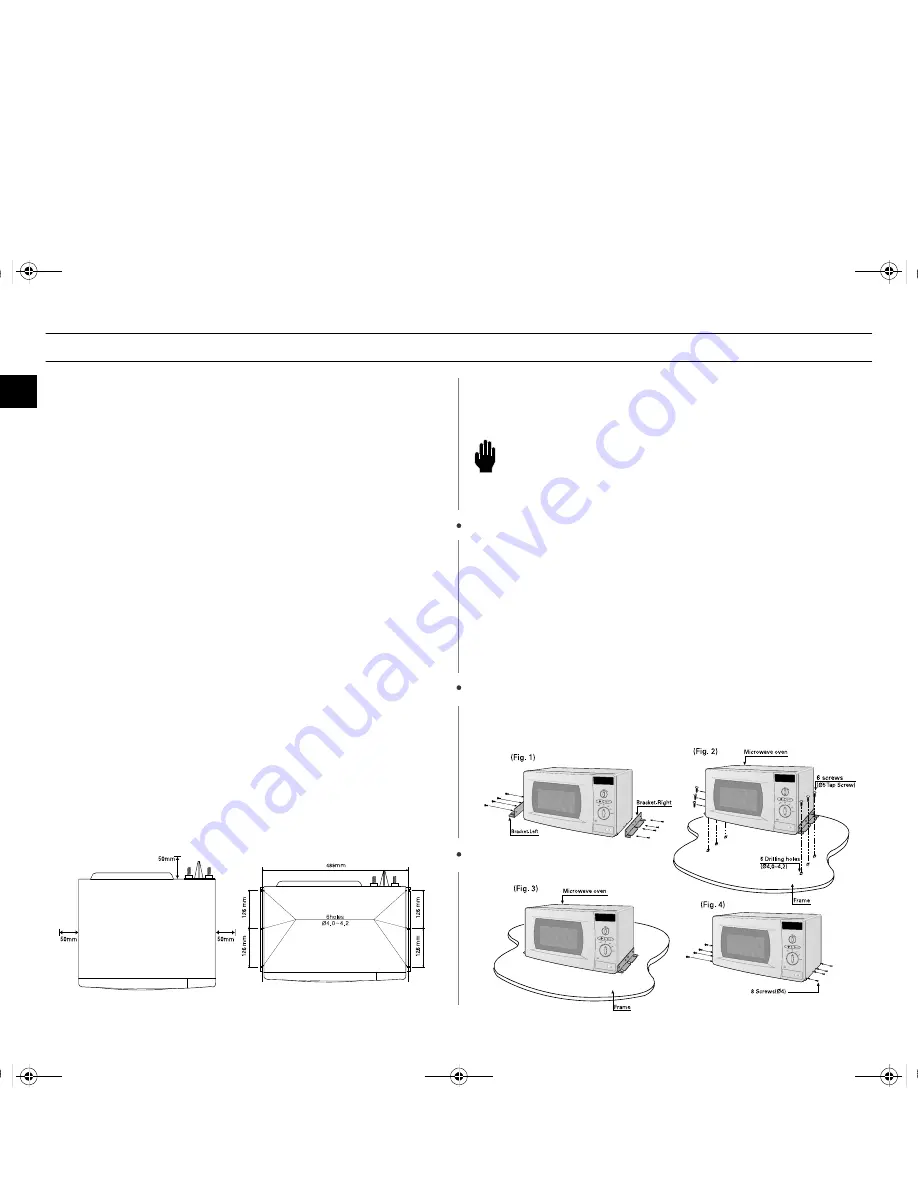
Allow free space of about 50mm around the oven for ventilation (Fig.1).

Take the oven’s weight into account. Check whether any protective 
measure such as a large support base is necessary or not.

To determine hole location, refer to the dimensions in Fig. 2 and follow the 
instructions.

WARNING 

When installing the oven in a vehicle, make sure that the installation location is 
safe enough to avoid an injury. (including a vehicle’s sudden stop or accident).

To make a hole in an accurate location, create a mark in advance with a hammer 
and punch. 
Smooth any rough edges on the holes and apply rust proof treatment to them.

Remove one screw securing outer panel of microwave oven (Right side).

Attach left and right brackets to the outer panel using 8 screws(Fig.1).

Secure the microwave oven brackets to the frame which has drilled 
holes(Ø 4.0~4.2) using 6 screws (Tap Screws).(Fig.2).

Fig.3 shows how the microwave should look attached to the frame.

If the electrical wiring does not work after the oven is fastened tightly, first follow 
the “Electrical Wiring (Page 5-6)” instructions and then re-fasten the oven.

The oven must be fastened tightly to protect against vibration.

If do not want to use brackets, please attach 8 screws (#4x12) on left and right 
side of the outer panel directly.(Fig.4)

Microwave Oven (Fig. 1)

Front of Microwave Oven (Fig. 2)

 #  !

Содержание DE6612

Страница 1: ...ttery 5 Connecting the Power Cables to the Oven 6 Battery Power Consumption for proper operation 6 Your New Microwave oven 6 Checking Parts 6 Thank You for Choosing Samsung 6 Setting Up Your Microwave Oven 7 Control Panel 7 Operation 8 Setting Cooking Times 8 Power Levels 8 Using the Cancel Button 8 Using the Start 30 s Button 9 Error Codes 9 Cooking Guide 9 Cooking Instruction 10 Cooking Utensils...

Страница 2: ...type of oven is specifically designed to heat cook or dry food It is not designed for industrial or laboratory use IMPORTANT SAFETY INSTRUCTIONS During cooking you should look into the oven from time to time when food is being heated or cooked in disposable containers of plastic paper or other combustible materials IMPORTANT Young children should NEVER be allowed to use or play with the microwave ...

Страница 3: ...r Bottles with narrow necks may also explode if overheated ALWAYS check the temperature of baby food or milk before giving it to the baby NEVER heat a baby s bottle with the teat on as the bottle may explode if overheated WARNING Safety Requirements If safety requirements are not followed it may result in an injury or a damage to the appliance Precaution Safety Requirements If safety requirements ...

Страница 4: ...location for the oven should be even flat and sturdy Do not allow humidity or heat to affect the oven Allow free space of about 50mm around the oven for ventilation Fig 1 Take the oven s weight into account Check whether any protective measure such as a large support base is necessary or not To determine hole location refer to the dimensions in Fig 2 and follow the instructions WARNING When instal...

Страница 5: ...gative battery power cable all the data stored in the memory of the vehicle s system will disappear Depending on equipment included in your vehicle you may have to enter the following data again Ex Vehicle audio password vehicle clock seat location panel computer and time switch Electrical Wiring Connection Power Cable Do not pull the power cable forcibly Do not connect to a power supply other tha...

Страница 6: ...arious conditions such as battery operating hours battery charging status ambient temperature etc Your New Microwave oven Checking Parts Unpack your microwave oven and check to make sure that you have all the parts shown here If any part is missing or broken call your dealer Thank You for Choosing Samsung Your new oven represents the latest in microwave cooking technology This oven is a full featu...

Страница 7: ...en Holding stick a device which prevents the grass tray from its bounce 5 Place the glass tray on top of the ring so that the three glass tabs in the center of the tray fit securely into the tabs on the floor of the oven Precaution Never operate the oven if the vehicle is experiencing violent movement Operating the oven in a fast moving vehicle is not recommended Ensure that the spillage is kept t...

Страница 8: ...cally turn off after 5 minutes to conserve battery power Setting time cannot exceed the maximum of 30 minutes WARNING Be sure to lock the door by keeping it to the left for the sake of safety except that the oven is operating Important Remark Voltage supply of the microwave oven is limited to protect the safety of product and vehicle 1 If the battery voltage goes below 21V when operating the oven ...

Страница 9: ...l memory IC error Call service center Check sum Error Thermistor Short Thermistor Sensor failure Call service center Thermistor Open No current No current or over current Press the Cancel button Press the Start 30s button after setting up cooking time Call Service Center Displaying three times continuous nC or oC Over current Food Portion Power Time min Standing Time min instructions Bread Rolls f...

Страница 10: ...h as margarine tubs can melt in the microwave Metal utensils These can damage your oven Remove all metal before cooking Testing Utensils If you are not sure whether a dish is microwave safe or not you can perform this test 1 Fill a 1 cup glass measuring cup with water and put it inside your oven next to the dish you want to test 2 Press the Start 30 s button 4 times to heat for two minutes The wat...

Страница 11: ... is often transferred to the cookware Always use pot holders when removing food from the microwave and instruct children to do the same Appendix Troubleshooting Guide Before you call a repair person for your oven check this list of possible problems and solutions The oven does not work properly Check the battery voltage The operating voltage for the oven should be greater than 21 5V or less than 2...

Страница 12: ...ishwasher Clean the outside surface of the oven with soap and a damp cloth Dry with a soft cloth To prevent damage to the operating parts of the oven don t let water seep into the openings Wash the door window with very mild soap and water Be sure to use a soft cloth to avoid scratching If steam accumulates inside or outside the oven door wipe with a soft cloth Steam can accumulate when operating ...

Отзывы: