background image

F-38

F-39

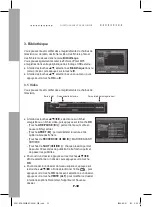
FONCTIONNEMENT DU DÉCODEUR

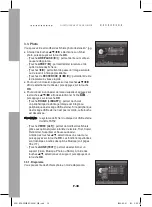
3.3. Photo

Vous pouvez lire et modifier des fichiers photo d’extension *.jpg.

● À l’aide des touches 

/

/

/

, sélectionnez un fichier 

photo, puis appuyez sur la touche 

OK

.

-  [Touche 

LIRE/PAUSE 

(

II)] : permet de lire ou mettre en 

pause le diaporama.

-  [Touche 

ARRÊT 

(

)] : permet d’arrêter la lecture et de 

quitter la liste des fichiers.

-  [Touches 

/

] : permettent de passer à l’image suivante 

ou de revenir à l’image précédente.

-  [Touches de 

RECHERCHE 

(



/



)] : permettent de lire 

le diaporama à vitesse rapide.

● Pour ouvrir un dossier, appuyez sur les touches 

/

/

/


afin de sélectionner le dossier, puis appuyez sur la touche 

OK

.

● Pour accéder à un dossier de niveau supérieur, appuyez sur 

les touches 

/

/

/

 afin de sélectionner l’icône 

 , 

puis appuyez sur la touche

 OK

.

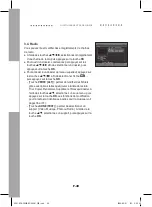
-  [Touche 

ROUGE (LIBRARY)

] : permet de choisir 

un périphérique de stockage (disque dur intégré ou 

périphérique de stockage USB externe). Si le périphérique 

de stockage USB externe n’est pas raccordé, cette touche 

est désactivée.

  le système de fichier du disque dur USB externe 

doit être FAT32.

-  [Touche 

VERTE (ALT)

] : permet de modifier des fichiers 

grâce aux options Ajouter à la liste de lecture, Trier, Copier, 

Renommer, Supprimer et Nouveau dossier.  

À l’aide des touches 

/

, sélectionnez un sous-menu, 

puis appuyez sur la touche 

OK

. Les fonctions répertoriées 

sont identiques à celles des options Musique (voir pages 

36 et 37).

-  [Touche 

JAUNE (TEXT)

] : permet de sélectionner un 

support (Vidéo, Musique, Photo ou Radio). À l’aide des 

touches 

/

, sélectionnez un support, puis appuyez sur 

la touche 

OK

.

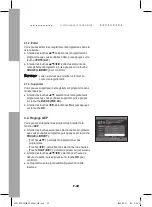
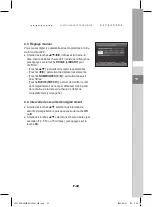
3.3.1. Diaporama

Vous pouvez lire des fichiers photo en mode diaporama.

0901 DCB-P850R,RS(408A)_FRE.indd   38

2006-09-01   ソタタ・9:59:08

Содержание DCB-P850R

Страница 1: ...TALE KABELONTVANGER MET INGEBOUWD HARDESCHIJFSTATION DIGITALE KABELONTVANGER MET INGEBOUWD HARDESCHIJFSTATION F MF68 00408A REV 1 0 GB Gebruiksinstructies NED Mode d emploi F Instructions for use GB DCB P850R P850RS Cover indd 1 2006 09 01 ソタタ 9 57 41 ...

Страница 2: ...DCB P850R P850RS 3 4 indd 2 2006 09 01 ソタタ 9 58 09 ...

Страница 3: ...Gebruiksinstructies NED Mode d emploi F Instructions for use GB DCB P850R DCB P850RS DCB P850R P850RS 3 4 indd 3 2006 09 01 ソタタ 9 58 09 ...

Страница 4: ...DIGITA DIGIT 0901 DCB P850R RS 408A _NED indd 2 2006 09 01 ソタタ 10 03 48 ...

Страница 5: ... KABELONTVANGER MET INGEBOUWD HARDESCHIJFSTATION Gebruiksinstructies NED DIGITALE KABELONTVANGER MET INGEBOUWD HARDESCHIJFSTATION DCB P850R DCB P850RS 0901 DCB P850R RS 408A _NED indd 3 2006 09 01 ソタタ 10 03 48 ...

Страница 6: ...schade aan veroorzaken AANSLUITING VAN KABEL TV EN STB Sluit alle onderdelen aan voordat u de stekkers in het stopcontact steekt Schakel de STB TV en andere onderdelen altijd eerst uit voordat u kabel aansluit of loskoppelt Voordat u deze STB loskoppelt van de hoofdstroomtoevoer moet de stekker uit het stopcontact van de hoofdstroomtoevoer verwijderd zijn daardoor zal de stekker van de hoofdstroom...

Страница 7: ...ontact op met uw plaatselijke productleverancier wanneer het product defect is 4 U mag de stroom niet uitschakelen wanneer het hardeschijfstation nog draait Het bedrijf is niet aansprakelijk voor enig verlies van gegevens op het hardeschijfstation dat veroorzaakt is door nalatigheid of misbruik door gebruikers VEILIGHEIDSVOORSCHRIFTEN Correcte verwijdering van dit product elektrische elektronische...

Страница 8: ...6 2 Zender 27 2 1 Favoriete zender 27 2 2 Automatisch zoeken 29 2 3 Zenderlijst 29 2 4 Ouderlijk toezicht 31 3 Bibliotheek 32 3 1 Video 32 3 2 Muziek 36 3 3 Foto 38 3 4 Radio 40 4 Tijdgestuurde opname 41 4 1 Geplande opnamen 41 4 2 EPG instelling 42 4 3 Handmatig instellen 43 4 4 Bewakingstijd opnemen 43 5 Setup 44 5 1 PVR 44 5 2 Voorkeursinstellingen 45 5 3 Taal 47 5 4 Systeem 48 5 5 Postvak 49 5...

Страница 9: ... VHF UHF BAND 50 870 MHz MAX 7 Msps FREQUENTIESNELHEID 16 256 QAM MODULATIEFORMAAT RF STROOMLUS OUTPUT MANN VOOR ANALOGE ONTVANGER 3 VIDEOGEDEELTE DVB C COMPATIBEL MPEG 2 VIDEO MP ML COMPATIBEL VOOR SCPC MCPC ONDERSTEUNT BREEDTE HOOGTE VERHOUDING 4 3 NORMAAL EN 16 9 BREEDBEELD 1 15 Mb s DATASNELHEID 2 SCARTAANSLUITINGEN COMPOSIET VIDEO OUTPUT 4 AUDIOGEDEELTE MPEG 1 AUDIOLAAG I II MONO DUBBEL STERE...

Страница 10: ...t aanduiding RF OUT RF UIT aan de achterkant van de STB en het andere uiteinde op het RF inputcontact van de TV Hier betekent RF OUT RF UIT de lus doorlopend Wanneer u uw TV aansluit met een SCART kabel sluit dan de SCART aansluiting met aanduiding AV1 TV aan op de betreffende SCART poort op de TV 4 UW VIDEORECORDER OF DVD SPELER AANSLUITEN Voor de aansluiting van een videorecorder of dvd speler i...

Страница 11: ...irect aan op de TV set Niet aansluiten via een videorecorder Geproduceerd onder licentie van Dolby Laboratories Dolby en het dubbele D symbool zijn handelsmerken van Dolby Laboratories TruSurround XT SRS en symbool zijn handelsmerken van SRS Labs Inc TruSurround XT technology is verenigd onder licentie van SRS labs Inc Signaalkabel 0901 DCB P850R RS 408A _NED indd 7 2006 09 01 ソタタ 10 03 50 ...

Страница 12: ...5 GUIDE Geeft de EPG van de TV Radio weer Elektronische Programmeringsgids 6 MENU Opent of sluit het menu 7 EXIT Sluit het huidige menu af 8 Infraroodsensor Ontvangt infraroodopdrachten van de afstandsbediening 9 Verplaatst de verlichte balk voor keuzeopties in het menu 10 OK Voor de invoer en bevestiging van gegevens naar de ontvanger in het menu 11 REC lampje Brandt als de ontvanger bezig is met...

Страница 13: ... OUT Aansluiting audio inputs van uw TV met behulp van RCA audiokabels 7 AV2 EXT Aansluiting voor uw videorecorder of andere apparatuur met een SCART kabel 8 AV1 TV Aansluiting voor uw TV met behulp van een SCART kabel 9 DIGITAL AUDIO OUT OPTICAL Aansluiting voor een optische input van uw digitale versterker met behulp van een optische kabel BESCHRIJVING Ventilator De ventilator draait altijd als ...

Страница 14: ...Y ON Schakelt de TV in en uit stand by 8 NUMERIEK 0 9 Voor de invoer van numerieke waarden en selectie van zenders door direct nummers in te voeren Wordt ook gebruikt voor tekstinvoer 9 FAV CH Geeft een lijst met favoriete zenders weer 10 BOOKMARK Wordt gebruikt voor de bladwijzerfunctie 11 REC Neemt rechtstreekse uitzendingen op 12 T REC Wordt gebruikt voor instelling van de tijdgestuurde opname ...

Страница 15: ... Geeft de zender en programma informatie weer Drukt u opnieuw deze toets in dan wordt het informatiemenu weergegeven waarin u informatie krijgt over signaalinformatie tijdgegevens audio videotrack Toevoegen aan lijst met favorieten PIP Aan Uit en opnamestatus 27 EXIT Sluit het huidige menu af 28 ROOD LIBRARY Geeft de lijst met opnames weer Deze toets werkt hetzelfde als de ROOD toets in het menu 2...

Страница 16: ...ron voor de TV te selecteren VOL Indrukken om het volume van de TV aan te passen Geldt alleen voor de TV CH Indrukken om een TV zender te selecteren DEMPEN Indrukken om het geluid van de TV stil te zetten NUMERIEK 0 9 Indrukken om het getal in te voeren 1 Er bestaat een model dat alleen kan worden ingeschakeld door de NUMERIEKE toets 0 op de afstandsbediening 2 Er zijn maar een aantal TV modellen ...

Страница 17: ...ellen Gebruik de toetsen om een gewenst netwerk ID te selecteren U kunt het juiste netwerk ID invoeren met behulp van de NUMERIEKE toetsen op de afstandsbediening Modulatie selecteren Gebruik de toetsen om de modulatie te selecteren van de zender die u wilt zoeken U kunt een waarde selecteren van 16 32 64 128 256 QAM tot AUTO Frequentiesnelheid instellen Gebruik de toetsen om een gewenste frequent...

Страница 18: ...ma s Doet u niets dan verdwijnt de banner van de zender na ongeveer vijf seconden Gedetailleerde programma informatie Druk tweemaal op de INFO i toets terwijl u naar een programma kijkt U ziet eerst de zenderinformatie Drukt u nogmaals op de toets dan wordt er gedetailleerde informatie over het huidige programma weergegeven zoals in de afbeelding toetsen geeft informatie weer over de vorige of vol...

Страница 19: ...Wanneer het kanaal geen ondertiteling en teletekst bevat Maximaal drie audiotracks zijn voor opname beschikbaar Wanneer het kanaal noch ondertiteling noch teletekst bevat Maximaal twee audiotracks zijn voor opname beschikbaar Wanneer het kanaal zowel ondertiteling als teletekst bevat Een audiotrack is voor opname beschikbaar 2 Voor de kanalen die veel audiotracks bevatten gebruikt u de GROEN ALT t...

Страница 20: ... op de FAV CH toets terwijl u naar een programma kijkt Druk op de TV RADIO toets om een TV of radiozender te selecteren U kunt alle TV of radiozenders selecteren evenals alle zenderlijsten Druk op de toetsen om een gewenste zender te selecteren en druk vervolgens op de OK toets Om naar de vorige of volgende pagina van de zenderlijst te gaan drukt u op de toetsen ROOD LIBRARY toets Verwijdert de fa...

Страница 21: ...ROOD LIBRARY toets Keert terug naar de vorige pagina GROEN ALT toets Gaat naar de volgende pagina toetsen Gaat naar de vorige volgende pagina CH toetsen Gaat naar de vorige volgende pagina Wanneer de GEEL TEXT toets wordt ingedrukt maar er gebeurt niets dan verdwijnt de banner van de teletekst na ongeveer vier seconden 8 Ondertitel Wanneer het huidige uitgezonden programma ondertiteling levert dru...

Страница 22: ...tie voor per blok van 30 minuten weer te geven OK toets U kunt een huidige rechtstreekse zender selecteren en tevens de komende programma s voor opname plannen ROOD LIBRARY toets Wordt gebruikt voor toevoegen of opheffen van de tijdgestuurde opname GEEL TEXT toets Geeft programma s per categorie weer Alles Film drama Nieuws actualiteiten Show spelprogramma Sport Kinder jeugdprogramma s Muziek ball...

Страница 23: ...EN PAUZE II toets tijdens het afspelen en het huidige rechtstreekse programma zal worden gepauzeerd Kort daarna drukt u op de AFSPELEN PAUZE II toets en het programma wordt hervat De statusbalk voor de Tijd verschijnt om u de huidige bedieningsstatus te tonen Gebruik de afspeeltoetsen om de opgeslagen inhoud op de harde schijf af te spelen TIMESHIFT II Wordt gebruikt om de Tijdverschuiving te star...

Страница 24: ...t wordt weergegeven Hoe stopt u met opnemen 1 Druk op de STOPPEN toets Het optiemenu voor opname verschijnt 2 Selecteer met de toetsen de zender waarvoor u de opname wilt stopzetten en druk op de STOPPEN toets 3 Om de tweede opname ook stop te zetten drukt u op de STOPPEN toets en dan nogmaals wanneer de optiemenu opent Bij het opnemen van twee zenders kunt u slechts één van de zenders bekijken Ho...

Страница 25: ...K toets tijdens het afspelen Druk op de ROOD LIBRARY toets wanneer een gewenste scène verschijnt Het getal 1 wordt weergegeven onder in het scherm en de scène wordt in het geheugen opgeslagen Druk opnieuw op de ROOD LIBRARY toets wanneer de volgende gewenste scène verschijnt Om de scène snel op te vragen gebruikt u de ZOEKEN toetsen Het getal 2 wordt weergegeven en de scène wordt in het geheugen o...

Страница 26: ... op de harde schijf te bekijken drukt u op de INFO i toets 14 1 Over rechtstreeks programma In het rechtstreekse programma doet u het volgende Druk driemaal op de INFO i toets De eerste druk op de toets opent de zenderinformatie de tweede druk op de toets opent de programma informatie Het venster met het informatiemenu geeft de volgende items weer zodat u deze aan uw voorkeur kunt aanpassen Audiot...

Страница 27: ...eelding dan wordt deze zender zwart leeg weergegeven 14 2 Terwijl een opgenomen bestand afspeelt In een opgenomen bestand dat afspeelt doet u het volgende Druk op de INFO i toets Het venster geeft de volgende items weer zodat u deze aan uw voorkeur kunt aanpassen Tijd Geeft de starttijd weer Speelduur Geeft de speelduur weer Resterende tijd Geeft de resterende tijd tot het einde weer Audiotrack Ge...

Страница 28: ...U kunt de opnamestatus controleren op de volgende punten zendernummer evenementnaam opnametype frequentie en resterende tijd Wanneer er 2 opnames beschikbaar zijn gebruik dan de toetsen om de opnamestatus van opname 1 of opname 2 te bekijken BASISFUNCTIES 0901 DCB P850R RS 408A _NED indd 24 2006 09 01 ソタタ 10 03 58 ...

Страница 29: ...amma s op verschillende zenders ophalen 1 Deze dienst is afhankelijk van de provider 2 Nadat de ontvanger de GMT tijd van het ontvangen signaal heeft herkend dit kan enkele seconden duren kan hij de juiste programma informatie weergeven Gebruik de toetsen om Gids in het hoofdmenu te selecteren en druk vervolgens op de toets Gebruik de toetsen om Volledige gids of Minigids te selecteren en druk ver...

Страница 30: ...ebruik de knoppen om informatie over het vorige of volgende programma op te vragen Gebruik de toetsen om Minigids in het Gids menu te selecteren en druk vervolgens op de OK of toets Druk op de knoppen om het vorige of volgende programma te selecteren U kunt de toetsen OK en INFO i gebruiken zoals in het Volledige gids menu 1 Het kan net zo ver komen als de tijd die de EPG informatie weergeeft 2 Al...

Страница 31: ...roepen met favorieten weer Selecteer de gewenste groep met favorieten Druk op de TV RADIO toets om te schakelen tussen de lijst met favoriete TV of radiozenders Gebruik de toetsen om een gewenste zender te selecteren U kunt de lijst met favoriete zenders bewerken met Rem FAV Fav herinneren Hernummeren Huidige toevoegen en Extra s Om de lijst te verlaten drukt u op de EXIT toets 2 1 1 Favoriete zen...

Страница 32: ... GROEN ALT toets Gebruik de toetsen om het zendernummer te wijzigen en druk vervolgens op de OK toets 2 1 3 Huidige toevoegen U kunt de huidige zender toevoegen aan de lijst met favorieten wanneer de huidige zender niet in de lijst met favorieten voorkomt Zie pagina 16 2 1 4 Extra s U kunt extra functies in de lijst met favorieten uitvoeren Zie pagina 16 0901 DCB P850R RS 408A _NED indd 28 2006 09...

Страница 33: ...ts op te slaan drukt u op de MENU of EXIT toets 2 3 Zenderlijst U kunt een TV of radiozender selecteren uit de zenderlijst Druk op de TV RADIO toets om te schakelen tussen de lijst met TV of radiozenders Gebruik de toetsen om een gewenste lijst met zenders te selecteren en druk vervolgens op de OK toets U kunt de lijst met zenders bewerken met Sorteren Blokkeren en Toevoegen aan FAV Om de lijst te...

Страница 34: ...enders gesorteerd volgens de door u gewenste sorteermethode 2 3 2 Blokkeren U kunt de huidige zender blokkeren Druk op de GROEN ALT toets om de zender te blokkeren Dan verschijnt het menu dat u om de pincode vraagt Voer de pincode in met de NUMERIEKE toetsen 2 3 3 Aan Favorieten toevoegen U kunt de huidige zender aan de lijst met favorieten toevoegen Gebruik de toetsen om de zender die u wilt toev...

Страница 35: ...n zender is vergrendeld moet de gebruiker eerste de pincode invoeren om de zender te bekijken Hoe vergrendelt ontgrendelt u de zender Selecteer Blokkeren of Deblokkeren en druk op de OK toets U ziet het scherm voor de invoer van het wachtwoord Voer uw pincode bestaande uit 4 cijfers in ter bevestiging 2 4 3 Pincode wijzigen U kunt de pincode wijzigen Gebruik de NUMERIEKE 0 9 toetsen om de oude en ...

Страница 36: ...volgens op de OK toets AFSPELEN PAUZE II toets Het huidige bestand wordt afgespeeld of gepauzeerd STOPPEN toets Afspelen wordt stopgezet en de bestandenlijst wordt geopend ZOEKEN toetsen REW FF SPRING I I toetsen Met elke druk op de toets wordt er 30 seconden reclame doorgespoeld Zo hoeft u geen reclameblokken meer te bekijken Hoe opent u een map u gebruikt de toetsen om een map te selecteren en d...

Страница 37: ...cteren Wanneer u drukt op de OK toets dan wordt de lijst met bestanden gesorteerd volgens de door u gewenste sorteersoort 3 1 2 Verplaatsen Bestanden kunnen worden verplaatst naar verschillende mappen op de harde schijf Als Verplaatsen is geselecteerd dan worden hier de videobestanden opgesomd Om de lijst met bestanden te verplaatsen drukt u op de toets Gebruik de toetsen om elk bestand te selecte...

Страница 38: ...erlaten zonder iets op te slaan drukt u op de MENU of EXIT toets 3 1 4 Blokkeren deblokkeren U kunt bestanden in de lijst vergrendelen of ontgrendelen Voer uw eigen PIN code in De in de fabriek ingestelde pincode is 0000 Als een bestand is vergrendeld ziet u een pictogram Om het vergrendelde bestand te kunnen bekijken moet u de pincode invoeren 3 1 5 Wissen U kunt bestanden uit de lijst met bestan...

Страница 39: ...gesteld als eerste bestand Verplaats de cursor naar het volgende bestand om het tweede bestand te selecteren dit doet u met de toetsen en vervolgens drukt u op de OK toets Er verschijnt een bericht met een bevestiging Selecteer Ja om te combineren Om de bewerking te annuleren selecteert u Annuleren met de toetsen en drukt u vervolgens op OK toets 3 1 9 Splitsen Een bestand kan in twee bestanden ge...

Страница 40: ...f met USB aansluiting gebruikt dan moet het bestandssysteem FAT32 zijn GROEN ALT toets Bewerkt bestanden met Toevoegen aan afspeellijst Sorteren Kopiëren Hernoemen Wissen en Nieuwe map Gebruik de toets om een submenu te selecteren en druk vervolgens op de OK toets GEEL TEXT toets Selecteert inhoud zoals Video Muziek Foto en Radio Gebruik de toets om een inhoud te selecteren en druk vervolgens op d...

Страница 41: ...s verlicht Selecteer Kopiëren met de toetsen en druk vervolgens op OK toets Selecteer een doelmap op de harde schijf of op het USB apparaat en druk op de GEEL TEXT toets Om te wisselen naar het externe USB apparaat drukt u op de ROOD LIBRARY toets waarmee u kunt schakelen tussen de harde schijf en het USB apparaat Tijdens het kopiëren van bestanden MP3 of JPEG kan het apparaat bij gebruik van een ...

Страница 42: ...OK toets ROOD LIBRARY toets Selecteert als opslagapparaat de ingebouwde harde schijf of het externe USB opslagapparaat Als het externe USB opslagapparaat niet is aangesloten dan wordt deze toets uitgeschakeld Wannneer u een externe harde schijf met USB aansluiting gebruikt dan moet het bestandssysteem FAT32 zijn GROEN ALT toets Bewerkt bestanden met Toevoegen aan afspeellijst Sorteren Kopiëren Her...

Страница 43: ...ruik de toetsen om een gewenste sorteersoort zoals bestandsnaam en formaat te selecteren Wanneer u drukt op de OK toets dan wordt de lijst met bestanden gesorteerd volgens de door u gewenste sorteersoort 3 3 4 Kopiëren Bestanden kunnen worden gekopieerd van uw ontvanger naar een extern USB opslagapparaat en vice versa Wij verwijzen naar de methode voor het verplaatsen van videobestanden Het enige ...

Страница 44: ... u gebruikt de toetsen om te selecteren en drukt vervolgens op de OK toets GROEN ALT toets Bewerkt bestanden met bijvoorbeeld Toevoegen aan afspeellijst Sorteren Kopiëren Hernoemen Wissen en Nieuwe map Gebruik de toets om een submenu te selecteren en druk vervolgens op de OK toets Bewerkingsfuncties van Radio zijn identiek aan die in Muziek Zie pagina 36 en 37 GEEL TEXT toets Selecteert inhoud zoa...

Страница 45: ...n de tijdgestuurde opname zoals Eenmaal Dagelijks Wekelijks en Work Day Werkdag 4 1 1 Toevoegen U kunt de tijdgestuurde opname aan de gereserveerde lijst toevoegen Druk op de ROOD LIBRARY toets om de tijdgestuurde opname aan de geplande lijst toe te voegen Gebruik de toetsen voor het instellen van de zender datum starttijd eindtijd en frequentie en druk vervolgens op de ROOD LIBRARY toets voor bev...

Страница 46: ...n Gebruik de toetsen voor de selectie van een tijdgestuurde opname die u wilt verwijderen en druk vervolgens op de BLAUW PRE CH toets Gebruik de toetsen om Ja te selecteren en druk vervolgens op de OK toets 4 2 EPG instelling U kunt de zenders opnemen met EPG Gebruik de volgende toetsen voor de selectie van een zender waarvan u wilt opnemen en druk vervolgens op de ROOD LIBRARY toets toetsen Selec...

Страница 47: ...toetsen Voert getallen in BLAUW PRE CH toets Wijzigt de opnamenaam De standaardnaam wordt gemaakt op basis van de zender datum en starttijd van de opname Zie pagina 34 4 4 Bewakingstijd opnemen Gebruik de toetsen om Record Guard Time Bewakingstijd opnemen te selecteren en druk vervolgens op de OK of toets Gebruik de toetsen voor de gewenste tijd zoals uit 2 5 10 en 15 minuten en druk vervolgens op...

Страница 48: ...vervolgens op de OK of toets Gebruik de toetsen voor de gewenste tijd zoals 30 60 90 120 en 240 minuten en druk vervolgens op de OK toets 5 1 2 Schijfbeheer U kunt de informatie van de schijfcapaciteit controleren en de schijf formatteren Alle opgeslagen gegevens op de schijf zullen zijn verwijderd na het formatteren Hoe formatteert u de schijf Druk op de toetsen om een opslagapparaat u kunt hierb...

Страница 49: ...ilt zien op het TV scherm met breedte hoogte verhouding 4 3 Het verkleint de breedte hoogte verhouding 16 9 zonder schermvervorming dus de boven en onderkant van het scherm zijn zwart leeg CCO CCO betekent center cutout centrale uitsnijding De afbeelding wordt in het midden weergegeven zodat de randen die buiten de schermgrenzen vallen worden weggesneden 14 9 LB Selecteer deze verhouding als u een...

Страница 50: ...S U kunt de Sound Retrieval System Systeem voor geluidherwinning aan of uitzetten Gebruik de toetsen om AAN of UIT te selecteren en druk vervolgens op de OK toets 5 2 6 Transparantie U kunt de OSD transparantie aan of uitzetten Gebruik de toetsen om AAN of UIT te selecteren en druk vervolgens op de OK toets 5 2 7 Automatische ondertiteling U kunt de automatische weergave van ondertiteling aan of u...

Страница 51: ...ecteren en druk vervolgens op de OK toets 5 3 3 Audioprioriteit U kunt eender welke audiotaal en Dolby Digital instellen Als de audiotaal voorrang heeft dan kunt u de audiotaal laten klinken zonder Dolby Digital geluid Gebruik de toetsen om een van de audiotalen en Dolby Digital te selecteren en druk vervolgens op de OK toets 5 3 4 Ondertiteling U kunt de taal van de ondertiteling instellen Gebrui...

Страница 52: ...tie instellen Voer uw eigen pincode in en druk op de OK toets Druk op de OK toets om de gewenste taal te selecteren beweeg de cursor dan naar Start installatie Druk op de OK toets U ziet het scherm voor het zoeken naar zenders Pas indien nodig de zoekinstellingen aan Zie pagina 13 voor meer informatie Om te starten met zoeken drukt u op de OK toets 0901 DCB P850R RS 408A _NED indd 48 2006 09 01 ソタ...

Страница 53: ...ijwerken van de software drukt u op de OK toets Wanneer de ontvanger bezig is met overdragen mag u geen andere wijzigingen doorvoeren zolang de overdracht voltooid is 5 4 3 Resetten U kunt de fabrieksinstellingen herstellen in het geval dat de gebruiker wat problemen heeft opgelopen door het instellen van nieuwe waarden voor zendergegevens en overige eventueel foutieve gegevens Gebruik de toetsen ...

Страница 54: ...beelding Servicestatus Geeft de status van de digitale radio en televisiediensten weer zoals in de afbeelding Laderstatus Geeft de laadstatus van de toegang tot de smartcard en fabrikant weer zoals in de afbeelding Componenten Toont u informatie over smartcard onderdelen zoals in de afbeelding DE ONTVANGER BEDIENEN 0901 DCB P850R RS 408A _NED indd 50 2006 09 01 ソタタ 10 04 08 ...

Страница 55: ...3 307 425 ASA 020 065 078 080 091 146 171 197 307 324 375 408 449 ASBERG 049 152 407 ASORA 195 ASTRA 195 ASUKA 050 076 123 378 379 NAAM fabrikant merk LIJST MET CODENUMMERS BESTAANDE UIT 3 CIJFERS ATLANTIC 049 050 071 113 152 236 379 ATORI 195 AUCHAN 107 425 AUDIOSONIC 049 074 076 152 182 195 213 379 421 AUDIOTON 050 076 379 421 AUSIND 090 407 AUTOVOX 050 071 078 079 080 083 090 156 236 324 379 40...

Страница 56: ...rikant merk LIJST MET CODENUMMERS BESTAANDE UIT 3 CIJFERS DIGILINE 049 152 DIXI 049 152 195 379 413 DORIC 104 105 DREAN 049 152 DTS 195 DUAL 049 050 107 139 152 156 168 182 243 379 414 417 424 468 470 DUAL TEC 040 050 168 195 379 DUMONT 045 065 080 102 139 146 324 375 379 449 469 DUMONT FINLUX 020 045 078 091 104 DUX 049 112 152 DYNATRON 049 152 ELBE 049 107 123 152 172 210 243 369 391 411 421 435...

Страница 57: ...2 195 378 380 425 435 GRONIC 045 379 GRUNDIG 049 080 090 152 232 247 249 407 454 455 HALIFAX 076 379 HAMPTON 379 NAAM fabrikant merk LIJST MET CODENUMMERS BESTAANDE UIT 3 CIJFERS HANIMEX 094 HANSEATIC 018 049 050 094 104 107 113 152 172 195 241 324 378 379 391 421 455 467 470 475 HANTAREX 045 046 049 152 195 HANTOR 049 152 HARLEY DAVIDSON 042 HARWOOD 049 152 195 426 HAUPPAUGE 049 152 HAVERMY 190 H...

Страница 58: ...AAM fabrikant merk LIJST MET CODENUMMERS BESTAANDE UIT 3 CIJFERS LENOIR 050 195 LESA 413 LEYCO 049 076 094 102 152 LIESENK TTER 049 112 152 345 LIFE 440 441 443 444 LIFETEC 049 076 123 152 195 226 440 441 443 444 LLOYD_S 195 LOEWE 035 049 089 120 152 324 391 421 LOEWE OPTA 035 046 049 065 120 144 152 213 324 LOGIK 131 225 LOGIX 195 LUMA 071 107 110 152 171 172 195 210 226 236 307 LUMATRON 049 076 ...

Страница 59: ...DMENDE 049 074 083 150 152 182 186 218 247 307 424 453 463 469 481 NOVATRONIC 020 049 152 226 NAAM fabrikant merk LIJST MET CODENUMMERS BESTAANDE UIT 3 CIJFERS OCEANIC 086 094 104 107 108 109 139 172 209 425 466 469 475 OCEANIC F 150 ODEON 076 OKANO 049 076 102 152 421 OMEGA 076 ONCEAS 050 ONWA 123 225 OPERA 049 152 OPTIMUS 099 OPTONICA 190 ORBIT 049 152 ORION 012 042 045 049 076 094 113 131 134 1...

Страница 60: ...36 RECOR 049 152 RECTILIGNE 049 152 REDIFFUSION 018 059 104 105 139 171 172 307 471 475 REDIFFUSION UK 150 162 NAAM fabrikant merk LIJST MET CODENUMMERS BESTAANDE UIT 3 CIJFERS REDSTAR 049 152 REFLEX 049 152 REOC 460 REVOX 049 152 421 REX 040 071 079 107 110 152 171 210 236 243 307 413 466 RFT 076 102 241 324 391 421 RHAPSODY 379 R LINE 049 152 ROADSTAR 049 076 123 152 163 195 ROBOTRON 065 324 ROD...

Страница 61: ...kant merk LIJST MET CODENUMMERS BESTAANDE UIT 3 CIJFERS SYTONG 379 TACTUS 106 TANDBERG 065 074 078 172 182 210 213 420 449 TANDY 050 102 123 190 307 379 413 466 TASHIKO 018 050 107 177 379 470 474 TATUNG 049 050 102 106 120 131 152 217 379 TCM 440 441 443 444 TEAC 049 076 152 163 195 217 378 380 426 457 458 470 TEC 040 050 064 168 195 213 218 243 379 413 480 TECH LINE 049 152 195 TECHICA 123 TECHN...

Страница 62: ...OSYSTEM 049 152 VIDEOTECHNIC 113 226 379 VIDEOTON 107 472 VIDIKRON 045 VIDTECH 018 VIPER 213 VISIOLA 379 VISION 049 113 152 467 VISOREX 442 VISTAR 172 236 VOLTEC 074 VORTEC 152 VOXSON 049 065 090 152 163 171 307 324 407 466 WALTHAM 049 152 163 182 307 379 472 WATSON 049 107 113 123 152 195 247 467 WATT RADIO 045 050 068 104 107 139 150 379 470 480 WEGA 018 049 139 152 324 WEGA COLOR 065 088 WEGAVO...

Страница 63: ...e batterijen of plaats ze op de juiste manier Afbeelding heeft slechte kwaliteit Signaalsterkte te zwak Controleer de signaalsterkte in het menu Info corrigeer de uitlijning van uw antenne Schermbericht met foutmelding Geen signaal Antennekabel niet stevig aangesloten Onjuiste aansluiting van de antenne Controleer verbinding en corrigeer indien nodig Controleer de signaalsterkte in het menu Info S...

Страница 64: ...MHz Niveau inputsignaal 78 20 dBm Lus doorlopend 50 860 MHz 78 20 dBm 50 860 MHz IED mann Videodecoder Systeemdecodering MPEG 2 ISO IEC 13818 Transportstroom Profiel en niveau MPEG 2 MP ML 4 2 2 Gegevenssnelheid 1 15 Mbs Videoformaten 4 3 normaal en 16 9 breedbeeld Afbeeldingsresolutie 720 H x 576 V x 50 velden sec Audiodecoder Systeemdecodering MPEG 1 ISO IEC 11172 3 lagen I II Audiomodus Mono Dua...

Страница 65: ...NGEBOUWDE HARDE SCHIJF 160GB TOEGANG EXTERNE HARDE SCHIJF USB2 0 HOST BESTANDSINDELING AFSPEELBARE INHOUD Muziek MP3 Foto JPG FYSIEKE SPECIFICATIE Afmeting B x D x H 381 x 267 x 60 mm Gewicht netto 3 1 Kg De huidige geformatteerde capaciteit kan kleiner zijn dan wat er op de doos en in de handleiding staat 1 GB 1 miljard bytes TECHNISCHE SPECIFICATIES 0901 DCB P850R RS 408A _NED indd 61 2006 09 01...

Страница 66: ...BO 0901 DCB P850R RS 408A _FRE indd 2 2006 09 01 ソタタ 9 58 51 ...

Страница 67: ...BOÎTIER DÉCODEUR NUMÉRIQUE AVEC DISQUE DUR INTÉGRÉ Mode d emploi DCB P850R DCB P850RS F DÉCODEUR NUMÉRIQUE AVEC DISQUE DUR INTÉGRÉ 0901 DCB P850R RS 408A _FRE indd 3 2006 09 01 ソタタ 9 58 51 ...

Страница 68: ...NTATION DU TÉLÉVISEUR ET DU DÉCODEUR Raccordez tous les composants avant de brancher le cordon d alimentation dans la prise murale Mettez toujours le décodeur le téléviseur et les autres composants hors tension avant de brancher ou débrancher les câbles Pour débrancher ce décodeur de l alimentation secteur vous devez retirer la prise du secteur L alimentation secteur doit donc être facilement acce...

Страница 69: ... revendeur local si l appareil ne fonctionne pas 4 N éteignez pas l appareil pendant que le disque dur travaille La société ne pourra être tenue responsable de la perte de données enregistrées sur le disque dur résultant d une négligence ou d une mauvaise utilisation CONSEILS DE SÉCURITÉ Comment éliminer ce produit déchets d équipements électriques et électroniques Applicable dans les pays de l Un...

Страница 70: ... de couleurs 26 2 Chaînes 27 2 1 Chaînes favorites 27 2 2 Recherche auto 29 2 3 Liste des chaînes 29 2 4 Guide parental 31 3 Bibliothèque 32 3 1 Vidéo 32 3 2 Musique 36 3 3 Photo 38 3 4 Radio 40 4 Programmation d enregistrement 41 4 1 Enregistrements programmés 41 4 2 Réglage GEP 42 4 3 Réglage manuel 43 4 4 Intervalle de sécurité d enregistrement 43 5 Réglage 44 5 1 PVR 44 5 2 Préférences 45 5 3 ...

Страница 71: ...L 2 SECTION TUNER BANDE VHF UHF 50 870 MHz DÉBIT DE SYMBOLES 7 Msps max FORMAT DE MODULATION 16 256 MAQ SORTIE EN BOUCLE RF MÂLE POUR DÉCODEUR ANALOGIQUE 3 SECTION VIDÉO COMPATIBLE DVB C VIDÉO MPEG 2 MP ML COMPATIBLE SCPC ET MCPC PRISE EN CHARGE DU FORMAT D IMAGE 4 3 NORMAL ET 16 9 ÉCRAN LARGE DÉBIT DE TRANSFERT DE DONNÉES 1 15 Mb s 2 PRISES PÉRITEL SORTIE VIDÉO COMPOSITE 4 SECTION AUDIO MPEG 1 AU...

Страница 72: ...rise RF OUT située sur le panneau arrière du décodeur et l autre extrémité à la prise d entrée RF du téléviseur Ici RF OUT correspond à la boucle Si vous raccordez votre téléviseur à l aide du câble péritel reliez la prise péritel AV1 TV au port péritel correspondant sur le téléviseur 4 RACCORDEMENT DE VOTRE MAGNÉTOSCOPE OU LECTEUR DVD Le décodeur comporte une prise péritel AV2 EXT située à l arri...

Страница 73: ...évision Ne le raccordez pas à un magnétoscope Fabriqué sous licence par Dolby Laboratories Dolby et le symbole de double D sont des marques déposées de Dolby Laboratories TruSurround XT SRS et le symbole sont des marques déposées de SRS Labs Inc La technologie TruSurround XT est intégrée dans le cadre d une licence de SRS labs Inc Câble de signal 0901 DCB P850R RS 408A _FRE indd 7 2006 09 01 ソタタ 9...

Страница 74: ...e guide électronique des programmes de télévision de radio GEP 6 MENU Permet d ouvrir ou de quitter le menu 7 EXIT Permet de quitter le menu affiché à l écran 8 Capteur infrarouge Détecte les signaux de commande infrarouges émis par la télécommande 9 Permettent de déplacer la barre de mise en surbrillance pour sélectionner des options de menu 10 OK Permet de transmettre des données au décodeur et d...

Страница 75: ...ntrées audio de votre téléviseur à l aide de câbles audio RCA 7 AV2 EXT Permet de raccorder votre magnétoscope ou d autres accessoires à l aide d un câble péritel 8 AV1 TV Permet de raccorder votre téléviseur à l aide d un câble péritel 9 DIGITAL AUDIO OUT OPTICAL Permet de raccorder une entrée optique de votre amplificateur numérique à l aide d un câble optique DESCRIPTION Ventilateur Le ventilate...

Страница 76: ...ttre en marche et d éteindre veille le décodeur 8 TOUCHES NUMÉRIQUES 0 9 Permettent de saisir des valeurs numériques et de sélectionner directement la chaîne en entrant son numéro Permettent également de saisir du texte 9 FAV CH Permet d afficher la liste des chaînes préférées 10 BOOKMARK Utilisé pour la fonction de signet 11 REC Permet d effectuer un enregistrement immédiat 12 T REC Permet de confi...

Страница 77: ...ogramme Une deuxième pression sur cette touche entraîne l affichage du menu Infos comprenant des informations sur le signal des détails sur l heure la piste audio vidéo l ajout à la liste de FAV l activation la désactivation de l image dans l image et l état de l enregistrement 27 EXIT Permet de quitter le menu affiché à l écran 28 ROUGE LIBRARY Permet d afficher la liste enregistrée Cette touche fon...

Страница 78: ...rce d entrée externe pour le téléviseur VOL Appuyez sur cette touche pour régler le volume du téléviseur Exclusivement pour le téléviseur CH Appuyez sur cette touche pour sélectionner une chaîne de télévision MUET Appuyez sur cette touche pour couper le son du téléviseur TOUCHES NUMÉRIQUES 0 9 Appuyez sur les touches pour entrer des numéros 1 Un des modèles peut être allumé uniquement en appuyant ...

Страница 79: ...églage de l ID Réseau À l aide des touches sélectionnez l ID Réseau de votre choix Vous pouvez saisir l ID Réseau exact à l aide des touches NUMÉRIQUES de la télécommande Sélection de la modulation À l aide des touches sélectionnez la modulation du canal de votre choix Vous pouvez choisir entre 16 32 64 128 256 MAQ ou AUTO Réglage du taux de symbole À l aide des touches sélectionnez le taux de sym...

Страница 80: ...o sans action de votre part la bannière des canaux disparaîtra au bout de cinq secondes environ Informations détaillées sur les programmes Appuyez deux fois sur la touche INFO i lors du visionnage d un programme Vous verrez d abord les informations sur la chaîne s afficher Si vous appuyez de nouveau sur cette touche les informations détaillées sur le programme en cours s affichent comme sur la photo...

Страница 81: ...s titre ni de télétexte Trois pistes audio au maximum sont disponibles pour l enregistrement Si la chaîne contient soit des sous titres soit du télétexte Deux pistes audio au maximum sont disponibles pour l enregistrement Si la chaîne contient à la fois des sous titres et du télétexte Seule une piste audio est disponible pour l enregistrement 2 Pour les chaînes présentant de multiples pistes audio...

Страница 82: ...V CH lors du visionnage d un programme Appuyez sur la touche TV RADIO pour sélectionner une chaîne de télévision ou de radio Vous pouvez sélectionner une liste de chaînes de télévision ou de radio ou bien la liste de toutes les chaînes Appuyez sur les touches pour sélectionner la chaîne désirée puis appuyez sur la touche OK Vous pouvez accéder à la page suivante ou revenir à la page précédente de ...

Страница 83: ...permet d accéder à la page suivante Touches permettent d accéder à la page suivante ou de revenir à la page précédente Touches CH permettent d accéder à la page suivante ou de revenir à la page précédente si vous appuyez sur la touche JAUNE TEXT sans exécuter aucune autre action la bannière du télétexte disparaîtra au bout de quatre secondes environ 8 Sous titres Si le programme diffusé propose de...

Страница 84: ...nt d afficher les informations sur les programmes par bloc de 30 minutes Touche OK permet de sélectionner une chaîne diffusant en direct et de programmer l enregistrement de programmes à venir Touche ROUGE LIBRARY permet d ajouter ou d annuler un enregistrement programmé Touche JAUNE TEXT affiche les programmes par catégorie Tous Film Actualités Divertissement Jeu Sports Programmes pour la jeunesse ...

Страница 85: ...URE PAUSE II pendant le visionnage pour mettre en pause le programme en direct Après quelques instants appuyez sur la touche LECTURE PAUSE II pour reprendre le visionnage du programme La barre d état de l heure apparaît pour indiquer l état de fonctionnement actuel À l aide des touches de lecture vous pouvez lire le contenu sauvegardé sur le disque dur TIMESHIFT II permet de démarrer la fonction T...

Страница 86: ... Appuyez sur la touche ARRÊT Le menu des options d enregistrement s affiche 2 Sélectionnez la chaîne dont vous souhaitez interrompre l enregistrement à l aide des touches puis appuyez sur la touche ARRÊT 3 Pour arrêter également le second enregistrement appuyez sur la touche ARRÊT et appuyez de nouveau sur cette touche lorsque le menu des options s ouvre Vous pouvez enregistrez deux chaînes simulta...

Страница 87: ...a touche BOOKMARK pendant la lecture Appuyez sur la touche ROUGE LIBRARY lorsqu une scène à mémoriser apparaît Le numéro 1 s affiche en haut de l écran et la scène est mémorisée Appuyez de nouveau sur la touche ROUGE LIBRARY lorsque la scène à mémoriser suivante apparaît Pour trouver rapidement la scène utilisez les touches de RECHERCHE Le numéro 2 s affiche et la scène est mémorisée Vous pouvez ajo...

Страница 88: ...un disque dur appuyez sur la touche INFO i 14 1 Programme en direct Lors de la diffusion du programme en direct Appuyez trois fois sur la touche INFO i La première pression entraîne l affichage des informations sur la chaîne tandis que la deuxième pression entraîne l affichage des informations sur le programme La boîte Menu infos contient les éléments suivants pour définir vos préférences Piste audio...

Страница 89: ...e chaîne verrouillée est affichée dans l image secondaire celle ci apparaît vide sur fond noir 14 2 Lecture d un fichier enregistré Lors de la lecture d un fichier enregistré Appuyez sur la touche INFO i Les éléments suivants s affichent pour définir vos préférences Heure affiche l heure de début Durée de lecture affiche la durée de lecture Durée restante affiche la durée restante jusqu à la fin Piste audi...

Страница 90: ...er l état de l enregistrement en visualisant le numéro de la chaîne le nom de l événement le type d enregistrement la fréquence et la durée restante Lorsque deux enregistrements sont en cours les touches vous permettent d afficher l état de l enregistrement 1 et de l enregistrement 2 FONCTIONS DE BASE 0901 DCB P850R RS 408A _FRE indd 24 2006 09 01 ソタタ 9 59 03 ...

Страница 91: ...chaînes 1 ce service dépend du fournisseur de services 2 Une fois que le décodeur a reconnu l heure GMT à partir du signal reçu c est à dire au bout de quelques secondes il est en mesure d afficher les informations correctes sur le programme À l aide des touches sélectionnez Guide dans le menu principal puis appuyez sur la touche À l aide des touches sélectionnez Guide complet ou Mini guide puis ap...

Страница 92: ...me précédent ou sur le programme suivant À l aide des touches sélectionnez Mini guide dans le menu Guide puis appuyez sur la touche OK ou Appuyez sur les touches pour sélectionner le programme précédent ou le programme suivant Vous pouvez utiliser les touches OK et INFO i comme dans le menu du Guide complet 1 vous pouvez également visualiser l heure d affichage des informations GEP 2 si vous sélect...

Страница 93: ...de favoris s affichent à l écran Sélectionnez le groupe favori désiré Appuyez sur la touche TV RADIO pour basculer entre la liste des favoris TV et celle des favoris radio Sélectionnez la chaîne de votre choix à l aide des touches Vous pouvez modifier la liste des chaînes favorites à l aide des options Retirer des FAV Renuméroter Ajouter actuel et Extras Pour quitter le menu appuyez sur la touche EX...

Страница 94: ...éro puis appuyez sur la touche VERTE ALT À l aide des touches modifiez le numéro de la chaîne puis appuyez sur la touche OK 2 1 3 Ajouter actuel Vous pouvez ajouter la chaîne affichée à l écran à la liste des favoris lorsqu elle ne s y trouve pas voir page 16 2 1 4 Extras Vous pouvez accéder à des fonctions supplémentaires pour la liste de favoris voir page 16 0901 DCB P850R RS 408A _FRE indd 28 200...

Страница 95: ...u EXIT 2 3 Liste des chaînes Vous pouvez sélectionner une chaîne de télévision ou de radio à partir de la liste des chaînes Appuyez sur la toucheTV RADIO pour basculer entre la liste des chaînes de télévision et celle des chaînes de radio À l aide des touches sélectionnez la liste de chaînes désirée puis appuyez sur la touche OK Vous pouvez modifier la liste des chaînes à l aide des options Trier V...

Страница 96: ...a méthode de tri choisie 2 3 2 Verrouiller Vous pouvez bloquer la chaîne affichée à l écran Appuyez sur la touche VERTE ALT pour verrouiller la chaîne en question La boîte de saisie du code PIN apparaît Saisissez votre code PIN à l aide des touches NUMÉRIQUES 2 3 3 Ajouter aux FAV Vous pouvez ajouter la chaîne affichée à l écran à la liste des favoris À l aide des touches sélectionnez la chaîne que ...

Страница 97: ... verrouillée l utilisateur doit saisir son code PIN pour pouvoir la visionner Pour verrouiller ou déverrouiller la chaîne procédez comme suit Sélectionnez Verrouiller ou Déverrouiller puis appuyez sur la touche OK La boîte de saisie du mot de passe apparaît Entrez votre code PIN à 4 chiffres pour le confirmer 2 4 3 Modifier le code PIN Vous pouvez modifier votre code PIN À l aide des touches NUMÉRIQU...

Страница 98: ...éo puis appuyez sur la touche OK Touche LIRE PAUSE II permet de lire ou mettre en pause le fichier actuel Touche ARRÊT permet d arrêter la lecture et de quitter la liste des fichiers Touches de RECHERCHE MARCHE AVANT ARRIÈRE Touches de SAUT I I chaque pression permet de sauter 30 secondes de publicité Cette fonction permet de passer les publicités Pour ouvrir un dossier appuyez sur les touches afin d...

Страница 99: ...i désiré longueur chaîne nom de l événement ou date Lorsque vous appuyez sur la touche OK la liste des fichiers est triée selon le critère de tri choisi 3 1 2 Move Déplacer Les fichiers peuvent être déplacés dans différents dossiers du disque dur Si vous sélectionnez l option Move Déplacer la liste des fichiers vidéo apparaît Pour vous déplacer dans la liste des fichiers appuyez sur la touche À l aide...

Страница 100: ...squ à 30 caractères Pour quitter sans sauvegarder appuyez sur la touche MENU ou EXIT 3 1 4 Verrouiller Déverrouiller Vous pouvez verrouiller ou déverrouiller des fichiers de la liste Entrez votre code PIN le code PIN par défaut est 0000 Si un fichier est verrouillé l icône apparaît Pour afficher le fichier verrouillé vous devez saisir votre code PIN 3 1 5 Supprimer Vous pouvez supprimer des fichiers de...

Страница 101: ...uel se trouve le curseur est défini comme premier fichier Déplacez le curseur jusqu au fichier suivant pour sélectionner le deuxième fichier à l aide des touches puis appuyez sur la touche OK Le message de confirmation apparaît Sélectionnez Oui pour procéder à la fusion Pour annuler cette action sélectionnez Annulation à l aide des touches puis appuyez sur la touche OK 3 1 9 Diviser Un fichier peut être...

Страница 102: ...e dur USB externe doit être FAT32 Touche VERTE ALT permet de modifier des fichiers grâce aux options Ajouter à la liste de lecture Trier Copier Renommer Supprimer et Nouveau dossier À l aide des touches sélectionnez un sous menu puis appuyez sur la touche OK Touche JAUNE TEXT permet de sélectionner un support Vidéo Musique Photo ou Radio À l aide de la touche sélectionnez un support puis appuyez sur...

Страница 103: ...e VERTE ALT Le fichier sélectionné est mis en surbrillance Sélectionnez Copy Copier à l aide des touches puis appuyez sur la touche OK Sélectionnez un dossier cible dans le disque dur ou le périphérique USB et appuyez sur la touche JAUNE TEXT Appuyez sur la touche ROUGE LIBRARY pour basculer entre le disque dur et le périphérique USB Vous pouvez constater une déconnexion inattendue avec un certain ...

Страница 104: ...yez sur la touche OK Touche ROUGE LIBRARY permet de choisir un périphérique de stockage disque dur intégré ou périphérique de stockage USB externe Si le périphérique de stockage USB externe n est pas raccordé cette touche est désactivée le système de fichier du disque dur USB externe doit être FAT32 Touche VERTE ALT permet de modifier des fichiers grâce aux options Ajouter à la liste de lecture Trier...

Страница 105: ... critère en fonction duquel vous souhaitez trier les fichiers par exemple le nom ou la taille des fichiers Si vous appuyez sur la touche OK la liste des fichiers est triée selon le critère sélectionné 3 3 4 Copy Copier Les fichiers peuvent être copiés depuis votre décodeur vers un périphérique de stockage USB externe Reportez vous à la méthode de déplacement des fichiers vidéo La seule différence est q...

Страница 106: ...n de sélectionner l icône puis appuyez sur la touche OK Touche VERTE ALT permet de modifier des fichiers grâce aux options telles que Ajouter à la liste de lecture Trier Copier Renommer Supprimer et Nouveau dossier À l aide des touches sélectionnez un sous menu puis appuyez sur la touche OK Les fonctions de modification pour la radio sont identiques à celles pour la musique voir pages 36 et 37 Touche...

Страница 107: ...é par exemple Une fois Ts les jrs Hebdomadaire et Jour ouvré 4 1 1 Ajouter Vous pouvez ajouter un enregistrement programmé à la liste réservée Appuyez sur la touche ROUGE LIBRARY pour ajouter un enregistrement programmé à la liste À l aide des touches définissez la chaîne la date l heure de début l heure de fin ainsi que la fréquence puis appuyez sur la touche ROUGE LIBRARY pour confirmer Touches per...

Страница 108: ...nnez l enregistrement programmé que vous souhaitez supprimer puis appuyez sur la touche BLEUE PRE CH À l aide des touches sélectionnez Oui puis appuyez sur la touche OK 4 2 Réglage GEP Vous pouvez enregistrer des programmes à l aide de la fonction GEP À l aide des touches suivantes sélectionnez le programme que vous souhaitez enregistrer puis appuyez sur la touche ROUGE LIBRARY Touches permettent ...

Страница 109: ... 9 permettent de saisir des chiffres Touche BLEUE PRE CH permet de modifier le nom de l enregistrement Le nom par défaut est créé à partir de la chaîne de la date et de l heure de début de l enregistrement voir page 34 4 4 Intervalle de sécurité d enregistrement À l aide des touches sélectionnez Intervalle de sécurité d enregistrement puis appuyez sur la touche OK ou À l aide des touches sélectionn...

Страница 110: ...onction Time Shift puis appuyez sur la touche OK ou À l aide des touches sélectionnez la durée de votre choix par exemple 30 60 90 120 ou 240 minutes puis appuyez sur la touche OK 5 1 2 Gestionnaire de disques Vous pouvez consulter les informations relatives à la capacité du disque et formater le disque Toutes les données stockées sur le disque seront supprimées après le formatage Pour formater le...

Страница 111: ...16 9 sur un écran de télévision au format 4 3 Elle entraîne une diminution du rapport d image 16 9 sans déformer l écran de sorte que les parties supérieure et inférieure de l écran sont vides et noires Pan Scan Pan Scan signifie recadrage automatique L image est recadrée de sorte que les bords dépassant les limites de l écran sont rognés Mixte sélectionnez cette option lorsque vous souhaitez obten...

Страница 112: ...Vous pouvez activer ou désactiver le système de récupération sonore À l aide des touches sélectionnez ON ou OFF puis appuyez sur la touche OK 5 2 6 Transparence Vous pouvez activer ou désactiver la transparence OSD À l aide des touches sélectionnez ON ou OFF puis appuyez sur la touche OK 5 2 7 Sous titres automatiques Vous pouvez activer ou désactiver l affichage automatique des sous titres Pour in...

Страница 113: ... sélectionnez la langue désirée puis appuyez sur la touche OK 5 3 3 Priorité audio Vous pouvez sélectionner la langue audio et Dolby Digital de votre choix Si la langue audio est prioritaire vous pourrez l entendre dans le son Dolby Digital À l aide des touches sélectionnez n importe quelle langue audio et Dolby Digital puis appuyez sur la touche OK 5 3 4 Sous titres Vous pouvez définir la langue d...

Страница 114: ...initiale Entrez votre code PIN puis appuyez sur la touche OK Appuyez sur la touche OK pour sélectionner la langue désirée puis déplacez le curseur sur Balayage canal initial Appuyez sur la touche OK La boîte du balayage des chaînes apparaît Au besoin réglez les paramètres du balayage pour plus de détails reportez vous à la page 13 Pour commencer le balayage appuyez sur la touche OK 0901 DCB P850R ...

Страница 115: ...ncer la mise à jour du logiciel appuyez sur la touche OK lorsque le décodeur procède à un transfert vous ne devez rien modifier jusqu à ce que le transfert soit terminé 5 4 3 Réinitialiser Vous pouvez rétablir les paramètres définis par défaut par le fabricant en cas de problèmes rencontrés suite à la modification des paramètres des canaux ou autres susceptibles de provoquer une erreur À l aide des t...

Страница 116: ... ci contre État du service Indique l état des services de diffusion numérique comme sur la photo ci contre État du chargeur Indique l état de chargement de l accès à la carte à puce et au fabricant comme sur la photo ci contre Composants Indique des informations relatives aux composants de la carte à puce comme sur la photo ci contre FONCTIONNEMENT DU DÉCODEUR 0901 DCB P850R RS 408A _FRE indd 50 2...

Страница 117: ... 107 127 136 139 153 307 425 ASA 020 065 078 080 091 146 171 197 307 324 375 408 449 ASBERG 049 152 407 ASORA 195 ASTRA 195 ASUKA 050 076 123 378 379 Nom du fabricant MARQUE LISTEDESNUMÉROSDECODE 3 CHIFFRES ATLANTIC 049 050 071 113 152 236 379 ATORI 195 AUCHAN 107 425 AUDIOSONIC 049 074 076 152 182 195 213 379 421 AUDIOTON 050 076 379 421 AUSIND 090 407 AUTOVOX 050 071 078 079 080 083 090 156 236 ...

Страница 118: ...t MARQUE LISTEDESNUMÉROSDECODE 3 CHIFFRES DIGILINE 049 152 DIXI 049 152 195 379 413 DORIC 104 105 DREAN 049 152 DTS 195 DUAL 049 050 107 139 152 156 168 182 243 379 414 417 424 468 470 DUAL TEC 040 050 168 195 379 DUMONT 045 065 080 102 139 146 324 375 379 449 469 DUMONT FINLUX 020 045 078 091 104 DUX 049 112 152 DYNATRON 049 152 ELBE 049 107 123 152 172 210 243 369 391 411 421 435 ELBIT 217 ELCIT...

Страница 119: ...8 380 425 435 GRONIC 045 379 GRUNDIG 049 080 090 152 232 247 249 407 454 455 HALIFAX 076 379 HAMPTON 379 Nom du fabricant MARQUE LISTEDESNUMÉROSDECODE 3 CHIFFRES HANIMEX 094 HANSEATIC 018 049 050 094 104 107 113 152 172 195 241 324 378 379 391 421 455 467 470 475 HANTAREX 045 046 049 152 195 HANTOR 049 152 HARLEY DAVIDSON 042 HARWOOD 049 152 195 426 HAUPPAUGE 049 152 HAVERMY 190 HCM 049 076 123 15...

Страница 120: ...abricant MARQUE LISTEDESNUMÉROSDECODE 3 CHIFFRES LENOIR 050 195 LESA 413 LEYCO 049 076 094 102 152 LIESENK TTER 049 112 152 345 LIFE 440 441 443 444 LIFETEC 049 076 123 152 195 226 440 441 443 444 LLOYD_S 195 LOEWE 035 049 089 120 152 324 391 421 LOEWE OPTA 035 046 049 065 120 144 152 213 324 LOGIK 131 225 LOGIX 195 LUMA 071 107 110 152 171 172 195 210 226 236 307 LUMATRON 049 076 107 152 172 236 ...

Страница 121: ...49 074 083 150 152 182 186 218 247 307 424 453 463 469 481 NOVATRONIC 020 049 152 226 Nom du fabricant MARQUE LISTEDESNUMÉROSDECODE 3 CHIFFRES OCEANIC 086 094 104 107 108 109 139 172 209 425 466 469 475 OCEANIC F 150 ODEON 076 OKANO 049 076 102 152 421 OMEGA 076 ONCEAS 050 ONWA 123 225 OPERA 049 152 OPTIMUS 099 OPTONICA 190 ORBIT 049 152 ORION 012 042 045 049 076 094 113 131 134 139 150 152 191 19...

Страница 122: ...R 049 152 RECTILIGNE 049 152 REDIFFUSION 018 059 104 105 139 171 172 307 471 475 REDIFFUSION UK 150 162 Nom du fabricant MARQUE LISTEDESNUMÉROSDECODE 3 CHIFFRES REDSTAR 049 152 REFLEX 049 152 REOC 460 REVOX 049 152 421 REX 040 071 079 107 110 152 171 210 236 243 307 413 466 RFT 076 102 241 324 391 421 RHAPSODY 379 R LINE 049 152 ROADSTAR 049 076 123 152 163 195 ROBOTRON 065 324 RODEX 049 152 ROWA ...

Страница 123: ...ARQUE LISTEDESNUMÉROSDECODE 3 CHIFFRES SYTONG 379 TACTUS 106 TANDBERG 065 074 078 172 182 210 213 420 449 TANDY 050 102 123 190 307 379 413 466 TASHIKO 018 050 107 177 379 470 474 TATUNG 049 050 102 106 120 131 152 217 379 TCM 440 441 443 444 TEAC 049 076 152 163 195 217 378 380 426 457 458 470 TEC 040 050 064 168 195 213 218 243 379 413 480 TECH LINE 049 152 195 TECHICA 123 TECHNEMA 113 467 TECHN...

Страница 124: ... 049 152 VIDEOTECHNIC 113 226 379 VIDEOTON 107 472 VIDIKRON 045 VIDTECH 018 VIPER 213 VISIOLA 379 VISION 049 113 152 467 VISOREX 442 VISTAR 172 236 VOLTEC 074 VORTEC 152 VOXSON 049 065 090 152 163 171 307 324 407 466 WALTHAM 049 152 163 182 307 379 472 WATSON 049 107 113 123 152 195 247 467 WATT RADIO 045 050 068 104 107 139 150 379 470 480 WEGA 018 049 139 152 324 WEGA COLOR 065 088 WEGAVOX 195 W...

Страница 125: ...sité du signal est trop faible Vérifiez l intensité du signal dans le Menu Infos Corrigez l alignement de votre antenne Message d erreur à l écran Aucun signal Le câble de l antenne est débranché ou desserré L antenne n est pas correctement branchée Vérifiez les branchements et corrigez les Vérifiez l intensité du signal dans le Menu Infos Message d erreur à l écran Veuillez insérer la carte à puce L...

Страница 126: ... MHz Niveau du signal d entrée 78 20 dBm Boucle 50 860 MHz 78 20 dBm 50 860 MHz IED mâle Décodeur vidéo Décodage du système MPEG 2 ISO IEC 13818 Flux de transport Profil et niveau MPEG 2 MP ML 4 2 2 Taux de transfert des données 1 15 Mb s Formats d image 4 3 normal et 16 9 écran large Résolution de l image 720 H x 576 V x 50 champs s Décodeur audio Décodage du système MPEG 1 ISO IEC 11172 3 couches...

Страница 127: ...DRAM 64 Mo DISQUE DUR INTÉGRÉ 160 Go ACCÈS AU DISQUE DUR EXTERNE USB 2 0 HÔTE FORMATS DE FICHIERS COMPATIBLES Musique MP3 Photo JPG CARACTÉRISTIQUES PHYSIQUES Dimensions L x P x H 381 x 267 x 60 mm Poids net 3 1 kg La capacité réelle formatée peut être inférieure à celle indiquée sur l emballage et dans le manuel 1Go 1 milliard d octets SPÉCIFICATIONS TECHNIQUES 0901 DCB P850R RS 408A _FRE indd 61...

Страница 128: ...D D 0901 DCB P850R RS 408A _GB indd 2 2006 09 01 ソタタ 10 02 38 ...

Страница 129: ...ITAL CABLE RECEIVER WITH BUILT IN HARD DISK DRIVE Instructions for use DCB P850R DCB P850RS GB DIGITAL CABLE RECEIVER WITH BUILT IN HARD DISK DRIVE 0901 DCB P850R RS 408A _GB indd 3 2006 09 01 ソタタ 10 02 38 ...

Страница 130: ... a hazard or damage the equipment CONNECTION OF CABLE TV AND STB Connect all components before plugging any power cords into the wall outlet Always turn off the STB TV and other components before you connect or disconnect any cables To disconnect this STB from the mains the plug must be pulled out from the mains socket therefore the mains plug shall be readily operable SERVICING Do not attempt to ...

Страница 131: ... product is out of order 4 Do not turn the power off suddenly while the hard disk drive is running The company shall not be liable for any corruption of data on the hard disk drive caused by the carelessness or misuse of users SAFETY INSTRUCTIONS Correct Disposal of This Product Waste Electrical Electronic Equipment Applicable in the European Union and other European countries with separate collec...

Страница 132: ...uttons 26 2 Channel 27 2 1 Favorite Channel 27 2 2 Auto Scanning 29 2 3 Channel List 29 2 4 Parental Guide 31 3 Library 32 3 1 Video 32 3 2 Music 36 3 3 Photo 38 3 4 Radio 40 4 Timer Recording 41 4 1 Scheduled Recordings 41 4 2 EPG Setting 42 4 3 Manual Setting 43 4 4 Record Guard Time 43 5 Setup 44 5 1 PVR 44 5 2 Preferences 45 5 3 Language 47 5 4 System 48 5 5 Mailbox 49 5 6 Irdeto CA Status 50 ...

Страница 133: ...UHF BAND 50 870 MHz MAX 7 Msps SYMBOL RATE 16 256 QAM MODULATION FORMAT RF LOOP THROUGH OUTPUT MALE FOR ANALOG RECEIVER 3 VIDEO SECTION DVB C COMPLIANT MPEG 2 VIDEO MP ML COMPATIBLE FOR BOTH SCPC MCPC SUPPORTS ASPECT RATIO 4 3 NORMAL AND 16 9 WIDE SCREEN 1 15 Mb s DATA RATE 2 SCART COMPOSITE VIDEO OUTPUT 4 AUDIO SECTION MPEG 1 AUDIO LAYER I II MONO DUAL STEREO AND JOINT STEREO AUDIO MODE 32 44 1 A...

Страница 134: ...e terminal marked RF OUT on the rear panel of STB and its other end to the TV RF input socket In here RF OUT means the loop through In the case of connecting your TV through SCART cable connect the SCART connector marked AV1 TV to the respective SCART port on the TV 4 CONNECTING YOUR VCR OR DVD PLAYER To connect a VCR or DVD player the STB has been provided with SCART at the rear marked AV2 EXT Us...

Страница 135: ...ctly to the TV set Do not connect through a VCR Manufactured under license from Dolby Laboratories Dolby and the double D symbol are trademarks of Dolby Laboratories TruSurround XT SRS and Symbol are trademarks of SRS Labs Inc TruSurround XT technology is incorporated under license from SRS labs Inc Signal Cable 0901 DCB P850R RS 408A _GB indd 7 2006 09 01 ソタタ 10 02 40 ...

Страница 136: ...plays the playing status 5 GUIDE Displays TV Radio EPG Electronic Programme Guide 6 MENU Opens up or exits the menu 7 EXIT Exits the current menu 8 Infrared Sensor Receives IR commands from the remote control 9 Moves the highlight bar for selecting options on the menu 10 OK Enters and confirms any data to the receiver in the menu 11 REC Indicator Lights when the receiver is recording 12 REC Records...

Страница 137: ...A video cable 6 AUDIO OUT Connects to audio inputs of your TV using RCA audio cables 7 AV2 EXT Connects to your VCR or other equipment using a SCART cable 8 AV1 TV Connects to your TV using a SCART cable 9 DIGITAL AUDIO OUT OPTICAL Connects to an optical input of your digital amplifier using an optical cable DESCRIPTION Fan The fan always revolves when the power is on Ensure a minimum of 10cm clear...

Страница 138: ...cture function 7 TV STANDBY ON Turns the TV on and off standby 8 NUMERIC 0 9 Enters numeric values and selects the channel directly by entering its number Also used for inputting text 9 FAV CH Displays the favorite channel list 10 BOOKMARK Used for bookmark function 11 REC Records for Live Broadcasting 12 T REC Used for configuring the timer recording 13 SKIP I I Buttons Used for skipping backwards...

Страница 139: ...e information If pressed again it displays the Info menu which includes information about signal information time details audio video track Add to FAV list PIP On Off and recording status 27 EXIT Exits the current menu 28 RED LIBRARY Displays the recorded list This button functions the same as the RED button on the menu 29 GREEN ALT Selects the audio and video track list for the current service Th...

Страница 140: ... off INPUT SEL Press to select an external input source for the TV VOL Press to adjust the TV volume Exclusive to the TV CH Press to select a TV channel MUTE Press to mute the TV sound NUMERIC 0 9 Press to enter the number 1 There is a model that can only be turned on by pressing the NUMERIC buttons 0 on the remote control 2 TV models of other manufacturer that can be controlled with the remote co...

Страница 141: ...emote control Setting Network ID Use the buttons to select a desired Network ID You can enter the proper Network ID using the NUMERIC buttons on the remote control Selecting Modulation Use the buttons to select the modulation of the channel you want to find You can select the value of 16 32 64 128 256 QAM or AUTO Setting Symbol Rate Use the buttons to select a desired symbol rate of channel you wan...

Страница 142: ...dio programmes are toggled With no action the channel banner disappears after about five seconds Detailed programme information Press the INFO i button twice while you are viewing a programme First you will see the channel information If pressed again detailed information on the current programme is displayed as shown in the picture buttons displays information of the previous or next programmes bu...

Страница 143: ...f the channel does not contain the subtitle and teletext Maximum three audio tracks are available for recording If the channel contains either the subtitle or teletext Maximum two audio tracks are available for recording If the channel contains both the subtitle and teletext One audio track is only available for recording 2 For the channels that contains many audio tracks use the GREEN ALT button ...

Страница 144: ...te List Press the FAV CH button while you are viewing a programme Press the TV RADIO button to select a TV or Radio channel You can select any of TV Radio and All channel lists Press the buttons to select a desired channel then press the OK button To move to the previous or next page on the channel list use the buttons RED LIBRARY button Removes the favorite channel GREEN ALT button Renumbers the ...

Страница 145: ...RY button Goes back to the previous page GREEN ALT button Goes to the next page buttons Moves to the previous next page CH buttons Moves to the previous next page When the YELLOW TEXT button is pressed but no action follows the teletext banner disappears after about four seconds 8 Subtitle When the current broadcasting programme provides subtitle press the YELLOW TEXT button three times to see the...

Страница 146: ...e program information by 30 minutes per block OK button You can select a current live channel and also can schedule the future coming programmes for recording RED LIBRARY button Used for adding or cancelling timer recording YELLOW TEXT button Displays programmes by categories All Movie Drama News Affairs Show Game Show Sports Children s Youth Programmes Music Ballet Dance Arts Culture Social Polit...

Страница 147: ... PLAY PAUSE II button during play and the current live programme will be paused After a while press the PLAY PAUSE II button and the programme resumes The Time status bar appears to show you the current operating status Use the playback related buttons to play contents saved in the HDD TIMESHIFT II Used to start the Time Shift To resume the stilled screen press it again LIVE Returns to the live ch...

Страница 148: ...yed To stop the recording 1 Press the STOP button The recording option menu will appear 2 Select the channel to stop the recording using the buttons and press the STOP button 3 To stop the second recording also press the STOP button and press it again when the option menu opens When recording two channels you can watch only one of those To use the Recording Option menu Press the REC button during ...

Страница 149: ...earch To add a bookmark Press the BOOKMARK button during playback Press the RED LIBRARY button when a desired scene appears The number 1 is displayed at the top on the screen and the scene is memorised Press the RED LIBRARY button again when the next desired scene appears To get the scene quickly use the SEARCH buttons The number 2 is displayed and the scene is memorised Bookmarks can be added by ...

Страница 150: ...annel or the recorded play on HDD press the INFO i button 14 1 On live programme With in the live programme do the following Press the INFO i button 3 times The first press opens the channel information while the second press opens the programme information The Info menu box displays the following items for your own taste Audio Track Use the buttons to select an audio language then press the OK but...

Страница 151: ... in the small picture it is displayed black empty 14 2 While a recorded file is played With in a recorded file playing do the following Press the INFO i button It displays the following items for your own taste Time Displays the started time Playing Time Displays the played period of time Remain Time Displays the remaining time to the end Audio Track Use the buttons to select an audio language then ...

Страница 152: ...Status You can check the recording status such as channel number event name record type frequency and remaining time When there are 2 recordings available use the buttons to see the recording status between recording 1 and recording 2 BASIC FUNCTIONS 0901 DCB P850R RS 408A _GB indd 24 2006 09 01 ソタタ 10 02 48 ...

Страница 153: ...nformation about programmes on various channels 1 This service depends on the service provider 2 After the receiver recognises the GMT time from the received signal that takes few seconds it can display correct programme information Use the buttons to select Guide in the main menu then press the button Use the buttons to select Full Guide or Mini Guide then press the OK or button The programme inf...

Страница 154: ...ni Guide Mini Guide menu is similar to Full Guide menu Use buttons to get previous or next programme information Use the buttons to select Mini Guide in the Guide menu then press the OK or button Press buttons to select previous or next programme You can use OK and INFO i buttons as in Full Guide menu 1 It can reach as far as the time displaying the EPG information 2 If you select a locked channel...

Страница 155: ...the favorite list The screen displays five different favorite groups Select a favorite group you want Press the TV RADIO button to toggle the TV and Radio favorite list Use the buttons to select a desired channel You can edit the favorite channel list using Rem FAV Renumber Add Current and Extras To exit press the EXIT button 2 1 1 Remove Favorite channel You can remove channels on the favorite lis...

Страница 156: ...en press the GREEN ALT button Use the buttons to change the channel number then press the OK button 2 1 3 Add Current You can add the current channel to the favorite list when the current channel is not in the favorite list See page 16 2 1 4 Extras You can perform extra functions in the favorite list See page 16 0901 DCB P850R RS 408A _GB indd 28 2006 09 01 ソタタ 10 02 50 ...

Страница 157: ...thout saving press the MENU or EXIT button 2 3 Channel List You can select TV or Radio channel from the channel list Press the TV RADIO button to toggle the TV and Radio channel list Use the buttons to select a desired channel list and press the OK button You can edit the channel list using Sort Lock and Add to FAV To exit press the EXIT button ICONS of the Channel List Locked channel Favorite cha...

Страница 158: ...rted by your desired sorting method 2 3 2 Lock You can block the current channel Press the GREEN ALT button to lock the channel Then the menu requesting the PIN code appears Enter the PIN code using the NUMERIC buttons 2 3 3 Add to FAV You can add the current channel to the favorite list Use the buttons to select the channel you want to add to the favorite list then press the YELLOW TEXT button 09...

Страница 159: ...k Channel When a channel is locked the user must input the PIN code to watch it To lock or unlock the channel Select Lock or Unlock and press the OK button The password input box appears Enter your 4 digit PIN code to confirm it 2 4 3 Change PIN Code You can change the PIN code Use the NUMERIC 0 9 buttons to enter the old PIN code and new PIN code To confirm it enter the new PIN code again Please re...

Страница 160: ... video file then press the OK button PLAY PAUSE II button Plays or pauses the current file STOP button Stops playback and exits to the file list SEARCH buttons REW FF SKIP I I buttons Each press performs a 30 second commercial skip It enables you to evade from watching commercials To enter a folder use the buttons to select a folder then press the OK button To change to a higher level folder use the ...

Страница 161: ...a desired sorting type such as length channel event name and date When you press the OK button file list is sorted by your desired sorting type 3 1 2 Move Files can be moved between different HDD folders If Move is selected it lists the video files To move to the file list press the button Use the buttons to select each file to move then press the OK button To move the selected files to the destination...

Страница 162: ...cters are allowed as a channel name To exit without saving press the MENU or EXIT button 3 1 4 Lock Unlock You can lock or unlock files in the list Enter your own PIN code The factory preset PIN code 0000 If a file is locked you can see icon In order to see the locked file you must enter the PIN code 3 1 5 Delete You can delete files from the file list Use the buttons to select Yes then press the OK bu...

Страница 163: ...u select Combine the file at which the cursor is located is set as the first file Move the cursor to the next file to select the second one using the buttons then press the OK button The confirmation message appears Select Yes for combine To cancel the action select Cancel using the buttons then press the OK button 3 1 9 Divide A file can be split into two files When you select Divide the highlight bar i...

Страница 164: ...ng external USB HDD its file system must be FAT32 GREEN ALT button Edits files by Add to Playlist Sort Copy Rename Delete and New folder Use the button to select a sub menu then press the OK button YELLOW TEXT button Selects the contents such as Video Music Photo and Radio Use the button to select a content then press the OK button BLUE PRE CH button Selects the play option such as Repeat and Random...

Страница 165: ...is highlighted Select Copy using the buttons then press the OK button Select a target folder in the HDD or USB device and press the YELLOW TEXT button To change to the external USB device press the RED LIBRARY button which can toggle between HDD and USB device It may cause a sudden disconnection with a particular USB memory during file MP3 or JPEG copying 3 2 4 Rename You can change the name of file...

Страница 166: ... the OK button RED LIBRARY button Selects the storage device between the built in HDD and the external USB storage device If the external USB storage device is not connected this button is deactivated When using external USB HDD its file system must be FAT32 GREEN ALT button Edits files by Add to Playlist Sort Copy Rename Delete and New folder Use the buttons to select a sub menu then press the OK b...

Страница 167: ...n the file list Use the buttons to select a desired sorting type such as file name and size When you press the OK button file list is sorted by your desired sorting type 3 3 4 Copy Files can be copied between your receiver and an external USB storage device Refer to the method as in video files moving Only the difference is the target files are not removed from the source folder by Copy 3 3 5 Rename Yo...

Страница 168: ...der use the buttons to select the then press the OK button GREEN ALT button Edits files such as Add to Playlist Sort Copy Rename Delete and New folder Use the button to select a sub menu then press the OK button Edit functions of Radio are the same as the ones in music See page 36 and 37 YELLOW TEXT button Selects the contents such as Video Music Photo and Radio Use the button to select a content t...

Страница 169: ...ency of the timer recording such as Once Daily Weekly and Work Day 4 1 1 Add You can add the timer recording to the reserved list Press the RED LIBRARY button to add the timer recording to the scheduled list Use the buttons to set the channel date start time end time and frequency then press the RED LIBRARY button to confirm buttons Adjusts the values buttons Moves through the items NUMERIC 0 9 but...

Страница 170: ...ved list Use the buttons to select a timer recording you want to delete then press the BLUE PRE CH button Use the buttons to select Yes then press the OK button 4 2 EPG Setting You can record the channels using EPG Use the following buttons to select a channel you want to record then press the RED LIBRARY button buttons Selects channels buttons Selects times SKIP I button Moves to the next day Use...

Страница 171: ...IC 0 9 buttons Enters number BLUE PRE CH button Changes the recording name The default name is created based on the channel date and start time of the recording See page 34 4 4 Record Guard Time Use the buttons to select Record Guard Time then press the OK or button Use the buttons to desired time such as off 2 5 10 and 15minutes then press the OK button OPERATING THE RECEIVER 0901 DCB P850R RS 40...

Страница 172: ...hift Buffer then press the OK or button Use the buttons to desired time such as 30 60 90 120 and 240 minutes then press the OK button 5 1 2 Disc Manager You can check the capacity information of the disc and you can format the disc All data stored in the disc will be deleted after formatting To format the disc Press the buttons to select a storage device between HDD and USB If the external USB sto...

Страница 173: ...t to see a 16 9 ratio image on the 4 3 ratio TV monitor It shrinks the 16 9 ratio image with no screen distortion so the top and bottom of the screen are black empty CCO CCO means center cutout The image is center focused so the other edges that exceed the screen limits are cropped 14 9 LB Select this when you want to see a 14 9 ratio image on the 4 3 ratio TV monitor It shrinks the 14 9 ratio ima...

Страница 174: ...hen press the OK button 5 2 5 SRS You can set the Sound Retrieval System on or off Use the buttons to select ON or OFF then press the OK button 5 2 6 Transparency You can set the OSD transparency on or off Use the buttons to select ON or OFF then press the OK button 5 2 7 Automatic Subtitles You can set the automatic display of subtitles on or off To show effect sounds such as knock knock for hear...

Страница 175: ...select a desired language then press the OK button 5 3 3 Audio Priority You can select any of audio language and Dolby Digital If the audio language has priority you can hear the audio language without Dolby Digital sound Use the buttons to select any of audio language and Dolby Digital then press the OK button 5 3 4 Subtitles You can set the language of subtitles Use the buttons to select a desir...

Страница 176: ... the initial installation Enter your own PIN code then press the OK button Press the OK button to select your desired language then move the cursor to Continue Press the OK button The channel scanning box appears Adjust the settings for scan if needed For details see page 13 To start scanning press the OK button 0901 DCB P850R RS 408A _GB indd 48 2006 09 01 ソタタ 10 02 57 ...

Страница 177: ... value using the buttons To start the software upgrade press the OK button When the receiver is transferring you must keep a thing intact until transfer is ended 5 4 3 Reset You can restore the factory preset values in case the user has encountered some problems after changing any new values for channel data and others which may be in error Use the buttons to select OK then press the OK button Ent...

Страница 178: ...ture Service Status It shows you the status of the digital broadcastng services as shown in the picture Loader Status It shows you the load status of the access to smartcard and manufacturer as shown in the picture Components It shows you information about smartcard components as shown in the picture OPERATING THE RECEIVER 0901 DCB P850R RS 408A _GB indd 50 2006 09 01 ソタタ 10 02 58 ...

Страница 179: ... ASA 020 065 078 080 091 146 171 197 307 324 375 408 449 ASBERG 049 152 407 ASORA 195 ASTRA 195 ASUKA 050 076 123 378 379 Maker BRAND NAME CODE NUMBER 3DIGIT LIST ATLANTIC 049 050 071 113 152 236 379 ATORI 195 AUCHAN 107 425 AUDIOSONIC 049 074 076 152 182 195 213 379 421 AUDIOTON 050 076 379 421 AUSIND 090 407 AUTOVOX 050 071 078 079 080 083 090 156 236 324 379 407 413 449 468 470 AWA 018 049 131 ...

Страница 180: ...RAND NAME CODE NUMBER 3DIGIT LIST DIGILINE 049 152 DIXI 049 152 195 379 413 DORIC 104 105 DREAN 049 152 DTS 195 DUAL 049 050 107 139 152 156 168 182 243 379 414 417 424 468 470 DUAL TEC 040 050 168 195 379 DUMONT 045 065 080 102 139 146 324 375 379 449 469 DUMONT FINLUX 020 045 078 091 104 DUX 049 112 152 DYNATRON 049 152 ELBE 049 107 123 152 172 210 243 369 391 411 421 435 ELBIT 217 ELCIT 045 046...

Страница 181: ...52 195 378 380 425 435 GRONIC 045 379 GRUNDIG 049 080 090 152 232 247 249 407 454 455 HALIFAX 076 379 HAMPTON 379 Maker BRAND NAME CODE NUMBER 3DIGIT LIST HANIMEX 094 HANSEATIC 018 049 050 094 104 107 113 152 172 195 241 324 378 379 391 421 455 467 470 475 HANTAREX 045 046 049 152 195 HANTOR 049 152 HARLEY DAVIDSON 042 HARWOOD 049 152 195 426 HAUPPAUGE 049 152 HAVERMY 190 HCM 049 076 123 152 163 1...

Страница 182: ...Maker BRAND NAME CODE NUMBER 3DIGIT LIST LENOIR 050 195 LESA 413 LEYCO 049 076 094 102 152 LIESENK TTER 049 112 152 345 LIFE 440 441 443 444 LIFETEC 049 076 123 152 195 226 440 441 443 444 LLOYD_S 195 LOEWE 035 049 089 120 152 324 391 421 LOEWE OPTA 035 046 049 065 120 144 152 213 324 LOGIK 131 225 LOGIX 195 LUMA 071 107 110 152 171 172 195 210 226 236 307 LUMATRON 049 076 107 152 172 236 379 LUX ...

Страница 183: ...RDMENDE 049 074 083 150 152 182 186 218 247 307 424 453 463 469 481 NOVATRONIC 020 049 152 226 Maker BRAND NAME CODE NUMBER 3DIGIT LIST OCEANIC 086 094 104 107 108 109 139 172 209 425 466 469 475 OCEANIC F 150 ODEON 076 OKANO 049 076 102 152 421 OMEGA 076 ONCEAS 050 ONWA 123 225 OPERA 049 152 OPTIMUS 099 OPTONICA 190 ORBIT 049 152 ORION 012 042 045 049 076 094 113 131 134 139 150 152 191 195 216 3...

Страница 184: ...436 RECOR 049 152 RECTILIGNE 049 152 REDIFFUSION 018 059 104 105 139 171 172 307 471 475 REDIFFUSION UK 150 162 Maker BRAND NAME CODE NUMBER 3DIGIT LIST REDSTAR 049 152 REFLEX 049 152 REOC 460 REVOX 049 152 421 REX 040 071 079 107 110 152 171 210 236 243 307 413 466 RFT 076 102 241 324 391 421 RHAPSODY 379 R LINE 049 152 ROADSTAR 049 076 123 152 163 195 ROBOTRON 065 324 RODEX 049 152 ROWA 458 ROWS...

Страница 185: ...D NAME CODE NUMBER 3DIGIT LIST SYTONG 379 TACTUS 106 TANDBERG 065 074 078 172 182 210 213 420 449 TANDY 050 102 123 190 307 379 413 466 TASHIKO 018 050 107 177 379 470 474 TATUNG 049 050 102 106 120 131 152 217 379 TCM 440 441 443 444 TEAC 049 076 152 163 195 217 378 380 426 457 458 470 TEC 040 050 064 168 195 213 218 243 379 413 480 TECH LINE 049 152 195 TECHICA 123 TECHNEMA 113 467 TECHNICS 099 ...

Страница 186: ...EOSYSTEM 049 152 VIDEOTECHNIC 113 226 379 VIDEOTON 107 472 VIDIKRON 045 VIDTECH 018 VIPER 213 VISIOLA 379 VISION 049 113 152 467 VISOREX 442 VISTAR 172 236 VOLTEC 074 VORTEC 152 VOXSON 049 065 090 152 163 171 307 324 407 466 WALTHAM 049 152 163 182 307 379 472 WATSON 049 107 113 123 152 195 247 467 WATT RADIO 045 050 068 104 107 139 150 379 470 480 WEGA 018 049 139 152 324 WEGA COLOR 065 088 WEGAV...

Страница 187: ...picture Signal strength too low Check the signal strength in the Info Menu correct alignment of your antenna On Screen Error Message No signal Antenna cable not connected or not tight Incorrect connection of the antenna Check connection and correct Check the signal strength in the Info Menu On Screen Error Messages Please insert Samrtcard Smartcard not plugged in correctly not plugged in depending...

Страница 188: ... 50 860 MHz Input signal level 78 20 dBm Loop through 50 860 MHz 78 20 dBm 50 860 MHz IED Male Video Decoder System decoding MPEG 2 ISO IEC 13818 Transport Stream Profile and level MPEG 2 MP ML 4 2 2 Data rate 1 15 Mbs Video formats 4 3 normal and 16 9 wide screen Picture resolution 720 H x 576 V x 50 fields sec Audio Decoder System decoding MPEG 1 ISO IEC 11172 3 layer I II Audio mode Mono Dual Ste...

Страница 189: ...ORY Flash 8MB SDRAM 64MB BUILT IN HDD 160GB ACCESS EXTERNAL HDD USB2 0 HOST PLAYABLE CONTENTS FILE FORMAT Music MP3 Photo JPG PHISICAL SPECIFICATION Size W x D x H 381 x 267 x 60 mm Weight Net 3 1 Kg Actual formatted capacity may be less than what is marked on box and manual 1GB 1billion byte TECHNICAL SPECIFICATIONS 0901 DCB P850R RS 408A _GB indd 61 2006 09 01 ソタタ 10 03 01 ...

Отзывы: