background image

43

42

CHAPTER 3

Watching TV

3

3

CHAPTER 3

Watching TV

3

3

Changing channels

All available channels from any of these sources will appear in the Guide, and can be
tuned in using the CHAN 

/

buttons and the 0 - 9 number buttons on your remote 

control. The Channel Banners that appear on the screen as you change channels (or when
you press the INFO button) indicate the signal type for the program you are watching.
Satellite indicates the program on the current channel is being received through your 
satellite dish. 

To change the channel you are watching:

1

Press the CHAN 

button on the remote control to tune to a higher channel number. Press the

CHAN 

button to tune to a lower channel number.

2

Enter a channel number directly with the 0 - 9 number buttons. After entering a number, 
press the SELECT button or wait a few seconds for the system to tune to the new channel.

Adjusting the volume

To adjust the volume while watching DIRECTV programming, you simply press the VOL +
button on the remote control to increase the volume or the VOL - button to decrease the 
volume. In order for the DIRECTV

®

Receiver’s remote control to adjust your TV’s volume 

setting,  you will have to program the remote control to operate your TV. (See Chapter 7:
Programming the remote control.)

Getting information on the TV program you are watching

Your DIRECTV

®

Receiver provides several layers of information about the TV programs 

you watch.

The Channel Banner

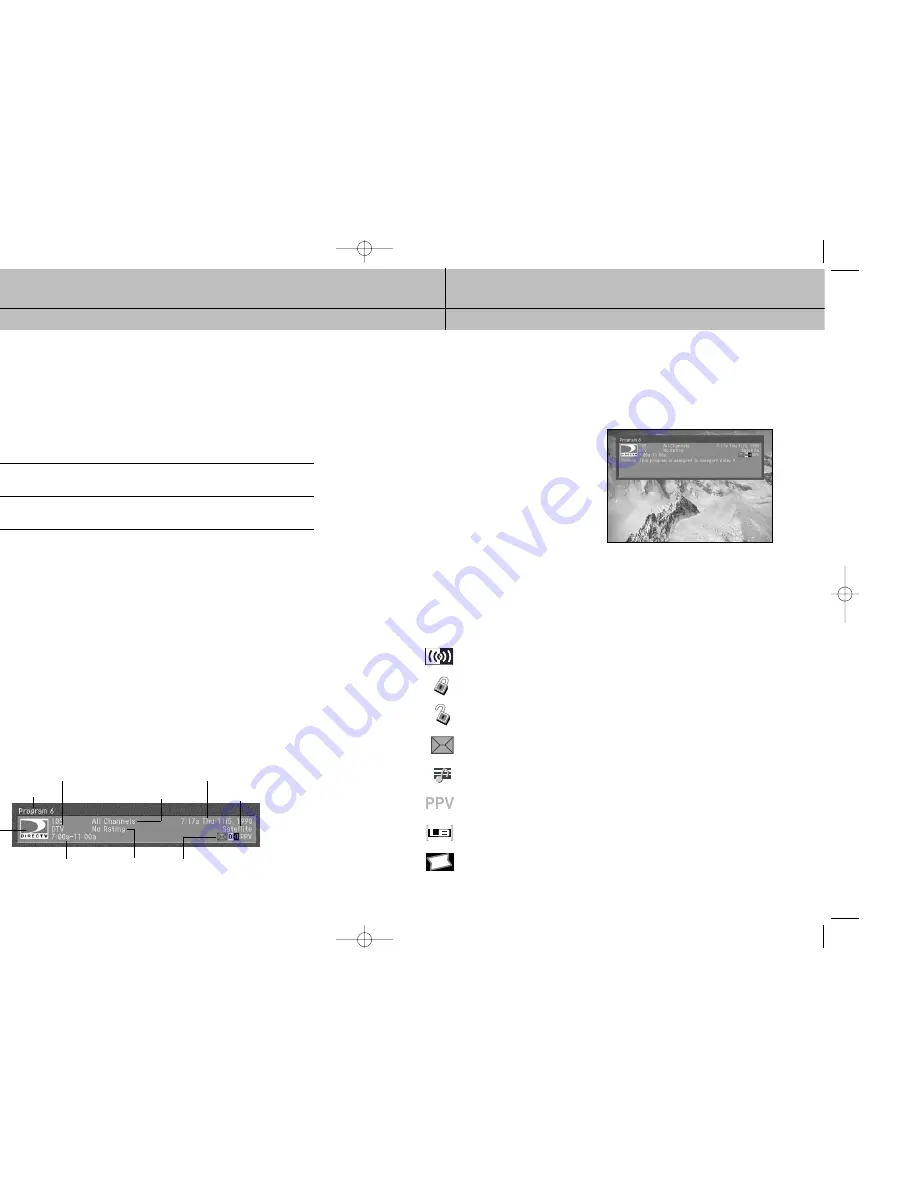
As you change channels you will see a Channel Banner on each channel you tune to.
After a few seconds, the Channel Banner disappears. If you want to clear it right away,
press the EXIT button on your remote control. The Channel Banner provides the following
information:

The Full Channel Banner

The Channel Banner provides quick information as you button channels on your DIRECTV

®

Receiver. If you want to see information about the channel you are currently watching, 
simply press the INFO button on your DIRECTV

®

Receiver’s remote control. Pressing the

INFO button displays the Full Channel Banner.

The Full Channel Banner displays all the
information in the Channel Banner, plus 
more details about the program. 
For example, the Full Channel Banner for 
a movie might display the category for the
movie (drama, comedy, action/adventure,
etc.), the cast, the year it was released, and
a short description of the plot. You can clear
the Full Channel Banner from your screen by
pressing the EXIT button on your remote 
control.

Information icons

In addition to the basic channel and program information contained in the Channel
Banners (program title, channel name, rating, etc.), there are a set of information icons.
These icons tell you more about the program you are watching and about the status of
your DIRECTV

®

Receiver. Here are descriptions of each icon:

Channel number and name

Program start
and end times

Program rating Information icons

(See next page for details.)

Current time and date

Current user profile

Signal type and
audio format

Program title

Channel logo

Multi-language

This icon appears when additional audio tracks are available.

Locked

This icon appears when the system is locked.

Unlocked

This icon appears when the system is temporarily unlocked.

Mail

This icon appears when there are unread mail messages from DIRECTV in your system mailbox.

Music channel

This icon appears when the channel is a music-only channel.

Pay per view program

This icon appears when the program is a pay per view program.

Letterbox

This icon indicates that the current program is being broadcast using the letterbox widescreen video format.

All Day Ticket

This icon will appear when you purchase All Day Ticket.

D10-200  CHAPTER  3-ENG_01    8/9/04    10:03  AM    Page  42

Содержание D10

Страница 1: ...Owner s Manual D10 200 DIRECTV Receiver User s Guide DIRECTV Inc 2230E Imperial Hwy El Segundo CA 90245 Telephone 1 800 DIRECTV 347 3288 MF68 00333A 01 ver_01 8 9 04 10 00 AM Page 1 ...

Страница 2: ...subject to the following two conditions 1 This device may not cause harmful interference and 2 This device must accept any interference that may cause undesired operation This satellite receiver provides display of television closed captioning in accordance with 15 119 of the FCC rules Note you should use the Telephone line cord which is supplied with the machine If you are replacing it with the o...

Страница 3: ... logo are registered trademarks of Inc All other trademarks and service marks are the property of their respective ision Information pment incorporates copyright protection technology that is protected by U S nd other intellectual property rights Use of this copyright protection technology d by Macrovision for home and other limited DBS IRD pay per view uses only engineering or disassembly is proh...

Страница 4: ...Y NOT APPLY TO YOU odifications or other changes to the product including but not limited to software dware modification in any way other than as expressly authorized by DIRECTV d this limited warranty Except in the case of hardware or software provided by TV installing software modifications hacks or utilizing service access or back will void this limited warranty Reception transmission problems ...

Страница 5: ...fied to comply with Class B limits may be attached to this device Operation with non certified peripherals is likely to result in interference to radio and TV reception To meet FCC requirements shielded cables are required to connect the device to a personal computer peripheral or other Class B certified device This equipment complies with Part 68 of the FCC Rules and the requirements adopted by A...

Страница 6: ...e simple steps below or call 1 800 DIRECTV 1 SIGN IN with your user name and password or click on the Register now link and go through the easy steps then continue with Step 2 2 SELECT Option B and then click the Next button at the bottom of the page 3 SCROLL down to Step 3 Add Additional Services and SELECT DIRECTV PROTECTION PLAN then CLICK on the Next button 4 REVIEW your change and CLICK on th...

Страница 7: ...m 50 Pay per view programs 51 apter 4 Program reminders 56 Scheduling program reminders 56 Reviewing and modifying reminders 57 TABLE OF CONTENTS Chapter 5 User profiles 58 User profiles basics 58 Editing user profile names 59 Editing channel lists 60 Setting ratings limits 61 Allowing or blocking pay per view purchases 65 Setting a pay per view spending limit 66 Setting the screen color and trans...

Страница 8: ...cord Access Card mote control S Video cable A V cable Power cord Œ POWER Turns your receiver on and Standby Remote Control Sensor Point your remote control at this sensor when operating your receiver ˇ GUIDE Displays the on screen Program Guide MENU Displays the Main Menu ˆ UP DOWN LEFT RIGHT These buttons navigate left right up or down in the on screen Guide and menu system Ø SELECT Selects a hig...

Страница 9: ...udio cables these jacks connect the DIRECTV Receiver to your TV or VCR JACK ne line connected to this jack allows you to order pay per view programming R plugs in the AC mains power cord The input AC voltage range is 120V 60Hz supply f the DIRECTV Receiver Installing the batteries in the remote control You ve unpacked the receiver and reviewed its front and back panels Now it s time to start setti...

Страница 10: ...fety and setup tips Protect your components from power surges Always turn off and unplug your DIRECTV Receiver TV and any other components before connecting or disconnecting any of the cables Position all cables correctly to avoid audio hum or interference After connecting the components please run the audio video cables along the side of the TV set rather than straight down the back of the TV Mak...

Страница 11: ...d for io and white for left audio Telephone jack and cord The Phone Line jack and the included telephone cord connect your DIRECTV Receiver to a phone line If your home does not have RJ 11 type phone jacks please contact your phone company to get one installed A continuous land based phone line connection is required for DIRECTV Pay Per View functionality and DIRECTV subscriptions Any calls genera...

Страница 12: ...e DIRECTV Receiver to a TV and VCR but Option es improved sound and video quality over Option C If you are planning to your DIRECTV Receiver to a TV and VCR which both have A V jacks use on Option D See page 28 for details E DIRECTV Receiver to TV and A V receiver shows you how to connect the DIRECTV Receiver to an A V system that includes eceiver If you plan to use an A V receiver with your DIREC...

Страница 13: ...nds of the A V cables to the audio and video input jacks on your TV ure to connect the outputs on the DIRECTV Receiver to corresponding inputs on your TV o out to video in left audio out to left audio in right audio out to right audio in ional if your TV has an S Video input jack connect one end of an S Video cable to the DEO jack on the back of the DIRECTV Receiver Connect the other end of this c...

Страница 14: ... the DIRECTV Receiver nect one end of the coaxial cable to the TV OUT connector on the back of the CTV Receiver Connect the other end of this cable to the Antenna In jack on your VCR nect one end of another coaxial cable not included to the TV OUT RF jack on the back ur VCR Connect the other end of this cable to the Antenna In jack on the back of your TV in the power cords for your DIRECTV Receive...

Страница 15: ...eceiver to corresponding inputs on your video out to video in left audio out to left audio in right audio out to right audio in ching like colors connect another set of A V cables not included to the other set of audio video output jacks on the back of the DIRECTV Receiver Connect the other ends of these es to the audio and video input jacks on your TV Be sure to connect the outputs on the CTV Rec...

Страница 16: ...riate audio and video input jacks on your receiver Be sure to connect the outputs on the DIRECTV Receiver to corresponding inputs our A V receiver video out to video in left audio out to left audio in right audio out to audio in nect another set of A V cables not included to the second set of audio and video output on the back of the DIRECTV Receiver nect the other ends of these A V cables to the ...

Страница 17: ...elp you point your dish accurately based on your ZIP code he setup of your satellite dish using an on screen signal meter dish type to tell your DIRECTV Receiver what kind of satellite dish you are using r dish type automatically ons that follow detail each of these procedures Acquiring the correct dish pointing angles The Dish Pointing menu item in the Set Dish menu allows you to find out exactly...

Страница 18: ...e dish type To function properly your DIRECTV Receiver needs to know what type of satellite dish you are using You can specify the dish type using the instructions here or you can follow the steps on page 36 to use the Auto Detection menu item to automatically set the dish type To manually set the dish type 1 If the Progress screen shown here is on your TV screen select Installation by pressing th...

Страница 19: ...low these steps 1 Press the MENU button on your remote control 2 Highlight the Setup menu item then press the SELECT button 3 Highlight the System menu item then press the SELECT button 4 Highlight the System Test menu item then press the SELECT button The System Test screen appears The test will begin as soon as the screen appears Results are displayed in a moment If the test discovers a problem ...

Страница 20: ...th your retailer or visit DIRECTV com for information on availability of local channels from DIRECTV in your area DIRECTV programming is provided in accordance with the terms and conditions of the DIRECTV Customer Agreement which is provided at DIRECTV com or with your first DIRECTV bill Activation of programming may be subject to credit approval and requires valid service address social security ...

Страница 21: ...ewind Fast Forward GUIDE Press to view the on screen Program Guide ACTIVE Press this button to search for a program listing in the Guide LIST Displays the program reminder in the Timer EXIT Exit any Guide or Menu screen and return to the TV program you were watching SELECT Select highlighted items in the on screen Menu or Guide Up Down Left Right arrows These buttons move the highlight to any on s...

Страница 22: ... information about the channel you are currently watching simply press the INFO button on your DIRECTV Receiver s remote control Pressing the INFO button displays the Full Channel Banner The Full Channel Banner displays all the information in the Channel Banner plus more details about the program For example the Full Channel Banner for a movie might display the category for the movie drama comedy ...

Страница 23: ... displays the last channel you were viewing Buy Price For pay per view programs allows you to purchase the program Cancel Price For pay per view programs that you have previously purchased but that have not yet aired lets you cancel your purchase View Displays the channel airing the program described Schedule For future programs allows you to set your DIRECTV Receiver to remind you when the progra...

Страница 24: ... highlight different program listings in the Guide use the arrow buttons on your remote control to move up or down in the channel list or forward and backward in time 2 To move up and down through the channel list a full page at a time press the CHAN and CHAN buttons on your remote control 3 To move the Guide directly to a specific channel press the 0 9 number buttons on your remote control to ent...

Страница 25: ...find programs that match your search terms 1 While viewing the Guide press the ACTIVE button on your remote control A search list appears allowing you to choose a type of search 2 Highlight By Credits By Title or By Text then press the SELECT button The search screen you selected appears If you chose to search By Credits the screen allows you to select a type of credit to search by Highlight one o...

Страница 26: ...le some s are available in alternative languages is icon indicates that two or more alternative languages are available for the program To change the audio format for a program you are watching follow these steps 1 While viewing a program press the INFO button on your remote control The Brief or Full Channel Banner appears 2 Press the right arrow button A list of available audio formats for the pr...

Страница 27: ...y per view purchases to view a list of upcoming pay per view purchases and to cancel upcoming pay per view purchases Viewing your Past Purchase list To see a list of pay per view programs that you purchased and watched follow these steps 1 Press the MENU button on your remote control 2 Highlight the Purchases menu item then press the SELECT button The Purchases menu appears The Past Purchases menu...

Страница 28: ...ch you have made not yet aired can be canceled following the instructions below Canceling a pay per view purchase To cancel the purchase of a pay per view program that you purchased but have not yet watched follow these steps 1 Press the MENU button on your remote control 2 Highlight the Purchases menu item then press the SELECT button 3 Highlight the Future Purchases menu item then press the SELE...

Страница 29: ...rough this list 5 To modify or check the details for any previously scheduled timers highlight that timer from the list then press the SELECT button To schedule a new program reminder highlight a blank line from the list then press the SELECT button The Timer No screen appears 6 Highlight the option you wish to change For new timers or for timers you previously scheduled using the Timers screen in...

Страница 30: ...to identify them with members of your household Ratings spending and channel restrictions set in the Family profile still apply when one of these four user profiles is the active profile and the system is locked Channels You can change the Screen color or Translucency in the preferences of the set up menu Editing user profile names The four profiles named User 1 4 can be renamed for members of you...

Страница 31: ...the channel list Edit Channel List screen appears 5 Edit the list using the controls as described below Channels that are removed from the channel list do not appear in the Program Guide and they are skipped when you change channels with the CHAN and CHAN buttons 6 When you have finished editing the list highlight the on screen Back button then press the SELECT button Setting ratings limits To con...

Страница 32: ...ire Audience rating screen TV G General audience Although not specifically designed for children most parents would find this program suitable for all ages TV PG Parental guidance suggested This program may not be suitable for younger children TV 14 Parents strongly cautioned This program may contain material parents would find unsuitable for children under 14 years of age TV MA Mature audience on...

Страница 33: ...tricted Some material not suitable for children 17 years of age or younger Parents are strongly urged to investigate this film before allowing children to view it with them 17 This film contains material that is intended to be viewed by adults only This film contains explicit sexual material and is intended to be viewed by adults only Allowing or blocking pay per view purchases To set whether pay ...

Страница 34: ...em is locked Locking and unlocking your DIRECTV System later in this chapter Setting the screen color and translucency For each of the profiles you can set the screen color and translucency level used to display Menu and Guide screens Screen colors can be set for the Family profile and the four User profiles You can also choose from four levels of translucency Translucency can be set for the Famil...

Страница 35: ... a screen where you ock the system When the system is locked the Unlock System menu item is displayed Selecting Unlock System displays a screen where you can unlock the system Chapter 6 Settings preferences and upgrades This chapter tells you how to use the DIRECTV menu system to control the way your DIRECTV Receiver operates Its contents include Reading your mail Setting system preferences Review...

Страница 36: ...on your TV screen Or you can choose 16 9 it will display the entire program video on your TV screen but will display black above and below the program to adjust the widescreen video image to your 4 3 format creen The choice is a matter of preference Setting the default screen color and translucency The Screen Color menu item in the Preferences menu allows you to set a default screen color that wil...

Страница 37: ... you to view a list of calls that you have received on the telephone line connected to your DIRECTV Receiver It also allows you to control whether the Caller ID feature is turned on or off The Caller ID feature only works if you subscribe to the caller ID service provided by your local telephone service Turning the Caller ID feature on or off To control whether your DIRECTV Receiver captures calle...

Страница 38: ... provider to automatically control two time settings the time zone your DIRECTV Receiver uses and whether your DIRECTV Receiver observes Daylight Savings Time If you turn the Local Time Setting on you can choose a time zone and decide whether or not to observe Daylight Savings Time With the Local Time setting off your service provider automatically controls these settings for you Follow these step...

Страница 39: ...cess Card screen appears art replacing your Access Card highlight the on screen CT button then press the SELECT button On screen uctions tell you how to replace your old card with the one Follow these instructions Viewing important information and a list of features supported by your DIRECTV Receiver The System menu allows you to view a list of important details about your DIRECTV Receiver as well...

Страница 40: ...rk with another t you can Simply set up your remote to work with the component and then follow the ck instructions see page 80 TV INPUT Select setup Once you ve set up your TV Power VOL and MUTE you can program the TV INPUT button if you d like 1 Move the slide switch near the top of the remote to TV 2 Point the remote away from your DIRECTV Receiver Press and hold MUTE and SELECT until the light ...

Страница 41: ...tes 1 First turn on the TV or component 2 Move the slide switch near the top of the remote control to the appropriate position 3 Point the remote away from your DIRECTV Receiver and components Press and hold MUTE and SELECT until the light near the slide switch on the remote flashes twice about 5 seconds 4 Enter one of the following 4 digits TV 9 9 1 1 VCR or DVD 9 9 1 2 Stereo 9 9 1 3 5 Press the...

Страница 42: ...cTV SATELLITE RECEIVERS Brand names Code numbers DirecTV 00001 00002 00003 00004 TELEVISION Brand names Code numbers Admiral 10093 10463 Advent 10761 10783 10842 Aiko 10092 Akai 10702 10030 10672 Alaron 10179 Albatron 10843 10700 Ambassador 10177 America Action 10180 Ampro 10751 Anam 10180 AOC 10030 Apex Digital 10748 10765 Audiovox 10451 10180 10092 Bell Howell 10154 10016 Bradford 10180 Broksoni...

Страница 43: ...ka 10054 10180 10150 10060 10092 10016 10179 10056 Telefunken 10702 10056 TELEVISION continued Brand names Code numbers TMK 10178 10056 10177 TNCi 10017 Toshiba 10154 10156 10060 10650 11704 10845 TVS 10463 Vector Research 10030 Victor 10053 Vidikron 10054 Vidtech 10178 Viewsonic 11755 Wards 10054 10030 10178 10866 10016 10179 10021 10056 Waycon 10156 White Westinghouse 10463 Yamaha 10030 Zenith 1...

Страница 44: ...0048 20047 20081 20240 20000 20042 20072 VCR continued Brand names Code numbers White Westinghouse 20209 20072 XR 1000 20035 20000 20072 Yamaha 20038 Zenith 20039 20033 20000 20209 20479 21479 PERSONAL VIDEO RECORDERS PVR Brand names Code numbers Panasonic 20616 Philips 20618 ReplayTV 20616 Sonic Blue 20616 Sony 20636 Tivo 20618 20636 DIGITAL VIDEO DISC DVD Brand names Code numbers Allegro 20869 A...

Страница 45: ...satellite see Checking the satellite signal strength in Chapter 2 Make sure the coaxial cable is properly connected to the satellite dish Check the connections between your DIRECTV Receiver and your TV Turn your receiver off unplug it wait 10 to 20 seconds then plug it back in and turn it on Unplug your receiver for 10 to 20 seconds then plug it back in and turn it on Check the batteries in the re...

Страница 46: ...s 3 0 Kg ion Temp 32 F 0 C to 104 F 40 C e Temp 30 F 30 C to 150 F 60 C ort stream MPEG 2 ISO IEC 13818 Input Output Interface Accessories Specifications are subject to change without notice LNB 1 input SATELLITE IN ANT input 1 input AIR IN TV output TV out Video output 2 RCA Cinch 1 S Video Audio output 4 RCA Cinch 2 pairs X Left Right Access Card 1 Access Card slot Cables 1 power cord 1 phone ca...

Отзывы: