background image

P

age

 47

S

amSung

 W

ireleSS

 r

outer

 u

Ser

S

 m

anual

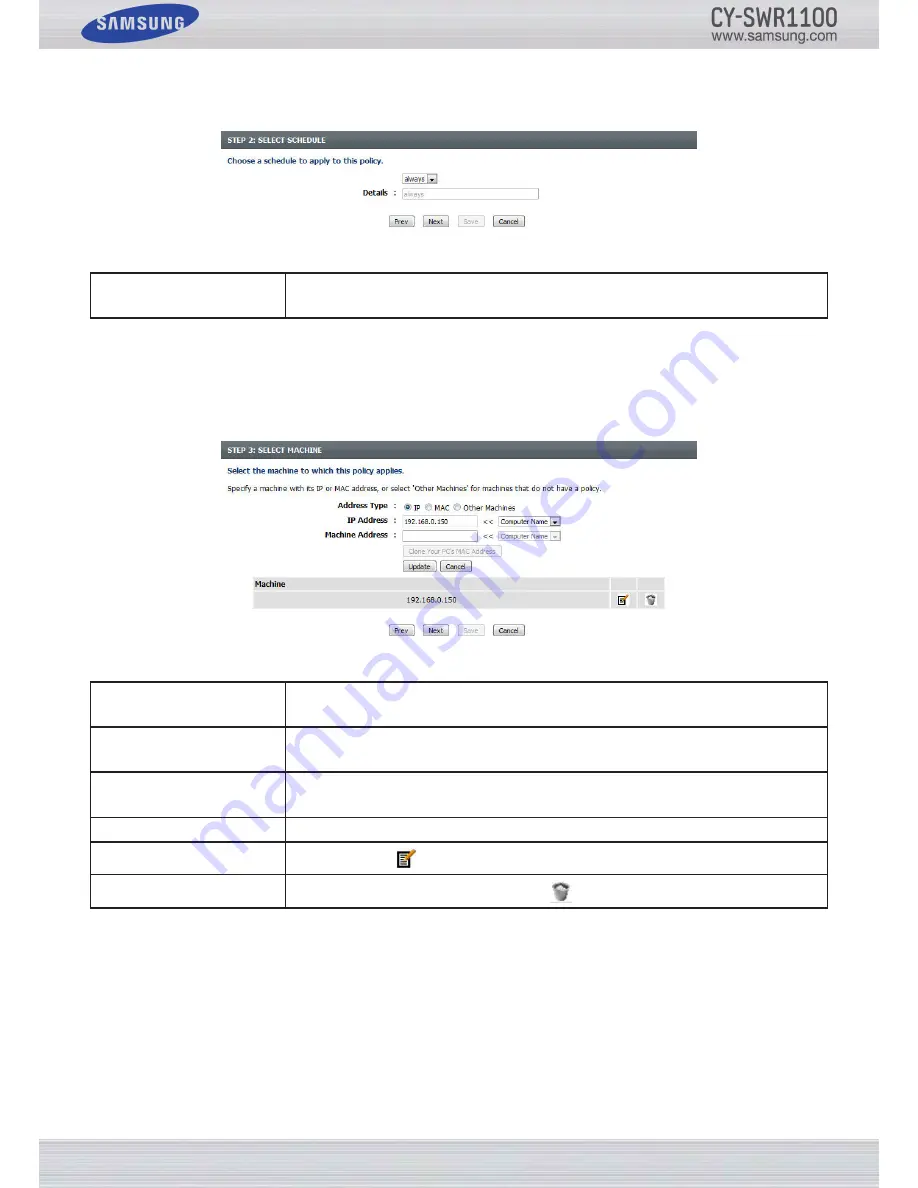
Step 2:

 Configure the schedule settings for this rule.

You can configure the following parameters:

Details:

Select the appropriate predefined schedule rule to apply to this rule from the drop-down 

menu.

Click the 

Prev

 button to return to the previous window.

Click the 

Next 

button to continue to the next window.

Click the 

Cancel

 button to discard the changes made and return to the main Access Control window.

Step 3:

 Configure the address type and IP address of the machines used in this rule.

You can configure the following parameters:

Address Type:

Specify a machine with its IP or MAC address, or select ‘Other Machines’ for machines 

that do not have a policy.

IP Address:

After selecting the IP address type, you can enter the IP address of the machines used in 

this rule here. Alternatively, you can select a Computer from the 

Computer Name

 list.

Machine Address:

After selecting the MAC address type, you can enter the MAC address of the machine used 

in this rule here. Alternatively, you can select a Computer from the 

Computer Name

 list.

Add:

Click this button to add the machine to the list.

Update:

After Clicking the 

 option, you can to update the machine information.

Delete:

To remove a machine from the list, click the 

 icon.

Click the 

Prev

 button to return to the previous window.

Click the 

Next 

button to continue to the next window.

Click the 

Cancel

 button to discard the changes made and return to the main Access Control window.

Содержание CY-SWR1100

Страница 1: ......

Страница 2: ...ted on the identification schecker located on the back of this device Install your device horizontally or vertically on a suitable piece of furniture or on a wall using the included wall mounting kit with enough space around it for proper ventilation 7 5 10cm Do not place the device on an amplifier or other piece of equipment which may become hot Do not stack anything on top of the device To disco...

Страница 3: ...Access Control 46 Website Filter 49 Inbound Filter 50 Firewall Settings 51 Routing 52 Advanced Wireless 53 Wi Fi Protected Setup 55 Advanced Network Settings 57 Guest Zone 59 IPv6 61 IPv6 Firewall 74 Tools Tab 75 Admin 76 Time 77 Syslog 78 Email Settings 79 System 80 Firmware 81 Dynamic DNS 82 System Check 83 Schedules 84 Status Tab 85 Device Info 86 Logs 88 Statistics 89 Internet Sessions 89 Wire...

Страница 4: ... Stand Wall Mount Kit System Requirements Network Requirements 10 100 1000Mbps Ethernet LAN adapter 802 11a b g n Wireless Adapter Ethernet based Cable or DSL Modem Computer Requirements Window 7 Vista XP with SP3 10 100 1000Mbps Ethernet LAN adapter CD ROM drive Software Requirements Operating System like Microsoft Windows Mac OS or Linux Browser like Internet Explorer 6 or higher Mozilla Firefox...

Страница 5: ... 10 100 1000Mbps It can handle a network of up to 1000 MAC addresses MULTICASTING This device supports IGMPv2 DHCP This device supports both Server and Client functionality QUALITY OF SERVICE You can create QoS rules to shape traffic based on weight or priority You can also manage IP Pools based on application port numbers ADVANCED SECURITY The Samsung router sup ports a list of security features ...

Страница 6: ... easy method for connecting devices to your network A flashing light indicates that the WPS connection is being established A solid light on for 5 seconds indicates that the WPS client has successfully been added to the network Front View Back View 1 USB PORT The USB port is used for WPS enabled Wireless USB adapters It is also used for the Plug Access feature 2 LAN PORTS The four LAN ports are us...

Страница 7: ...ough may limit the range Typical ranges vary depending on the types of materials and background RF radio frequency noise in your home or business The key to maximizing wireless range is to follow these basic guidelines Keep the number of walls and ceilings between the router and other network devices to a minimum each wall or ceiling can reduce your adapter s range from 3 90 feet 1 30 meters Posit...

Страница 8: ... configuration utility of the router in the future Close the browser and change your computer s IP settings back to the original values as in Step 2 7 Disconnect the Ethernet cable from the router and reconnect your computer to your network 8 Connect an Ethernet cable to one of the LAN ports of the router and connect it to your other router Do not plug anything into the Internet WAN port of the ro...

Страница 9: ...tion is within reach of an electrical outlet and the modem or other router you intend to connect this router to 2 Tape the template below to the wall 3 Drill two holes into the wall where indicated on the template Make sure the holes are 73mm apart 4 Remove the template from the wall 5 Insert mollies into each hole and then insert a screw into each mollie leaving 3mm of its head exposed Note If yo...

Страница 10: ...n the table below Protocol Required Information PPPoE User Name Password PPPoE is commonly used by DSL providers In most cases these providers use Dynamic DHCP addresses If your provider uses Static addresses you will also need to provide the IP address PPTP User Name Password In most cases PPTP protocol providers use Dynamic DHCP addresses If your provider uses Static addresses you will also need...

Страница 11: ...uter s Web UI you ll need to use your Internet Browser Open your Internet browser Internet Explorer Firefox etc and enter the router s default IP address 192 168 0 1 into the address bar If you connected your router to an other router you must enter the IP address you assigned the router in Step 6 in the Connecting to Another Router procedure After entering the IP address press enter or Click the ...

Страница 12: ...y Local Area Network Connectivity and Wireless Connectivity Advanced On the Advanced screen you can configure the router s more advanced features These features include Port Forwarding Firewall settings Quality of Service settings and more Tools On the Tools screen you can configure features that are related to the router itself These features include the time settings login accounts firmware upda...

Страница 13: ...f the router Wireless Settings For configuring the Wireless settings of the router Network Settings For configuring the Network settings of this router You can also launch the Internet Connection Setup Wizard and access the Manual Internet Connection Setup pages To configure the Internet settings of your router using the Connection Wizard go to Internet Connection Wizard on page 14 We recommend mo...

Страница 14: ...e Prev button to return to the previous window and Click the Next button to continue to the next window Click the Cancel button to discard the changes made and return to the Internet home page Click the Next button now to go to Step 1 Set Your Password When done Click the Next button to continue to Step 2 Select Your Time Zone STEP 1 Set Your Password By default the new Samsung Router does not hav...

Страница 15: ... you have a PPPoE Internet connection Most DSL modems use this type of connec tion PPTP Choose if you have a PPTP Internet connection L2TP Choose if you have a L2TP Internet connection Static IP Address Choose if your Internet connection is not a PPPoE PPTP or L2TP connection and it requires a Static IP address After you have selected the correct option Click Next The screen that corresponds to yo...

Страница 16: ...onnected to the router also acts as the Internet gateway then Click the Clone Your PC s MAC Address button to copy the PC s MAC address into the space provided If you re not sure leave the MAC Address field blank PPPoE Connection After you select PPPoE the following page appears Parameter Instructions Address Mode You must select either Dynamic or Static IP address from the Address Mode drop down ...

Страница 17: ...f you selected Static Address enter the PPTP Subnet Mask here PPTP Gateway IP Address If you selected Static Address enter the PPTP Gateway IP address here PPTP Server IP Address Enter the PPTP Server IP address here This is normally the same a the PPTP Gateway IP address User Name Enter your PPTP username here Password Enter your PPTP password here Verify Password Re enter your PPTP password here...

Страница 18: ... here Verify Password Re enter the L2TP password used here Static IP Address Connection Click Next to continue to Step 4 and go to page 19 Click the Cancel button to discard the changes and return to the Internet home page Parameter Instructions IP Address Enter the Static IP address provided by the ISP here Subnet Mask Enter the Subnet Mask provided by the ISP here Gateway Address Enter the Gatew...

Страница 19: ...p Wizard is complete Click the Connect button to save your settings After you Click the Connect button the following window appears The router saves the settings and returns to the main Internet page If you have successfully run the Connection Setup Wizard you are now ready to configure your router for wireless operation To begin go to Wireless Settings on page 29 ...

Страница 20: ...l Internet Connection page click the Manual Internet Connection Setup button On the Manual Internet Connection page you can configure multiple Internet Connection setup parameters by Internet Con nection Type Static IP Dynamic IP PPPoE etc At any point you can save the settings you ve configured on this page by Clicking the Save Settings button If you choose to discard the changes click the Don t ...

Страница 21: ...set to the Internet port s physical interface MAC address on the Broadband Router We recommend you leave it unchanged unless your are required to change it by your ISP You can use the Clone Your PC s MAC Address button to replace the Internet port s MAC address with the MAC address of your Ethernet card Internet Connection Type Static IP Select Static IP from the drop down menu if all the Internet...

Страница 22: ...nk if you are not sure Primary DNS Server Enter the Primary DNS IP address here Secondary DNS Server Enter the Secondary DNS IP address here This field is normally optional Only one DNS address is required for a functional Internet connection but using a second DNS address provides more stability MTU Maximum Transmission Unit You may need to change the MTU for optimal performance with your specifi...

Страница 23: ...only available if Static IP is selected Username Enter the PPPoE account user name here Get this information from the IP Password Enter the PPPoE account password used here Get this information from the IP Verify Password Re enter the PPPoE account password used here Service Name This optional field enables lets you enter a service name to identify this Internet connec tion Reconnect Mode Use the ...

Страница 24: ...ary DNS IP address here This field is normally optional Only one DNS address is required for a functional Internet connection but using a second DNS address provides more stability MTU Maximum Transmission Unit You may need to change the MTU for optimal performance with your specific ISP 1492 is the default MTU MAC Address The default MAC Address is set to the Internet port s physical interface MA...

Страница 25: ...This option is only available if you select Static IP PPTP Subnet Mask Enter the PPTP Subnet Mask here PPTP Gateway IP Address Enter the PPTP Gateway IP address here PPTP Server IP Address Enter the PPTP Server IP address here This is normally the same a the PPTP Gateway IP address Username Enter the PPTP username here Password Enter the PPTP password here Verify Password Re enter the PPTP passwor...

Страница 26: ...g a second DNS address provides more stability MTU Maximum Transmission Unit You may need to change the MTU for optimal performance with your specific ISP 1400 is the default MTU MAC Address The default MAC Address is set to the Internet port s physical interface MAC address on the Broadband Router We recommend you leave it unchanged unless your are required to change it by your ISP You can use th...

Страница 27: ...Address Enter the L2TP Gateway IP address here L2TP Server IP Address Enter the L2TP Server IP address here This is normally the same as the PPTP Gateway IP address Username Enter the L2TP username here Password Enter the L2TP password here Verify Password Re enter the L2TP password here Reconnect Mode Use the radio buttons to specify the reconnect mode You can specify a custom schedule or specify...

Страница 28: ...for optimal performance with your specific ISP 1400 is the default MTU MAC Address The default MAC Address is set to the Internet port s physical interface MAC address on the Broadband Router We recommend you leave it unchanged unless your are required to change it by your ISP You can use the Clone Your PC s MAC Address button to replace the Internet port s MAC address with the MAC address of your...

Страница 29: ...ork users with a simple step by step set of instructions for configuring the wireless settings of this router To start the Wireless Network Setup Wizard click the Wireless Connection Setup Wizard button Step 1 Enter a Custom Wireless Network Name Enter a custom Wireless Network Name also called an SSID for each frequency band 2 4GHz and 5Ghz in the fields pro vided using up to 32 characters Step 2...

Страница 30: ...t button to continue The Setup Complete page appears Step 4 Complete the Setup On the Setup Complete page confirm that the configuration parameters are correct Also record the Pre Shared key You will have to enter the key into all wireless clients you want to connect to your network through this router that are not WPS compliant Click the Save button to accept the configuration The router saves th...

Страница 31: ...o to Step 2 If you selected Manual the Manual Connect Your Wireless Device page appears Go to Step 4 You can also Click the Prev button to return to the previous page or Click the Cancel button to return to the main wireless page Step 2 Select the WPS Connection Method The WPS Connect Your Wireless Device page provides two ways to connect WPS compliant devices to the router The Per sonal Identific...

Страница 32: ... need to enter this information exactly as it appears on this page when you configure the connection settings for wireless clients that can t use the WPS method to connect Click the Prev button to return to the previous page Click the Cancel button to return to the main wireless page Click the Wireless Status button to navigate to the Status Wireless page to see which wireless client are connected...

Страница 33: ...nt to use wireless uncheck the box to disable all the wireless functions Select the time frame that you would like your wireless network enabled The schedule may be set to Always Any schedule you create will be available in the drop down menu Click New Schedule to create a new schedule Wireless Network Name The Service Set Identifier SSID is the name of your wireless network Create a name us ing u...

Страница 34: ...e wireless security for the 2 4GHz band There are two types of encryption you can use WEP or WPA WPA2 Wireless Security Mode WEP Wireless Security basic Wired Equivalent Privacy WEP is the most basic form of encryption you can use for wireless networks Even though it is known as a weak security method it is better than no security at all Older wireless adapters sometimes only support WEP encryptio...

Страница 35: ...ameworks Pre Shared Key PSK and Extensible Au thentication Protocol EAP PSK requires only the use of a pass phrase Shared Secret for security EAP on the other hand requires the installation of a RADIUS Server on the local network RADIUS Server IP Ad dress If you choose the EAP authentication framework enter the RADIUS server s IP address here Port If you choose the EAP authentication framework ent...

Страница 36: ... Automatic for best performance Wireless Mode Select the preferred frequency band to use for this wireless network Band Width When using the 802 11n frequency band you can choose between a 20MHz or 20 40MHz bandwidth WMM Enable WMM Wi Fi Multimedia is QoS for your wireless network Check this box to improve the quality of video and voice applications for your wireless clients This feature is not av...

Страница 37: ... subnet mask is 255 255 255 0 Host Name Enter a Host Name to identify this device Local Domain Name Enter the Domain name Optional Enable DNS Relay Uncheck the box to transfer the DNS server information from your ISP to your computers If checked your computers will use the router for a DNS server DHCP Server Settings DHCP stands for Dynamic Host Control Protocol This device has a built in DHCP ser...

Страница 38: ...Reservation section you can configure reserved IP address to selective DHCP clients by entering their MAC addresses in the list along with the appropriate IP address You can configure the following parameters Checkbox Check this box to enable the reservation Computer Name Enter the computer name Alternatively select a computer that currently has a DHCP lease from the drop down menu and Click to au...

Страница 39: ...isabled and application priority is not classified automatically Network Filter On this page you can configure network filtering rules Access Control On this page you can configure access control rules Website Filter On this page you can configure website and domain filtering rules Inbound Filter On this page you can configure Inbound Firewall Filtering rules Firewall Settings On this page you can...

Страница 40: ...irtual Server rule Name Enter a name for the rule or select an application from the drop down menu Select an application and Click to populate the fields IP Address Enter the IP address of the computer on your local network that you want to allow the in coming service access to If your computer is receiving an IP address automatically from the router DHCP you computer will be listed in the Compute...

Страница 41: ...er Name drop down menu Select your computer and Click Ports to Open TCP UDP Enter the external port number in the appropriate space provided If the port number is TCP then enter the number in the TCP space and if the port number is UDP than enter it in the UDP space Schedule Use the drop down menu to schedule the time that the Port Forwarding rule will be ena bled The schedule may be set to Always...

Страница 42: ...n the left side to enable the Application Rule Name Enter a name for the rule You may select a predefined application from the Application drop down menu and Click Application Displays a list of predefined application to use in the rules Port Trigger This is the port used to trigger the application It can be either a single port or a range of ports Port Firewall This is the port number on the Inte...

Страница 43: ...an test your uplink speed with a service such as www dslreports com Downlink Speed The speed at which data can be transferred from the ISP to the router This is deter mined by your ISP ISP s often define speed as a download upload pair For example 1 5Mbits 284Kbits Using this example you would enter 1500 Alternatively you can test your downlink speed with a service such as www dslreports com Queue...

Страница 44: ...oose Highest Higher Normal and Best Effort Protocol Select the protocol used for the application in the drop down menu and it will automati cally place it in the Protocol field Local IP Range Enter the local IP range here This is the IP range of you Local Area Network The Router s IP cannot be included in this range Remote IP Range Enter the remote IP range here This is the IP range of the public ...

Страница 45: ... you can select Turn MAC Filtering OFF Turn MAC Filtering ON and ALLOW computers listed to access the network or Turn MAC Filtering ON and DENY computers listed to access the network Checkbox Check the box on the left side to enable the Network Filter MAC Address Enter the MAC address you would like to use in this filtering rule DHCP Client List Select a DHCP client from the Computer Name drop dow...

Страница 46: ...ontrol feature Add Policy Click this button to add a new Access Control Policy After you Click the Add Policy button the add policy wizard will guide you step by step through process of adding a new policy The first window explains the process Step 1 Enter the policy name You can configure the following parameters Policy Name Enter the new policy name for this rule here Click the Prev button to re...

Страница 47: ...ress or select Other Machines for machines that do not have a policy IP Address After selecting the IP address type you can enter the IP address of the machines used in this rule here Alternatively you can select a Computer from the Computer Name list Machine Address After selecting the MAC address type you can enter the MAC address of the machine used in this rule here Alternatively you can selec...

Страница 48: ...on this option becomes accessible Select ing this option allows the advanced port filters access control feature to be applied to this rule Click the Prev button to return to the previous window Click the Next button to continue to the next window Click the Cancel button to discard the changes made and return to the main Access Control window Click the Save button to accept the changes made and re...

Страница 49: ...ccess only specified URLs and Domain Names Select DENY computers access to ONLY these sites to deny computers on your network access to specified URLs and Domain Names You can configure the following parameters Website URL Domain Enter the URL or Domain name that you want to allow or block here An example of an URL is http www facebook com An example of a domain name is facebook com Click the Clea...

Страница 50: ... You can configure the following parameters Name You can enter a custom name for the inbound filter rule here Action Select an action that will take place when this rule is initiated Choose Allow and Deny Enable Check this option to enable the specified IP range for this rule Remote IP Start Enter the remote starting IP address in the range here Remote IP End Enter the remote ending IP address in ...

Страница 51: ... configure the following parameters Enable SPI Check the Enable SPI box to enable the SPI Stateful Packet Inspection also known as dynamic packet filtering feature Enabling SPI helps to prevent cyber attacks by tracking more states per session It validates that the traffic passing through the session conforms to the protocol In the DMZ Host section you can configure the DMZ settings for this route...

Страница 52: ...To enable a route check the box that is on the left side of the route Interface Use the drop down menu to specify if the IP packet must use the WAN or LAN interface to transit out of the Router Destination Enter the IP address of the packets that will take this route Subnet Mask Enter the subnet mask to specify the subnet of the IP packets that will take this route Gateway Enter the next hop that ...

Страница 53: ...ecommended RTS Threshold You can enter the RTS threshold value used This value should remain at its default setting of 2346 If inconsistent data flow is a problem only a minor modification should be made Fragmentation The fragmentation threshold which is specified in bytes determines whether packets will be fragmented Packets exceeding the 2346 byte setting will be fragmented before transmission 2...

Страница 54: ...ld which is specified in bytes determines whether packets will be fragmented Packets exceeding the 2346 byte setting will be fragmented before transmission 2346 is the default setting DTIM Interval You can enter the DTIM Interval value Delivery Traffic Indication Message DTIM is a count down informing clients of the next window for listening to broadcast and multicast messages The default settings...

Страница 55: ... Protected Setup feature Wi Fi Protected Setup This parameter displays the WPS setup status Reset to Unconfigured Click this button to disable the WPS feature used on this router In the PIN Settings section You not only will be able to view the PIN code but will also be able to reset the PIN to default or to generate a new PIN code A PIN is a unique number that can be used to add the router to an ...

Страница 56: ... the network by pressing the configuration button on the device and then the one on the router within 60 seconds The status LED on the router will flash three times if the device has been successfully added to the network There are several ways to add a wireless device to your network A registrar controls access to the wireless network and only allows devices onto the wireless network if you have ...

Страница 57: ...gure the following parameters Enable UPnP Check this option to enable the UPnP feature of the router WAN Ping When you Enable WAN Ping response you are causing the public WAN Wide Area Network IP address on the device to respond to ping commands sent by Internet users Pinging public WAN IP addresses is a common method used by hackers to test whether your WAN IP address is valid You can configure t...

Страница 58: ...t such as multimedia from a source to a number of recipients This option must be enabled if any applications on the LAN participate in a multicast group If you have a multimedia LAN application that is not receiving content as expected try enabling this option Wireless Enhance Mode Check the Wireless Enhance Mode box to enable the router to forward all multicast streams from the Internet to the wi...

Страница 59: ...rameters Enable Guest Zone Check this option to enable the Guest Zone feature for the 2 4GHz frequency band Use the drop down menu to schedule the time that the Firewall rule will be enabled The schedule may be set to Always which will allow the particular service to always be enabled Click the New Schedule button to create your own times in the Schedules page Wireless Band Displays the frequency ...

Страница 60: ... allow the particular service to always be enabled Click the New Schedule button to create your own times in the Schedules page Wireless Band Displays the frequency band used Wireless Network Name The Service Set Identifier SSID is the name of your wireless network Create a name us ing up to 32 characters The SSID is case sensitive Security Mode The security mode enables You to configure wireless ...

Страница 61: ...Prefix Length Default Gateway Primary DNS Server and Secondary DNS Server Your ISP provides you with all this information You can configure the following parameters My IPv6 Connection is Select the IPv6 Connection Type used for this configuration here You can configure the following parameters IPv6 Address Enter the WAN IPv6 address for the router here Subnet Prefix Length Enter the WAN subnet pre...

Страница 62: ...t lifetime value here IPv6 Address Range Start This option is only available when the auto configuration type is set to Stateful Enter the start IPv6 Address of the DHCPv6 range for your local computers IPv6 Address Range End This option is only available when the auto configuration type is set to Stateful Enter the end IPv6 Address of the DHCPv6 range for your local computers IPv6 Address Lifetim...

Страница 63: ...erver addresses automatically Use the following IPv6 Select this option to manually enter the DNS Server addresses used Primary DNS Server Enter the primary DNS Server address used here Secondary DNS Server Enter the secondary DNS Server address used here You can configure the following parameters Enable DHCP PD Select this option to enable DHCP PD LAN IPv6 Address Enter the LAN IPv6 address used ...

Страница 64: ...lifetime value used here IPv6 Address Range Start This option is only available when the auto configuration type is set to Stateful Enter the start IPv6 Address of the DHCPv6 range for your local computers IPv6 Address Range End This option is only available when the auto configuration type is set to Stateful Enter the end IPv6 Address of the DHCPv6 range for your local computers IPv6 Address Life...

Страница 65: ...ption will state that this connection shares it s information with the already configured IPv6 PPPoE connection or You can create a new PPPoE connection here Username Enter the PPPoE username used here This information is obtainable from the ISP Password Enter the PPPoE password used here This information is obtainable from the ISP Verify Password Re enter the PPPoE password used here Service Name...

Страница 66: ...heck this option to enable the auto configuration feature Auto Configuration Type You can select the auto configuration type used here Choose Stateless or Stateful DHCPv6 Router Advertisement Lifetime This option is only available when the auto configuration type is set to Stateless Enter the router advertisement lifetime value used here IPv6 Address Range Start This option is only available when ...

Страница 67: ...te IPv6 address used here Local IPv4 Address Enter the local IPv4 address used here Local IPv6 Address Enter the local IPv6 address used here Subnet Prefix Length Enter the Subnet prefix length value used here You can configure the following parameters Obtain IPv6 Select this option to obtain the DNS Server addresses automatically Use the following IPv6 Select this option to manually enter the DNS...

Страница 68: ...time value used here IPv6 Address Range Start This option is only available when the auto configuration type is set to Stateful Enter the start IPv6 Address of the DHCPv6 range for your local computers IPv6 Address Range End This option is only available when the auto configuration type is set to Stateful Enter the end IPv6 Address of the DHCPv6 range for your local computers IPv6 Address Lifetime...

Страница 69: ...nnection is Select the IPv6 Connection Type used for this configuration here You can configure the following parameters 6to4 Address Displays the 6to4 configured address 6to4 Relay Enter the 6to4 relay address used here Primary DNS Server Enter the primary DNS Server address used here Secondary DNS Server Enter the secondary DNS Server address used here You can configure the following parameters L...

Страница 70: ...time value used here IPv6 Address Range Start This option is only available when the auto configuration type is set to Stateful Enter the start IPv6 Address of the DHCPv6 range for your local computers IPv6 Address Range End This option is only available when the auto configuration type is set to Stateful Enter the end IPv6 Address of the DHCPv6 range for your local computers IPv6 Address Lifetime...

Страница 71: ...Pv4 Address Enter the IPv4 address used here Mask Length Enter the IPv4 mask length used here Assigned IPv6 Prefix Displays the IPv6 assigned prefix value 6rd Border Relay IPv4 Address Enter the 6rd border relay IPv4 address used here Primary DNS Server Enter the primary DNS Server address used here Secondary DNS Server Enter the secondary DNS Server address uses here You can configure the followi...

Страница 72: ...time value used here IPv6 Address Range Start This option is only available when the auto configuration type is set to Stateful Enter the start IPv6 Address of the DHCPv6 range for your local computers IPv6 Address Range End This option is only available when the auto configuration type is set to Stateful Enter the end IPv6 Address of the DHCPv6 range for your local computers IPv6 Address Lifetime...

Страница 73: ...pable devices to communicate with each other on the LAN side You can configure the following parameters My IPv6 Connection is Select the IPv6 Connection Type used for this configuration here You can configure the following parameters LAN IPv6 Link Local Address Displays the LAN IPv6 Link Local address used Click the Save Settings button to accept the changes Click the Don t Save Settings button to...

Страница 74: ...ed Choose Turn IPv6 Filtering OFF Turn IPv6 Filtering ON and ALLOW rules listed or Turn IPv6 Filtering ON and DENY rules listed Select the appropriate option used here Checkbox Check this option to use the firewall rules created Name Enter a custom firewall rule name here This name is used for identification Source Interface Select the source interface used here Destination Interface Select the de...

Страница 75: ...age you can configure the time and date settings for this router System Log On this page you can view and configure the system log EMail Settings On this page you can configure the email settings for this router System On this page you can reboot reset backup and restore this router Firmware On this page you can perform a firmware upgrade on this router Dynamic DNS On this page you can configure t...

Страница 76: ...ical image confirmation when you login to the web configuration Example Enable Remote Manage ment Check this option to enable remote management This option will enable the router to be accessible from the Internet port Remote Admin Port Enter the remote administration port number used here Sometimes services such as an internal webserver will occupy the port number 80 In this option you can change...

Страница 77: ...this button to synchronize the router s system clock to the management computer s time settings You can configure the following parameters Automatically synchronize NTP is short for Network Time Protocol NTP synchronizes computer clock times in a network of computers Check this option to enable automatic time and date synchroniz ing NTP Server Used Select the NTP server The interval at which the r...

Страница 78: ... to a System Log Server You can configure the following parameters Enable Logging Check this option to enable the Syslog feature Syslog Server IP Address Enter the Syslog Server IP address here Click the Save Settings button to accept the changes Click the Don t Save Settings button to discard the changes ...

Страница 79: ...mail Subject Enter the text that you want to appear in the subject line of the e mail sent SMTP Server Address Enter the SMTP e mail server address If your SMTP server requires authentication select this option Account Name Enter your email account name Password Enter the password associated with the account Verify Password Re enter the password associated with the account Send Mail Now Click this...

Страница 80: ...d a location to saver them to Load Settings From Local Hard Drive Use this option to load previously saved router configuration settings First use the Browse option to find a previously saved file of configuration settings Then click the Upload Settings button below to transfer those settings to the router Restore To Factory Default Settings This option will restore all configuration settings to t...

Страница 81: ... this firmware In the Firmware Upgrade section you can physically upgrade the firmware of this device by clicking on the Browse button navigating to the firmware file and saving the file on your local hard drive After locating the file on your local disk click the Upload button to initiate the firmware upgrade In the Language section you can change the router s language Always keep a close lookout...

Страница 82: ...can configure the following parameters Enable DDNS Dynamic Domain Name System is a method of keeping a domain name linked to a chang ing IP Address Check the box to enable DDNS Server Address Choose your DDNS provider from the drop down menu Host Name Enter the Host Name that you registered with your DDNS service provider User Account Enter Youname for your DDNS account Password Enter the Password...

Страница 83: ... you want to ping Packet Internet Groper and then Click the Ping button The status of your Ping attempt will be displayed in the Ping Result box In the IPv6 Ping Test section you can test the Internet connectivity by entering a host name or the IPv6 address that you want to ping Packet Internet Groper and then Click the Ping button The status of your Ping attempt will be displayed in the Ping Resu...

Страница 84: ...r this rule select the Select Day s option and then check the days you want to apply the rule All Day 24 hrs To enable a rule to run 24 hours instead of only a certain part of the day check this option Start Time If you don t select the All Day option you can enter the starting time here End Time If you don t select the All Day option you can enter the ending time here Click the Add button to add ...

Страница 85: ...s to a compu ter on your network that is running a Syslog utility Statistics You can view the number of packets that pass through the router on both the WAN and LAN ports and both the 802 11n g 2 4GHz and 802 11n a 5GHz wireless bands The traffic counter will reset if the device is rebooted Internet Sessions The Internet Sessions page displays full details of active Internet sessions through your ...

Страница 86: ...d a Renew button will be displayed Use Release to disconnect from your ISP and use Renew to connect to your ISP In the General section information about the time and firmware is being displayed In the WAN section information about the Internet connection is displayed In the LAN section information about the Local Area Network configuration is displayed In the Wireless LAN section information about...

Страница 87: ...Page 87 Samsung Wireless Router User s Manual In the Wireless LAN2 section information about the 5GHz Wireless Local Area Network configuration is displayed ...

Страница 88: ...e the Router s log entries to a log file on your computer You can configure the following parameters Log Type Use the radio buttons to select the types of messages that you want to display from the log You can select System Firewall Security and Router Status messages Log Level There are three levels of message importance Critical Warning and Information Select the levels that you want displayed i...

Страница 89: ... bands The traffic counter will reset if the device is rebooted Click the Refresh button to refresh the display page Click the Reset button to clear all the statistics for all the fields displayed Internet Sessions The Internet Sessions page displays full details of active Internet sessions through your router An Internet session is a con versation between a program or application on a LAN side co...

Страница 90: ...ddress of the connected wireless clients In the Number of Wireless Clients 2 4GHz Band section a list of 2 4GHz active wireless clients will be displayed In the Number of Wireless Clients 5GHz Band section a list of 5GHz active wireless clients will be displayed IPv6 The IPv6 page displays a summary of the Router s IPv6 settings and lists the IPv6 address and host name of any IPv6 clients ...

Страница 91: ...Page 91 Samsung Wireless Router User s Manual Support Tab The Support Tab gives you access to basic information about each page and parameter that exists on this device ...

Страница 92: ...ENTER 3 Select One Foot Connection and press ENTER then press ENTER again 4 Place the wireless router in parallel with your TV set and no farther away than 25cm about 9 3 4 inches Note If One Foot Connection does not connect your TV to your router a pop up window appears on the screen noti fying you of the failure If you want to try using One Foot Connection again reset the wireless router and the...

Страница 93: ... of the other connection setup The Priority QoS function is unique to the CY SWR1100 You can connect a Samsung wireless router to many devices such as laptops mobile phones BD players etc However when you connect a Samsung TV or Blu ray player to a Samsung wireless router the Samsung wireless router gives the Samsung TV or player a priority connection This ensures your TV or player gets the fastes...

Страница 94: ...rmation go to Connecting to the Web UI on page 11 in this manual Step 2 Click WIRELESS SETTINGS in the SETUP Tap How to set up PRIORITY QoS Step 3 Click the Manual Wireless Connection Setup button Step 4 Check the Samsung priority QOS box for each wireless band Step 5 Click the Save Settings button to accept the changes ...

Страница 95: ...ers anywhere in your home or office network How does Wireless work Wireless networking works much the same way as cordless phone work through radio signals that transmit data from one point A to point B But wireless technology has restrictions which limit how you can access the network You must be within the wireless network s range to be able to connect your computer Wireless Local Area Network W...

Страница 96: ...ing it for the first time it could be quite a task if you don t know where to start That s why we ve put together a few setup steps and tips to help you through the process of setting up a wireless network Centralize your router or access point Make sure you place the router access point in a centralized location within your network for the best performance Try to place the router access point as ...

Страница 97: ...cy The 2 major improvements over WEP Improved data encryption through the Temporal Key Integrity Protocol TKIP TKIP scrambles the keys using a hashing algorithm and by adding an integrity checking feature ensures that the keys haven t been tampered with WPA2 is based on 802 11i and uses Advanced Encryption Standard AES instead of TKIP User authentication which is generally missing in WEP through t...

Страница 98: ...ick Start Control Panel Network and Internet Network and Sharing Center Change Adapter Set ting Windows Vista Click Start Control Panel Network and Internet Network and Sharing Center Manage Network Connections Windows XP Click Start Control Panel Network Connections Windows 2000 From the desktop right Click My Network Places Properties Step 2 Right Click the Local Area Connection which represents...

Страница 99: ...ght the wireless network SSID you would like to connect to and then Click the Connect button If you get a good signal but cannot access the Internet check the TCP IP settings for your wireless adapter Refer to the Networking Basics section in this manual for more informa tion 4 The following window appears while your computer tries to connect to the router 5 Enter the same security key or passphra...

Страница 100: ...u can configure the WPS feature of the router using Windows 7 Follow the steps below to use Windows 7 to configure the WPS feature of the router 1 Click the Start button and select then Computer from the Start menu 2 Click the Network option 3 Double Click the Router ...

Страница 101: ...101 Samsung Wireless Router User s Manual 4 Input the WPS PIN number and then click Next 5 Type a name to identify the network 6 To configure advanced settings click the drop down icon Click Next to continue ...

Страница 102: ...igured Wait for the configuration to complete 8 The following window informs you that WPS on the CY SWR1100 has been setup successfully Make a note of the security key You may need to provide this security key if adding an older wireless device to the network in the future 9 Click Close to complete WPS setup ...

Страница 103: ... get a good signal but cannot access the Internet check you TCP IP settings for your wireless adapter Refer to the Networking Basics section in this manual for more information We recommend that you enable wireless security WPA WPA2 on your wireless router or access point before configuring your wireless adapter If you are joining an existing network you will need to know the security key or passp...

Страница 104: ...and then Click the Connect button If you get a good signal but cannot access the Internet check you TCP IP settings for your wireless adapter Refer to the Networking Basics section in this manual for more informa tion We recommend that you enable WPA wireless security on your wireless router or access point before configuring your wireless adapter If you are joining an existing network you will ne...

Страница 105: ...ndows XP firewall may block access to the configuration pages Check the help files included with your firewall software for more information on disabling or configuring it Configure your Internet settings Go to Start Settings Control Panel Double Click the Internet Options Icon From the Security tab click the button to restore the settings to their defaults Click the Connection tab and set the dia...

Страница 106: ... at 1472 and work your way down by 10 each time Once you get a reply go up by 2 until you get a fragment ed packet Take that value and add 28 to account for the various TCP IP headers For example lets say that 1452 was the final value The actual MTU size would be 1480 which is the optimum for the network we re working with 1452 28 1480 Once you find your MTU you can now configure your router with ...

Страница 107: ...dards IEEE 802 11a IEEE 802 11b IEEE 802 11g IEEE 802 11n Wireless Frequency Range 2 4GHz 2 4GHz 2 4835GHz 5GHz 5 15GHz 5 25GHz 5 725GHz 5 850GHz MIMO 2Tx and 2Rx Wireless Bandwidth Rate IEEE 802 11a 6 9 12 18 24 36 48 54Mbps IEEE 802 11b 1 2 5 5 11Mbps IEEE 802 11g 6 9 12 18 24 36 48 54Mbps IEEE 802 11n MAX 300Mbps with HT40MHz RF Output Power 802 11a 7 17dBm 802 11b 15 19dBm 802 11g 12 18dBm 802...

Страница 108: ...rtant Changes or modifications not expressly approved by the party responsible for compliance could void You s authority to operate the equipment FCC Radiation Exposure Statement This equipment complies with FCC radiation exposure limits set forth for an un controlled environment This equipment should be installed and operated with minimum distance 20cm between the radiator and your body Industry ...

Отзывы: