


English - 3
Viewing the Menus
Press the
MENU
button.
The main menu is displayed on the screen. Its left side
has five icons:
Input
,
Picture
,
Sound
,
Channel
, and
Setup
.
2
Press the ▲ or ▼ button to select one of the icons.
Press the
ENTER
button to access the icon’s sub-menu.
3
Press the ▲ or ▼ button to move to items in the menu.
Press the
ENTER
button to enter items in the menu.
4
Press the ▲/▼/◄/► button to change the selected items.
Press the
MENU
button to return to the previous menu.
5
Press the
EXIT
button to exit from the menu.
Input - Source List
You can switch between viewing
signal from connected equipment,
such as a VCR, DVD, set-top box,
and the TV source (broadcast or
cable).
➢
You can change the required
source simply by pressing
the
SOURCE
button on the
remote control. It might take a short period of time for
pictures to be switched.
Channel - Auto Store
You can scan for the frequency ranges available to you (and
availability depends on your country). Automatically allocated
programme numbers may not correspond to actual or desired
programme numbers. However you can sort numbers
manually and clear any channels you do not wish to watch.
Channels are sorted and stored
in the order which reflects their
position in the frequency range
(with lowest first and highest
last). The programme originally
selected is then displayed.
➢
To stop the search before it has finished, press the
ENTER
button.
When finished, the
Sort
menu is displayed. To sort the stored
channels into the desired numerical order, refer to “
Channel -
Sort
” on page 4.
To exit without sorting, press the
EXIT
button.
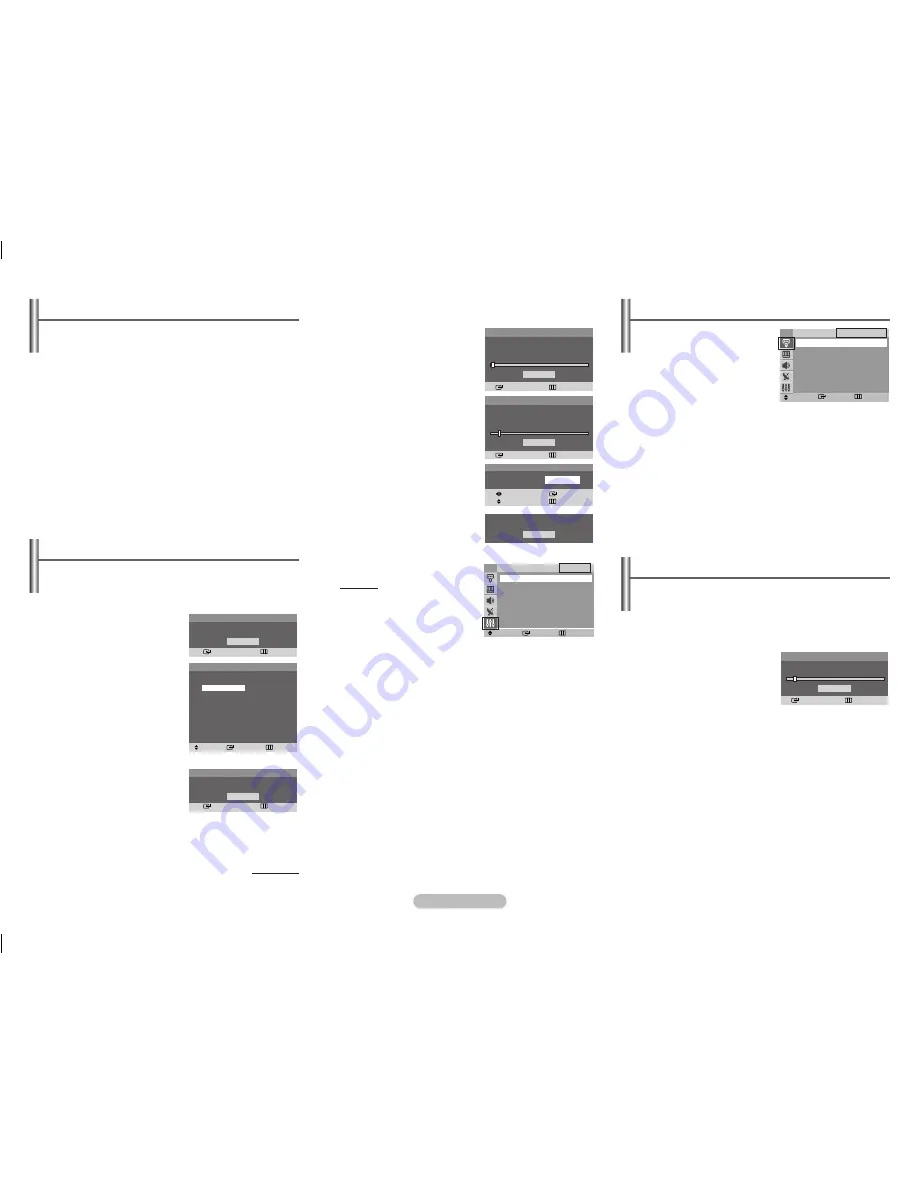
Setup - Plug & Play
(depending on the model)
When the television is initially powered on, several basic
customer settings proceed automatically and subsequently.
The following settings are available.
If the television is in standby
mode, press the
POWER
button on the remote control.
The message
Start Plug &
Play
is displayed.
To start Plug & Play, press the
ENTER
button.
The
Language
menu is
displayed.
➢
The
Language
menu will
automatically appear after
several seconds, even if
the
ENTER
button is not
pressed.
2
Select the appropriated
language by pressing the
▲ or ▼ button. Press the
ENTER
button.
The
Check antenna input.
is
displayed.
➢
If any language is not selected, the language menu
will disappear about 30 seconds later.
continued...
3
To search the channels,
press the
ENTER
button.
To stop the search, press the
ENTER
button.
When the channel searching
has finished, the
Clock Set
menu is displayed.
4
Press the ◄ or ► button to
move to the hour or minute.
Set the hour or minute by
pressing the ▲ or ▼ button.
5
When you have finished,
press the
MENU
button.
The
Enjoy your watching.
is displayed, and then the
channel which has been
stored will be activated.
Re-setting the Plug & Play
Method:
MENU
▲/▼ (Setup)
ENTER
▲/▼ (Plug & Play)
ENTER
Plug & Play
Enter
Exit
OK
Start Plug & Play.
Plug & Play
Enter
Skip
OK
Check antenna input.
OK
Enjoy your watching.
Move
Enter
Return
Source List
TV
TV
Ext.
Search
Enter
Return
Stop
P 1
102MHz
7 %
Plug & Play
Enter
Skip
Auto Store
Start
Plug & Play
Enter
Skip
Auto Store
P 1
102MHz
7 %
Stop
Move
Enter
Return
Setup
TV
Plug & Play
►
Language : English
►
Time
►
Child Lock
►
Blue Screen : Off
►
Plug & Play
Move
Enter
Skip
Language
English
Pусcкий
Plug & Play
Move
Enter
Adjust
Skip
Clock Set
0 0 : 0 0
AA68-03992F.indd 3
2009-02-04 오후 3:34:21


