English - 2
Switching the Television On and Off
The mains lead is attached to the rear of the television
1
Plug the mains lead into an appropriate socket.
➢
The main voltage is indicated on the rear of the
television and the frequency is 50 or 60Hz.
2
Press the “
I
” button (On/Off) on the front (or side) of the
television.
3
Press the
POWER
button on the remote control to switch
the television on. The programme that you were watching
last is re-selected automatically. If you have not yet stored
any channels, no clear picture appears. Refer to “Channel
- Auto Store” on page 3 or “Channel - Manual Store” on
page 4.
➢
If the television is initially powered on, several basic
customer settings proceed automatically.
Refer to “Setup - Plug & Play” on page 3.
4
To switch the television off, press the “
I
” button (On/Off)
on the front (or side) of the television.
Placing the Television in Standby Mode
The television can be placed in standby mode, in order to
reduce power consumption and wear of the cathode ray
tube. Standby mode can be useful when you wish to interrupt
viewing temporarily (during a meal, for example).
1
Press the
POWER
button on the remote control while
viewing.
The television is in standby mode.
2
To switch the television back on, simply press it again.
➢
You can also switch on by pressing the
TV
,
P
/
P
, or numeric button.
☛
Do not leave the television in standby mode for long
periods of time (when you are away on holiday, for
example). Turn the television off by pressing the “
I
”
button (On/Off) on the front (or side) of the television. It is
best to unplug the set from the mains and aerial.
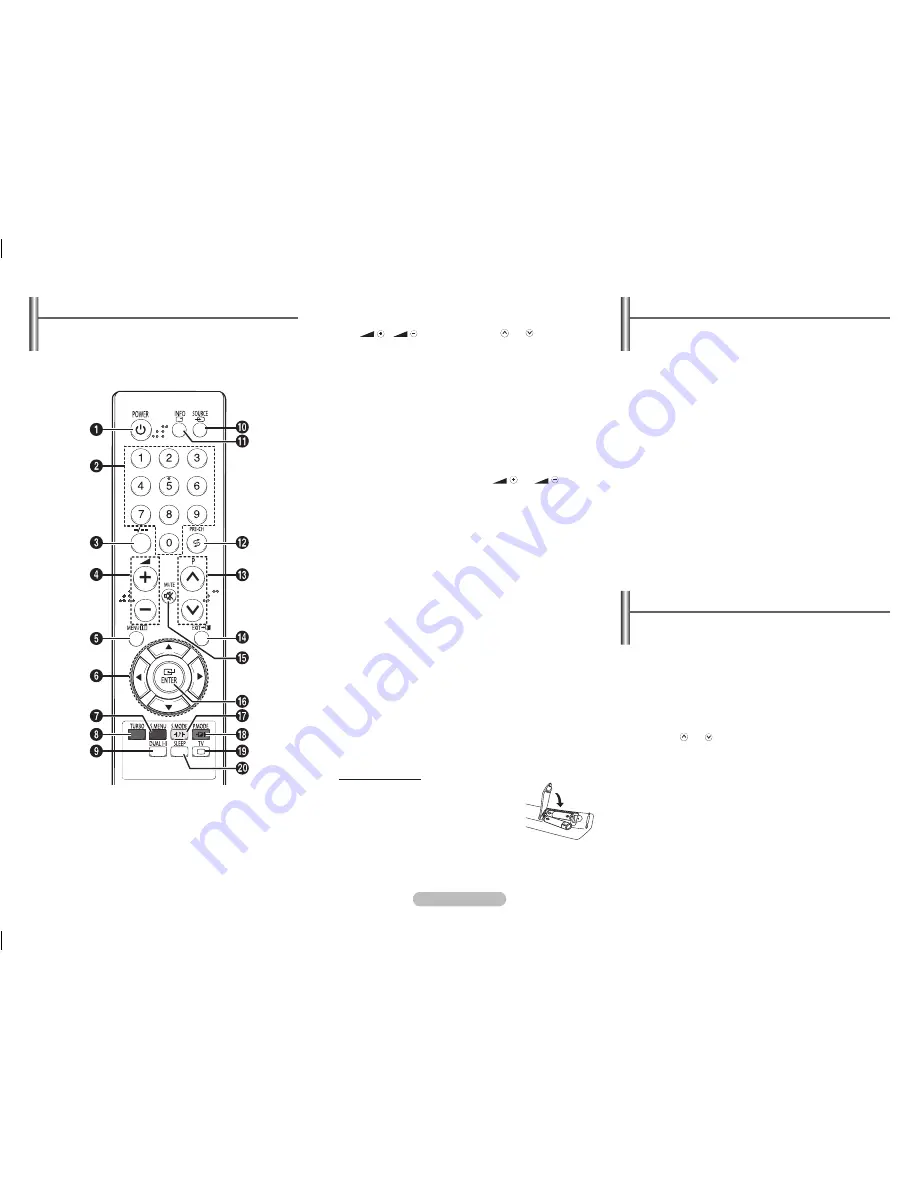
Remote Control
(depending on the model)
➢
Operation of remote control may be affected by bright
artificial light near to the TV.
➢
This is a special remote control for the visually impaired,
and has Braille points on the POWER, Channel and
Volume buttons.
1
POWER
Used to switch the TV
on and off.
2
Numeric buttons
Used to select channels
directly.
3
-/--
Used to select a
channel numbered
ten or over. Press this
button, then “--” symbol
is displayed. Enter
the two-digit channel
number.
4
/
Used to increase or
decrease the volume.
5
MENU
Used to display the
on-screen menu or
return to the previous
menu.
6
▲/▼/◄/►
Used to control the
cursor in the menu.
7
S.MENU
(option)
Used to display the
sound menu.
8
TURBO
(option)
Used to select the turbo
sound option.
9
DUAL I-II
(option)
Used to select the
sound mode.
0
SOURCE
Used to display all of
the available video
sources.
!
INFO
Used to view the
channel information
and setting status you
selected.
@
PRE-CH
Used to switch
repeatedly between
the last two channels
displayed.
#
P / P
Used to display the
next or previous stored
channel.
$
EXIT
Used to exit from any
display or return to
normal viewing.
%
MUTE
Used to switch the
sound off temporarily.
To turn the sound back
on, press the
MUTE
,
, or
button.
^
ENTER
While using the
on-screen menus, press
the
ENTER
button to
activate (or change) a
particular item.
&
S.MODE
(option)
Used to select the
sound effect.
*
P.MODE
Used to select the
picture effect.
(
TV
Used to return to the
TV mode when it is in
external input mode.
)
SLEEP
Used to select a
preset time interval for
automatic turn off.
Installing Batteries
Remove the cover. Install two AAA size
batteries, then replace the cover.
When the remote control does not operate
normally, check that the “+” and “–” ends of
the batteries are inserted correctly or the
batteries are drained.
➢
Do not mix battery types, i.e. alkaline and manganese.
AA68-03905A-06Eng.indd 2
2008-01-10 ¿ÀÀü 11:35:30


