background image

 GB

Memory Pads Programming

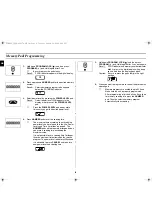
1.

Hold down 

PROGRAM LOCK

(

) and then press 

PROGRAM

(

) pad. Hold together for 2 sec.

Be sure to press the pads firmly.

Result : 

PROG indicator appears in the digital display.

2.

Press appropriate 

NUMBER

 pad for the desired memory 

number.
Result : 

Selected memory program code appears 
below the PROGRAM indicator.

3.

Select power level by pressing the 

POWER LEVEL

 pad.

Result : 

Default power level HIGH appears in the 
display at first press of the 

POWER LEVEL


pad.

Press the 

POWER LEVEL

 pad one or more 

times until you get the desired power level.

4.

Press 

NUMBER

 pads to set the cooking time.

The maximum time according to each cooking 
power level can be referred to in the title “Power 
Levels and Time Variations” on page 6. The 

NUMBER

 pads will not operate or respond when 

you press a cooking time exceeding the 
maximum value.
It is not possible to set a cooking time for longer 
than the maximum time allowed on the chosen 
program. The power level indicator will flash and 
it is advisable to press 

CANCEL

 and to enter a 

new power level and cooking time.

5.

Hold down 

PROGRAM LOCK

(

) and then press 

PROGRAM

(

) pad. Hold together for 2 sec once again.

Result : 

PROG indicator and memory number indicator 
blink 3 times in the digital display with a beep 
sound. And then the display goes blank.

Caution:  Be sure to press the pads firmly in the right 

position.

6.

When you want to program more, repeat the procedures 
above again.

Memory programs are available up to 30 items. 
Make sure the unit is properly programmed.
After programming is finished, all you have to do 
for memory cooking is to press the 

NUMBER


pad. Then the selected memory program 
automatically starts cooking.

jtX_Y`†X[Y`TWX[X^h†niU”GGwˆŽŒG_GG{œŒš‹ˆ SGhœŽœš›GXWSGYWW[GG_aZ_Gwt

Содержание CM1429

Страница 1: ...sing 20sec Pad 7 Using the Defrost Feature 7 Memory Pads Programming 8 How to Operate Memory Cooking 9 Double Quantity Pad Programming 9 How to Operate Double Quantity Pad 10 Programming Air Filter Clean Time 11 Controlling Beep Tone 11 Error Codes 12 Hidden Keys 13 Care of Your Microwave Oven 13 Installation Instructions for Stacking 15 Replacement of Lamp 15 Cookware Guide 16 Cooking Guide 17 Cl...

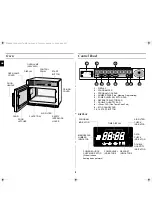
Страница 2: ...AD 3 PROGRAM LOCK PAD 4 NUMBER PADS Time Memory Programming 5 POWER LEVEL SELECTOR PAD 6 DEFROST SELECTOR PAD 7 DOUBLE QUANTITY PAD 8 20sec PAD One Touch Cook Pad 9 STOP CANCEL PAD 10 10 START BUTTON POWERLEVEL INDICATORS DEFROST INDICATORS DOUBLE QUANTITY INDICATOR DATA CHECK INDICATOR POWER SOURCE CHECK INDICATOR When it shows heating does not work AIR FILTER CHECK INDICATOR TIME DISPLAY PROGRAM...

Страница 3: ...s Dinnerware with gold or silver trimmings Skewers forks etc Reason Electric arcing or sparking may occur and may damage the oven 2 DO NOT heat Airtight or vacuum sealed bottles jars containers Ex Baby food jars Airtight food Ex Eggs nuts in shells tomatoes Reason The increase in pressure may cause them to explode Tip Remove lids and pierce skins bags etc 3 DO NOT operate the microwave oven when i...

Страница 4: ...ok into the oven from time to time when food is being heated or cooked in disposable containers of plastic paper or other combustible materials IMPORTANT Young children should NEVER be allowed to use or play with the microwave oven Nor should they be left unattended near the microwave oven when it is in use Items of interest to children should not be stored or hidden just above the oven Installing...

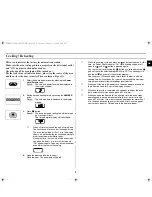
Страница 5: ...y turns on and goes off 1 min later When you open the door whilst in a heating cycle the oven stops operating and the oven lamp automatically turns on for 1 min and goes off 1 min later If you leave the oven door open for more than 1 min the oven beeps once every minute and after 5 min the power source check indicator ON appears in the display window 1 Select the desired power level by pressing th...

Страница 6: ...s CANCEL once Repeat Feature Power Level CM1829 CM1429 Percentage Output Percentage Output HIGH MEDIUM LOW HIGH DEFROST LOW DEFROST 100 70 50 20 10 1800 W 1260 W 900 W 360 W 180 W 100 70 50 25 13 1400 W 980 W 700 W 360 W 180 W Power Level Max Time HIGH MEDIUM LOW HIGH DEFROST LOW DEFROST 25 min 40 min 40 min 50 min 50 min To stop the cooking Then Temporarily Open the door or press pad once Result ...

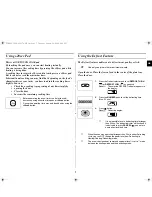
Страница 7: ...entre of the plate tray Close the door When the oven was operating for longer than 25 min under Defrosting cycle you can NOT change the power level from Defrosting to Heating Cooking Reheating mode The oven is designed not to work when power level is set to mode between the heating mode and the defrosting mode Before operating the oven times can be increased decreased using either the time pads or...

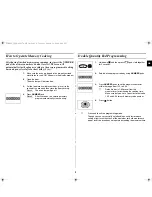
Страница 8: ...operate or respond when you press a cooking time exceeding the maximum value It is not possible to set a cooking time for longer than the maximum time allowed on the chosen program The power level indicator will flash and it is advisable to press CANCEL and to enter a new power level and cooking time 5 Hold down PROGRAM LOCK and then press PROGRAM pad Hold together for 2 sec once again Result PROG...

Страница 9: ...rthed electrical outlet and ON appears in the display window 2 Open the door The oven lamp will be turned on 3 Put the food into a suitable container place it in the centre of the oven and then close the door securely Result The oven lamp will go off 4 Press NUMBER pad Result After 2 seconds the selected memory program automatically starts heating 1 Hold down and then press pad Hold together for 2...

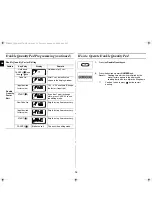
Страница 10: ...RT If you don t want to change more press CANCEL to exit the editing mode New Code No Skip this step if not necessary Input desired factor value Skip this step if not necessary START Skip this step if not necessary CANCEL Mode cancel This exits the editing mode 1 Press the Double Quantity pad 2 Press the desired memory NUMBER pad Result Cooking time which was multiplied by the preset factor appear...

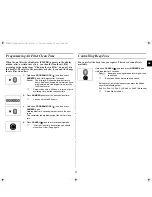
Страница 11: ... by the manufacturer Default clean time is 500 hours in terms of pure oscillating time not the continuity time 2 Press NUMBER pads to set the desired clean time You can set up to 999 hours 3 Hold down PROGRAM LOCK and then press NUMBER 3 pad Hold together for 2 seconds in order to save the new value This completes the programming of the air filter clean time 4 Press CANCEL pad to return to cooking...

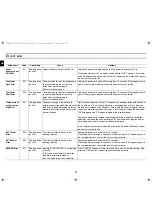
Страница 12: ...with no load or too small load 2 the air filter is placed in a wrong position or 3 any blocking materials exist around the Air Exhaust Cool down the oven for approx 30 min under the normal temperature The oven is back to normal when the error code E3 disappears and ON appears again in the display window Unplug the power cord remove the blocking materials around the ventilation openings cool down t...

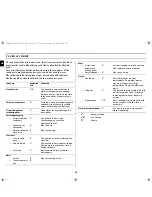
Страница 13: ...et into the back ventilation or control panel opening 4 When you clean the window of the door be sure to use a soft cloth after washing with very mild soap and water Do not use window cleaner as the front door can be scratched by harsh soap or cleaners Feature Key Entry Display Remark Key 1 Next Continuity time total CANCEL 1 Hold together for 2 sec Unit 10 hrs Magnetron oscillating time total CAN...

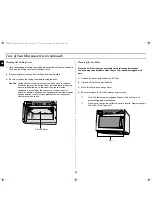
Страница 14: ...eformed abnormal symptom can happen such as arcing or sparks during operation In case of such problem contact the nearest after sales service centre Cleaning the Air Filter Clean the Air Filter regularly according to the following instructions The oven may have problems when the Air Filter becomes clogged with dust 1 Remove the bolt at both ends of the Air Filter 2 Lift the Air Filter off the post...

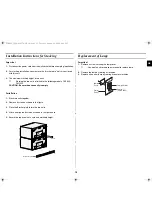
Страница 15: ...tallation 1 Stack two units together 2 Remove 6 screws as shown in the figure 3 Place the Bracket plate to join the two units 4 Attach and tighten 6 screws as shown in the figure here 5 Ensure the top oven is at a safe and workable height Replacement of Lamp Important 1 Remove a screw securing the lamp cover You don t need to remove outer panel to replace lamp 2 Remove the lamp by rotating it cloc...

Страница 16: ...r bags or newspaper Recycled paper or metal trims Can be used to warm food Overheating may cause the polystyrene to melt May catch fire May cause arcing Glassware Oven to table ware Fine glassware Glass jars Can be used unless decorated with a metal trim Can be used to warm foods or liquids Delicate glass may break or crack if heated suddenly Must remove the lid Suitable for warming only Metal Dis...

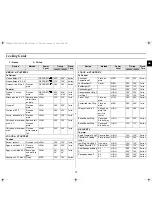
Страница 17: ...5 45 1 min Sausages X 2 Thick C Pierce MED 1 00 1 20 2 mins Recipe Method Power Level Timing Stand Time 1800W 1400W SNACK STARTERS To Reheat Sausages Cumberland F Place on plate MED 2 00 2 20 2 mins Full breakfast C Cover MED 2 30 2 50 1 min Beefburgers F HIGH 0 55 1 10 1 min Chickenburger F HIGH 0 55 1 10 1 min Donner kebab 162g F HIGH 1 00 1 20 1 min Hot Dog F HIGH 1 00 1 20 1 min Pizza 190g F P...

Страница 18: ... safe dish HIGH 3 20 3 50 1 min Plated Meal 350g C Covered HIGH 2 00 2 30 1 min Plated Meal 700g C Covered HIGH 3 00 3 30 1 min Recipe Method Power Level Timing Stand Time 1800W 1400W FRESH VEGETABLES To cook 500g Beans green sliced 60ml 4tbsps water cover HIGH 3 00 3 30 2 mins Brocolli florets 60ml 4tbsps water cover HIGH 3 00 3 30 2 mins Cabbage shredded 10tbsps water cover HIGH 5 00 6 00 2 mins...

Страница 19: ...pill water in the vents NEVER use any abrasive products or chemical solvents Take particular care when cleaning the door seals to ensure that no particles Accumulate Prevent the door from closing correctly Clean the microwave oven cavity right after each use with a mild detergent solution but let the microwave oven cool down before cleaning in order to avoid injury Recipe Method Power Level Timing...

Страница 20: ...ket Contact the nearest after sales service centre Technical Specifications SAMSUNG strives to improve its products at all times Both the design specifications and these user instructions are thus subject to change without notice Model CM1829 CM1429 Power source 240 V 50 Hz 240 V 50 Hz Power consumption Microwave 3 200 W 2 600 W Output power 1 800 W IEC 705 1 400W IEC 705 Operating frequency 2 450...

Страница 21: ...GB 21 Memo jtX_Y X Y TWX X h niU GGw GYXGG SGh GXWSGYWW GG_aZ_Gwt ...

Страница 22: ...GB 22 Memo jtX_Y X Y TWX X h niU GGw GYYGG SGh GXWSGYWW GG_aZ_Gwt ...

Страница 23: ...GB 23 Memo jtX_Y X Y TWX X h niU GGw GYZGG SGh GXWSGYWW GG_aZ_Gwt ...

Страница 24: ...Printed in Malaysia jtX_Y X Y TWX X h niU GGw GY GG SGh GXWSGYWW GG_aZ_Gwt ...

Отзывы: