


GB
5
Cooking / Reheating
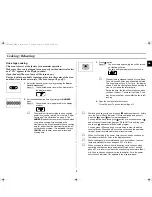
One-stage cooking
This oven is preset at the factory for automatic operation.
Make sure the oven is plugged into a properly earthed electrical outlet
and “ON” appears in the display window.
Open the door(The oven lamp will be turned on.).
Put the food into a suitable container, place it in the centre of the oven
and then close the door securely (The oven lamp will go off.).
✉
Whilst in a heating cycle, one press on
pad stops the oven. At this
time, the Power Check Indicator “ON” starts blinking and goes off
when the
pad or
button is pressed again.
You can restart it by pressing the
button or a second press on
pad will cancel the selected program. While NOT in a heating cycle,
one tap on
pad cancels the selected program.
You can press +20sec pad one or more times in order to add the
cooking time by 20 seconds. But you can not exceed the maximum
time per power level allowed for power level selected.
✉
When you first plug in the power cord, the oven beeps once and all
the indicators show for 5 sec in the display window.
✉
When heating cycle is completed and you open the door, the oven
lamp automatically turns on and goes off 1 min later.
✉
When you open the door whilst in a heating cycle, the oven stops
operating and the oven lamp automatically turns on for 1 min and
goes off 1 min later. If you leave the oven door open for more than 1
min, the oven beeps once every minute and after 5 min the power
source check indicator ‘ON’ appears in the display window.
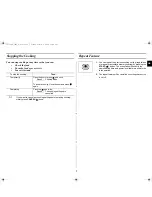
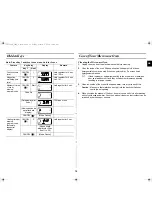
1.
Select the desired power level by pressing the Power
Level Selector pad.
Result :
The selected power level will be displayed in
the display window.
2.
Set the desired heating time by pressing the NUMBER
pads.
Result :
The selected time is displayed in the display
window.
✉
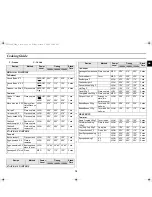
The maximum time according to each cooking
power level can be referred to in the title “Power
Levels ans Time Variations” on page 6. The
NUMBER pads will not operate or respond when
you press a cooking time exceeding the
maximum value. It is not possible to set a cooking
time for longer than the maximum time allowed
on the chosen program. It is advisable to press
CANCEL and to enter a new power level and
cooking time.
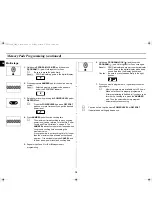
3.
Press
button:
Result :
The oven lamp and cooling fan will be turned
on. Heating will start.
The time on digital display will count down.
✉
When all time is elapsed, the end of cycle Beep
Tone will sound 4 times and all heating will stop.
The oven lamp will go off. For 1 min, the display
shows ‘0‘ and the cooling fan will keep working in
order to cool down the interior parts.
During the time, the fan will not stop even when
you open the door. 1 min later it will stop. Food
may be removed from oven whilst the fan is still
running.
4.
Open the door and take the food out.
Close the door. The oven lamp will go off.
jtX`Y`X]Y`niUGGwG\GGm SGtG\SGYWW[GGXWaY_Ght