8
3. Disassembly and Reassembly
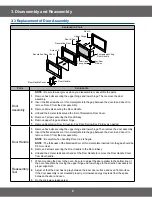
3-3 Replacement of Door Assembly
Explanation Photo
Upper Hinge
Lower Hinge
Spring-Key
2 screws securing
Door Handle
Key-Door
Pin-Key
Screen B
Door C
Door E Ass'y
Decoration Door
Decoration Door Cover
Door Handle
Door Handle Cover
Parts
Explaination
Door
Assembly
NOTE :
Be sure to wear gloves when you disassemble or assemble the parts .
1.
Remove hex bolts securing the upper hinge and lower hinge . Then remove the door
assembly .
.
Insert the flat screwdriver or thin metal plate into the gap between the door-E and door-C to
remove Door-C from the door assembly .
3.
Remove 2screws securing the Door-Handle .
4.
Unbend the 6 metal tabs around the trim of Decoration Door Cover .
5.
Remove 3 screws securing the Door-E Assy .
6.
Remove upper hinge and lower hinge .
7.
Remove Decoration Door, Screen-B, Key-Door, Spring-Key, Pin-Key as needed .
Door Handle
1.
Remove hex bolts securing the upper hinge and lower hinge .Then remove the door assembly .
.
Insert the flat screwdriver or thin metal plate into the gap between the door-E and door-C to
remove Door-C from the door assembly .
NOTE :
Be careful when handling Door-C as is fragile .
NOTE :
The thickness of the flatscrewdriver or thin metal plate inserted into the gap should be
0 .5mm or less .
3.
Remove 2 screws securing the Door Handle to the Door-E Assy .
4.
Unbend the 2 metal tabs at both ends of the Door Handle to remove the Door Handle Cover
from Door handle .
Reassembly
Test
1.
When mounting the door to the oven, be sure to adjust the door parallel to the bottom line of
the oven face plate by moving the upper hinge and lower hinge in the direction necessary for
proper alignment .
.
Adjust so that the door has no play between the inner door surface and oven front surface .
If the door assembly is not mounted properly, microwave energy may leak from the space
between the door and oven .
3.
Do the microwave leakage test .


