background image

EN

15 

Cooking Guide(continued)

Reheating Snacks

Use the power levels and times in this table as a guide lines for cooking. 

Cooking Breakfast

Use the power levels and times in this table as a guide lines for cooking.

Defrosting Bread and Cake 

Use the power levels and times in this table as a guide lines for cooking. .

Defrosting and Cooking Desserts

Use the power levels and times in this table as a guide lines for cooking. 

Food

Portion

Method

Power 

Time 

(min)

Standing 

Time(min)

Cheesebur
ger
(chilled)

150 g
(1pc)

Put burger on kitchen 
paper on a ceramic plate.

HIGH

1-1½

2-3

Cheesebur
ger
(frozen)

150 g
(1pc)

Put burger on kitchen 
paper on a ceramic plate.

LO

3-3½

2-3

Hot Dog
(chilled)

125 g
(1pc)

Put hot dog on kitchen 
paper on a ceramic plate.

MEDIUM ca. 1½

2-3

Pizza; Slice
(chilled)

100 g

Put the pizza slice on a 
kitchen paper on ceramic 
plate.

LO

1½-2

1-2

Meat & 
Vegetable 
Wrap 
(chilled)

200 g

Put the chilled wrap (filled 
pastry roll) on kitchen 
paper on a ceramic plate.

MEDIUM

2-2½

1-2

Quiche/ Pie
(chilled)

150 g

Put quiche on kitchen 
paper on a ceramic plate.

MEDIUM

2-2½

2-3

Croissants

2 pcs
(60g)

Put the croissants on 
kitchen paper on a ceramic 
plate. Serve croissants 
directly after warming.

MEDIUM

½-1

-

Food

Portion

Method

Power 

Time 

(min)

Standing 

Time(min)

Bacon
(chilled)

2 slices 
à 20 g

Put bacon slices on 
kitchen paper on a flat 
ceramic plate.

HIGH

ca. 1½

1

Scrambled 
Eggs

2 eggs 

Beat eggs, add salt and 2 
tbsp. milk. Put in a deep 
ceramic plate. Stir several 
times during cooking.

LO

ca. 2½

1

Baked 
Beans
(canned)

250 g

Put the beans in a deep 
ceramic plate. 
Reheat covered. Stir 
during reheating. 

MEDIUM 2½-3½

1-2

Food

Portion

Method

Power 

Time 

(min)

Standing 

Time(min)

Baguettes

150 g
(1pc)

Put the baguette 
widthways on kitchen 
paper in the oven. 

DEFROST

ca. ½

3-5

Bread 
Rolls

4 pcs à 
50 g

Put the rolls side by side 
on kitchen paper in the 
oven. 

DEFROST

ca. 3

3-5

Fruit Cake 120 g

(1pc)

Put the piece of cake on 
a ceramic plate.

DEFROST

3-3½

5-10

Cream 
Cake Roll

100 g
(1pc)

Put the piece of cake on 
a ceramic plate. 
Place plate in the centre 
of table. Let stand until 
cream is totally 
defrosted.

DEFROST

ca. 1

10-20

Food

Portion

Method

Power 

Time 

(min)

Standing 

Time(min)

Berries in 
sauce

250 g

Put frozen fruits in a 
glass pyrex bowl  with 
lid. Reheat covered. 
Stir once during standing 
time.

MEDIUM

6-6½

2-3

Yeast 
Dumplings
with jam 
filling

300 g
(2pcs)

Put frozen yeast 
dumplings (pre-cooked) 
side by side in a glass 
pyrex bowl with lid.
Moist the top of them 
with cold water. Cook 
covered.

MEDIUM

4½-5

2-3

jtXW]`†l|TWZZXWh†luU”GGwˆŽŒGX\GGt–•‹ˆ SGzŒ—›Œ”‰Œ™GXXSGYWW]GGXYa\[Gwt

Содержание CM1069

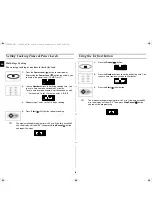
Страница 1: ...f You are in Doubt or Have a Problem 7 Setting Cooking Times Power Levels 7 Using the Defrost button 8 Using the Start button 9 Using the Stop Cancel Button 9 Memory Programming 10 Using the Check button 11 Resetting the Memory Program Cycle Counter 12 Setting the Sound 12 Using the Double Quantity button 12 Cookware Guide 13 Cooking Guide 14 Cleaning Your Microwave Oven 16 Storing and Repairing Y...

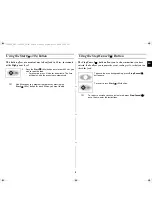
Страница 2: ...tton Result Cooking starts The oven beeps four times when cooking is over 1 Place the frozen food in the oven Press the Defrost button 2 Press the Number button to set the Defrosting time Max 30min 3 Press Start 30s button Result Defrost starts The oven beeps four times when cooking is over 4 Leave the food in the oven Press 30s once or more times for each extra 30 seconds that you wish to add VEN...

Страница 3: ...e safety interlock holes b Do not place any object between the oven door and front face or allow food or cleaner residues to accumulate on sealing surfaces Ensure that the door and door sealing surfaces are kept clean by wiping after use first with a damp cloth and then with a soft dry cloth c Do not operate the oven if it is damaged until it has been repaired by a qualified microwave service tech...

Страница 4: ...d into a socket that is properly installed and earthed The wires in this mains lead are coloured in accordance with the following code Green and yellow Earth Blue Neutral Brown Live As the colours of the wires in the mains lead of this appliance may not correspond with the coloured markings indentifying the terminals in your plug proceed as follows Connect the green and yellow wire to the terminal...

Страница 5: ...ting Take care when handling the container after heating You may burn yourself if the container is too hot A risk of delayed eruptive boiling exists To prevent delayed boiling and possible scalding you should put a plastic spoon or glass stick into the beverages and stir before during and after heating Reason During the heating of liquids the boiling point can be delayed this means that eruptive b...

Страница 6: ...ntainer WARNING The contents of feeding bottles and baby food jars must be stirred or shaken and the temperature checked before consumption in order to avoid burns Installing Your Microwave Oven This microwave oven can be placed almost anywhere kitchen work surface or shelf movable trolley table For your personal safety this appliance must be Properly earthed 3 pin plug Plugged into a standard 230...

Страница 7: ...s If using foil use only narrow strips and allow at least one inch between the foil and interior oven walls Using your microwave causes TV or radio interference This is similar to the interference caused by other small appliances such as hair dryers Move your microwave further away from other appliances like your TV or radio Door opening starts automatic operation of FAN When placing or removing f...

Страница 8: ... Press the Power Level button to select power By pressing the Power Level button repeatedly you can select the power level HI MED or LO 2 Use the Number buttons to enter the cooking time You can set a time from one second to 30 minutes To set a time over one minute enter the second as well For example to set 10 minutes enter 1 0 0 0 3 Repeat steps 1 and 2 for II or III stage cooking 4 Press Start ...

Страница 9: ...u have entered It also allows you to pause the oven s cooking cycle so that you can check the food To correct a mistake you have just entered press Stop Cancel once then re enter the instructions 1 Press the Start 30s button once for each 30 sec you wish to cook the food For example press it twice for one minute The time will display and the oven starts automatically To pause the oven during cooki...

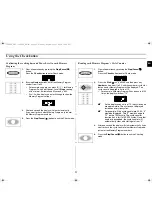
Страница 10: ...e Power Level button repeatedly you can select the power level HI MED or LO 4 Use the Number buttons to enter the cooking time You can set a time from one second to 30 minutes To set a time over one minute enter the seconds as well For example to set 10 minutes enter 1 0 0 0 5 Press the Program button to complete setting the memory The display will show 0 1 Upon pressing the Program button the ove...

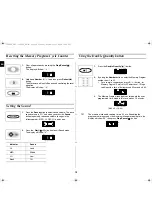
Страница 11: ... button Press the Check button to enter Check mode 2 Press the Start 30s button and then press any Number button from 1 to 20 and the number of cycles for that particular Memory Program will be displayed The cycle count is displayed in units of 10 For example if Memory Program 5 has been used 100 times the display will show 10 As the display uses units of 10 the cycle counts are approximate The cy...

Страница 12: ... to adjust sound volume The basic sound volume is LO and when you press the Sound button repeatedly the sound volume changes in the following order MED HI OFF LO one by one 2 Press the Start 30s button to exit Sound mode The display will show 0 Indicator Sound HI Loud MED Middle LO Low Blank Off 1 Press the Double Quantity button 2 By using the Number buttons enter the Memory Program number from 1...

Страница 13: ...er bags or newspaper Recycled paper or metal trims Can be used to warm food Overheating may cause the polystyrene to melt May catch fire May cause arcing Glassware Oven to table ware Fine glassware Glass jars Can be used unless decorated with a metal trim Can be used to warm foods or liquids Delicate glass may break or crack if heated suddenly Must remove the lid Suitable for warming only Metal Di...

Страница 14: ...d Stir occasionally during reheating MEDIUM 4 5 3 Lasagne chilled 400 g Put the chilled lasagne pre cooked product widthways in the centre of table Reheat covered HIGH 4 5 3 Bechamel Potatoes chilled 400 g Put bechamel potatoes pre cooked product widthways in the centre of table Reheat covered MEDIUM 5 6 3 Baked Potatoes ready cooked and chilled 500 g 2x250 g Pierce film and put potatoes on a flat...

Страница 15: ...irectly after warming MEDIUM 1 Food Portion Method Power Time min Standing Time min Bacon chilled 2 slices à 20 g Put bacon slices on kitchen paper on a flat ceramic plate HIGH ca 1 1 Scrambled Eggs 2 eggs Beat eggs add salt and 2 tbsp milk Put in a deep ceramic plate Stir several times during cooking LO ca 2 1 Baked Beans canned 250 g Put the beans in a deep ceramic plate Reheat covered Stir duri...

Страница 16: ...icrowave oven cool down before cleaning in order to avoid injury Storing and Repairing Your Microwave Oven A few simple precautions should be taken when storing or having your microwave oven serviced The oven must not be used if the door or door seals are damaged Broken hinge Deteriorated seals Distorted or bent oven casing Only a qualified microwave service technician should repair this oven NEVE...

Отзывы: