


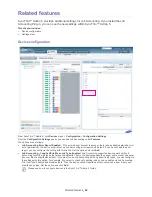


Group Permissions
_ 30
•
Display devices from subgroups :
By default, this option is enabled, which means you can see all the devices,
including the subgroups’ members. If you do not want to see the devices from subgroups, you can uncheck the option.
If you uncheck the option, the
Job Accounting Enabled Device List
displays a different total number of
devices from the number in the group list because the current
Job Accounting Enabled Device List
displays
only the members of the selected group.
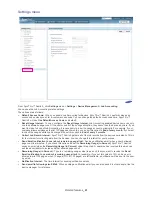
The
Job Accounting Enabled Device List
has Job Accounting compatible columns as follows:
•
JAC State :
shows current Job Accounting status of the device
-
Enabled :
Job Accounting enabled by SyncThru™ Admin 5 system
-
Disabled :
Job Accounting disabled
-
Occupied :
Job Accounting enabled by another SyncThru™ Web Admin Service 4.x or SyncThru™ Admin 5
system
•
JAC Supported :
shows whether the device supports Job Accounting or not
-
Supported :
device supports Job Accounting
-
Not Supported :
device does not support Job Accounting
•
JAC URL :
shows which server is controlling the Job Accounting if the device’s
JAC State
is
Occupied
. In other
words,
JAC URL
shows the URL of the server enabling Job Accounting. If the
JAC State
is
Enabled
, SyncThru™
Admin 5 itself is controlling Job Accounting, so the
JAC URL
does not show.
•
Modify Groups :
shows the assigned user group and user group permissions of the device. If you click the
Groups
button, the
Group Permissions for Selected Device
window pops up. You can see the assigned user group
permissions and modify them. You can also check the usage count for each user group or the usage count by job
types..
With this Groups button, you can:
-
see all assigned users and permissions.
-
change the permissions.
-
delete groups by clicking the
button.
Assigning user group permissions to devices
1.
From SyncThru™ Admin 5, click
Job Accounting
menu >
Group Permissions
>
Group Permissions Settings
>
Job Accounting Enabled Device List
.
2.
Select the device(s) you want to configure permissions for.
3.
From the
Apply Permissions
panel, click the
button.
The
Select User Group
window appears.
4.
Select the user group you want to assign permissions to.
If you haven’t created user groups, you can create a group with the
button at the bottom of the
Customized groups
panel. For more information on how to add a group. See the SyncThru™ Admin 5 Guide.
5.
Click the
Select
button.
The group is added to the
Apply Permissions
panel.
If you want to add another group, repeat steps 2-5.
6.
Select the group(s).
7.
At the bottom of
Apply Permissions
you can see the
Permissions
list.
Check the function(s) you want to assign.
8.
Click
OK
/
Apply
.
You can see the results of this permission setting in the
Group Permissions History
. If you click the
OK
button (not
Apply
), the page automatically moves to the
Group Permissions History
.
Or, you can export group permissions with
Import Permissions (CSV)
button (See "Importing group permissions from
a CSV file" on page 30).
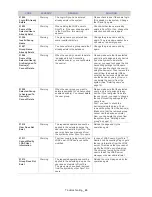
Importing group permissions from a CSV file
1.
From SyncThru™ Admin 5, click
Job Accounting
menu >
Group Permissions
>
Group Permissions Settings
>
Apply Permissions
.
2.
Click the
Import Permission (CSV)
button.
3.
Upload the CSV file you want to import.
If you don’t know what CSV file format is, you can use
Import Permissions (CSV)
button in the
Apply Permissions
panel. With this button, you can save the list in a CSV file and reuse it for importing user permission.
CSV files for importing should be created with UTF-8 encoding, the following is an example of a CSV file.
Содержание CLX 6210FX - Color Laser - All-in-One
Страница 1: ...SyncThru Admin 5 Job Accounting Plug in Admin Guide...
Страница 65: ......


