O
P E R AT I O N
C
HAPTER
T
HREE
: TV O
PERATION
3
.11
1
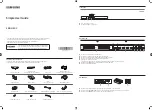
Press
MENU
to display
menu.
Customizing the Picture
You can use the on-screen menus to change the contrast, brightness, tint, color, and
sharpness according to personal preference. (Alternatively, you can use one of the
“automatic” settings. See next page.)
2
Press
VOL –
or
VOL +
repeatedly, until the
word “Custom” is
selected. (When Custom
is highlighted, the words
“Adjust” will appear on
the screen.)
4
Press
VOL –
or
VOL +
to increase or
decrease the value of
a particular item.
Press
MENU
four
times to exit.
▼
After adjusting an item, the gauge
will automatically disappear (after
about 5 seconds).
3
Press
CH
▼
to select
“Adjust”, then press
VOL+
. (The words
Color Tone, Contrast,
Brightness, Sharpness,
Color, and Tint will
appear on the screen.)
Press
CH
▲
or
CH
▼
to
select a particular item.
▼
The customer can select
“Normal”, “Warm”, or “Cool” accord-
ing to personal preference.
Note: Sharpness and Tint can’t be
adjusted in DVD mode.