background image

62

63

GB

GB

MP3/WMA Play

• Your MP3 or WMA files should be ISO 9660 or JOLIET format.

ISO 9660 format and Joliet MP3 or WMA files are compatible with Microsoft's DOS and Windows, and with
Apple's Mac. These two formats are the most widely used.

• When naming your MP3 or WMA files do not exceed 8 characters, and place ".mp3, .wma" as the file

extension.
General name format of: Title.mp3. or Title.wma. When composing your title, make sure that you use 8
characters or less, have no spaces in the name, and avoid the use of special characters including: (.,/,\,=,+).

• Use a decompression transfer rate of at least 128 Kbps when recording MP3 files.

Sound quality with MP3 files basically depends on the rate of compression/decompression you choose. Getting
audio CD sound quality requires an analog/digital sampling rate, that is conversion to MP3 format, of at least 128
Kbps and up to 160 Kbps. However, choosing higher rates, like 192 Kbps or more, only rarely give better sound
quality.
Conversely, files with decompression rates below 128 Kbps will not be played properly.

• Use a decompression transfer rate of at least 64Kbps when recording WMA files.

Sound quality with WMA files basically depends on the rate of compression/decompression you choose. Getting
audio CD sound quality requires an analog/digital sampling rate, that is conversion to WMA format, of at least
64Kbps and up to 192Kbps.
Conversely, files with decompression rates  below 64Kbps or over 192Kbps will not be played properly.

• Do not try recording copyright protected MP3 files.

Certain "secured" files are encrypted and code protected to prevent illegal copying. These files are of the
following types: Windows Media

TM

(registered trade mark of Microsoft Inc) and SDMI

TM

(registered trade mark of

The SDMI Foundation). You cannot copy such files.

• Important: The above recommendations cannot be taken as a guarantee that the DVD player will play MP3

recordings, or as an assurance of sound quality.
You should note that certain technologies and methods for MP3 file recording on CD-Rs prevent optimal playback 

of these files on your DVD player (degraded sound quality and in some cases, inability of the player to read the 
files).

• This unit can play a maximum of 500 files and 300 folders per disc.

When you record MP3 files on the CD-R, please refer to the following.

CD-R MP3/WMA discs

DVD

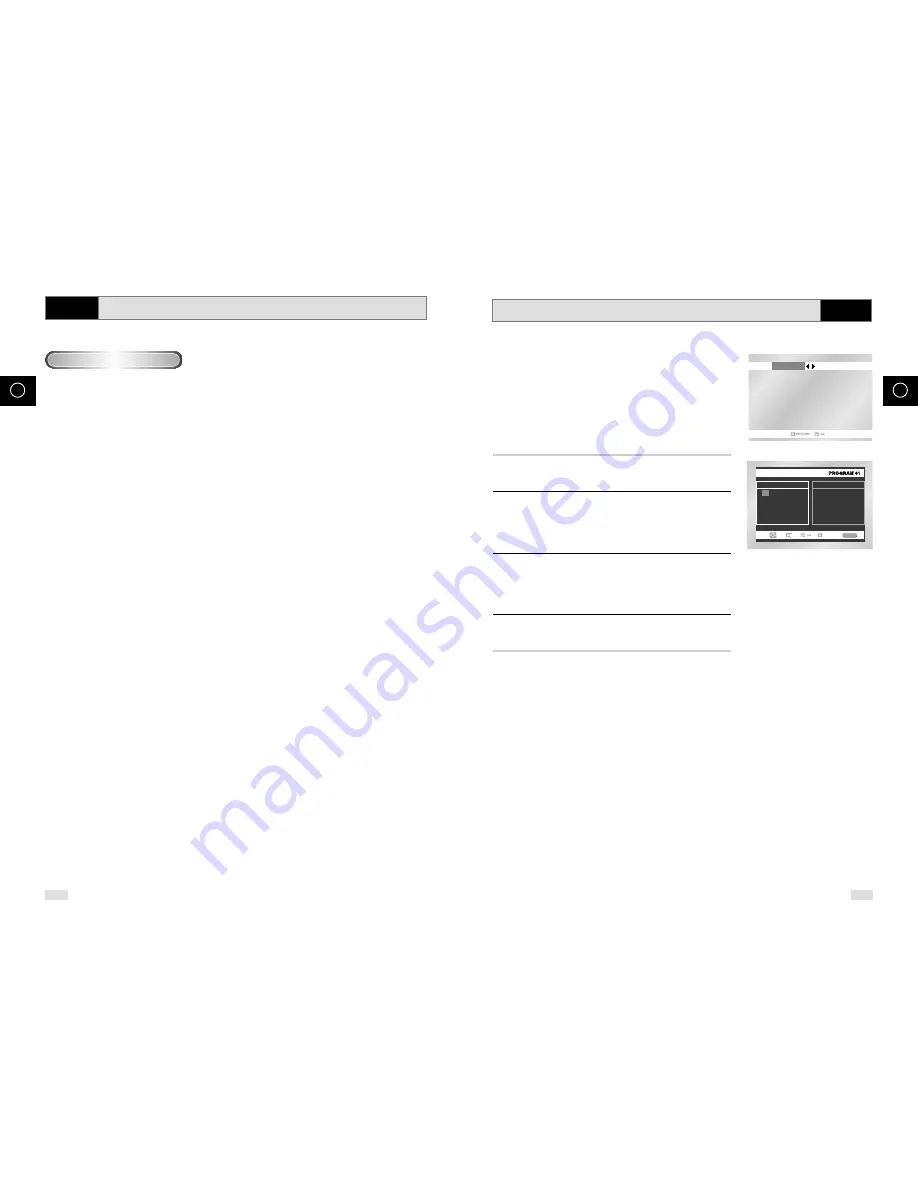
Program Play & Random Play

You can listen to songs randomly or in the desired sequence.
Up to 20 tracks can be programmed.
This function is available only with Audio CDs.

Before You Begin...

Set the channel to "3" or use the TV/VIDEO button on the 
TV to select the input source.

Press the DVD button on the remote control to switch to 

DVD mode.

1

In STOP mode, press the REPEAT button.

The Playback Sequence menu will appear.

2

Use 

,

buttons to select PROGRAM, and then press the OK 

button.

The Selective Play screen will appear.

- Select <RANDOM> and press the OK button to play 

tracks in random order.

3

Use 

"

,

or 

,

buttons to select the desired track (CD), and 

then press the OK button.

The selected track will be added to the Program order.

- Press the CLEAR button. The track added last will be 

deleted from the Program order.

4

To finish programming and start playback, press the 

ll button.

Tracks will play in the order they are added.

• If the disc tray is opened during programming, Program Play will

be canceled.

• Program Play can be set only when the CD is not playing.

• To Cancel Programming

-

Press the REPEAT or RETURN button. 
The program will not be saved and the program screen 
will disappear.

• To Cancel Program Play

-

During playback or in Stop mode, press the CLEAR 
button.

RANDOM

PROGRAM

Track

05    06    07    08

09    10    11    12

13    14    15    16

- -     - -     - -     - -

- -     - -     - -     - -

- -     - -     - -     - -

- -     - -     - -     - -

- -     - -     - -     - -

Program  Order

01    02    03    04

CLEAR

RETURN

DVD

Содержание CHT-250H

Страница 1: ...GB DVD VCR CHT 250 EJECT REC S MODE STANDBY ON PHONES COPY PROG SELECT VOL P SCAN Instruction Manual www samsungvcr com PAL NTSC AK68 00463A ...

Страница 2: ...7 Using the Zoom DVD VCD 57 Repeat Chapter Title 58 Selecting the Audio Language 58 Using the Mark Function DVD VCD 59 MP3 CD Playback 60 WMA Play 61 MP3 WMA Play 62 Program Play Random Play 63 Picture CD Playback 64 Contents FOREWORD Safety Instructions 5 Disc Type and Characteristics 6 DVD VCR OVERVIEWS Front View of the DVD VCR 7 Rear View of the DVD VCR 7 Infrared Remote Control 8 Display Indi...

Страница 3: ... remote control is not used for a long period of time remove the batteries and store it in a cool dry place The following illustrations represent precautions This product incorporates copyright protection technology that is protected by method claims of certain U S patents and other intellectual property rights owned by Macrovision Corporation and other rights owners Use of this copyright protecti...

Страница 4: ...ver time VIDEO CD AUDIO CD 12 Cm 8 Cm 74 min 20 min 12 Cm 8 Cm 74 min 20 min Disc Types Logos Recording Types Disc Size Max Playing Time Characteristics DVD DTS and DTS Digital Surround are registered trademarks of Digital Theater Systems Inc Manufactured under license from Dolby Laboratories Dolby Pro Logic and the double D symbol are trademarks of Dolby Laboratories 1 DVD DECK 2 DVD OPEN CLOSE 3...

Страница 5: ...35 36 37 38 39 40 41 42 1 2 3 4 5 6 7 8 9 10 1 The DVD Deck is active 2 DVD or CD VCD SVCD media is loaded 3 The time counter position time remaining or current deck status is indicated 4 Recording is in progress normal and timer 5 VHS videotape is loaded 6 The VCR Deck is active 7 A DVD with a DTS soundtrack is loaded 8 The Hi Fi track of a VHS videotape is playing or the current TV program or vi...

Страница 6: ...erwise no picture will be visible on the screen when the DVD VCR is switched off Make sure that both the television and the DVD VCR are switched off before connecting the cables 1 Connect the coaxial cable as indicated in the above section 2 Connect one end of the RCA Audio Video cable to the Video output and Audio L R output socket on the rear of the DVD VCR 3 Plug the other end into the appropri...

Страница 7: ... of stations automatically stored by the VCR depends on the number of stations that it has found Auto preset can be performed by pressing STOP on the VCR continuously for 5 seconds or more with no tape inserted Connecting DVD VCR to a Satellite Receiver or Other Equipment RADIO ANT AM FM 75 COAXIAL LINE IN LINE OUT V DVD VCR R L IN FROM ANT OUT TO TV RF TV Auto setup Please wait 00 Clock Set 12 00...

Страница 8: ...ontrol to select and watch DVD Tuning Your Television for the DVD VCR You must tune your television for the DVD VCR only if you are not using a RCA cable To view pictures from your DVD VCR when a RCA cable is used the television must be set to the audio video mode AV 1 Switch on the television 2 Switch on the DVD VCR by pressing STANDBY ON on the front of the DVD VCR or STANDBY ON on the remote co...

Страница 9: ...ectly 4 INFO Press to display the channel you are watching Also works in DVD and VCR mode The DVD VCR allows you to copy the contents of a DVD to a VHS tape with a press of the COPY button If the DVD you are attempting to copy is copy protected you will not be able to copy the disc It is not permitted to copy Macrovision encoded DVDs 1 INSERT DISC Insert the disc you wish to copy in the DVD deck a...

Страница 10: ...21 Auto Setup Your data will be lost Press OK to continue Menu to exit Auto Setup Manual Setup TV System G VCR Output CH CH 36 Install Language English User Set Auto Power Off Off Screen Messages On Install Setting the Menu Language 1 Open MENU After pressing the MENU press the OK or 2 Select Language Use the or buttons to highlight Language then press the OK or 3 Set menu Language Place the selec...

Страница 11: ...nu is displayed 8 Press the or buttons to start scanning channel Result The frequency band is scanned and the first station found is displayed 9 Press the or buttons until the NAME is selected The station name is set automatically from the broadcast signal 10 To change the programme s name press the button Result The first letter of the name flashes 11 To Then Select a character Press the or butto...

Страница 12: ...an change the DVD VCR output channel to adjust the frequency in which information is displayed on the screen 1 After pressing the MENU press the OK or Result The Setup menu is displayed 2 Press the corresponding buttons to select the Install option 3 Press the OK or to select this option Result The Install menu is displayed 4 Press the or buttons until the VCR Output CH option is selected 5 Select...

Страница 13: ...n Install NICAM programmes are divided into 3 types NICAM Stereo NICAM Mono and Bilingual transmission in another language NICAM programmes are always accompanied by a standard mono sound broadcast and you can select the desired sound Please refer to page 38 1 After pressing the MENU press the OK or Result The Setup menu is displayed 2 Press the corresponding buttons to select the User Set option ...

Страница 14: ...5 Press the corresponding or buttons until the IPC option is selected 6 Press the OK or button to select IPC Intelligent Picture Control option When intelligent picture control mode is ON the sharpness of the image is adjusted automatically 7 To adjust the sharpness manually press the button to turn the IPC mode OFF 8 Press the or buttons until the picture is displayed according to your preference...

Страница 15: ... Repeat Play Off VCR Setup Tape Select E180 S VHS Off Off On Screen Messages Selecting the Cassette Type Your DVD VCR displays most information on both the DVD VCR and the television You can choose to display or hide this information on the television screen except for the SEARCH Programming MENU and Timer functions which cannot be hidden 1 After pressing the MENU press the OK or Result The Setup ...

Страница 16: ...for asatellite tuner or external video source Result The station number is displayed and the programme can be seen on the television 5 Select the recording speed by pressing the SPEED button as many times as required see page 30 6 Hold REC down for a while to start recording Result The record indicator appears on the television and DVD VCR display An index is recorded on the tape see page 38 7 To ...

Страница 17: ...rd the whole programme Using the Timer Programming Feature 32 33 GB GB Recording a Programme with Automatic Stop This function enables you to record up to nine hours LP of programmes Your DVD VCR stops automatically after the requested length of time 1 Switch on the television 2 To monitor the programme being recorded select the television channel reserved for use with your DVD VCR or the AV input...

Страница 18: ...nd stable Result The tracking bar appears The image is adjusted The tracking bar disappears when you release the button Checking a Preset Recording Cancelling a Preset Recording You can check your preset recordings When you have finished presetting the DVD VCR If you have forgotten which programmes will be recorded 1 Press TIMER on the remote control Result The Timer Programme is displayed 2 Press...

Страница 19: ...ormal channels MONO Used to listen to the sound on the normal mono channel L R Used to listen to Hi Fi stereo sound on the left and right channels When playing back tapes recorded in Hi Fi the sound switches to Hi Fi after five seconds of Mono To select the sound mode simply press the AUDIO button on the remote control until the required option is displayed L R MIX L R MONO You can play a cassette...

Страница 20: ...e Each time you record a cassette on this DVD VCR an index is automatically marked on the tape when recording starts The Search function allows you to fast forward or rewind to a specific index and start playback from that point Depending on the direction selected the indexes are numbered as follows This DVD VCR uses a standard indexing system VISS As a result it will recognize any indexes marked ...

Страница 21: ...psed time in the play and record modes hours minutes and seconds Is reset when a cassette is inserted in the DVD VCR Allows you to find the beginning of a sequence easily If the remaining time is to be calculated correctly you must indicate the type of cassette being used 1 Insert a cassette in your DVD VCR 2 To set the tape counter to zero at the beginning of a sequence Press INFO twice to displa...

Страница 22: ...ayer Restriction Audio dubbing is applicable only to the longitudinal audio track normal audio 1 Connect an RCA audio cable to the appropriate output on your sound system cassette player for example 2 Connect the other end of the RCA audio cable to the audio input connectors L R on the rear of your DVD VCR 3 Insert the pre recorded cassette on which the audio track is to be replaced and press the ...

Страница 23: ... 27 TOSHIBA 07 16 to 19 21 Result If your television is compatible with the remote control it will switch off It is now programmed to operate with the remote control If several codes are indicated for your television brand try each one in turn until you find one that works When you change the batteries in the remote control you must reprogramme the code following the same procedure You can then co...

Страница 24: ...t as your initial language in that case the disc will use its original language setting 6 Press the OK button English is selected and the screen returns to Language Setup Using the Audio Language Using the Subtitle Language Language Setup Disc Menu English Audio English Subtitle Automatic Subtitle Subtitle Language Automatic Setup Setup Setup Display Setup Language Setup Disc Menu English Audio En...

Страница 25: ...n 2 Select DVD using buttons then OK or button 3 Select Parental Setup using buttons then press the OK or button 4 Use OK or to select Yes if you want to use a password The Enter Password screen appears 5 Enter your password The Re Enter Password screen appears to confirm the password ENTER your password again The Parental Setup screen appears About the Rating Level The Rating Level will work only...

Страница 26: ...NENT VIDEO OUT S VIDEO OUT To S Video Input on Your TV 1 Component Connections for DVD DVD Component video output is available only for DVD playback RF and Line input are available for Tuner and VCR playback If your TV set supports Progressive Scan it can transmit Pr Pb and Y signals separately so you can enjoy sharp and clear picture What is Progressive Scan It is a set of jacks that can provide ...

Страница 27: ...sume the DVD CD from the point where the disc stopped press the ll button Press the button twice to completely stop playback The next time you press ll the disc will start over from the beginning DVD 1 2 2 4 Adjusting the Aspect Ratio EZ View DVD 1 Press the EZ VIEW button The screen size changes when the button is pressed repeatedly The screen zoom mode operates differently depending on the scree...

Страница 28: ...e the buttons to make the desired setup You may use the number buttons of the remote control to directly access a title chapter or to start the playback from the desired time 4 To make the screen disappear press the INFO button again To access the desired title when there is more than one in the disc For example if there is more than one movie on a DVD each movie will be identified Most of DVD dis...

Страница 29: ...a chosen section A B or all of the disc 1 Press the REPEAT button on the remote Repeat screen appears 2 Select Chapter Title or A B using the buttons Press the REPEAT button Select A B on screen with the buttons Press OK at the point where you want the repeat play to start A The B is automatically highlighted Press OK at the point where you want the repeat play to stop B To terminate the function ...

Страница 30: ...ress the OK button to repeat the title DVD repeats play by chapter or title VCD repeats play by track or disc Repeat Chapter Title 1 Off Track Disc A B Off Chapter Title A B DVD VCD CD DVD Stereo ENG DOLBYDIGITAL 5 1CH DVD VCD CD Using the Mark Function DVD VCD DVD This feature lets you mark sections of a DVD or VCD MENU OFF mode so you can quickly find them at a later time 1 During play press the...

Страница 31: ...to select the folder and then press the OK button A list of albums in the folder will appear To view the next album press the RETURN button 3 Use buttons to select ALBUM and then press the OK button Select the track and then press the OK button Playback will start To select the previous track or next track press or 4 To change the album press the button and then press RETURN button A list of album...

Страница 32: ...The SDMI Foundation You cannot copy such files Important The above recommendations cannot be taken as a guarantee that the DVD player will play MP3 recordings or as an assurance of sound quality You should note that certain technologies and methods for MP3 file recording on CD Rs prevent optimal playback of these files on your DVD player degraded sound quality and in some cases inability of the pl...

Страница 33: ...te control to switch to DVD mode 1 Press the OPEN CLOSE button to open the disc tray and then load the disc Load the disc with the labeled side up 2 Press the OPEN CLOSE button to close the disc tray As the disc tray is closing the screen shown on the left will appear 3 Use buttons on the remote control to select the picture you want to view and then press the OK button The screen shown in the mid...

Страница 34: ...MPONENT VIDEO OUT S VIDEO OUT SPEAKERS FRONT R FRONT L WOOFER SURROUND R SURROUND L CENTER IN FROM ANT OUT TO TV RF Setting the Delay Time A delay effect can be added to the sound from the Center and Surround speakers to adjust the sound according to the acoustic condition of the listening room Initially the delay time is set to 0 ms When 5 1CH Surround Sound is played you can enjoy the best sound...

Страница 35: ...d Depending the type of disc being played the effect of each surround mode may vary During playback of a DVD encoded in 2 or more channels a surround mode cannot be selected When you select a surround mode during playback of a MP3 WMA or Audio CD the 5 1 CH Surround Sound will be selected NATURAL NATURAL JAZZ JAZZ CONCE CONCERT STA STADIUM MOVIE MOVIE MUSIC MUSIC MA MATRIX 4 STEREO 4 STEREO STEREO...

Страница 36: ...0 stations 20 FM stations and 10 AM stations Example Storing an FM station of 87 50 MHz into the preset station number 01 1 Press the FM AM button to select FM Each time you press the button the selection will toggle between FM and AM 2 Use and to tune in to FM 87_50 3 Press the button or the OK button on the remote control FM1 will blink on the display 4 Select the reception mode and then select ...

Страница 37: ...t channel clashing with 3 Carry out the instructions Setting the DVD VCR output the normal TV transmissions in your area Channel see page 23 move the channel number To prevent this you will need to change the several channels down from the original setting DVD VCR output channel in the following example from 36 to 39 way 4 Replace the aerial plug into the socket marked aerial symbol on the rear of...

Страница 38: ...it 2 The DVD s software doesn t support the feature e g angles 3 The feature is not available at the moment 4 You ve requested a title or chapter number or search time that is out of range Some of the functions selected in the Setup Menu may not work properly if the disc is not encoded with the corresponding function The Screen Ratio is fixed on your DVDs Make sure you have selected the correct Di...

Отзывы: