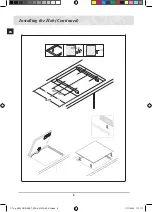
background image

5

EN

Installing the Hob


Important

: Be sure the new appliance is installed and grounded only by qualified 

personnel .


 Please observe this instruction . The warranty will not cover any damage that may 

occur as a result of improper installation .


Technical data is provided at the end of this manual .

Regulations and compliance

This appliance meets the following standards:
•  EN 60 335 - 1 and EN 60 335 - 2 - 6, relating to the safety of electrical appliances for house

-

hold use and similar purposes;

•  EN 60350, or DIN 44546 / 44547 / 44548, relating to the operating features of electric cook

-

ers, hobs, ovens, and grills for household use;

• EN 55014 - 2;
• EN 55014;
• EN 61000 - 3 - 2; and
• EN 61000 - 3 - 3, relating to basic requirements for electromagnetic compatibility (EMC).
 

This appliance complies with the following EU Directives:


• 73 / 23 / EWG dated 19.02.1973 (Low Voltage Directive);


•  89 / 336 / EWG dated 03.05.1989 (EMC Directive including Amending Directive 92 

/ 31 / EWG); and


• 93 / 68 / EWG CE Labeling Directive.

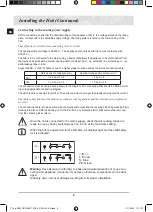
Safety instructions for the installer

•  A device must be provided in the electrical installation that allows the appliance to be discon

-

nected from the mains at all poles with a contact opening width of at least 3 mm . Suitable 

isolation devices include line protecting cut - outs, fuses (screw type fuses are to be removed 

from the holder), earth leakage trips and contactors.

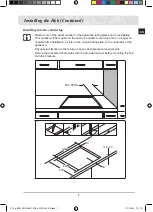
•  With respect to fire protection, this appliance corresponds to EN 60 335 - 2 - 6. This type of 

appliance may be installed with a high cupboard or wall on one side .

• Drawers may not be fitted underneath the hob.
• The installation must guarantee shock protection.
•  The kitchen unit in which the appliance is fitted must satisfy the stability requirements of DIN 

68930.

• For protection against moisture, all cut surfaces are to be sealed with a suitable sealant.
•  On tiled work surfaces, the joints in the area where the hob sits must be completely filled with 

grout .

•  On natural, artificial stone, or ceramic tops, the snap action springs must be bonded in place 

with a suitable artificial resin or mixed adhesive.

•  Ensure that the seal is correctly seated against the work surface without any gaps. Additional 

silicon sealant must not be applied; this would make removal more difficult when servicing.

• The hob must be pressed out from below when removed.

C Top_MID] C61RAAST_XFA-00131A-05_EN.indd   5

1/11/2555   11:17:17

Содержание C61RAAST

Страница 1: ...MST C61R1ABMAL C61R1ACMN C61R1ADMST C61R1AEME C61R2AAST C61R2ABAL C61R2ACN C61R2ADST C61R2AEE To avoid the risk of accidents or damage to the hob read all instructions before installing or using the a...

Страница 2: ...C Top_MID C61RAAST_XFA 00131A 05_EN indd 2 1 11 2555 11 17 17...

Страница 3: ...afety shutoff 12 Residual heat indicator 12 Before You Begin 13 Initial cleaning 13 Hob Use 13 Using suitable cookware 13 Using the touch control sensors 14 Switching the appliance on 15 Temperature c...

Страница 4: ...ety alert symbol Warning indicates information concerning your personal safety Important indicates information on avoiding damage to the appliance This symbol indicates useful information and practica...

Страница 5: ...standards This ensures sufficient protection against contact for electrical units as required by the VDE Association of Ger man Electrical Engineers If your appliance malfunctions or if fractures crac...

Страница 6: ...a steam jet or high pressure cleaner Clean the hob in accordance with the cleaning and care instructions contained in this manual Safety continued Disposal Instructions Disposing of the packaging mat...

Страница 7: ...llows the appliance to be discon nected from the mains at all poles with a contact opening width of at least 3 mm Suitable isolation devices include line protecting cut outs fuses screw type fuses are...

Страница 8: ...own in the diagram The connecting links should be fitted accord ing to the appropriate connection diagram The earth lead is connected to terminal The earth lead must be longer than leads carrying elec...

Страница 9: ...or service and is no longer ac cessible after installation as it is on the original rating plate on the underside of the appliance Pay special attention to the minimum space and clearance requirements...

Страница 10: ...8 EN Installing the Hob Continued x4 90 2 100 100 490 1 C Top_MID C61RAAST_XFA 00131A 05_EN indd 8 1 11 2555 11 17 17...

Страница 11: ...gle cooking zone 1200 W Single cooking zone 1800W Single cooking zone 1200 W Control panel Single cooking zone 1800W Heat setting selectors Indicators for heat settings and residual heat Lock control...

Страница 12: ...10 EN Components 1 Ceramic Glass Hob 2 Installation Brackets 3 Screws Parts and Features Continued C Top_MID C61RAAST_XFA 00131A 05_EN indd 10 1 11 2555 11 17 17...

Страница 13: ...Control and function indicators Digital displays and indicator lights provide information about settings and activated functions as well as the presence of residual heat in the various cooking zones...

Страница 14: ...mselves off if liquid boils over and lands on the control panel The automatic shutoff will also be activated if you place a damp cloth on the control panel In both of these instances the appliance wil...

Страница 15: ...aged bases with rough edges or burrs Permanent scratching can occur if these pan are slid across the surface When cold pan bases are normally bowed slightly inwards concave They should never be bowed...

Страница 16: ...ase of the pan should be the same size as the cooking zone Using a pressure cooker reduces cooking times by up to 50 Using the touch control sensors To operate the touch control sensors touch the desi...

Страница 17: ...ce a heat setting must be selected within approximately 10 seconds Otherwise the appliance will switch itself off for safety reasons Temperature control For setting and adjusting the power level to fo...

Страница 18: ...etting is at and you want to turn the burner off the sensor can be touched one additional time and the heat setting will go to zero For faster adjustment keep your finger on the or sensor until the re...

Страница 19: ...can be used only when the power is on Switching the child safety lock on 1 Touch the control sensor for approximately 3 seconds An acoustic signal will sound as confirmation 2 Touch any heat setting...

Страница 20: ...sensor for approximately 3 seconds An acoustic signal will sound as confirmation After switching off the appliance child safety lock will be activated automatically within some minutes for safety reas...

Страница 21: ...arious cooking methods depend on a number of variables including the quality of the cookware being used and the type and amount of food being cooked Switch Setting Cookingmethod Examples for Use 9 War...

Страница 22: ...lly available ceramic glass or stainless steel cleaner Light Soiling 1 Wipe the ceramic glass surface with a damp cloth 2 Rub dry with a clean cloth Remnants of cleaning agent must not be left on the...

Страница 23: ...oktop or if the pan is empty Ceramic glass is very tough and resistant to temperature shock but it is not unbreakable It can be damaged by a particularly sharp or hard object dropping onto the cooktop...

Страница 24: ...seconds has elapsed between when the On Off button was actu ated and the desired cooking zone switches on see the section Switching the appliance on The control panel is partially covered by a damp c...

Страница 25: ...will ease the process of diagnosing the problem and also make it easier to decide if a customer service visit is necessary Please take note of the following information What form does the problem take...

Страница 26: ...90 mm Corner radius 3 mm Cooking rings Position Diameter Power Front left 183 mm 1 800 W Rear left 148 mm 1 200 W Rear right 183 mm 1 800 W Front right 148 mm 1 200 W Connection voltage 230 V 50 Hz Ma...

Страница 27: ...25 EN NOTE C Top_MID C61RAAST_XFA 00131A 05_EN indd 25 1 11 2555 11 17 18...

Страница 28: ...OUTH AFRICA 0860 SAMSUNG 726 7864 OMAN 800 SAMSUNG 726 7864 KUWAIT 183 2255 BAHRAIN 8000 4726 EGYPT 08000 726786 JORDAN 800 22273 MOROCCO 080 100 2255 SAUDI ARABIA 9200 21230 TURKEY 444 77 11 U A E 80...

Отзывы: