Samsung B550 Скачать руководство пользователя страница 40

ENG - 40

Hereby, Samsung declares that this radio equipment is in compliance with Directive 2014/53/EU and the 
relevant UK statutory requirements. 
The full text of the declaration of conformity is available at the following internet address:  
http://www.samsung.com go to Support and enter the model name.
This equipment may be operated in all EU countries and in the UK.

[Correct disposal of batteries in this product]

(Applicable in countries with separate collection systems)

This marking on the battery, manual or packaging indicates that the batteries in this product should not be 
disposed of with other household waste at the end of their working life. Where marked, the chemical 
symbols Hg, Cd or Pb indicate that the battery contains mercury, cadmium or lead above the reference 
levels in EC Directive 2006/66.  
If batteries are not properly disposed of, these substances can cause harm to human health or the 
environment.
To protect natural resources and to promote material reuse, please separate batteries from other types of 
waste and recycle them through your local, free battery return system.

Correct Disposal of This Product
(Waste Electrical & Electronic Equipment)

(Applicable in countries with separate collection systems)

This marking on the product, accessories or literature indicates that the product and its electronic 
accessories (e.g. charger, headset, USB cable) should not be disposed of with other household waste at the 
end of their working life. To prevent possible harm to the environment or human health from uncontrolled 
waste disposal, please separate these items from other types of waste and recycle them responsibly to 
promote the sustainable reuse of material resources.
Household users should contact either the retailer where they purchased this product, or their local 
government office, for details of where and how they can take these items for environmentally safe 
recycling.
Business users should contact their supplier and check the terms and conditions of the purchase contract. 
This product and its electronic accessories should not be mixed with other commercial wastes for disposal.

For information on Samsung’s environmental commitments and product specific regulatory obligations 
e.g. REACH, WEEE, Batteries, visit:  
www.samsung.com/uk/aboutsamsung/sustainability/environment/our-commitment/data/

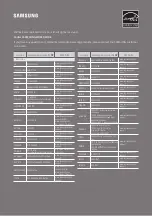
COMMISSION REGULATION (EU) 2019/1782 

Ecodesign requirements for external power supplies :
www.samsung.com/global/ecodesign_component

Содержание B550

Страница 1: ...HW B550 FULL MANUAL Imagine the possibilities Thank you for purchasing this Samsung product To receive more complete service please register your product at www samsung com register...

Страница 2: ...o not expose this appliance to rain or moisture CAUTION TO PREVENT ELECTRIC SHOCK MATCH WIDE BLADE OF PLUG TO WIDE SLOT FULLY INSERT This apparatus shall always be connected to a AC outlet with a prot...

Страница 3: ...ion slots are not covered Do not place the unit on amplifiers or other equipment which may become hot This unit is designed for continuous use To fully turn off the unit disconnect the AC plug from th...

Страница 4: ...e than one function 13 Output specifications for the different sound effect modes 13 Adjusting the Soundbar volume with a TV remote control 14 04 ConnectingtheSoundbar 15 Connecting Electrical Power 1...

Страница 5: ...obileDevice 27 Connecting via Bluetooth 27 10 InstallingtheWallMount 31 Installation Precautions 31 Wallmount Components 31 11 SoftwareUpdate 33 How to check the Firmware version 33 Update Procedure 3...

Страница 6: ...nsumption refer to the label attached to the product Label Bottom of the Soundbar Main Unit To purchase additional components or optional cables contact a Samsung Service Centre or Samsung Customer Ca...

Страница 7: ...elects the source input mode Inputmode Display Optical Digital input D IN ARC HDMI OUT input D IN TV ARC Auto conversion HDMI input HDMI BLUETOOTH mode BT USB mode USB To turn on BTPAIRING mode change...

Страница 8: ...DC 24V HDMI IN HDMI TO TV ARC DIGITAL AUDIO IN OPTICAL USB 5V 0 5A DC 24V DIGITALAUDIOIN OPTICAL Connect to the digital optical output of an external device USB 5V0 5A Connect a USB device here to pl...

Страница 9: ...OL CHLEVEL Power Turns the Soundbar on and off SOUND MODE WOOFER TONE CONTROL CHLEVEL Source Press to select a source connected to the Soundbar SOUND MODE WOOFER TONE CONTROL CHLEVEL Mute Press the Mu...

Страница 10: ...onds by using the Up Down buttons Not available in USB or BT mode NIGHTMODEON OFF This mode is optimized for nighttime viewing with the settings adjusted to bring the volume down but keep the dialog c...

Страница 11: ...USB mode press the Up button MusicSkip Press the Right button to select the next music file Press the Left button to select the previous music file IDSET Press and hold the Up button for 5 seconds to...

Страница 12: ...RC turned on loud sound is reduced The sound may be distorted BluetoothPower This feature automatically turns the Soundbar on when it receives a connection request from a previously connected TV or Bl...

Страница 13: ...ferentsoundeffectmodes Effect Input Output WithoutWirelessRear SpeakerKit WithWirelessRear SpeakerKit SOUNDMODE Surround VOL WOOFER SOUND MODE Bluetooth POWER SURROUND SOUND 2 0 ch 2 1 ch 4 1 ch 5 1 c...

Страница 14: ...2 Push up and hold the WOOFER button for 5 seconds Each time you push the WOOFER button up and hold it for 5 seconds the mode switches in the following order OFF TVREMOTE Default mode SAMSUNG TVREMOTE...

Страница 15: ...ectrical power and power consumption refer to the label attached to the product Label Bottom of the Soundbar Main Unit POWER RearofSubwoofer PowerCord Connecting ElectricalPower Bottomofthe SoundbarMa...

Страница 16: ...ofer LED Status Description Resolution Blue On Successfully connected normal operation Blinking Recovering the connection Check if the power cable attached to the main Soundbar unit is connected prope...

Страница 17: ...ofer turns off and the blue indicator blinks 5 Sec RearofSubwoofer 2 Press and hold the Upbutton on the remote control for at least 5 seconds The IDSET message appears on the display of the Soundbar f...

Страница 18: ...signal is about 10 m but may vary depending on your operating environment If a steel concrete or metallic wall is between the main unit and the wireless subwoofer the system may not operate at all bec...

Страница 19: ...us settings as well as the volume and mute Method1 ConnectingaTVusinganHDMICable CAUTION When both the HDMI cable and optical cable are connected the HDMI signal is received first To connect the HDMI...

Страница 20: ...HDMI is an interface that enables the digital transmission of video and audio data with just a single connector If the TV provides an ARC port connect the HDMI cable to the HDMI IN ARC port We recomme...

Страница 21: ...terminals have covers be sure to remove the covers AUX IN USB 5V 0 5A DIGITAL AUDIO IN OPTICAL OPTICAL OUT OpticalCable notsupplied BottomoftheSoundbar D IN TopoftheSoundbar 1 Connect the DIGITALAUDIO...

Страница 22: ...el of the Soundbar for more than 5 seconds to display BTPAIRING 2 Select Bluetooth mode on the TV For more information see the TV s manual 3 Select AV SoundbarB5 Series from the list on TV s screen An...

Страница 23: ...on the remote control or press and hold the Source button on the top of the Soundbar for more than 5 seconds while the Soundbar is in BT mode NOTES If asked for a PIN code when connecting a Bluetooth...

Страница 24: ...otsupplied BottomoftheSoundbar ExternalDevice HDMI TopoftheSoundbar 1 Connect an HDMI cable not supplied from the HDMIIN port on the bottom of the Soundbar to the HDMI OUT port on your digital device...

Страница 25: ...tsupplied BottomoftheSoundbar D IN TopoftheSoundbar BD DVDplayer Set topbox Gameconsole 1 Connect DIGITALAUDIOIN OPTICAL on the main unit to the OPTICAL OUT port of the Source Device using a digital o...

Страница 26: ...connected for more than 20 minutes FileFormatTypeCompatibilitylist Extension Codec SamplingRate BitRate mp3 MPEG1 Layer2 32kHz 48kHz 32kbps 320kbps MPEG1 Layer3 32kHz 48kHz 32kbps 320kbps MPEG2 Layer...

Страница 27: ...TREADY if there is a connect record b When BTREADY appears press and hold the Source button on the top panel of the Soundbar for more than 5 seconds to display BTPAIRING 2 On your device select AV Sam...

Страница 28: ...ices may cause radio interference Devices that generate electromagnetic waves must be kept away from the Soundbar main unit e g microwaves wireless LAN devices etc The Soundbar supports SBC data 44 1k...

Страница 29: ...h Bluetooth is a technology that enables Bluetooth compliant devices to interconnect easily with each other using a short wireless connection A Bluetooth device may cause noise or malfunction dependin...

Страница 30: ...Bluetooth device side switch Bluetooth on and select the Soundbar from the list of available devices the Soundbar will automatically connect to the Bluetooth device 3 A 2nd Bluetooth device can be pai...

Страница 31: ...ds Purchase wall mounting screws according to the type and thickness of the wall you want to mount the Soundbar on Diameter M5 Length 35 mm or longer recommended Connect cables from the unit to extern...

Страница 32: ...the markings do not correspond to the positions of studs make sure you insert appropriate anchors into the holes before you insert the support screws If you use anchors make sure the holes you drill a...

Страница 33: ...AL AUDIO IN OPTICAL If an update is offered you can update the firmware by connecting a USB device with the firmware update stored on it to the USB port on your Soundbar For more information about how...

Страница 34: ...update is complete This product has a DUAL BOOT function If the firmware fails to update you can update the firmware again 7 Restore your settings on the Soundbar IfUPDATEisnotdisplayed 1 Turn off th...

Страница 35: ...ly reconnect and turn the power on Reset the product and try again See page 34 Subwooferdoesnotoutputanysound Check whether the LED indicator on the rear of the Subwoofer is on in blue Reconnect the S...

Страница 36: ...he selection Remove and reconnect the power plug then try again Reset the product and try again See page 34 Sounddropsoutwhenconnectedvia Bluetooth If your device that is connected via Bluetooth moves...

Страница 37: ...nly Your Samsung product is ENERGY STAR qualified in its factory default setting Change to certain features settings and functionality in this product can change the power consumption possibly beyond...

Страница 38: ...ed for reference only and may differ from actual product appearance An administration fee may be charged if either a an engineer is called out at your request and there is no defect with the product i...

Страница 39: ...POWER BT max transmitter power SRD max transmitter power 100mW at 2 4GHz 2 4835GHz 25mW at 5 725GHz 5 825GHz Subwoofer Name PS WB65D Weight 5 1 kg Dimensions W x H x D 184 0 x 346 0 x 295 0 mm AMPLIFI...

Страница 40: ...asteElectrical ElectronicEquipment Applicableincountrieswithseparatecollectionsystems This marking on the product accessories or literature indicates that the product and its electronic accessories e...

Страница 41: ...product for its normal purposes or incorrect installation d Damage caused by Lightning Water Fire Acts of God War Public Disturbances incorrect mains voltage improper ventilation or any other cause b...

Страница 42: ...msung com pl support HUNGARY 0680SAMSUNG 0680 726 7864 www samsung com hu support AUSTRIA 08007267864 0800 SAMSUNG www samsung com at support SWITZERLAND 0800726786 www samsung com ch support German w...

Отзывы: