background image

ENG-11

ENG-10

Choosing a Connection

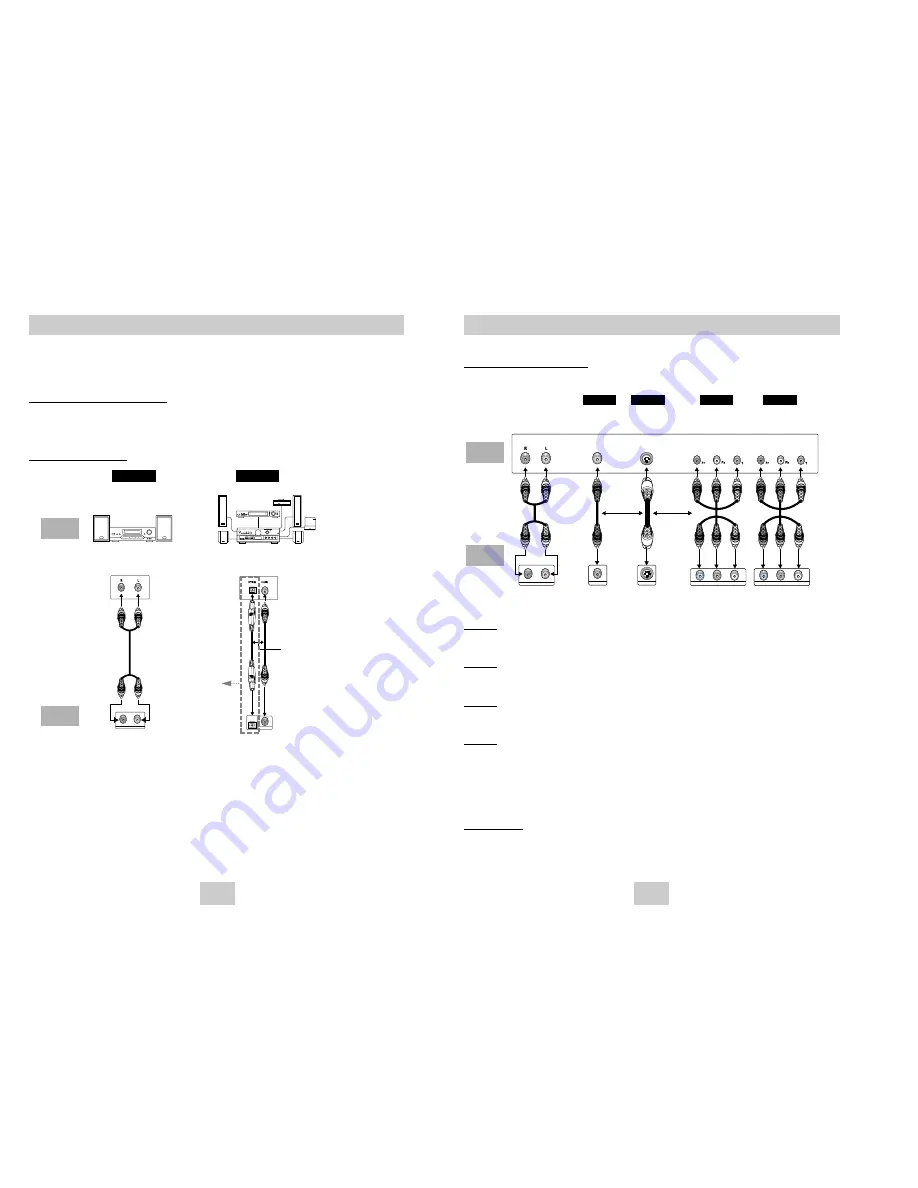
Connection to a TV (For Video)

TV (Normal, Widescreen, Projection, etc..)

Method 1

DVD  TV with Video Input Jack
(The Video Output in Setup Menu must be set to the S-Video or Component(I-SCAN).)

Method 2

DVD  TV with S-Video Input Jack 
(The Video Output in Setup Menu must be set to the S-Video.)

Method 3

DVD  TV with interlace Scan Component Video Jacks 
(The Video Output in Setup Menu must be set to the Component(I-SCAN).)

Method 4

DVD  TV with Progressive Scan Component Video Jacks. 
(The Video Output in Setup Menu must be set to the Component(P-SCAN).)
• If you want to convert Video Output to the Progressive Scan, you have to first connect Video or S-Video on

your TV. Then select Component(P-SCAN)(480p) out of Video Output in Setup Menu. Within 10 seconds,
change the TV’s external input to 525p(480p or Component) and select “Yes” (See Page 31).

• If Component(P-SCAN) Video Output is selected in Setup Menu, Video(Composite) and S-Video will not work.

Important Note

Important Note

• Consult your TV User’s Manual to find out if your TV supports Progressive Scan. 

If Progressive Scan is supported, follow the TV User’s Manual’s instructions regarding Progressive Scan 
settings in the TV’s menu system.

• Depending on your TV, the Method of connection may differ from the illustration above.

R

L

ANALOG AUDIO OUT

Pr

Pb

Y

S-VIDEO OUT

VIDEO OUT

COMPONENT VIDEO OUT

Pr

Pb

Y

COMPONENT VIDEO OUT

Good 

picture

Better 

picture

Best 

picture

Optimum  

picture

Basic Audio

AV 

Cable

S-Video

Cable

OR

OR

Video

Cables

Audio Output 

Jacks

Video Output

Jack

S-Video 

Jack

Component Video

Jacks

(Interlace)

Component Video

Jacks

(Progressive)

TV

DVD 

Player

Method 1

Method 2

Method 3

Method 4

Choosing a Connection

The following shows examples of connections commonly used to connect the DVD player with a TV
and other components. 

Before Connecting the DVD Player

• Always turn off the DVD player, TV, and other components before you connect or disconnect any cables.

• Refer to the owner’s manual of the additional components you are connecting for more information on those

particular components.

Connection to an Audio 

Method 1

Method 2

R

L

ANALOG AUDIO OUT

COAXIAL

OPTICAL

Analog Audio Out

Digital Audio Out

OR

2ch Amplifier

Audio Input Jacks

Dolby Digital Decoder

Digital Audio Input Jack

AUDIO 

SYSTEM

DVD 

Player

DVD-P248K only

Содержание AK68-00411A

Страница 1: ...DVD Player DVD P148 DVD P248K AK68 00411A ...

Страница 2: ...condensation forms inside the player due to sharp changes in temperature the player may not operate correctly If this occurs leave the player at room temperature until the inside of the player becomes dry and operational 4 Disc Do not clean record cleaning sprays benzene thinner or other volatile solvents that may cause damage to the disc surface Do not touch the disc s signal surface Hold by the ...

Страница 3: ...r intellectual property rights owned by Macrovision Corporation and other rights owners Use of this copyright protection technology must be authorized by Macrovision Corporation and is intended for home and other limited viewing uses only unless otherwise authorized by Macrovision Corporation Reverse engineering or disassembly is prohibited PROGRESSIVE SCAN OUTPUTS 525p 625p General Features Disc ...

Страница 4: ...Manual to find out if your TV supports Progressive Scan If Progressive Scan is supported follow the TV User s Manual s instructions regarding Progressive Scan settings in the TV s menu system If Component P SCAN Video Output is selected in Setup Menu Video and S Video will not work See page 31 to get more information on how to use the Setup Menu 1 2 3 4 5 6 ENG 6 Description Front Panel STANDBY ON...

Страница 5: ...ack Tour of the Remote Control 1 11 12 13 14 15 16 17 18 19 20 21 22 2 3 4 5 6 7 8 9 10 DVD P248K 6 STOP Button 7 MENU Button Brings up the DVD player s setup menu 8 RETURN Button Returns to a previous menu 9 REPEAT A B Button Use to mark a segment to repeat between A and B 10 SUBTITLE Button 11 OPEN CLOSE Button To open and close the disc tray 12 CLEAR Button Use to remove menus or status display...

Страница 6: ...ur TV supports Progressive Scan If Progressive Scan is supported follow the TV User s Manual s instructions regarding Progressive Scan settings in the TV s menu system Depending on your TV the Method of connection may differ from the illustration above R L ANALOG AUDIO OUT Pr Pb Y S VIDEO OUT VIDEO OUT COMPONENT VIDEO OUT Pr Pb Y COMPONENT VIDEO OUT Good picture Better picture Best picture Optimum...

Страница 7: ...V VIDEO button to select the video mode Turn on your Audio System and select AUX CD or DVD After plugging in the player the first time you press the DVD POWER button this screen comes up If you want to select the language press a NUMBER button This screen will only appear when you plug in the player for the first time Play 1 Press the OPEN CLOSE button The STANDBY indicator light goes out and the ...

Страница 8: ... or ENTER button to access the function Note Note You can also directly select the parts of these functions using their respective buttons on the remote Off 01 01 A B REPEAT ENTER T Off 01 01 A B REPEAT ENTER T D DVD VCD CD T Using the Display Function Using the Disc and Title Menu Using the Disc Menu 1 During the playback of a DVD disc press the MENU button on the remote 2 Select Disc Menu using ...

Страница 9: ... vertically stretched Zoom Fit The top bottom left and right of the screen are cut off and the central portion of the screen is enlarged Note Note This function may behave differently depending on the type of disc Program Play Random Play Program Play CD 1 Press the PROG button 2 Use the LEFT RIGHT buttons to select PROGRAM Press the ENTER button 3 Use the LEFT RIGHT UP DOWN buttons to select the ...

Страница 10: ...ANGLE Selecting the Audio Language You can select a desired language quickly and easily with the AUDIO button Using the AUDIO button 1 Press the AUDIO button 2 The Audio changes when the button is pressed repeatedly The audio languages are represented by abbreviations 3 Press the AUDIO button to select Stereo Left or Right On VCD CD Note Note This function depends on what languages are encoded on ...

Страница 11: ...During DVD play press ENTER to zoom in 2X 4X 2X Normal in order During VCD play press ENTER to zoom in 2X Normal in order This feature lets you bookmark sections of a DVD or VCD MENU OFF mode so you can quickly find them at a later time Using the Bookmark Function DVD VCD 1 During play press the MENU button on the remote 2 Use the UP DOWN buttons to highlight Function then press the RIGHT or ENTER...

Страница 12: ...ends on the rate of compression decompression you choose Getting CD audio sound requires an analog digital sampling rate that is conversion to WMA format of at least 64Kbps and up to 192Kbps Conversely files with decompression rates below 64Kbps or over 192Kbps will not be played properly Do not try recording copyright protected MP3 files Certain secured files are encrypted and code protected to p...

Страница 13: ...not the clips menu CD R JPEG Discs Only files with the jpg and JPG extensions can be played If the disc is not closed it will take longer to start playing and not all of the recorded files may be played Only CD R discs with JPEG files in ISO 9660 or Joliet format can be played The name of the JPEG file may not be longer than 8 characters and should contain no blank spaces or special characters Onl...

Страница 14: ... your DVD player by allowing you to select various language preferences set up a parental level even adjust the player to the type of television screen you have 1 With the unit in Stop mode press the MENU button on the remote Select Setup using UP DOWN buttons then press the RIGHT or ENTER button Language Setup Setup of the Language Audio Setup Setup of the Audio Options Display Setup Setup of the...

Страница 15: ... DTS Digital Out are trademarks of Digital Theater Systems Inc Setting Up the Language Features Using the Audio Language 1 With the unit in Stop mode press the MENU button 2 Select Setup using UP DOWN buttons then RIGHT or ENTER button 3 Select Language Setup using UP DOWN buttons then press the RIGHT or ENTER button 4 Select Audio using UP DOWN buttons then press the RIGHT or ENTER button 5 Press...

Страница 16: ...buttons then RIGHT or ENTER button 3 Select Display Setup using UP DOWN buttons then press the RIGHT or ENTER button 4 Use the UP DOWN buttons to select the desired item Then press the RIGHT or ENTER button TV Aspect Depending on the type of television you have you may want to adjust the screen setting aspect ratio 1 4 3 Letter Box Select when you want to see the total 16 9 ratio screen DVD suppli...

Страница 17: ... on the front panel for three seconds The SELECT MENU LANGUAGE display will appear Select the number button of the desired language Press power on from a cold start with no disc in the unit Press the STOP and PLAY buttons simultaneously on the front panel for three seconds The SELECT MENU LANGUAGE display will appear Select the number button of the desired language Press the MENU button and then p...

Страница 18: ...ng Speed 4 8 5 6 m sec Maximum Play Time 74 min Reading Speed 4 8 5 6 m sec Maximum Play Time 20 min Reading Speed 4 8 5 6 m sec Maximum Play Time 74 min Video Audio 1 channel 1 0 Vp p 75 Ω load Y 1 0 Vp p 75 Ω load Pr 0 70 Vp p 75 Ω load Pb 0 70 Vp p 75 Ω load Luminance Signal 1 0 Vp p 75 Ω load Chrominance Signal 0 3 Vp p 75 Ω load L 1 L R 2 R 48 kHz Sampling 4 Hz to 22 kHz 96 kHz Sampling 4 Hz ...

Отзывы: