background image

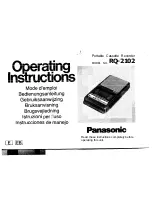
Description-Rear Panel

Rear Panel

1. DIGITAL AUDIO OUT JACKS

• Use either an optical or coaxial digital cable to connect to a compatible Dolby Digital receiver. 

Use to connect to an A/V Amplifier that contains a Dolby Digital or DTS decoder.

2. ANALOG AUDIO OUT JACKS

• Connect to the Audio input jacks of your television, audio/video receiver, or VCR.

3. VIDEO OUT JACK

• Use a video cable to connect to the Video input jack on your television.

4. S-VIDEO OUT JACK

• Use the S-Video cable to connect this jack to the S-Video jack on your television for a higher quality

picture. The S-Video must be selected in the VIDEO OUT SELECT.

5. COMPONENT VIDEO OUT JACKS

• Use these jacks if you have a TV with Component Video in jacks. These jacks provide Pr, Pb and Y

video. Along with S-Video, Component Video provides the best picture quality. The Y, Pb, Pr must be
selected in the VIDEO OUT SELECT. 

6. VIDEO OUT SELECT SWITCH

• Use the switch to set video out.
• If Y, Pb or Pr is selected, S-Video will not work.
• If S-Video is selected, Y, Pb or Pr will not work.

SETUP

SETUP

* Select the VIDEO OUT SELECT switch in the Stop or Power Off mode.

NOTE

1

2

3

4

5

6

Description-Front Panel

OPEN/CLOSE

STOP

PLAY/PAUSE

SKIP

Front Panel Controls

1. STANDBY / ON

• When the unit is first plugged in, the indicator lights.

When STANDBY/ON is pressed on again, 
the light goes out and the player is turned on.

2. DISC TRAY

• Load the disc here.

3. DISPLAY

• Operation indicators are displayed here.

4. OPEN/CLOSE

• Press to open and close the disc tray.

5. PLAY/PAUSE

• Begin or pause disc play.

6. STOP

• Stops disc play.

7. SKIP

• Use to skip a scene or music.

10

11

1

2

3

4

5

6

7

Front Panel Display

1. Angle indicator. You can select multiple angles 

of a scene recorded by different cameras.

2. Disc type indicators

3. Play / Pause / Forward play

4. DVD : Title, Chapter number.

5. Video/Audio CD : Track number

6. Repeat play mode

7. MP3 indicators
8. Displays various messages concerning operations such as 

PLAY, STOP, LOAD ...

no DISC

: No disc loaded.

OPEN

: The disc tray is open.

LOAD

: Player is loading disc information.

1

2

4

5

6

7

3

8

Содержание AK68-00102A

Страница 1: ...ENG ENG D DVD PLA VD PLAYER YER DVD S129 AK68 00102A ...

Страница 2: ...TROLS OR ADJUSTMENTS OR PERFORMANCE OF PROCEDURES OTHER THAN THOSE SPECIFIED HEREIN MAY RESULT IN HAZARDOUS RADIATION EXPOSURE DO NOT OPEN COVER AND DO NOT REPAIR YOURSELF REFER SERVICING TO QUALIFIED PERSONNEL Note This unit can be used only where the power supply is AC 120V 60Hz It cannot be used elsewhere This DVD player is designed and manufactured to respond to the Region Management Informati...

Страница 3: ...y cords should be routed so that they are not likely to be walked on or pinched by items placed upon or against them paying particular attention to cords at plugs convenience receptacles and the point where they exit from the product 14 Lightning For added protection for this product during a lightning storm or when it is left unattended and unused for long periods of time unplug it from the wall ...

Страница 4: ...9 Description Front Panel 10 Tour of the Remote Control 12 Choosing a Connection 14 Playing a Disc 16 Using the Search Skip Functions 18 Using the Display Function 19 Repeat Play 20 Program Play Random Play 21 S FIT Play 22 Digest Play 23 Using the Disc View Function 24 Slow Repeat play 25 Selecting the Audio Language 26 Selecting the Subtitle Language 27 Changing the Camera Angle 28 Using the Ins...

Страница 5: ...protection technology must be authorized by Macrovision Corporation and is intended for home and other limited viewing uses only unless otherwise authorized by Macrovision Corporation Reverse engineering or disassembly is prohibited This DVD player is capable of playing the following types of discs with the corresponding logos 5 31 2 Single sided 240 min Double sided 480 min Single sided 80 min Do...

Страница 6: ...set video out If Y Pb or Pr is selected S Video will not work If S Video is selected Y Pb or Pr will not work SETUP SETUP Select the VIDEO OUT SELECT switch in the Stop or Power Off mode NOTE 1 2 3 4 5 6 Description Front Panel OPEN CLOSE STOP PLAY PAUSE SKIP Front Panel Controls 1 STANDBY ON When the unit is first plugged in the indicator lights When STANDBY ON is pressed on again the light goes ...

Страница 7: ...Use to skip the title chapter or track 18 RETURN Button Returns to a previous menu 19 DISPLAY Button Displays the current disc mode 20 ENTER DIRECTION Button UP DOWN or LEFT RIGHT Buttons This button functions as a toggle switch 21 ANGLE Button Use to access various camera angles on a DVD 22 MODE Button Allows you to program a specific order 23 SUBTITLE Button 24 AUDIO Button Use this button to ac...

Страница 8: ...igital Audio Out 2ch Amplifier Audio Input Jacks Dolby Digital Decoder Digital Audio Input Jack AUDIO DVD TV Normal Widescreen Projection etc Good picture Basic Audio Better picture Best picture Method 1 Method 2 Method 3 Audio Output Jacks OR OR OR AV Cable S Video Cable Video Cables Video Output Jack S Video Jack Component Video Jacks DVD TV Method 1 DVD Player TV with Video Input Jack Method 2 ...

Страница 9: ...nless the disc is removed the STOP button is pressed twice or the player is unplugged If the player is left for 5 minutes in pause mode it will stop If the player is left in the stop mode for more than 30 minutes the power will automatically shut off Automatic Power Off Function If the player is left in the stop mode for more than one minute without any user interaction a screen saver will be acti...

Страница 10: ...on the remote Current title chapter number elapsed time audio subtitle and volume control will be dis played Use the NUMBER buttons to enter a different title then press the ENTER button Use the LEFT RIGHT or NUMBER buttons to enter a chapter number then press the ENTER button To enter the time from which you want to start use the UP DOWN buttons to select then use the NUMBER buttons to enter the ...

Страница 11: ... the Repeat function may not work If the title or track is completed before marking the end B the end of title or track becomes B automatically When in VCD 2 0 mode MENU ON mode this function does not work NOTE Depending on the disc the Program and Random Play function may not work See page 32 When in VCD 2 0 mode MENU ON mode these functions do not work To resume normal play press the CLEAR butto...

Страница 12: ...con trol Allows you to eliminate the black bars in the top and bottom of the screen when a movie is playing in the Widescreen format 16 9 Screen Fit will not work when the Zoom mode is active you can not remove the black bars on the screen However Zoom mode will work when Screen Fit is active NOTE Various aspect ratios are available only in multiple screen format discs This function does not work ...

Страница 13: ...e TOP MENU button 2 2 Press UP DOWN buttons to select INDEX VIEW Press the ENTER button 3 3 Select the desired view by pressing UP DOWN or LEFT RIGHT buttons 4 4 Press the ENTER button NOTE When pressing the TOP MENU button with a DVD the disc s TITLE MENU function comes up A disc must have at least two titles for the TITLE MENU function to work When pressing the TOP MENU button with a CD the unit...

Страница 14: ...age Features on page 36 26 Selecting the Subtitle Language You can select a desired subtitle quickly and easily with the SUBTITLE button Using the SUBTITLE button 1 1 Press the SUBTITLE button 2 2 Use the UP DOWN buttons to select the desired subtitle language 3 3 Use the LEFT RIGHT buttons to determine whether or not the subtitle will be displayed Initially the subtitling will not appear on scree...

Страница 15: ... button then an ANGLE select icon will appear at the upper left hand corner of the screen 2 2 Use the UP DOWN buttons to select the desired screen angle 3 3 To turn off the display press the ANGLE button again Using the Instant Replay function DVD If you miss part of a scene you can see it again using this function 1 1 If you press the I REPLAY button the current scene moves backward about 10 seco...

Страница 16: ...k ADV ADVANCED ANCED FUNCTIONS FUNCTIONS Using the Zoom 3D Sound Functions Using the Zoom Function DVD VCD 1 1 During play or pause mode press the ZOOM button on the remote A square will be displayed on screen 2 2 Use the UP DOWN or LEFT RIGHT buttons to select the part of the screen you want to zoom in on 3 3 Press the ENTER button During DVD play press ENTER to zoom in 2X 4X 2X Normal in order D...

Страница 17: ...8 Kbps and up to 160 Kbps However choosing higher rates like 192 Kbps or more only rarely give better sound quality Conversely files with sampling rates below 128 Kbps will not be played properly Do not try recording copyright protected MP3 files Certain securized files are encrypted and code protected to prevent illegal copying These files are of the following types Windows MediaTM registered tra...

Страница 18: ...isplay options 2 2 Use the UP DOWN buttons on the remote to access the different features 3 3 Press the ENTER button to access the sub features To make the setup screen disappear after setting up press the SETUP button again NOTE Depending on the disc some Setup Menu selections may not work 34 35 CHANGING CHANGING SETUP MENU SETUP MENU Setting Up the Language Features Using the Player Menu Languag...

Страница 19: ...p Press RETURN button 36 37 CHANGING CHANGING SETUP MENU SETUP MENU Setting Up the Parental Control The Parental Control function works in conjunction with DVDs that have been assigned a rating which helps you control the types of DVDs that your family watches There are up to 8 rating levels on a disc 1 1 With the unit in Stop mode press SETUP button The Setup Menu screen appears 2 2 Use UP DOWN t...
Страница 20: ...n Stop mode press the SETUP button 2 2 Use the UP DOWN buttons to select DISPLAY OPTIONS Then press the ENTER button 3 3 Use the UP DOWN buttons to select the desired item Then press the LEFT RIGHT buttons TV Aspect Depending on the type of television you have you may want to adjust the screen setting aspect ratio 1 4 3 Letter Box Select when you want to see the total 16 9 ratio screen DVD supplie...

Страница 21: ... in the unit Press the STOP and PLAY buttons simultaneously on the front panel for three seconds The Select Menu Language display will appear Select the desired language button Press the SETUP button on the remote control to select the Parental Mode The Parental Mode is now unlocked as indicated on the display Press the DOWN button to select Parental Press ENTER and the Create Password display wil...

Отзывы: