background image

13

Press STOP button.

If playing a disc, press the 

STOP

button twice so that “

STOP

”, appears on the display.

Press and hold P.SCAN button on the remote control for over 5 seconds.

Pressing and holding the button for over 5 seconds will select "

P.SCAN

" and "

I.SCAN

" alternately.

When you select P.SCAN, "

P.SCAN

" will appear on the display.

To set P.Scan mode for DivX discs, press the 

P.SCAN

button on the remote control for more than 

5 seconds with no disc in the unit (“'

NO DISC

" on the display), then load the DivX disc and play.

In interlaced-scan video, a frame consists of two inter-
laced fields (odd and even), where each field contains
every other horizontal line in the frame. 
The odd field of alternating lines is displayed first, and
then the even field is displayed to fill in the alternating
gaps left by the odd field to form a single frame. 
One frame, displayed every 1/30th of a second, contains
two interfaced fields, thus a total of 60 fields are dis-
played every 1/60th of a second.
The interlaced scanning method is intended for capturing
a still object. 

Interlaced Scan (1 FRAME = 2 FIELDS)

The progressive scanning method scans one full frame of
video consecutively down the screen, line by line.
An entire image is drawn at one time, as opposed to the
interlaced scanning process by which a video image is
drawn in a series of passes.
The progressive scanning method is desirable for dealing
with moving objects.   

Progressive Scan (FULL FRAME)

What is Progressive (or Non-Interlaced) Scanning?

Depending on the capabilities of your TV, this function may not work. 

Note

1

2

Unlike regular Interlace Scan, in which two fields of picture information alternate to create the entire
picture (odd scan lines, then even scan lines), Progressive Scan uses one field of information (all lines
displayed in one pass) to create a clear and detailed picture without visible scan lines. 

P.SCAN

(Progressive Scan) 

Function

GB

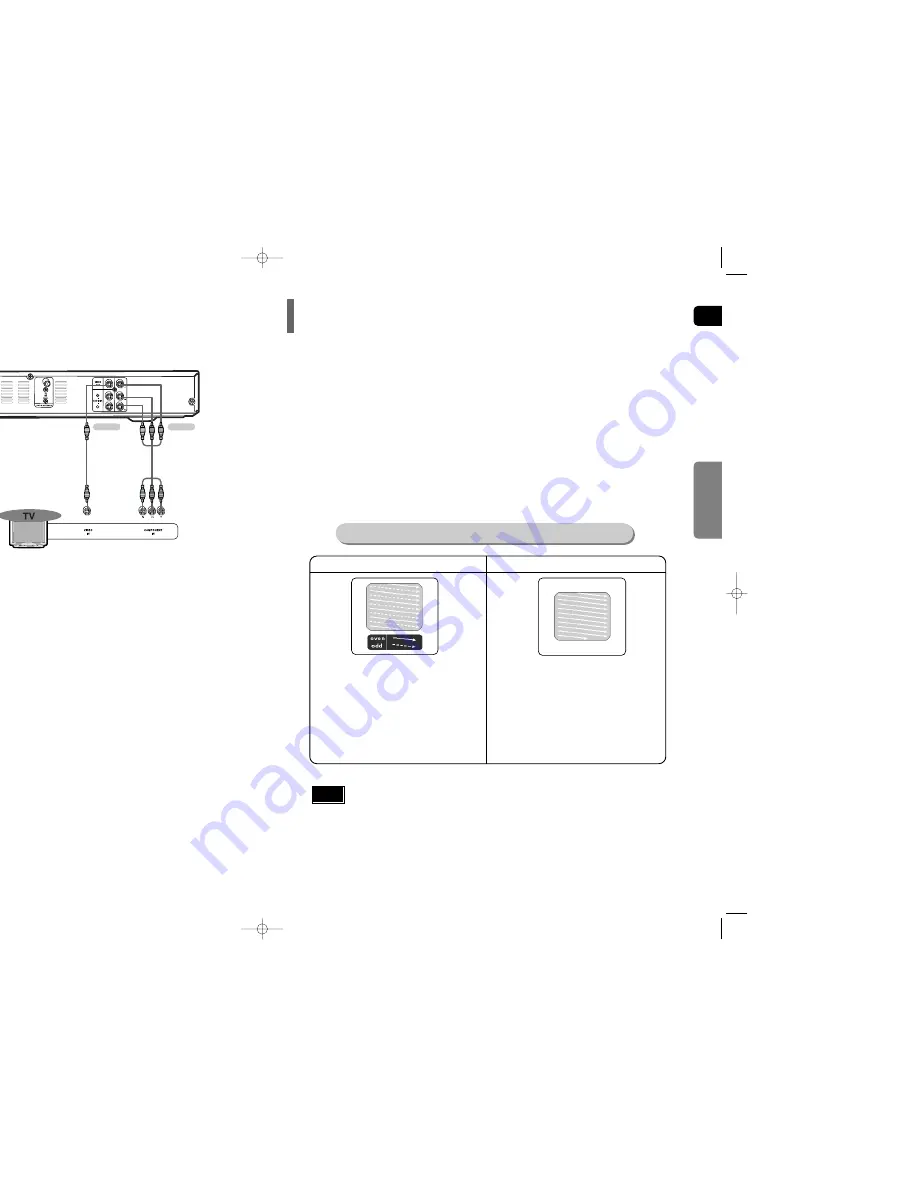
METHOD 1   

Composite Video ...............

Good Quality

Connect the supplied video cable from the VIDEO OUT jack on the back panel of the 
system to the VIDEO IN jack on your television.

METHOD 2   

Component (Progressive Scan) Video ...............

Best Quality

If your television is equipped with Component Video inputs, connect a component video
cable (not supplied) from the Pr, Pb and Y jacks on the back panel of the system to the 
corresponding jacks on your television.

CONNECTIONS

14

Choose one of the two methods for connecting to a TV.

Connecting the Video Out to TV

METHOD 1

METHOD 2

HT-Q9(1~40P) GB-RDS  2006.5.22  1:30 PM  Page 16

Содержание AH68-01835K

Страница 1: ...DIGITAL HOME CINEMA SYSTEM HT Q9 Instruction Manual CE IS MANUFACTURED BY COMPACT DIGITAL VIDEO AH68 01835B e 2 ...

Страница 2: ... ngs Use of controls adjustments or performance of procedures other than those specified herein may result in hazardous radiation exposure CAUTION INVISIBLE LASER RADIATION WHEN OPEN AND INTERLOCKS DEFEATED AVOID EXPOSURE TO BEAM This symbol indicates that dangerous voltage which can cause electric shock is present inside this unit This symbol alerts you to important operating and maintenance inst...

Страница 3: ... JPEG File Playback 21 DivX Playback 23 Checking the Remaining Time 25 Fast Slow Playback 26 Skipping Scenes Songs 26 Repeat Playback 27 A B Repeat Playback 28 Step Function 29 Angle Function 29 Zoom Screen Enlarge Function 30 EZ VIEW Function 30 Selecting Audio Language 31 Selecting Subtitle Language 32 Moving Directly to a Scene Song 33 Using Disc Menu 34 Using the Title Menu 34 SETUP Setting th...

Страница 4: ...only up to the blank segment A maximum of 9 999 images can be stored on a single CD When playing a Kodak Fuji Picture CD only the JPEG files in the picture folder can be played Picture discs other than Kodak Fuji Picture CDs may take longer to start playing or may not play at all CD R RW DivX Discs Since this product only provides encoding formats authorized by DivX Networks Inc a DivX file create...

Страница 5: ...e VIDEO OUT connector COMPONENT VIDEO OUTPUT jacks Connect a TV with component video inputs to these jacks External Audio Input Connector Accessories Volume buttons Tuning Down Skip buttons Tuning Up Skip buttons Stop button Play Pause button Open Close button Function button 8 Video Cable Remote Control FM Antenna User s Manual System Status Display e 10 ...

Страница 6: ...s SUB TITLE button Play Pause button Tuning Preset CD Skip button Stop button DIMMER button Insert Remote Batteries Caution Remove the battery cover on the back of the remote by pressing down and sliding the cover in the direction of the arrow 1 Insert two 1 5V AAA batteries paying attention to the correct polarities and 2 Replace the battery cover 3 Follow these precautions to avoid leaking or cr...

Страница 7: ... distance of the TV s screen size away from the TV Example For 32 TVs 2 2 4m 6 8feet For 55 TVs 3 5 4m 11 13feet to turn off the power and disconnect the power cord CONNECTIONS SR SL SW he Speakers SR C SW R Back of the Main Unit Connect the correcting jacks to the back of the DVD player Mack sure the colors of the speaker terminals match the colors of the connect ing jacks Do not let children pla...

Страница 8: ... scanning method is intended for capturing a still object Interlaced Scan 1 FRAME 2 FIELDS The progressive scanning method scans one full frame of video consecutively down the screen line by line An entire image is drawn at one time as opposed to the interlaced scanning process by which a video image is drawn in a series of passes The progressive scanning method is desirable for dealing with movin...

Страница 9: ...tion where reception is good then fasten it to a wall or other rigid surface FM Antenna supplied 1 2 GB 16 CONNECTIONS ternal Components me Theater to Audio Out on the external analog control to select AUX input n on the main unit DVD CD AUX s a VCR alog Component o Cable supplied l analog compo y one Audio Out her left or right ut jack on your VCR to the TV and connect the Audio product e 18 ...

Страница 10: ...play At this time press the NT PAL button shortly to select between NTSC and PAL Each country has a different video format standard For normal playback the video format of the disc must be the same as the video format of your TV Disc Playback 2 Load a disc Place a disc gently into the tray with the disc s label facing up Depending on the content of the disc the initial screen may appear different ...

Страница 11: ...UBTITLE display AUDIO LANGUAGE display REPEAT PLAYBACK display ANGLE display DOLBY DIGITALdisplay STEREO L R display What is a Title A movie contained in a DVD VIDEO disc What is a Chapter Each title on a DVD disc is divided into several smaller sections called chapters What is a Track File A section of video or a music file recorded on a CD or MP3 CD VCD ding on the recording mode some MP3 WMA CD...

Страница 12: ...g en before moving 22 mage with 9 windows press Press Cursor buttons during playback Original Image OPERATION The maximum resolutions supported by this product are 5120 x 3480 or 19 0 MPixel for standard JPEG files and 2048 x 1536 or 3 0 MPixel for progressive image files Note order or JPEG files on a PC can be stored on a CD and then ayback JPEG e 24 ...

Страница 13: ...oblems such as broken images or no sound 2 Caption Function You must have some experience with video extraction and editing in order to use this feature properly To use the caption function save the caption file smi in the same file name as that of the DivX media file avi within the same folder Example Root Samsung_007CD1 avi Samsung_007CD1 smi Up to 60 alphanumeric characters or 30 East Asian cha...

Страница 14: ...nutes Fast Playback DVD VCD MP3 CD Press Each time the button is pressed during playback the playback speed changes as follows Press SLOW button Each time the button is pressed during playback the playback speed changes as follows Slow Playback DVD VCD No sound is heard during slow playback and step motion playback Reverse slow playback does not work with VCD and DivX Note During fast playback of ...

Страница 15: ...esignated section of a DVD A B Repeat Playback the repeat playback mode changes as follows CHAPTER Repeatedly plays the selected chapter TITLE Repeatedly plays the selected title RANDOM Plays tracks in random order A track that has already been played may be played again TRACK Repeatedly plays the selected track DIR Repeatedly plays all tracks in the selected folder DISC Repeatedly plays the entir...

Страница 16: ... OFF EZ VIEW SELECT ZOOM POSITION This function allows you to enlarge a particular area of the displayed image Zoom Screen Enlarge Function EZ VIEW Function This function will not work if the DVD is recorded with multi camera angle format Black bars may not disappear because some DVD discs have a built in horizontal to vertical ratio This feature is not supported for DivX discs Note When a DivX di...

Страница 17: ...Language Selection Function DVD 2 Press Cursor button to move to SUBTITLE display 1Press INFO button twice 3 Press Cursor button or numeric buttons to select the desired subtitle Note Selecting Subtitle Language pending on the number of guages on a DVD disc a different io language ENGLISH ANISH FRENCH etc is selected h time the button is pressed Press Cursor buttons or numeric buttons to select th...

Страница 18: ...PBC ON and OFF PBC Playback Control Function When playing a VCD version 2 0 you can select and view various scenes according to the menu screen PBC ON This VCD disc is version 2 0 The disc is played back according to the menu screen Some functions may be disabled When some functions are disabled select PBC OFF to enable them PBC OFF This VCD disc is version 1 1 The disc is played back in the same ...

Страница 19: ...ting the Disc Menu Language recorded on the disc Select Language and then press ENTER button 5 Press Cursor button to select OSD Language and then press ENTER button Press Cursor button to select the desired language and then press ENTER button Press RETURN button to return to the previous level Press MENU button to exit the setup screen another language select OTHER and enter the language code of...

Страница 20: ...r monitor For a standard TV select either 4 3LB or 4 3PS option according to personal preference Select 16 9 if you have a widescreen TV Select this to view a 16 9 picture in the full screen mode on your widescreen TV You can enjoy the widescreen aspect Select this to play a 16 9 picture in the letter box mode on a conventional TV Black bars will appear at the top and bottom of the screen Select t...

Страница 21: ...d The setting is complete 3 5 Press Cursor button to move to PASS WORD and then press ENTER button Press ENTER button Enter the password and then press ENTER button 2 1 Press MENU button Press Cursor button to move to Setup and then press ENTER button The password is set to 7890 by default Note If you have forgotten the rating level password do the following While the player is in the no disc mode...

Страница 22: ...desired USER and then press ENTER Press RETURN button to return to the previous level Press MENU button to exit the setup screen DVD VCD JPEG as Select this to set the desired image as your wallpaper OPY LOGO DATA will be dis ayed on the TV screen This selects one of the 3 wallpa per screens Press LOGO button COPY LOGO DATA you can set the image you like as background wallpaper allpaper MOVE ENTER...

Страница 23: ...cted Depending on PRO LOGIC and STEREO settings the speaker mode may vary see page 53 Note Signal outputs and frequency responses from the speakers will automatically be adjusted according to your speaker configuration and whether certain speakers are used or not Setting the Speaker Mode 2 ress the MENU utton while the isc tray is open Press Cursor button to move to Setup and then press ENTER butt...

Страница 24: ...le to place all speakers within this circle Ideal SUR ROUND SPEAKER placement SETUP You can set the delay time for C between 00 and 05mSEC and for SL and SR between 00 and 15mSEC 4 3 5 Press Cursor button to move to DELAY TIME and then press ENTER button Press Cursor buttons to move to the desired speaker and then press ENTER button Press Cursor to set the Delay time 0 ms 3 ms 6 ms 9 ms 12 ms 15 m...

Страница 25: ...c mode press MENU button Press Cursor button to move to Audio and then press ENTER button When the Cursor button is pressed the effect is greater and when the Cursor button is pressed the effect is smaller 3 4 Press Cursor button to move to DRC and then press ENTER button Press Cursor to adjust the DRC Press RETURN button to return to the previous level Press MENU button to exit the setup screen T...

Страница 26: ...sting Subwoofer Speaker Level 50 Press SOUND EDIT button and then press Cursor Press SOUND EDIT button and then press Cursor Press SOUND EDIT button and then press Cursor Press SOUND EDIT button and then press Cursor Note SETUP ss RETURN button to return to the previous level ess MENU button to exit the setup screen 2 1 4 3 In Stop mode press MENU button Press Cursor button to move to Audio and th...

Страница 27: ...ure works with CDs MP3 CDs 2 channel DivX and Dolby Digital discs When playing a DVD disc encoded with two or more channels multi channel mode will be selected automatically and DSP EQ function does not work Note DSP Digital Signal Processor DSP modes have been designed to simulate different acoustic environments EQ You can select ROCK POP or CLASSIC to optimize the sound for the genre of music yo...

Страница 28: ...lect between 0 and 6 Incrementally adjusts the sound field DSP from the front or rear 3 4 When playing a DVD disc encoded with two or more channels multi channel mode will be selected automatically and Dolby Pro Logic II button does not work You can select either 0 or 1 This mode extends the front stereo image to include the surround speakers for an exciting wraparound effect with side wall imagin...

Страница 29: ...ion Press the STOP button to select RESET and then press utton to select the preset station utomaticTuning1 Press the STOP button to select MANUAL nd then press and hold utton to automatically search the band utomaticTuning2 Press STOP to select MANUAL and then briefly ress to tune in to a lower or gher frequency anual Tuning me the button is pressed the sound switches between STEREO and MONO or r...

Страница 30: ...the display To restore the sound press the button again to select MUTE OFF Mute Function This is useful when answering a doorbell or telephone call Press MUTE button er will shut itself off is displayed p time from what you have set g press SLEEP button ss SLEEP button until 58 GB MISCELLANEOUS e 62 ...

Страница 31: ...n 16 9 WIDE mode 4 3 LETTER BOX mode or 4 3 PAN SCAN mode but 4 3 DVDs can be seen in 4 3 ratio only Refer to the DVD disc jacket and then select the appro priate function Aspect ratio cannot be changed 60 the power cord plugged securely into the outlet urn off the power and then turn it back on heck the region number of the DVD VD discs purchased from abroad may not be playable D ROMs and DVD ROM...

Страница 32: ...142 Greek 1298 Greenlandic 1481 Rhaeto Romance 1543 Twi 1144 English 1299 Cambodian 1482 Kirundi 1557 Ukrainian 1145 Esperanto 1300 Kannada 1483 Romanian 1564 Urdu 1149 Spanish 1301 Korean 1489 Russian 1572 Uzbek 1150 Estonian 1305 Kashmiri 1491 Kinyarwanda 1581 Vietnamese 1151 Basque 1307 Kurdish 1495 Sanskrit 1587 Volapuk 1157 Persian 1311 Kirghiz 1498 Sindhi 1613 Wolof 1165 Finnish 1313 Latin 1...

Страница 33: ...5 Kg 0 5 Kg Front Rear Center Front Center Rear speaker 4Ω 140Hz 20KHz 85dB W M 30W 60W 5 1ch speaker system ns 40W 2 6Kg 430 x 65 5 x 256 5 mm 5 C 35 C 10 75 10dB 60dB 0 5 1 0Vp p 75Ω load Y 1 0Vp p 75Ω load Pr 0 70Vp p 75Ω load Pb 0 70Vp p 75Ω load 30W x 2 4Ω 30W 4Ω 30W x 2 4Ω 30W 8Ω 20Hz 20KHz 75dB 60dB AUX 500mV e 68 ...

Страница 34: ... fi FRANCE 08 25 08 65 65 0 15 Min www samsung com fr GERMANY 01805 121213 0 12 Min www samsung de HUNGARY 06 40 985 985 www samsung com hu ITALIA 199 153 153 www samsung com it LUXEMBURG 02 261 03 710 www samsung lu NETHERLANDS 0900 20 200 88 0 10 Min www samsung com nl NORWAY 231 627 22 www samsung com no POLAND 0 801 801 881 www samsung com pl PORTUGAL 80 8 200 128 www samsung com pt SLOVAKIA 0...

Отзывы: