background image

C

HAPTER

F

OUR

: DVD O

PERATION

4

.20

D V D   O

P E R AT I O N

Setting up the Language Features

If you set the player menu, disc menu, audio and subtitle language in advance, they will
come up automatically every time you watch a movie.

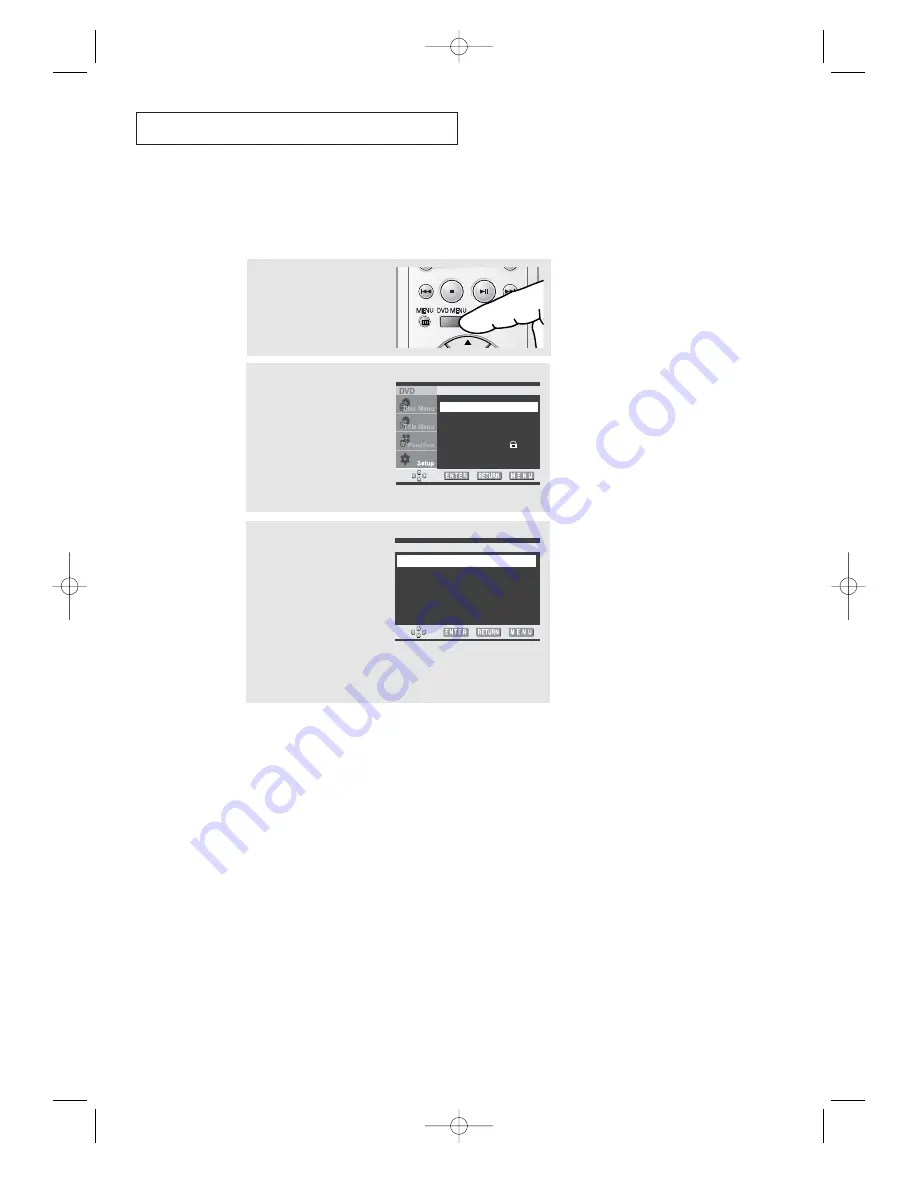
1

Press the DVD MENU button
during play.

2

Press the UP/DOWN

▲▼

button to select Setup.
Press the ENTER button.

The Language Setup menu
is selected.
Press the ENTER button
again.

Language Setup                    

Audio Setup 

Display Setup 

Parental Setup :        

3

Press the UP/DOWN

▲▼

button to select the
required menu (Player
Menu, Disc Menu, Audio,
or Subtitle). 
Press the ENTER button.

Select the appropriate 
language by pressing the
UP/DOWN

▲▼

button. 

Press the ENTER button.

LANGUAGE SETUP

Player Menu

: English  

Disc Menu

: English 

Audio

: English 

Subtitle

: Automatic 

• Player Menu

Use the Player preference menu to select the language for the player’s on-screen displays.

• Disc Menu

Use the Menu preference menu to select the language you want a DVD’s disc menu to be 
displayed in.
- Select Others if the language you want is not listed.

• Audio

Use the Audio preference menu to select the sound-track language.
- Select Original if you want the default soundtrack language to be the original language the 

disc is recorded in.

-  Select Others if the language you want is not listed.

• Subtitle

Use the Subtitle preference menu to select the language the disc’s subtitles are to be displayed in.
- Select Automatic if you want the subtitle language to be the same as the language selected   

as the audio preference.

- Select Others if the language you want is not listed. Some discs may not contain the 

language you select as your initial language; in that case the disc will use its original 
language setting.

You can select by simply pressing the SUBTITLE button on the remote control.

This function depends on what

languages are encoded on the disc
and may not work with all DVDs.

If the selected language is not record-
ed on the disc, the original pre-
recorded language is selected.

03233A(E)-CHAPTER 4  11/28/03  1:38 PM  Page 20

Содержание AA68-03265A-00

Страница 1: ...Owner s Instructions 3WAY COMBINATION UNIT CFTD2785 CFTD2085 AA68 03265A 00 03265A E FRONT COVER 1 26 04 1 28 PM Page 1 ...

Страница 2: ...Signal source 3 3 Storing Channels in Memory Automatic Method 3 4 Adding and Erasing Channels Manual Method 3 5 Changing Channels 3 6 Using the Channel Buttons 3 6 Directly Accessing Channels 3 6 Using the Pre CH Button to select the Previous Channel 3 6 Adjusting the Volume 3 7 Using Mute 3 7 Setting the Clock 3 8 Customizing the Picture 3 9 Changing the Color Tone 3 10 Changing the Screen Size 3...

Страница 3: ...Recorded Video Cassette Tape 5 2 Playing the Tape 5 2 Pausing 5 2 Using Picture Search 5 3 Using Automatic Tracking 5 3 Using the Time Counter 5 4 Using Memory Stop 5 5 Using P PLUS 5 6 Recording TV Programs As You Watch 5 7 Recording 5 7 Editing While Recording 5 8 Using Advanced Recording Features 5 9 Using One Touch Recording 5 9 Recording at a Later Time 5 10 Using Program Review 5 13 Using Tr...

Страница 4: ... eliminate reception problems Fine tuning control for the sharpest picture possible A built in multi channel sound decoder for stereo and bilingual listening Built in dual channel speakers A special sleep timer V chip function DVD Features DTS digital output for DTS enhanced DVDs Playback MP3 JPG WMA MPG files from CD ROM VCR Features Hi Fi Stereo VCR 4 heads for superior slow motion and stop acti...

Страница 5: ...n Unit Front Panel Buttons The buttons on the front panel control your 3way Combination Unit s basic features including the on screen menu To use the more advanced features you must use the remote control YOUR NEW 3WAY COMBINATION UNIT CFTD2785 CFTD2085 03233A E CHAPTER 1 11 26 03 3 36 PM Page 2 ...

Страница 6: ...DVD Press to play or pause the disc ˆ STOP DVD Press to stop the disc Ø OPEN CLOSE DVD Press to open and close the disc tray STAND BY indicator Lit when TV power is Off TIMER indicator Lit when the program times are stored REC indicator Lit when the VCR is recording Remote Control Sensor Aim the remote control towards this spot on the TV Ô REC VCR Press to begin recording STOP EJECT VCR Press to s...

Страница 7: ...ormation on connecting equipment see pages 2 1 2 6 Œ DIGITAL AUDIO OUTPUT Connect to a compatible dolby digital receiver VIDEO AUDIO INPUTS Used to connect video audio signals from VCRs laserdisc players and similar devices ˇ AUDIO VIDEO MONITOR OUTPUTS Connect to the audio video input jacks of a recording VCR VHF UHF Connect to an antenna or to a cable 3way Combination Unit system 03233A E CHAPTE...

Страница 8: ...e of the preset factory settings or select your personal cus tomized sound settings MENU Displays the main on screen menu Control the cursor in the menu Allows move to items TV VCR DVD selection Press to switch between TV VCR and DVD mode PRE CH Tunes to the previous channel Ô INPUT Press to watch the TV picture or a picture from a connected compo nent VCR camcorder etc SLEEP Press to select a pre...

Страница 9: ...area of a scene ANGLE Press to access various camera angles on a DVD PROGRAM For program play Skip Press to skip the title chapter or track Play pause Press to play or pause disc play Ô DVD MENU Displays the DVD play s Setup menu SUBTITLE Press to display the subtitle lan guage name abbreviation on screen Ò RETURN Press to return to a previous menu or exit Ú AUDIO Press to access various audio fun...

Страница 10: ... a video tape ˇ Stop Press to stop a video tape OPEN CLOSE Press to eject a tape ˆ F ADV frame advance Press to advance a tape frame by frame Ø SP SLP Press to select the tape recording speed P PLUS Press to compensate for a poor rental tape SLOW Press to watch a tape in slow motion Play pause Press to play or pause a tape REC Press to begin recording 03233A E CHAPTER 1 11 26 03 3 36 PM Page 7 ...

Страница 11: ... ohm Flat Twin Leads If you are using an off air antenna such as a roof antenna or rabbit ears that has 300 ohm twin flat leads follow the directions below Chapter Two INSTALLATION 1 Place the wires from the twin leads under the screws on the 300 75 ohm adaptor not sup plied Use a screwdriver to tighten the screws 2 Plug the adaptor into the VHF UHF terminal on the bottom of the back panel 2 Anten...

Страница 12: ...ntennas If you have two separate antennas for your TV one VHF and one UHF you must combine the two antenna signals before connecting the antennas to the TV This procedure requires a an optional combiner adaptor available at most electronics shops 1 Connect both antenna leads to the combiner Connecting to a Cable Box that Descrambles All Channels 1 Find the cable that is connected to the ANTENNA OU...

Страница 13: ...vailable at most electronics stores 1 Find and disconnect the cable that is connected to the ANTENNA IN terminal on your cable box This terminal might be labeled ANT IN VHF IN or simply IN 2 Connect this cable to a two way splitter 3 Connect a coaxial cable between an OUTPUT terminal on the splitter and the IN terminal on the cable box 4 Connect a coaxial cable between the ANTENNA OUT terminal on ...

Страница 14: ...g a Second VCR to Record from the TV Your TV can send out signals of its picture and sound to be recorded by a second VCR To do this connect your second VCR as follows 1 Connect a coaxial cable between the ANTENNA OUT terminal on the VCR and the antenna terminal on the TV A coaxial cable is usually included with a VCR If not check your local electronics store 2 Connect a set of audio cables betwee...

Страница 15: ...e The audio video cables shown here are usually included with a Camcorder If not check your local electron ics store If your camcorder is stereo you need to connect a set of two cables Connecting a Camcorder The front side panel jacks on your TV make it easy to connect a camcorder to your TV They allow you to view the camcorder tapes without using a VCR Also see Viewing a VCR or Camcorder Tape on ...

Страница 16: ... AUDIO IN jacks on the AUDIO and the DIGITAL AUDIO OUT jack on the TV Connecting an Audio System When playing a DVD The DIGITAL AUDIO OUT connector is used for equipment such as an audio system to take full advantage of the Surround sound effect 03233A E CHAPTER 2 11 28 03 1 34 PM Page 6 ...

Страница 17: ...time The remote control can be used up to about 23 feet from the TV Assuming typical TV usage the bat teries last for about one year 2 Install two AA size batteries Make sure to match the and ends of the batteries with the diagram inside the compartment Installing Batteries in the Remote Control 1 Slide the cover out completely 03233A E CHAPTER 2 11 28 03 1 34 PM Page 7 ...

Страница 18: ...RIGHT œ œ but tons to access the item s sub menu 3 Press the MENU button to exit Chapter Three TV OPERATION Turning the TV On and Off Press the POWER button on the remote control You can also use the Power button on the front panel Viewing the Display The display identifies the current channel and the status of certain audio video settings The on screen displays disappear after about ten seconds 1...

Страница 19: ...2 Press the UP DOWN buttons to select Language Press the LEFT RIGHT œ œ buttons to select the appropriate language English Spanish or French 1 Press the MENU button to display the menu Press the UP DOWN buttons to select Function Press the LEFT RIGHT œ œ buttons 03233A E CHAPTER 3 12 9 03 9 57 AM Page 2 ...

Страница 20: ...vision can begin memorizing the available channels you must specify the type of signal source that is connected to the TV i e an antenna or a cable system 1 Press the MENU button to display the menu Press the UP DOWN buttons to select Channel Press the LEFT RIGHT œ œ buttons 2 Press the UP DOWN buttons to select ANT CATV Repeatedly press the LEFT RIGHT œ œ buttons to cycle through these choic es A...

Страница 21: ... to two minutes Press the RIGHT button at any time to interrupt the memorization process and return to the Channel menu 2 Press the UP DOWN buttons to select Auto Program 1 First select the correct signal source ANT STD HRC IRC See steps 1 2 on previous page Press the UP DOWN buttons to select Channel then press the LEFT RIGHT œ œ buttons 4 After all the available channels are stored the Auto prog...

Страница 22: ...ons or the number buttons to select the channel you want to add or erase 2 Press the UP DOWN buttons to select Add Erase Press the LEFT RIGHT œ œ buttons 1 Press the MENU button to display the menu Press the UP DOWN buttons to select Channel Press the LEFT RIGHT œ œ buttons 4 Press the UP DOWN buttons to select Sel Press the LEFT RIGHT œ œ buttons to select Added or Erased Press the MENU button to...

Страница 23: ...nnels in sequence You will see all the channels that the TV has memorized The TV must have memorized at least three channels You will not see channels that were either erased or not memorized To quickly switch between two chan nels that are far apart tune to one chan nel then use the number button to select the second channel Then use the Pre CH button to quickly alternate between them When you us...

Страница 24: ... Using Mute At any time you can temporarily cut off the sound using the Mute button 1 Press the MUTE button and the sound cuts off The word Mute will appear in the lower left corner of the screen 2 To turn mute off press the MUTE button again or simply press either the VOL or VOL buttons 03233A E CHAPTER 3 12 9 03 9 57 AM Page 7 ...

Страница 25: ...lternatively you can use one of the automatic settings See next page 3 Press the UP DOWN buttons to select particu lar item Press the LEFT RIGHT œ œ buttons increase or decrease the value of a particular item 2 Press the LEFT RIGHT œ œ buttons to select Custom Press the UP DOWN buttons to select Adjust then press the LEFT RIGHT œ œ buttons After adjusting an item the gauge will automatically disap...

Страница 26: ...ther Dynamic Standard or Movie by press ing P MODE or by making a selection from the menu Or you can select Custom which automatically recalls your personalized picture settings Choose Dynamic for viewing the TV during the day or when there is brightlight in the room Choose Standard for the standard factory settings Choose Movie when viewing the movie Choose Custom if you want to adjust the settin...

Страница 27: ...IGHT œ œ buttons to display the Picture menu 2 Press the UP DOWN buttons to select Color Tone Press the LEFT RIGHT œ œ buttons to select Cool 2 Cool 1 Normal Warm 1 or Warm 2 according to personal preference Changing the Color Tone 3 Press the MENU button to exit 03233A E CHAPTER 3 12 9 03 9 57 AM Page 10 ...

Страница 28: ...en size Zoom Sets the picture to Zoom mode 16 9 Sets the picture to 16 9 mode 1 Press the MENU button to display the menu Press the LEFT RIGHT œ œ buttons to display the Picture menu 2 Press the UP DOWN buttons to select Size Press the LEFT RIGHT œ œ buttons to select Normal Zoom or 16 9 3 Press the MENU button to exit 03233A E CHAPTER 3 12 9 03 9 57 AM Page 11 ...

Страница 29: ...T œ œ buttons 2 Press the UP DOWN buttons to select Fine tune Press the LEFT RIGHT œ œ buttons to adjust the fine tuning 3 To store the fine tuning set ting in the TV s memory press the UP button An asterisk will appear To reset the fine tuning to 0 press the DOWN but ton After you adjust the fine tuning the color of Channel No will turn into red if you press the DISPLAY button while watching this...

Страница 30: ...c and ghosting that may appear on the screen 1 Press the MENU button to display the menu Press the LEFT RIGHT œ œ buttons to display the Picture menu 2 Press the UP DOWN buttons to select Digital NR Press the LEFT RIGHT œ œ buttons to select Digital NR On Pressing the LEFT RIGHT œ œ buttons will alternate between On and Off 3 Press the MENU button to exit 03233A E CHAPTER 3 12 9 03 9 57 AM Page 13...

Страница 31: ...he TV s location When this occurs follow the steps below 1 Press the MENU button to display the menu Press the LEFT RIGHT œ œ buttons to display the Picture menu 2 Press the UP DOWN buttons to select Tilt Press the LEFT RIGHT œ œ buttons to adjust the Tilt 3 Press the MENU button to exit TV OPERATION 03233A E CHAPTER 3 12 9 03 9 57 AM Page 14 ...

Страница 32: ...es Alternatively you can use one of the automatic settings See next page 2 Press the UP DOWN buttons to select Adjust the press the LEFT RIGHT œ œ buttons 3 Press the UP DOWN buttons to select a partic ular item Press the LEFT RIGHT œ œ buttons increase or decrease the value of a particular item 17 After adjusting an item the gauge will automatically disappear after about 3 seconds 4 Press the MEN...

Страница 33: ...sic Movie Speech or Custom sound setting Press the MENU button to exit 1 Press the MENU button to display the menu Press the UP DOWN buttons to select Sound then press the LEFT RIGHT œ œ buttons TV OPERATION Choose Standard for the standard factory settings Choose Music when watching music videos or concerts Choose Movie when watching movies Choose Speech when watching a show that is mostly dialog...

Страница 34: ...ifficulty receiving a stereo signal Choose Stereo for channels that are broadcasting in stereo Choose SAP to listen to the Separate Audio Program which is usually a foreign language translation You can also change the MTS setting by pressing the MTS button on the remote control 1 Press the MENU button to display the menu Press the UP DOWN buttons to select Sound Press the LEFT RIGHT œ œ buttons 2 ...

Страница 35: ... appropriate mode in order to view the VCR or Camcorder signal on the TV 2 Press the LEFT RIGHT œ œ buttons You will switch between viewing the sig nals coming from equip ment connected to the TV s A V jacks and the TV signal Press the MENU button to exit Simply press the INPUT but ton on the remote control one or more times until the required input is displayed Alternate method 03233A E CHAPTER 3...

Страница 36: ...3 Press the UP DOWN buttons to select Clock then press the RIGHT button Press the UP DOWN buttons repeatedly until the correct hour appears When selecting the hours be sure to select the proper time of day am or pm You can change the hours by pressing the UP or DOWN button repeat edly or by holding down either of these buttons 4 After the hour is entered Press the RIGHT at this point the minutes d...

Страница 37: ...e the item 5 Press the UP DOWN buttons to select Date then press the RIGHT button Press the UP DOWN buttons to to set the cur rent month 6 Press the RIGHT button then press the UP DOWN buttons to to set the current day 7 Press the RIGHT button then press the UP DOWN buttons to to set the current year TV OPERATION 03233A E CHAPTER 3 12 9 03 9 57 AM Page 20 ...

Страница 38: ...e RIGHT button to acti vate the channel number field Press the UP DOWN buttons to select your local PBS channel Press the RIGHT button TV OPERATION 1 Press the MENU button to display the menu Press the UP DOWN buttons to select Function then press the LEFT RIGHT œ œ buttons 2 Press the LEFT RIGHT œ œ buttons to select Auto 03233A E CHAPTER 3 12 9 03 9 57 AM Page 21 ...

Страница 39: ...en press the LEFT RIGHT œ œ buttons to indicate Yes or No The clock is set Press the MENU button to exit TV OPERATION 4 Press the UP DOWN buttons to select Time Zone then press the RIGHT button to change the Time zone Sequence ATL EAST CEN MTN PAC ALAS HAW 03233A E CHAPTER 3 12 9 03 9 57 AM Page 22 ...

Страница 40: ... Timer then press the LEFT RIGHT œ œ buttons 3 Press the UP DOWN buttons to select On Time Press the RIGHT button to highlight the On time hours Press the UP DOWN buttons repeatedly to select the appropriate hours i e the hour when the TV will turn on 4 Press the RIGHT button to highlight the On time minutes Press the UP DOWN buttons repeatedly to select the appropriate minutes When you set the ho...

Страница 41: ... press the UP DOWN buttons to select Off Time Press the RIGHT button and set the hours and min utes Follow the same pro cedure as in steps 1 6 above 8 If you want to set the vol ume level when the TV turns on press the DOWN button to select On time volume Press the LEFT RIGHT œ œ buttons to set the volume level you want when the TV turns on 6 When finished press the RIGHT button 9 When finished se...

Страница 42: ... Timer then press the LEFT RIGHT œ œ buttons 3 Press the UP DOWN buttons to select Sleep Timer Press the RIGHT button repeatedly until the appro priate time interval appears any of the preset values from Off to 180 Press the MENU button to exit Simply press SLEEP repeat edly until the appropriate time interval appears any of the preset values from Off to 180 Alternate method After about 3 seconds ...

Страница 43: ...Field 2 carries additional information that supplements the information in Field 1 For example Channel 1 may have subtitles in English while Channel 2 has subtitles in Spanish 1 Press the MENU button to display the menu Press the UP DOWN buttons to select Function then press the LEFT RIGHT œ œ buttons 2 Press the UP DOWN buttons to select Caption then press the LEFT RIGHT œ œ buttons 3 Press the L...

Страница 44: ... number the V chip mode screen will appear Press the UP DOWN buttons to select Change pin 4 While the Change pin field is selected press the LEFT RIGHT œ œ buttons The Change pin screen will appear Choose any 4 digits for your PIN and enter them As soon as the 4 digits are entered the Confirm new pin screen appears Re enter the same 4 digits When the Confirm screen disappears your PIN has been mem...

Страница 45: ...elect Function then press the LEFT RIGHT œ œ buttons 2 Press the UP DOWN buttons to select V Chip Press the LEFT RIGHT œ œ buttons The Enter pin screen will appear Enter your 4 digit PIN number 3 After entering a valid PIN number the V chip screen will appear To enable the V Chip fea ture press the LEFT RIGHT œ œ buttons so that the V Chip lock field is Yes Pressing the LEFT RIGHT œ œ buttons will...

Страница 46: ...age S Sexual situation V Violence Note 2 The V Chip will automatically block certain categories that are more restrictive For example if you block TV Y category then TV Y7 will automatically be blocked Similarly if you block the TV G category then all the categories in the young adult group will be blocked TV G TV PG TV 14 and TV MA The sub ratings D L S V work together similarly See next section ...

Страница 47: ...B will be displayed for each sub rating While the U or B is selected press the UP DOWN buttons to change the sub rating Press the LEFT RIGHT œ œ buttons to save the TV guidelines A TV Rating will be selected To select a different TV Rating press the UP DOWN buttons and then repeat the process Note The V chip will automatically block certain categories that are More restrictive For example if you b...

Страница 48: ...ress the LEFT RIGHTœ œ buttons to temporarily disable the V Chip Lock G General audience no restrictions PG Parental guidance suggested PG 13 PG 13 Parents strongly cautioned R R Restricted Children under 17 should be accompanied by an adult NC 17 No children under age 17 X X Adults only NR Not rated 3 Press the UP DOWN buttons to select the MPAA Rating 4 Press the LEFT RIGHT œ œ buttons The MPAA ...

Страница 49: ...l facing up 4 Press the PLAY PAUSE or OPEN CLOSE button to close the disc tray Stopping Playback Press the STOP but ton during playback Removing Disc Press the OPEN CLOSE button Pausing Playback Press the PLAY PAUSE or STEP button on the remote control during playback Screen stops no sound To resume again press the PLAY PAUSE button once again Playing a Disc Playback 03233A E CHAPTER 4 11 28 03 1 ...

Страница 50: ...playback You can only perform step motion playback in the forward direction Slow Motion Playback Except CD Press the FWD SEARCH button on the remote control during PAUSE By pressing the FWD SEARCH button you can select slow motion playback for 1 2 1 4 1 8 or 1 16 of nor mal speed No sound is heard during slow mode Press the PLAY PAUSE button to resume normal playback When playing a VCD the reverse...

Страница 51: ...ou press the BACK SKIP button it moves to the beginning of the track One more press makes it move to the beginning of the previous track When playing a VCD 2 0 in MENU OFF mode a VCD1 1 or a CD if you press the NEXT SKIP button it moves to next track If you press the BACK SKIP button it moves to the the beginning of the track One more press makes it move to the beginning of the previ ous track If ...

Страница 52: ...older6 MP3 JPG MPG WMA 3 Press the UP DOWN button again to select a song file Press the ENTER or PLAY PAUSE but ton to begin play of the song file To play another song file of the same music folder press the STOP button and press theUP DOWN button to select a song file Press the ENTER or PLAY PAUSE but ton To play another song file of another folder press the LEFT œ button to move the music folder...

Страница 53: ...Kbps or more only rarely give better sound quality Conversely files with sam pling rates below 128 Kbps will not be played properly Do not try recording copyright protected MP3 files Certain securized files are encrypted and code protected to prevent illegal copying These files are of the following types Windows MediaTM registered trade mark of Microsoft Inc and SDMIM registered trade mark of The ...

Страница 54: ...00 00 003 007 MPEG folder1 MPEG folder1 MPEG 1 MPEG 2 MPEG 3 MPEG 4 MPEG 5 A V A V A V A V A V 3 Press the UP DOWN button again to select a MPEG file Press the ENTER or PLAY PAUSE but ton to begin play of the MPEG file MP3 JPG MPG WMA 00 00 00 00 003 007 MPEG folder1 MPEG folder1 MPEG 1 MPEG 2 MPEG 3 MPEG 4 MPEG 5 A V A V A V A V A V 4 To play another MPEG file of the same MPEG folder press the ST...

Страница 55: ... zontally MP3 JPG MPG WMA 00 00 00 00 003 007 picture folder1 picture folder1 picture1 picture2 picture3 picture4 picture5 Press the OPEN CLOSE button Place a disc gently into the tray with the disc s label facing up Press the PLAY PAUSE or OPEN CLOSE button to close the disc tray If you want to return to the file list press the STOP button Slide Show Press the LEFT RIGHT œ button to select the de...

Страница 56: ...ENTER button Press ENTER key for DiscMenu 3 To display the next or pre vious 12 pictures press the next skip or back skip button Press the UP DOWN or LEFT RIGHT œ button to select the desired pic ture then press the PLAY PAUSE but ton If you press the ENTER button after selecting the desired picture the selected picture will be displayed only 03233A E CHAPTER 4 11 28 03 1 38 PM Page 8 ...

Страница 57: ...is selected Press the ENTER button Press ENTER key for DiscMenu Using the Title Menu 1 Press the DVD MENU but ton during the play of a DVD Depending on the disc the Title Menu may not work The Title Menu will only be dis played if there are at least two titles in the disc 2 Press the UP DOWN button to select Title Menu Press the ENTER button Press ENTER key for TitleMenu 03233A E CHAPTER 4 11 28 0...

Страница 58: ...ton on the remote control Depending on the disc the disc information will be displayed You may use the number but tons of the remote control to start play from a desired time Info Zoom Bookmark Repeat EZ View Program 4 Press the UP DOWN button to select the required item Press the LEFT RIGHT œ but ton to make the required setup then press the ENTER button To make the screen disappear press the INF...

Страница 59: ...ct the unit to your stereo system you can enhance sound quality and produce a greater surround effect This feature is useful when you are using the DVD player with a two channel stereo through the analog outputs Discs which are recorded with PCM or DTS will not work 3D Sound is possible only on discs recorded using DOLBY SUR ROUND or DOLBY DIGITAL However some of these discs do not con tain rear c...

Страница 60: ...n to select Zoom Press the ENTER button Info Zoom Bookmark Repeat EZ View Program 3 You can display by simply pressing the ZOOM button on the remote control Press the ENTER button repeatedly to zoom in on DVD or VCD 2X 3X 4X 1 2X 1 3X 1 4X in order Press the UP DOWN or LEFT RIGHT œ button to select the part of the screen you want to zoom in on 2X 3X 4X 4 The mark is displayed 2X 03233A E CHAPTER 4...

Страница 61: ...ton on the remote con trol 2 Press the UP DOWN button to select Function Press the ENTER button Press the UP DOWN button to select Bookmark Press the ENTER button Info Zoom Bookmark Repeat EZ View Program 4 Press the LEFT RIGHT œ buttons to move to the desired bookmark icon 5 When you reach the scene you want to mark press the ENTER button The icon will change to a number 1 2 or 3 Press the BOOKMA...

Страница 62: ...will be displayed Clearing a Bookmark 3 Press the CLEAR button to delete a bookmark number Press the BOOKMARK but ton to turn off display Up to three scenes may be marked at the same time Depending on the disc the Bookmark function may not work 1 During playback press the BOOKMARK button A marker will be displayed 2 Press the LEFT RIGHT œ buttons to select the book mark number you want to delete 0...

Страница 63: ...the LEFT RIGHTœ œ button to select B Press the ENTER button at the point where you want the repeat play to stop ˇ To return to normal play press the LEFT RIGHTœ œ button to select Off and press the ENTER button 2 Press the UP DOWN button to select Function Press the ENTER button Press the UP DOWN button to select Repeat Press the ENTER button Info Zoom Bookmark Repeat EZ View Program 3 You can dis...

Страница 64: ...VD repeats playback by chapter or title CD and VCD repeat playback by disc or track Depending on the disc the Repeat function may not work If the title or track is completed before marking the end B the end of title or track becomes B automati cally Off Chapter Title A B DVD Off Track Disc A B VCD CD 03233A E CHAPTER 4 11 28 03 1 38 PM Page 16 ...

Страница 65: ...ess the UP DOWN button to select Function Press the ENTER button Press the UP DOWN button to select EZ View Press the ENTER button Info Zoom Bookmark Repeat EZ View Program Wide Wide Normal LB Normal PS Refer to page 22 SCREEN FIT The top and bottom of the screen are cut off When playing a 2 35 1 aspect ratio disc the black bars at top and bottom of the screen will disappear The picture will look ...

Страница 66: ...first track to add to the program Selected numvers are dis played in the first track Program Track 01 17 4 Press the UP DOWN or LEFT RIGHTœ œ button to move the next tray Follow the above instruc tion for programming Press the PLAY PAUSE button Program Track 01 17 The disc will be played in programmed order Depending on the disc this function may not work Press the STOP button twice to cancel Prog...

Страница 67: ...a DVD contains multiple angles of a particular scene you can select the Angle function 1 Press the ANGLE button Press the LEFT RIGHTœ œ button to select the desired screen angle To turn off the display press the ANGLE button again 1 9 03233A E CHAPTER 4 11 28 03 1 38 PM Page 19 ...

Страница 68: ...ect the language you want a DVD s disc menu to be displayed in Select Others if the language you want is not listed Audio Use the Audio preference menu to select the sound track language Select Original if you want the default soundtrack language to be the original language the disc is recorded in Select Others if the language you want is not listed Subtitle Use the Subtitle preference menu to sel...

Страница 69: ...al Output or Dynamic Compression Select the appropriate option by pressing the LEFT RIGHTœ œ button AUDIO SETUP Digital Output Off Dynamic Compression Off Digital output Off Bitstream PCM Select Bitstream when using the Digital Audio Output Converts to Dolby Digital Bitstream 5 1CH in case of MPEG 2 5 1CH or 7 1CH Select PCM when using the Analog Audio Outputs Converts to PCM 2CH audio Dynamic Com...

Страница 70: ...ith the TV Aspect selected Press the ENTER button DISPLAY SETUP 4 3 Letter Box Select when you want to see the total 16 9 ratio screen DVD supplies Black bars will appear at the top and bottom of the screen 4 3 Pan Scan Select this for conventional size TVs when you want to see the central portion of the 16 9 screen Extreme left and right side of movie picture will be cut off 16 9 Wide You can vie...

Страница 71: ... button Language Setup Audio Setup Display Setup Parental Setup 3 Press the UP DOWN button to select the required menu Screen Messages Black Level Select the appropriate option by pressing the LEFT RIGHTœ œ button DISPLAY SETUP Screen Messages On or Off Use to turn on screen messages on or off Black Level On or Off Adjusts the brightness of the screen TV Aspect Wide Screen Messages Off Black Level...

Страница 72: ... the default password 0000 by using the numeric buttons CREAT PASSWORD Enter Password 4 Select Yes by pressing the RIGHT button to use a password PARENTAL SETUP The options available in the Parental Setup group are displayed with the Use Password selected If you have lost your password enter the master password 1369 Use Password Yes Rating Level 8 Change Password Language Setup Audio Setup Display...

Страница 73: ...rd pressing the RIGHT button RATING LEVEL Level 8 Adult Level 7 Level 6 Level 5 Level 4 Level 3 Level 2 Level 1 Kids Safe PARENTAL SETUP Use Password Yes Rating Level 8 Change Password 6 About Change Password ŒPress the UP DOWN button to select Change Password Press the ENTER button Enter your new password ˇEnter your new password again to confirm CREAT PASSWORD Enter New Password CHANGE PASSWORD ...

Страница 74: ... video tapes labeled VHS European PAL VHS video tapes and S VHS pre recorded tapes aren t compatible with this unit Choose brand name high quality tapes for best results 2 Gently push the tape through the compartment door until you feel the VCR pull it The VCR loads the tape automatically If the power is off when you insert a tape the TV turns on auto matically If the safety tab of your video tape...

Страница 75: ...e a tape is playing press the PLAY PAUSE button when you want to interrupt play The tape pauses temporarily The VCR does not play sound while a video tape is paused See Using Automatic Tracking on the next page If the tape is still paused after five minutes the TV VCR automatically play the tape and switches to the TV mode to protect the video heads from excessive wear Pausing 2 Press the PLAY PAU...

Страница 76: ... be some horizontal streaks on the screen while you search This technique is good if you re searching through only a small amount of tape If you want to search through a large amount of tape stop the tape before pressing FF or REW 2 When you find the scene you want press and release the FWD or REW button again to resume playing the tape at regular speed Using Automatic Tracking Automatic tracking ...

Страница 77: ... tapes see page 5 1 and 5 2 1 While a tape is playing press the INFO button twice The counter displays time only for recorded sections of tape Blank tapes or blank sections of tapes do not affect the counter display 2 The time counter appears in the upper left corner of the screen 3 Press the CLEAR button to set the counter to 00 00 00 The VCR automatically resets the counter to 00 00 00 when you ...

Страница 78: ...ant to remove the time counter memory from the screen and cancel the memory stop feature just press the INFO button again Using Memory Stop Memory stop makes it easy for you to find a particular scene in a video tape The VCR automatically stops rewinding or fast forwarding when the memory counter is at 00 00 00 so you simply need to mark the desired scene as 00 00 00 Then you ll be able to search ...

Страница 79: ...e scene you marked The VCR stops the tape when the counter reaches 00 00 00M 3 Press the PLAY PAUSE button to view the scene again Using P PLUS Press P PLUS to compensate for a poor rental tape 1 Insert a tape and press the PLAY PAUSE button 2 Press the P PLUS button and Picture plus Off appears on the screen Press the P PLUS button again to turn to Picture plus On The Picture Plus functions only ...

Страница 80: ...VD by switching into the DVD mode during channel recording You can t play a DVD by switching into DVD mode during A V recording Mode Switching doesn t operate during recording in DVD mode 2 Press the SP SLP button repeatedly until the speed you want SLP or SP appears 3 Select the TV channel you want by pressing the CH or CH button or by using the number buttons If you are using the number buttons ...

Страница 81: ...mporarily stop recording After ten minutes in the pause mode the VCR automatically stops the tape and switches to TV mode to protect the video heads from exces sive wear If this happens press REC to resume recording 1 Be sure you have begun recording and that the record indicator light on the front panel is illuminated For information on recording see page 5 6 VCR OPERATION 3 To resume recording p...

Страница 82: ... if the record safety tab on the tape has been removed For information on the record safety tab see page A 3 Your recording time options are 30 minutes 1 hour 1 hour and 30 minutes 2 hours 3 hours or 4 hours You can increase the length of time you want to record at any time during the recording process by pressing the REC button again and choosing additional time If you want to stop recording befo...

Страница 83: ...hen turn off the TV all without you being there You can also choose to record a program one time daily every day Monday through Friday or weekly the same day every week 1 Press the MENU button Press the UP DOWN button to select VCR Setup then press the LEFT RIGHT œ œ button The clock must be set to the cor rect time and date before you pro gram the timer For more informa tion on setting the clock ...

Страница 84: ... starting time 5 Press the RIGHT button then press the UP DOWN buttons to select the minute when you want to begin record ing 8 Press the RIGHT button The month will select Press the UP DOWN buttons to select the month when you want to begin recording 9 Press the RIGHT button then press the UP DOWN buttons to select the day when you want to begin recording If you enter two program times that overl...

Страница 85: ...ve the cable box turned on and tuned to the channel you want to record When a timer recording is in progress there is no picture on the monitor because the power is off If you want to watch the channel while it s being recorded press POWER on the remote control only One time timer programs clear from memory automatically when the recording is finished Daily and weekly programs remain in the timer ...

Страница 86: ...ater time 3 To see the information for the program number press the RIGHT button If you re recording through a cable box the Program Review screen displays the output channel of the cable box as the channel number to be recorded 4 If you want to remove a program from memory press the CLEAR button when the program you want to erase appears on the screen That program is erased from memory Press the ...

Страница 87: ... forward until it reaches the end of the tape 4 Press the STOP button to end the repeat Using True Repeat You can set your VCR to automatically repeat a tape or a section of tape When you use True Repeat your VCR will play until it reaches the end of a tape Then it will rewind to the beginning of the tape and begin playing again For information on viewing the main menu see page 3 1 For information...

Страница 88: ...be set up at a minimum five second interval 5 When you reach the end of the block press the REPEAT button again The word Repeat will appear on the screen To stop block repeat press the STOP or POWER buttons You can also can cel block repeat by fast forwarding or rewinding to a point outside the block The VCR will rewind the tape to beginning of the block and repeat it The VCR will repeat the block...

Страница 89: ...press the PLAY PAUSE button MTS Recording Monitor Mode Type of broad Regular Normal audio Stereo broadcast Bilingual broadcast Stereo Bilingual broadcast Display on the TV screen None Stereo SAP Stereo SAP Stereo SAP Selection Invalid Invalid Stereo SAP Stereo SAP Normal audio track Mono L R Main audio program Sub audio progrma L R Sub audio program Hi Fi audio tack 2 channel L channel R channel M...

Страница 90: ...ctors You can find these at most electronics supply stores We recommend that you play the pre recorded tape in the separate VCR or camcorder and record on your TV Making the Connections Attach one end of the first cable to the VIDEO AUDIO OUT connector of the playback VCR or camcorder and the other end to the VIDEO AUDIO IN connector of the TV VCR OPERATION 03233A E CHAPTER 5 12 9 03 10 09 AM Page...

Страница 91: ... the playback VCR or camcorder 5 When you are finished press the STOP button on both the VCR or camcorder and the TV to stop recording 6 Press the INPUT button to return to normal TV view ing VCR OPERATION Video Dubbing POWER TIMER REC POWER STOP EJECT REW PLAY FF REC VOLUME CHANNEL 1 Insert the video cassette tape you want to copy into the playback VCR or cam corder Important Warning One Federal ...

Страница 92: ...ou can watch a tape at various slow motion speeds 2 Press the F ADV button repeatedly to move for ward frame by frame Do not hold the button down Press the PLAY PAUSE button to resume normal playback 1 While a tape is playing press the PLAY PAUSE button on the remote If the picture jitters press the TRK button 1 While a tape is playing press the SLOW or SLOW button on the remote If the picture is ...

Страница 93: ...layer cannot play CD ROMs DVD ROMs CD R etc Insert a DVD a VIDEO CD or a CD 5 1 channel sound is reproduced only when the fol lowing conditions are met 1 The DVD player is connected with the proper amplifier 2 The disc is recorded with 5 1 channel sound Check whether the disc being played has the Dolby 5 1 ch mark on the outside Check if your audio system is connected and working properly If the T...

Страница 94: ...ble at the moment 4 You ve requested a title or chapter number or search time that is out of range Check if the disc has a Menu Some of the functions selected in the Setup Menu may not work properly if the disc is not encoded with the corresponding function The Screen Ratio is fixed on your DVDs Make sure you have selected the correct Digital Output in the Audio Options Menu Go to the contents and...

Страница 95: ...ke sure there has been a recording on the tape Check the antenna or cable connections Make sure the VCR is not in pause mode Make sure the tape hasn t already been rewound Make sure the VCR is not in pause mode Make sure the tape hasn t already been forwarded This is normal for SP and LP recordings Problem Unit won t turn on Unit won t take video tape Unit didn t record a program Unit didn t recor...

Страница 96: ...ation Liquids that spill into it can cause serious damage Cabinet Never open the cabinet or touch the parts inside Wipe your 3way combination with a clean dry cloth Never use water cleaning flu ids wax or chemicals Do not put heavy objects on top of the cabinet Temperature If your 3way combination is suddenly moved from a cold to a warm place unplug the power cord and allow at least two hours for ...

Страница 97: ...th a video tape Choosing the Correct Recording Speed Your VCR is equipped with variable tape speed You can play or record a tape at SP Standard Play the fastest speed SLP Super Long Play the slowest speed When you are playing a tape your VCR automatically selects the proper speed even if segments of the tape have been recorded at a different speed When you are recording the slower the tape speed y...

Страница 98: ...ved cover the hole with cello phane tape Sending Tapes to Another Country Because various TV standards are used throughout the world we recommend that you check for compatibility before sending your tapes to a foreign country Tapes made on machines sold in the U S A can be played back only on units that use the NTSC television system Specifications APPENDIX Model Voltage Frequency of Operation Pow...

Отзывы: