


3-1
3. Disassembly and Reassemble
3. Disassembly and Reassemble
When disassembling the monitor, do not use any metal tools except for the provided jig.
WARNING:
As this monitor has parts that are sensitive to static electricity, be careful when handling them.
3-1. Disassembly
Cautions:
1. Disconnect the monitor from the power source before disassembly.
2. Follow these directions carefully; never use metal instruments to pry apart the cabinet.
3. When disassembling the monitor, do not use any metal tools except for the provided jig.
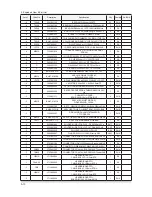
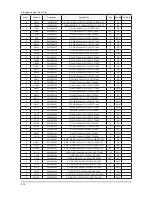
Description
Picture Description
Screws
1. Remove 17 screws from the rear cover and lift
up the rear cover.
2. Remove the twenty (20) screws on the shield
cover and remove it.
3. Remove the four (2) screws and the power cable
designated in the right photo.
4. Remove the four (4) screws and the power cable
designated in the right photo.
Содержание 820DXn - SyncMaster - 82" LCD Flat Panel Display
Страница 7: ...3 4 3 Disassembly and Reassemble Memo ...
Страница 25: ...1 4 1 Precautions Memo ...
Страница 31: ...2 6 2 Product specifications Memo ...
Страница 34: ...4 3 4 Troubleshooting 4 2 1 Waveform ...
Страница 36: ...4 5 4 Troubleshooting 4 3 1 Waveform ...
Страница 38: ...4 7 4 Troubleshooting 4 4 1 Waveform ...
Страница 40: ...4 9 4 Troubleshooting 4 5 1 Waveform ...
Страница 42: ...4 11 4 Troubleshooting 4 6 1 Waveform ...
Страница 44: ...4 13 4 Troubleshooting 4 7 1 Waveform ...
Страница 46: ...4 15 4 Troubleshooting 4 8 1 Screens to Check 16 ...
Страница 62: ...4 31 4 Troubleshooting 5 The installation proceeds ...
Страница 64: ...6 1 6 Wiring Diagram 6 Wiring Diagram 6 1 Wiring Diagram Main ...
Страница 65: ...6 2 6 Wiring Diagram 6 2 Wiring Diagram Network ...
Страница 66: ...6 3 6 Wiring Diagram 6 3 Wiring Diagram Main Power ...
Страница 67: ...6 4 6 Wiring Diagram 6 4 Wiring Diagram Network Power ...
Страница 69: ...6 6 6 Wiring Diagram 6 6 Wiring Diagram SMPS Board ...
Страница 70: ...6 7 6 Wiring Diagram 6 7 Wiring Diagram Network Power Board ...
Страница 71: ...6 8 6 Wiring Diagram 6 8 Wiring Diagram ...