background image

V-Position

Changes the vertical position of the monitor's entire 
display. 

MENU 

→ ▲

 , 

▼ →


→ ▲

 , 

▼ →


→ ▲

 , 

▼ →

 MENU 


 OSD 


Menu

Description

Play/Stop

Language

Change the language used in the menu. You can choose 
one of the seven languages. 

Note

:The language chosen affects only the language of 

the OSD. It has no effect on any software running on the 

computer. 

MENU 

→ ▲

 , 

▼ →


→ ▲

 , 

▼ →

 MENU 

H-Position

You can change the horizontal position where the OSD 
menu appears on your monitor. 

MENU 

→ ▲

 , 

▼ →


→ ▲

 , 

▼ →


→ ▲

 , 

▼ →

 MENU 

V-Position

You can change the vertical position where the OSD menu 
appears on your monitor. 

MENU 

→ ▲

 , 

▼ →


→ ▲

 , 

▼ →


→ ▲

 , 

▼ →

 MENU 

Transparency

Change the transparency of the background of the OSD. 

MENU 

→ ▲

 , 

▼ →


→ ▲

 , 

▼ →


→ ▲

 , 

▼ →

 MENU 

Display Time

The menu will be automatically turn

 off

 if no adjustments 

are made for a certain time period.  
You can set the amount of time the menu will wait before it 
is turned off. 

MENU 

→ ▲

 , 

▼ →


→ ▲

 , 

▼ →


→ ▲

 , 

▼ →

 MENU 


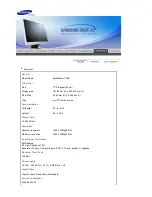
Содержание 720N - SyncMaster - 17" LCD Monitor

Страница 1: ...SyncMaster 720N...

Страница 2: ...quipment Prohibited Important to read and understand at all times Do not disassemble Disconnect the plug from the outlet Do not touch Grounding to prevent an electric shock Power When not used for ext...

Страница 3: ...se fire Do not excessively bend the plug and wire nor place heavy objects upon them which could cause damage z This may cause an electric shock or fire Do not connect too many extension cords or plugs...

Страница 4: ...to the product or human body Install the monitor base in a showcase or shelf so that the end of the base does not protrude from the showcase or shelf z Dropping the product may cause damage to the pr...

Страница 5: ...ice specified in the owner s manual When installing the product make sure to keep it away from the wall more than 10 cm 4 inch for ventilation purposes z Poor ventilation may cause an increase in the...

Страница 6: ...leaning once a year z Keep the product s interior clean Dust which has accumulated in the interior over an extended period of time may cause malfunction or fire Others Do not remove cover or back z Th...

Страница 7: ...not move the monitor right or left by pulling only the wire or the signal cable z This may cause a breakdown electric shock or fire due to damage to the cable Do not cover the vents on the monitor ca...

Страница 8: ...Watching the monitor continuously at a too close angle may result in eyesight damage To ease eye strain take at least a five minute break after every hour of using the monitor Do not install the produ...

Страница 9: ...graded insulation leading to electric shock or fire Do not place children s favorite objects or anything else that may be tempting on the product z Children may try to climb on the product to retrieve...

Страница 10: ...y items are missing contact your dealer Contact a local dealer to buy optional items Unpacking Monitor Simple stand Bottom Manual Quick Setup Guide Warranty Card Not available in all locations User s...

Страница 11: ...ortable to your eyes depending on your taste If this is the case adjust the brightness and contrast by using the OSD menu 2 Text Normal brightness For documentations or works involving heavy text 3 In...

Страница 12: ...roduct to product 1 Power port Connect the power cord for your monitor to the power port on the back of the monitor 2 D sub 15 pin port Connect the D sub cable to the 15 pin D sub connector on the bac...

Страница 13: ...nnect the D sub cable to the 15 pin D sub connector on the back of your monitor 2 2 Connected to a Macintosh Connect the monitor to the Macintosh computer using the D sub connection cable 2 3 In the c...

Страница 14: ...screws and then remove the stand from the LCD monitor 4 Align the Mounting interface pad with the holes in the rear cover mounting pad and secure it with four screws that came with the arm type base...

Страница 15: ...www samsungmonitor com cn China Windows ME 1 Insert CD into the CD ROM drive 2 Click Windows ME Driver 3 Choose your monitor model in the model list then click the OK button 4 Click the Install button...

Страница 16: ...or driver insert the CD ROM included with this monitor Driver installation is slightly different from one operating system to another Follow the directions appropriate for the operating system you hav...

Страница 17: ...5 Click Update Driver and select Install from a list or then click Next button 6 Select Don t search I will then click Next and then click Have disk 7 Click the Browse button then choose A D Driver an...

Страница 18: ...Monitor homepage http www samsung com 9 Click the Close button then click OK button continually 10 Monitor driver installation is completed Microsoft Windows 2000 Operating System When you can see Dig...

Страница 19: ...monitor that corresponds to the one you connected to your computer and click OK 11 Continue choosing Close button and OK button until you close the Display Properties dialogue box Microsoft Windows NT...

Страница 20: ...information refer to Help F1 in the software program How to install the Natural Color software Insert the CD included with the Samsung monitor into the CD ROM Drive Then the initial screen of the pro...

Страница 21: ...ment menu 2 This button allows you to adjust items in the menu 3 This button allows you to adjust items in the menu 4 Press this button to activate a highlighted menu item 5 AUTO Press to self adjust...

Страница 22: ...o make the automatic adjustment function sharper execute the AUTO function while the AUTO PATTERN is on z If auto adjustment does not work properly press auto button again to adjust picture with more...

Страница 23: ...h the button to adjust brightness 1 Picture Brightness Contrast 2 Color Color Tone Color Control Gamma 3 Image Coarse Fine Sharpness H Position V Position 4 OSD Language H Position V Position Transpar...

Страница 24: ...rsonal preference Direct Access Feature When OSD is not on the screen Push the button to adjust brightness MENU MENU Contrast You can use the on screen menus to change the contrast according to person...

Страница 25: ...tion Play Stop Coarse Removes noise such as vertical stripes Coarse adjustment may move the screen image area You may relocate it to the center using the Horizontal Control menu MENU MENU Fine Removes...

Страница 26: ...ning on the computer MENU MENU H Position You can change the horizontal position where the OSD menu appears on your monitor MENU MENU V Position You can change the vertical position where the OSD menu...

Страница 27: ...Menu Description Play Stop Image Reset Image parameters are replaced with the factory default values MENU MENU Color Reset Color parameters are replaced with the factory default values MENU MENU Infor...

Страница 28: ...Menu Description Information Shows a video source display mode on the OSD screen MENU...

Страница 29: ...ter in the applicable mode the safe mode for Windows ME XP 2000 and then change the frequency of the video card Refer to the Preset Timing Modes Note If the initial screen the login screen does not ap...

Страница 30: ...justed when checking the Display Timing on the menu Adjust the frequency properly by referring to the video card manual and the Preset Timing Modes The maximum frequency per resolution may differ from...

Страница 31: ...ther a cleaning solution or plain water Do not leave any remains of the detergent nor scratch the case Do not allow any water to go inside the monitor Self Test Feature Check Self Test Feature Check W...

Страница 32: ...3 feet one meter of the monitor Useful Tips z A monitor recreates visual signals received from the computer Therefore if there is trouble with the computer or the video card this can cause the monito...

Страница 33: ...Vertical 56 75 Hz Display Color 16 2 M Colors Resolution Optimum resolution 1280 x 1024 60 Hz Maximum resolution 1280 x 1024 75 Hz Input Signal Terminated RGB Analog 0 7 Vp p Positive at 75 Separate...

Страница 34: ...of TFT LCD sub pixels that is contained in this product are 3 932 160 Note Design and specifications are subject to change without prior notice PowerSaver This monitor has a built in power management...

Страница 35: ...156 56 250 36 000 VESA 800 x 600 37 879 60 317 40 000 VESA 800 x 600 46 875 75 000 49 500 VESA 800 x 600 48 077 72 188 50 000 VESA 1024 x 768 48 363 60 004 65 000 VESA 1024 x 768 56 476 70 069 75 000...

Страница 36: ...CHILE 800 726 7864 SAMSUNG http www samsung com cl COSTA RICA 0 800 507 7267 http www samsung com latin ECUADOR 1 800 10 7267 http www samsung com latin EL SALVADOR 800 6225 http www samsung com lati...

Страница 37: ...samsung com se U K 0870 242 0303 http www samsung com uk CIS RUSSIA 8 800 200 0400 http www samsung ru UKRAINE 8 800 502 0000 http www samsung com ur Asia Pacific AUSTRALIA 1300 362 603 http www samsu...

Страница 38: ...e international standard VESA DDC for the Plug Play function Resolution The number of horizontal and vertical dots used to compose the screen image is called resolution This number shows the accuracy...

Страница 39: ...sequential damages in connection with the furnishing performance or use of this material Samsung is the registered trademark of Samsung Electronics Co Ltd Microsoft Windows and Windows NT are register...

Страница 40: ......

Страница 41: ...Mode Ex z Turn the power off when using a stationary pattern z Use a Screen saver if possible z Set the Monitor to power off with the PC Display Properties Power Scheme Turn the power off for 4 hours...

Страница 42: ...atterns When the LCD panel is operated for a long time with a fixed pattern over 12 hours there may be slight difference in voltage between electrodes that work the liquid crystal LC in a pixel The vo...

Страница 43: ...ment or human health from uncontrolled waste disposal please separate this from other types of wastes and recycle it responsibly to promote the sustainable reuse of material resources Household users...

Отзывы: