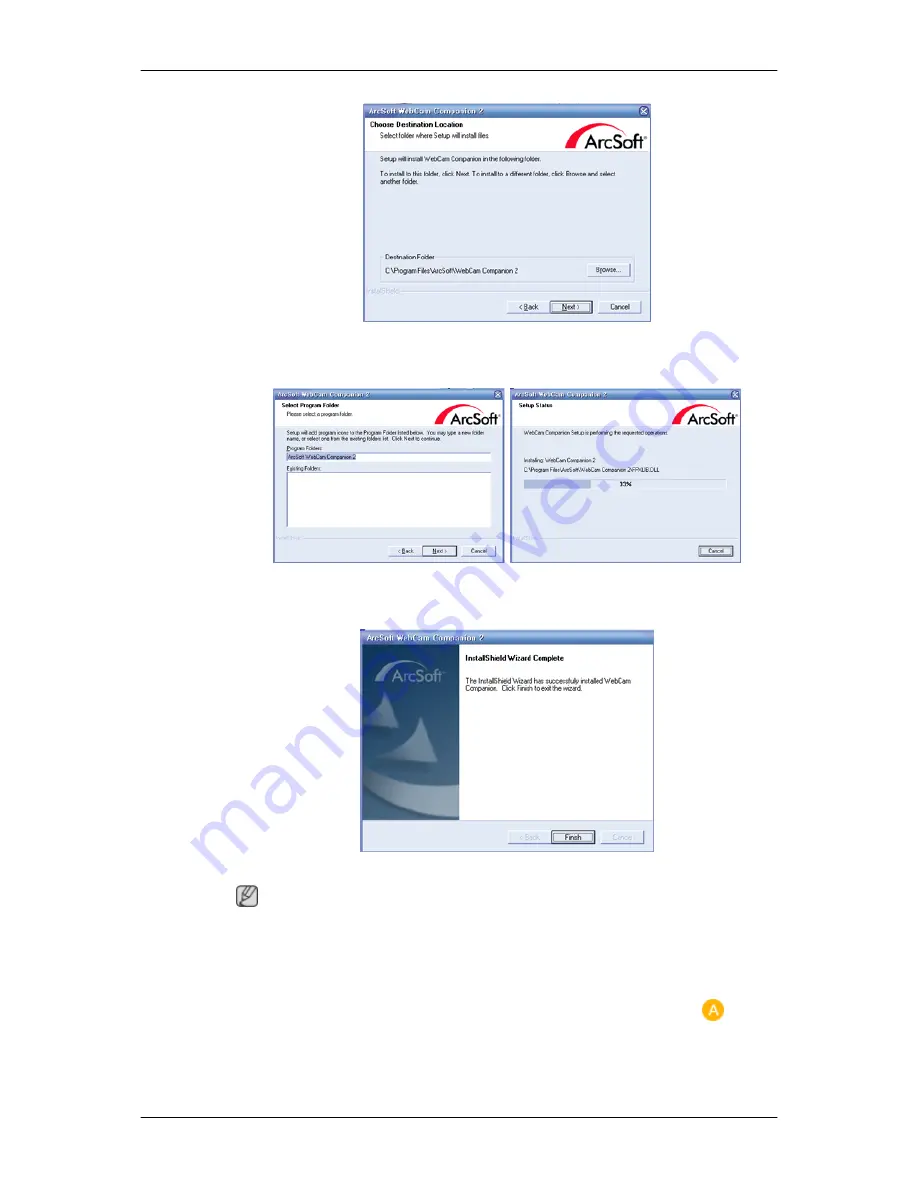
Samsung 2263DX - SyncMaster - 22

7.

Click the "Next" button.

8.

Click the “Finish” button. The installation of the Web Cam Companion 2 is completed.

 Note

For more information on how to use the program, refer to its “Help” section.

Opening the chat program

When the installation of the Web Cam Companion 2 program is completed, touch the “

” position

on the monitor for the Web Cam Companion 2 chat window to appear, as shown in the figure
below.

Using the Software

Содержание 2263DX - SyncMaster - 22" LCD Monitor

Страница 1: ...SyncMaster 2263DX LCD Monitor User Manual...

Страница 2: ...et your computer to DPM If using screen saver set it to active screen mode The images here are for reference only and are not applicable in all cases or countries Shortcut to Anti Afterimage Instructi...

Страница 3: ...tact an authorized Service Center when installing your monitor in a location with heavy dust high or low temperatures high humidity and exposed to chemical substances and where it operates for 24 hour...

Страница 4: ...learance of more than 10 cm from the wall Otherwise it may result in fire due to an increase in the internal tem perature Ensure that the packaging vinyl is kept away from children Otherwise it may re...

Страница 5: ...When cleaning the product do not spray water directly onto the main body of the product Ensure that water does not enter the product and that it is not wet Otherwise this may result in electric shock...

Страница 6: ...t in a product malfunction electric shock or fire Do not insert any metal such as chopsticks coins pins and steels or inflammable objects such as matches or paper inside the product through the ventil...

Страница 7: ...to electric shock or leakage Do not place any heavy items or toys or confectionery such as cookies etc that may attract the attentions of children onto the product Your children may hang onto the prod...

Страница 8: ...the product This may result in personal injury and or damage to the product Good Postures When Using the Monitor When using the product use it in the correct position Keep your back straight while lo...

Страница 9: ...tems are missing contact your dealer Contact a local dealer to buy optional items Unpacking Without stand With stand USB Monitor Manuals Quick Setup Guide Warranty Card Not available in all loca tions...

Страница 10: ...disappear after 40 seconds Turn the Power button off and on It will be displayed again It can be displayed up to three 3 times Make sure to adjust the resolution of your PC before reaching the maximu...

Страница 11: ...sage appears in the upper left of the screen displaying the current mode analog or digital input signal Activates a highlighted menu item Note If you select the digital mode you must connect your moni...

Страница 12: ...iary monitor Activating the function Turn off the USB monitor and hold down the Power button for five 5 seconds The monitor is turned on again and the afterimage prevention program is ac tivated while...

Страница 13: ...nnect the HDMI terminal at the back of your monitor to the HDMI terminal of your digital out put device using a HDMI cable DVI IN Connect the DVI cable to the DVI IN port on the back of your monitor R...

Страница 14: ...on Lock The Kensington Lock is a device used to physi cally fix the system when using it in a public place The locking device has to be purchased separately The appearance and locking method may diffe...

Страница 15: ...inal MIC Connect a microphone to the MIC terminal Cable holding ring Fix the cables using the holding ring as shown in the figure Note See Connecting Cables for further information regarding cable con...

Страница 16: ...o the 15 pin D sub port on the back of your monitor RGB IN Using the DVI Digital connector on the video card Connect the DVI Cable to the DVI IN Port on the back of your Monitor DVI IN Connected to a...

Страница 17: ...sing the SOURCE button Connecting Using a DVI to HDMI Cable 1 Connect the DVI output terminal of a digital output device to the HDMI terminal of the monitor using a DVI to HDMI cable 2 To listen to so...

Страница 18: ...480 Mbps 12 Mbps 1 5 Mbps Power Consumption 2 5 W Max each port 2 5 W Max each port 2 5 W Max each port 1 Connect the UP port of the monitor and the USB port of the computer with the USB cable Note To...

Страница 19: ...pany is not liable for problems or damages to an external device caused by using an unauthorized cable for the connection Some products do not follow the USB standard and it may cause a malfunction of...

Страница 20: ...or Note You can also adjust the length of the armrest holder after adjusting the location of the USB monitor 1 Do not tilt the stand too far backwards when the USB auxiliary monitor is lifted up as sh...

Страница 21: ...product to fall resulting in damage or a malfunction 4 When moving a 7 USB monitor take care not to knock the monitor against something The monitor may become scratched 5 When disassembling the 7 USB...

Страница 22: ...eadphone connection terminal Connecting MIC Note You may connect your microphone to the monitor 1 Connect the microphone cable to the MIC port on the monitor Using the Stand Monitor Assembly Simple St...

Страница 23: ...you try to rotate the monitor in the state of the power cord or cable connecting to the monitor the power cord of cable can be destroyed Tilt angle Using You can adjust the tilt angle within a range o...

Страница 24: ...ons the length of the screws may differ depending on their specifications Do not use screws that do not comply with the VESA standard screw specifica tions Do not fasten the screws too tightly as this...

Страница 25: ...wer cable and the USB cable to your PC Minimum baseline spec System Requirements CPU 1 73GHz or Later OS Windows XP Service Pack2 or later However Windows Vista 64bit is not supported RAM 512 MB RAM o...

Страница 26: ...ws Installation Precautions 1 Never disconnect the USB cable from the USB port while the auto installation is in progress The installation takes about a minute If you remove the USB port during the in...

Страница 27: ...symbol showing that the device has failed to be installed is displayed as shown in 2 In this case click Scan for hardware changes to run the Setup Wizard again At this time if the installation fails...

Страница 28: ...Web Camera Setup 1 Double click My Computer on the Windows Desktop 2 Double click the USB Video Device 2 You should find that the web camera has been set up normally as shown in the figure below Check...

Страница 29: ...after setting the volume of your PC to the maximum 3 Follow the steps described below You should find that the microphone and speaker have been set up Restrictions on Using the Monitor 1 The Camera an...

Страница 30: ...USB 2 0 7 If more than one monitor of this type of model is connected the USB device recognized for each monitor may not operate normally 8 Noise may occur from the MIC and speaker if this monitor is...

Страница 31: ...t the Program Setup CD into the CD ROM drive 2 Click on Web Cam Companion 2 WCC2 3 Select a language and click the OK button 4 Click the Next button 5 Click the Yes button 6 Click the Next button Usin...

Страница 32: ...Note For more information on how to use the program refer to its Help section Opening the chat program When the installation of the Web Cam Companion 2 program is completed touch the position on the...

Страница 33: ...ough frames effects and themes Using Video Plug in technology Magic i Visual Effects launches automatically when you start a video chat with any of your favorite chat clients so you can apply fun effe...

Страница 34: ...1 Insert the Program Setup CD into the CD ROM drive 2 Click on Magic I Visual Effects 3 Select a language and click the OK button 4 Click the Next button 5 Click the Yes button 6 Click the Next butto...

Страница 35: ...For more information on how to use the program refer to its Help section Media Impression ArcSoft Media Impression manages your media for you and gives you tons of fun and exciting ways to create and...

Страница 36: ...ple QuickTime 7 0 or higher recommended Macintosh OS X 10 3 10 4 PowerPC G4 800 MHz or Intel processor 150 MB available hard disk space 800x600 pixels 16 bit color monitor Apple QuickTime 6 0 or highe...

Страница 37: ...6 Click the Next button 7 Click the Next button 8 Select a file type and click the Next button Using the Software...

Страница 38: ...r later However Windows Vista 64bit is not supported RAM 512 MB RAM or more USB 1 1 or higher USB 2 0 recommended Installing Your USB Monitor Make sure to connect the USB cable and begin the installat...

Страница 39: ...ed as shown in the figure below When setup is finished a monitor icon is created in the system tray at the bottom of the monitor screen and the information for the installed USB monitor is displayed 5...

Страница 40: ...driver setup for the USB monitor is finished a monitor icon is created in the system tray at the bottom of the monitor screen 2 Click the monitor icon to display a list of connected USB monitors Selec...

Страница 41: ...n check the configuration by following these steps 1 Right click My Computer and select Properties System Properties the Hardware tab 2 Click Device Manager 3 A list of the installed device will be di...

Страница 42: ...a Supported 64bit Not Supported To check the information on the operating system of your PC right click My Computer on the Windows Desktop and select Properties from the displayed menu Check the infor...

Страница 43: ...dows Vista Example Some versions of the Matrox Card Monitor Driver Note When prompted by the operating system for the monitor driver insert the CD ROM included with this monitor Driver installation is...

Страница 44: ...n doesn t damage your system The certified driver will be posted on Samsung Monitor homepage http www samsung com Installing the Monitor Driver Manual Microsoft Windows Vista Operating System 1 Insert...

Страница 45: ...layed as shown in the figure below click Continue Note This monitor driver is under certifying MS logo and this installation doesn t damage your system The certified driver will be posted on Samsung M...

Страница 46: ...rive where the driver setup file is located and click OK 9 Select the model that matches your monitor from the list of monitor models on the screen and click Next 10 Click Close Close OK OK on the fol...

Страница 47: ...into the CD ROM drive 2 Click Start Control Panel then click the Appearance and Themes icon 3 Click Display icon and choose the Settings tab then click Advanced 4 Click the Properties button on the Mo...

Страница 48: ...choose A D Driver and choose your monitor model in the model list and click the Next button 8 If you can see following message window then click the Continue Anyway button Then click OK button Note T...

Страница 49: ...l 2 Double click the Display icon 3 Select the Settings tab and click Advanced Properties button 4 Choose Monitor Case1 If the Properties button is inactive it means your monitor is properly configure...

Страница 50: ...on and OK button until you close the Display Properties dia logue box Microsoft Windows NT Operating System 1 Click Start Settings Control Panel and then double click Display icon 2 In Display Registr...

Страница 51: ...solution for this problem It is a color administration system de veloped by Samsung Electronics in association with Korea Electronics Telecommunications Research Institute ETRI This system is availab...

Страница 52: ...he Natural Color software program Select Setting Control Panel on the Start menu and then double click Add Delete a program Select Natural Color from the list and then click the Add Delete button Usin...

Страница 53: ...lf adjust to the incoming Analog signal The values of Fine Coarse and Position are adjusted automatically Available in Analog mode only If auto adjustment does not work properly press AUTO button agai...

Страница 54: ...rrent states of settings or prevent others from adjusting the current settings Lock Hold down the MENU button for more than five 5 seconds to activate the OSD adjustment lock function Unlock Hold down...

Страница 55: ...tomize key assignment for the Custom button according to your preferences To view the operating screen displayed when pressing the button after configuring the cus tomized key for a function click the...

Страница 56: ...e When OSD is not on the screen push the button to adjust volume SOURCE Selects the video signal while the OSD is off OSD Function Picture Brightness Contrast MagicBright Picture Mode Adjusting the Mo...

Страница 57: ...play Time Setup Reset Customized Key Off Timer Auto Source Image Size AV Mode HDMI Black Level Information Picture Brightness Not available in MagicBright mode of Dynamic Contrast You can use the on s...

Страница 58: ...of Full and Intelligent MENU MENU MagicBright Push the button to circle through available preconfigured modes MagicBright is a new feature providing optimum viewing environment depending on the conten...

Страница 59: ...ess and contrast by using the OSD menu Text For documentations or works involving heavy text Internet For working with a mixture of images such as texts and graphics Game For watching motion pictures...

Страница 60: ...provides a sharp image Movie Select this mode when the surroundings are dark This will save power and reduce eye fatigue Custom Select this mode when you want to adjust the image according to your pre...

Страница 61: ...skin color with clearness Intelligent Displays vivid natural color with clearness MENU MENU Color Tone The tone of the color can be changed and one of four modes can be selected Cool Makes whites blu...

Страница 62: ...n Blue color balance Not available in MagicColor mode of Full and Intelligent MENU MENU Color Effect You can change the overall mood by changing the screen colors Not available in MagicColor mode of F...

Страница 63: ...his applies the green color effect to a black and white screen Aqua This applies the aqua color effect to a black and white screen Sepia This applies the Sepia color effect to a black and white screen...

Страница 64: ...moves noise such as vertical stripes Coarse adjustment may move the screen image area You may relocate it to the center using the horizontal control menu Available in Analog mode only MENU MENU Adjust...

Страница 65: ...as horizontal stripes If the noise persists even after Fine tuning repeat it after adjusting the frequency clock speed Available in Analog mode only MENU MENU Sharpness Changes the clearance of image...

Страница 66: ...ilable in MagicColor mode of Full and Intelligent MENU MENU H Position Changes the horizontal position of the monitor s entire display Available in Analog mode only MENU MENU V Position Adjusting the...

Страница 67: ...re display Available in Analog mode only MENU MENU OSD Language You can choose one of nine languages Note The language chosen affects only the language of the OSD It has no effect on any software runn...

Страница 68: ...u can change the horizontal position where the OSD menu appears on your monitor MENU MENU V Position You can change the vertical position where the OSD menu appears on your monitor MENU MENU Adjusting...

Страница 69: ...background of the OSD Off On MENU MENU Display Time The menu will be automatically turned off if no adjustments are made for a certain time period You can set the amount of time the menu will wait be...

Страница 70: ...5 sec 10 sec 20 sec 200 sec MENU MENU Setup Reset Reverts the product settings to factory defaults No Yes MENU MENU Adjusting the Monitor...

Страница 71: ...ized Key You can specify a function which will be activated when the Customized Key is pressed MENU MENU Off Timer The monitors will turn off automatically at the specified time Off On Adjusting the M...

Страница 72: ...MENU MENU Auto Source Select Auto Source for the monitor to automatically select the signal source Auto Manual MENU MENU Image Size PC Mode Adjusting the Monitor...

Страница 73: ...MENU HDMI DVI Mode You can change the size of the screen displayed on your monitor 4 3 Sets the picture to 4 3 normal mode Wide Enlarges the aspect ratio of the picture to fit the entire screen Just...

Страница 74: ...screen when a 480P 576P 720P 1080i or 1080P video signal is input in HDMI DVI mode Set to Off when connected to a PC Set to On when connected to an AV device If not set to On the screen may not be dis...

Страница 75: ...lack level a low contrast or discoloration etc depending on the external device connected In this case adjust the screen quality of your TV by configuring the HDMI black level This function is active...

Страница 76: ...MENU MENU Adjusting the Monitor...

Страница 77: ...and computer system your monitor is functioning properly Warning Messages If there is something wrong with the input signal a message appears on the screen or the screen goes blank although the power...

Страница 78: ...g the D sub cable Check the signal cable connection Connected using the DVI cable If you still see an error message on the screen when the monitor is connected properly check to see if the monitor sta...

Страница 79: ...and then reconnect the DVI cable while the system is running as certain types of graphic cards do not send out video signals Connect the DVI cable and then reboot the system I cannot see the On Screen...

Страница 80: ...solution at the Control Panel Display Settings Q Has the video card been set properly A Set the video card by referring to the video card manual There is a message that reads Unrecognized monitor Plug...

Страница 81: ...S Setup menu and reboot the computer A Example Phoenix BIOS If you turn on the computer the Press F2 to enter SETUP message is displayed on the bottom of the screen Press F2 to display the BIOS Setup...

Страница 82: ...hemes Display Settings A Windows ME 2000 Set the resolution in the Control Panel Display Settings Contact the video card manufacturer for details Q How can I set the Power Saving function A Windows XP...

Страница 83: ...isplay Properties window A The deactivated USB monitors are such that the power to them is turned off or their USB cables are disconnected To remove this information you have to remove the Samsung Ubi...

Страница 84: ...Signal Terminated RGB Analog DVI Digital Visual Interface Compliant Digital RGB 0 7 Vp p 5 Separate H V sync Composite SOG TTL level V high 2 0 V V low 0 8 V Maximum Pixel Clock 146MHz Analog Digital...

Страница 85: ...above are used for this product But the pixels of RED GREEN BLUE and WHITE color appear to be bright sometimes or some black pixels may be seen This is not from bad quality and you can use it without...

Страница 86: ...s monitor has a built in power management system called PowerSaver This system saves energy by switching your monitor to low power mode when it has not been used for a certain amount of time The monit...

Страница 87: ...VESA 800 x 600 48 077 72 188 50 000 VESA 800 x 600 46 875 75 000 49 500 VESA 1024 x 768 48 363 60 004 65 000 VESA 1024 x 768 56 476 70 069 75 000 VESA 1024 x 768 60 023 75 029 78 750 VESA 1152 x 864...

Страница 88: ...f excessive force is applied you may stain it If you are not satisfied with the picture quality you can get better quality of picture by performing the Auto Adjustment function in display screen that...

Страница 89: ...s recommended Set the Monitor to power off with the PC Display Properties Power Scheme Suggestions for specific applications Ex Airports Transit Stations Stock Markets Banks and Controlling Systems We...

Страница 90: ...nder normal conditions Normal conditions are defined as continuously changing video patterns When the LCD panel is operated for a long time with a fixed pattern over 12 hours there may be slight diffe...

Страница 91: ...Our LCD Monitor satisfies ISO13406 2 Pixel fault Class II Information...

Страница 92: ...EL SALVADOR 800 6225 http www samsung com latin GUATEMALA 1 800 299 0013 http www samsung com latin HONDURAS 800 7919267 JAMAICA 1 800 234 7267 http www samsung com latin NICARAGUA 00 1800 5077267 PA...

Страница 93: ...w samsung ee LATVIA 800 7267 http www samsung com lv LITHUANIA 8 800 77777 http www samsung lt KAZAKHSTAN 8 10 800 500 55 500 http www samsung kz KYRGYZSTAN 00 800 500 55 500 RUSSIA 8 800 555 55 55 ht...

Страница 94: ...verse number of the Horizontal Cycle is called Horizontal Fre quency Unit kHz Interlace and Non Interlace Methods Showing the horizontal lines of the screen from the top to the bot tom sequentially i...

Страница 95: ...eck the terms and conditions of the purchase contract This prod uct should not be mixed with other commercial wastes for disposal Authority Information in this document is subject to change without no...

Отзывы: