Samson STUDIOGT Скачать руководство пользователя страница 12

Studio GT 

Owner’s Manual

6

STUDIO GT QUICK START

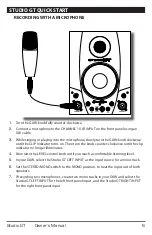
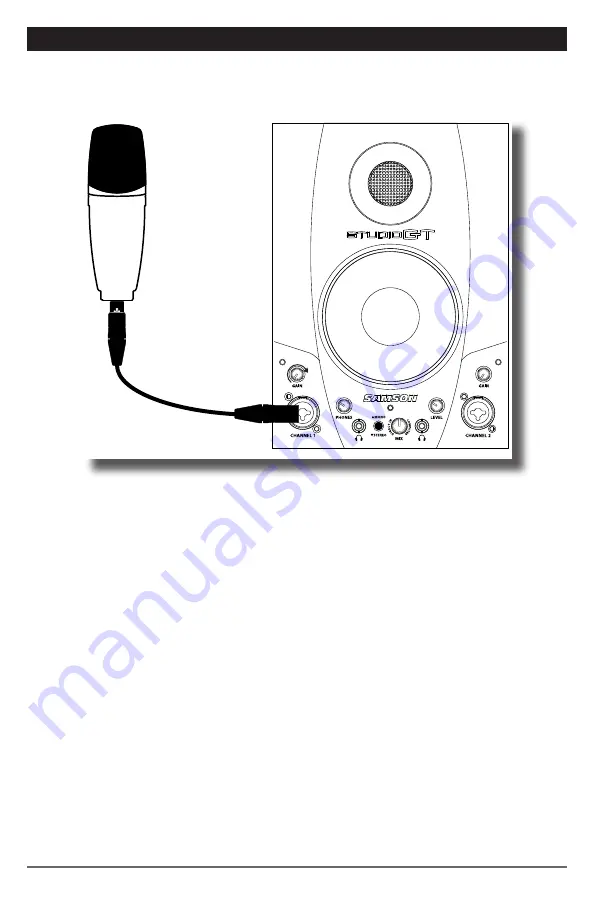
  RECORDING WITH A MICROPHONE

1. 

Turn the GAIN knob fully counter-clockwise.

2. 

Connect a microphone to the CHANNEL 1 XLR INPUT on the front panel using an 

XLR cable.

3. 

While singing or playing into the microphone, slowly turn the GAIN knob clockwise 

until the CLIP indicator turns on. Then turn the knob counter-clockwise until the clip 

indicator no longer illuminates.

4. 

Now raise the LEVEL control knob until you reach a comfortable listening level. 

5. 

In your DAW, select the Studio GT LEFT INPUT as the input source for a mono track.

6. 

Set the STEREO/MONO switch to the MONO position, to hear the input out of both 

speakers.

7. 

If recording two microphones, create two mono tracks in your DAW and select the 

Studio GT LEFT INPUT for the left front panel input, and the Studio GT RIGHT INPUT 

for the right front panel input.

Содержание STUDIOGT

Страница 1: ......

Страница 2: ...cient magnitude to constitute a risk of elec tric shock to persons The exclamation point within an equilateral triangle is intended to alert the user to the presence of important operating and mainten...

Страница 3: ...y at the plugs convenience receptacles and at the point where they exit from the apparatus 11 Only use attachments accessories speci fied by the manufacturer 12 Use only with the cart stand tripod bra...

Страница 4: ...die Gefahr eines Stromschlags zu verringern sollten Sie weder Deckel noch R ckwand des Ger ts entfernen Im Innern befinden sich keine Teile die vom Anwender gewartet werden k nnen berlassen Sie die W...

Страница 5: ...a humedad si no funciona normalmente o si ha ca do al suelo ATTENZIONE per ridurre il rischio di incendio o di scariche elettriche non esponete questo apparecchio a pioggia o umidit Per ridurre il per...

Страница 6: ...800 372 6766 Fax 631 784 2201 www samsontech com Table of Contents Introduction 1 Studio GT Features 2 Studio GT Front Panel Layout 3 Studio GT Rear Panel Layout 4 Studio GT Quick Start 5 Setting Up...

Страница 7: ...he features of the Studio GT monitors as well as a guided tour through its control panel step by step instructions for its setup and use and full specifications You ll also find a warranty card enclos...

Страница 8: ...are two 1 8 inch stereo headphone outputs with individual level controls The internal speakers automatically turn off when you plug into the right Headphone output For tight and controlled low frequen...

Страница 9: ...dphones 8 Phones Level Controls the overall output level to the left HEADPHONE output 7 9 STEREO MONO Button This button allows you to select the direct input monitoring between stereo and mono operat...

Страница 10: ...ector Connect the supplied USB cable to this rear panel USB B connector 4 LEFT SPEAKER OUTPUT Push Terminals for connecting the Left side Extension Speaker 5 POWER SWITCH Main power switch When set to...

Страница 11: ...he passive speaker no knobs and jacks is the left side speaker 3 Connect the left and right speaker using the included speaker cable 4 Plug the included power cable into the AC IN jack 5 Connect the U...

Страница 12: ...en turn the knob counter clockwise until the clip indicator no longer illuminates 4 Now raise the LEVEL control knob until you reach a comfortable listening level 5 In your DAW select the Studio GT LE...

Страница 13: ...the CLIP indicator turns on Then turn the knob counter clockwise until the clip indicator no longer illuminates 4 Now raise the LEVEL control knob until you reach a comfortable listening level 5 In y...

Страница 14: ...the GAIN knobs clockwise until the CLIP indicators turn on Then turn the knobs counter clockwise until the clip indicators no longer illuminate 4 Now raise the LEVEL control knob until you reach a co...

Страница 15: ...EO position CHANNEL 1 will be heard in the LEFT speaker and CHANNEL 2 will be heard in the RIGHT speaker 3 The input signals are mixed with the output signal from your DAW The MONO STE REO switch does...

Страница 16: ...viding 20 watts per channel through passive crossovers Positioning the Studio GT Near field monitoring has become the choice of many engineers in large and small studios because it minimizes the effec...

Страница 17: ...CPU balance control Adjustments to the STEREO MONO switch and MIX control do not affect what is being recorded by your DAW MONO Mode When the MONO mode is selected you hear the two mono input signals...

Страница 18: ...s the Default Device after you plug it in and defaults to maximum volume Double check this by hovering over the speaker icon in the bottom right hand corner of the screen It should show Volume 100 and...

Страница 19: ...volume at 0 dB the audio signal is still passing through the Windows volume control and is not bit perfect You can use a free program like ASIO4ALL which is a hardware independent low latency ASIO dr...

Страница 20: ...A bal loon tip will pop up telling you it has found the Samson StudioGT Figure 7 2 When it is finished installing the driv ers it will say Your new hardware is installed and ready to use Figure 8 Note...

Страница 21: ...Output tab and select Samson StudioGT You may notice that the Volume slider sets itself to the full level This will allow you to have full range using Studio GT s hardware Volume con trol Figure 14 At...

Страница 22: ...NSTRUMENT Input Connector Phone jack unbalanced Tip HOT Sleeve GND Input impedance 1 M Input level 14 dBu Trim max to 20 dBu Any gain Aux Input Connectors RCA 3 5mm Headphone Outputs Connector 1 8 Pho...

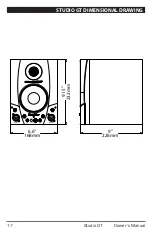
Страница 23: ...Studio GT Owner s Manual 17 STUDIO GT DIMENSIONAL DRAWING 9 15 232mm 9 226mm 6 6 168mm...

Страница 24: ...45 Gilpin Avenue Hauppauge New York 11788 8816 Phone 1 800 3 SAMSON 1 800 372 6766 Fax 631 784 2201 www samsontech com...

Отзывы: